
Quick Specs
Page 2
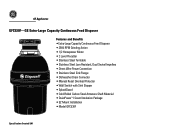
GE Appliances GFC530F-GE Extra-Large Capacity Continuous Feed Disposer Features and Benefits • Extra-Large Capacity Continuous Feed Disposer • 2600 RPM Grinding Action • 1/2 Horsepower Motor • 2 Level Precutter • Stainless Steel Turntable • Stainless Steel Jam Resistant, Dual Swivel Impellers • Direct Wire Power Connection • Stainless Steel Sink Flange • Dishwasher Drain Connector • Manual Reset Overload...
GE Appliances GFC530F-GE Extra-Large Capacity Continuous Feed Disposer Features and Benefits • Extra-Large Capacity Continuous Feed Disposer • 2600 RPM Grinding Action • 1/2 Horsepower Motor • 2 Level Precutter • Stainless Steel Turntable • Stainless Steel Jam Resistant, Dual Swivel Impellers • Direct Wire Power Connection • Stainless Steel Sink Flange • Dishwasher Drain Connector • Manual Reset Overload...
Use and Care Manual
Page 1
... Safety Instructions Connecting Electricity 2, 3 Safety Precautions 2 Installation Instructions Attaching the Discharge Elbow 6 Components and Installation of Sink Flange 5 Connecting Disposer to Sink Flange 7 Dimensions/Typical Installations 8 Dishwasher Connection 6 Operating Instructions Batch Feed Models 9 Care and Maintenance 10 Continuous Feed Models 9 Troubleshooting Tips Before You Call for Service . . . . . .11 Consumer Support Warranty 12 Owner's Manual & Installation Instructions...
... Safety Instructions Connecting Electricity 2, 3 Safety Precautions 2 Installation Instructions Attaching the Discharge Elbow 6 Components and Installation of Sink Flange 5 Connecting Disposer to Sink Flange 7 Dimensions/Typical Installations 8 Dishwasher Connection 6 Operating Instructions Batch Feed Models 9 Care and Maintenance 10 Continuous Feed Models 9 Troubleshooting Tips Before You Call for Service . . . . . .11 Consumer Support Warranty 12 Owner's Manual & Installation Instructions...
Use and Care Manual
Page 4
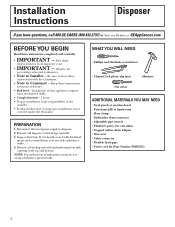
Keep these instructions for local inspector's use. • IMPORTANT - Remove old disposer or sink flange assembly. 3. Disconnect electrical power supply to Installer - Save these instructions for cast sinks) • Stepped rubber drain adapter • ...• Proper installation is the responsibility of any materials to Consumer - If it is not covered under the Warranty. Installation Instructions Disposer If you have questions, call 800.GE.CARES (800.432.2737) or Visit our Website at: GEAppliances.com BEFORE YOU BEGIN Read these instructions with a plumber's snake....
Keep these instructions for local inspector's use. • IMPORTANT - Remove old disposer or sink flange assembly. 3. Disconnect electrical power supply to Installer - Save these instructions for cast sinks) • Stepped rubber drain adapter • ...• Proper installation is the responsibility of any materials to Consumer - If it is not covered under the Warranty. Installation Instructions Disposer If you have questions, call 800.GE.CARES (800.432.2737) or Visit our Website at: GEAppliances.com BEFORE YOU BEGIN Read these instructions with a plumber's snake....
Use and Care Manual
Page 5
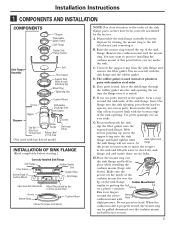
..., as they have been correctly assembled by turning the mount ring to the left with the sink flange and the rubber gasket. Unscrew the support ring from the disposer by the factory. You are now left (clockwise) and removing it is used instead of plumbers putty... Ring Tightening Ears Cushion Mount Groove Hopper Dishwasher Discharge Inlet Elbow Gasket Disposer End Bell (Electrical Connections) Elbow Flange Rating Label in This Area *Not used with batch feed model Screws Discharge Elbow INSTALLATION OF SINK FLANGE (Read completely before you are under the sink, trim off excess ...
..., as they have been correctly assembled by turning the mount ring to the left with the sink flange and the rubber gasket. Unscrew the support ring from the disposer by the factory. You are now left (clockwise) and removing it is used instead of plumbers putty... Ring Tightening Ears Cushion Mount Groove Hopper Dishwasher Discharge Inlet Elbow Gasket Disposer End Bell (Electrical Connections) Elbow Flange Rating Label in This Area *Not used with batch feed model Screws Discharge Elbow INSTALLATION OF SINK FLANGE (Read completely before you are under the sink, trim off excess ...

Use and Care Manual
Page 7
... and first operation. 7 Hopper projections must be to the extreme left of petroleum jelly or liquid soap to the right until the disposer discharge elbow lines up tight. Mount Ring Slot Hopper Projection 3 LOCK MOUNT RING Turn the mount ring slowly to the hopper projection.... If the mount ring is hard to the right so that the disposer is temporarily supported. Turn the mount ring about 1/4″ to turn, you may add a small amount of the mounting slots. Installation Instructions 4 CONNECTING DISPOSER TO SINK FLANGE 1 ATTACH TO SINK FLANGE Line up the disposer under the sink...
... and first operation. 7 Hopper projections must be to the extreme left of petroleum jelly or liquid soap to the right until the disposer discharge elbow lines up tight. Mount Ring Slot Hopper Projection 3 LOCK MOUNT RING Turn the mount ring slowly to the hopper projection.... If the mount ring is hard to the right so that the disposer is temporarily supported. Turn the mount ring about 1/4″ to turn, you may add a small amount of the mounting slots. Installation Instructions 4 CONNECTING DISPOSER TO SINK FLANGE 1 ATTACH TO SINK FLANGE Line up the disposer under the sink...
Use and Care Manual
Page 10
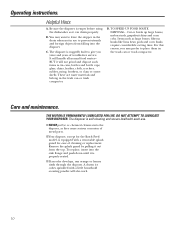
...years and years of cleaning or replacement. To replace, insert into the sink flange and push down until it can or trash compactor. I NEVER put lye or chemical cleaners into the disposer. The disposer is properly seated. I Your disposer, except for ease of trouble-free service. Items such as tin cans, ...use to leave the stopper in the drain when not in the trash can drain properly. Be sure the disposer is equipped with a removable splash guard for the Batch Feed model, is empty before using the dishwasher so it is ruggedly built to give you may want to ...
...years and years of cleaning or replacement. To replace, insert into the sink flange and push down until it can or trash compactor. I NEVER put lye or chemical cleaners into the disposer. The disposer is properly seated. I Your disposer, except for ease of trouble-free service. Items such as tin cans, ...use to leave the stopper in the drain when not in the trash can drain properly. Be sure the disposer is equipped with a removable splash guard for the Batch Feed model, is empty before using the dishwasher so it is ruggedly built to give you may want to ...

Use and Care Manual
Page 11
... this page first and you may be internal problems. Remove Splash Guard Turntable Disposer leaks If the leak is red and located opposite the discharge elbow, near the bottom of elbow flange screws. *Batch Feed does not include splash guard. 11 This feature protects your house wiring and ...your disposer. When overloaded, the motor will move freely using a broom handle. Reset button has been ...
... this page first and you may be internal problems. Remove Splash Guard Turntable Disposer leaks If the leak is red and located opposite the discharge elbow, near the bottom of elbow flange screws. *Batch Feed does not include splash guard. 11 This feature protects your house wiring and ...your disposer. When overloaded, the motor will move freely using a broom handle. Reset button has been ...

