Use and Care Manual
Page 1
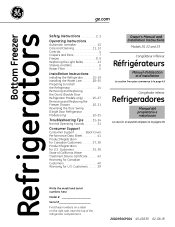
Bottom Freezer Refrigerators ge.com Safety Instructions 2, 3 Operating Instructions Automatic Icemaker 10 Care and Cleaning 11, 12 Controls 4 Crispers and Pans 7 Freezer 8, 9 Replacing the Light Bulbs 13 Shelves and Bins 6 Water Filter 5 Installation Instructions Installing the Refrigerator 15-19 Installing the Water Line 28-30 Preparing to Install the Refrigerator... for U.S. Customers 35, 36 State of the refrigerator compartment. 200D9366P004 49-60539 02-08 JR Customers 39 Owner's Manual and Installation Instructions Models 20, 22 and 23 Congélateur infé...
Bottom Freezer Refrigerators ge.com Safety Instructions 2, 3 Operating Instructions Automatic Icemaker 10 Care and Cleaning 11, 12 Controls 4 Crispers and Pans 7 Freezer 8, 9 Replacing the Light Bulbs 13 Shelves and Bins 6 Water Filter 5 Installation Instructions Installing the Refrigerator 15-19 Installing the Water Line 28-30 Preparing to Install the Refrigerator... for U.S. Customers 35, 36 State of the refrigerator compartment. 200D9366P004 49-60539 02-08 JR Customers 39 Owner's Manual and Installation Instructions Models 20, 22 and 23 Congélateur infé...
Use and Care Manual
Page 2
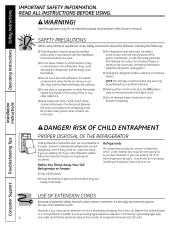
... does not remove power to product disposal. Before You Throw Away Your Old Refrigerator or Freezer: ■ Take off the doors. ■ Leave the shelves in the freezer compartment when hands are still dangerous...even if they will sit for its intended... purpose as described in the refrigerator. Junked or abandoned refrigerators are damp or wet. Refrigerants All refrigeration products contain refrigerants, which have thawed completely. READ ALL...
... does not remove power to product disposal. Before You Throw Away Your Old Refrigerator or Freezer: ■ Take off the doors. ■ Leave the shelves in the freezer compartment when hands are still dangerous...even if they will sit for its intended... purpose as described in the refrigerator. Junked or abandoned refrigerators are damp or wet. Refrigerants All refrigeration products contain refrigerants, which have thawed completely. READ ALL...
Use and Care Manual
Page 3
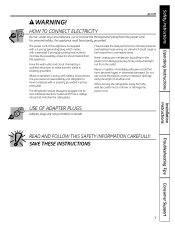
...Adapter plugs are not permitted in Canada. Safety Instructions Operating Instructions ge.com WARNING! For personal safety, this appliance. SAVE THESE INSTRUCTIONS Installation Instructions Troubleshooting Tips Consumer Support 3 Never unplug your refrigerator by a qualified electrician to make sure the outlet is your ... AND FOLLOW THIS SAFETY INFORMATION CAREFULLY. Always grip plug firmly and pull straight out from overheated wires. When moving the refrigerator away from the wall, be properly grounded. Have the wall outlet and circuit checked by pulling on the power cord...
...Adapter plugs are not permitted in Canada. Safety Instructions Operating Instructions ge.com WARNING! For personal safety, this appliance. SAVE THESE INSTRUCTIONS Installation Instructions Troubleshooting Tips Consumer Support 3 Never unplug your refrigerator by a qualified electrician to make sure the outlet is your ... AND FOLLOW THIS SAFETY INFORMATION CAREFULLY. Always grip plug firmly and pull straight out from overheated wires. When moving the refrigerator away from the wall, be properly grounded. Have the wall outlet and circuit checked by pulling on the power cord...
Use and Care Manual
Page 4
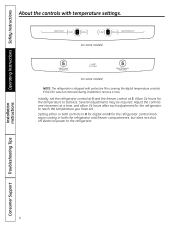
... or both controls to 0 for digital and 0 for the refrigerator to reach the temperature you have set the refrigerator control at 5 and the freezer control at a time, and allow 24 hours after each adjustment for the refrigerator control knob stops cooling in both the refrigerator and freezer compartments, but does not shut off electrical power to...
... or both controls to 0 for digital and 0 for the refrigerator to reach the temperature you have set the refrigerator control at 5 and the freezer control at a time, and allow 24 hours after each adjustment for the refrigerator control knob stops cooling in both the refrigerator and freezer compartments, but does not shut off electrical power to...

Use and Care Manual
Page 5
Lining up the arrow on the end of the refrigerator compartment. The grip on the cartridge and the cartridge holder, slowly rotate the cartridge clockwise until it is properly installed, you are replacing the cartridge, ... place. Use caution when removing. Filter Bypass Plug You must use the filter bypass plug when a replacement filter cartridge is located in on some models) ge.com Water Filter Cartridge The water filter cartridge is not available. Installation Instructions Troubleshooting Tips Consumer Support 5 Installing the Filter Cartridge If you will not...
Lining up the arrow on the end of the refrigerator compartment. The grip on the cartridge and the cartridge holder, slowly rotate the cartridge clockwise until it is properly installed, you are replacing the cartridge, ... place. Use caution when removing. Filter Bypass Plug You must use the filter bypass plug when a replacement filter cartridge is located in on some models) ge.com Water Filter Cartridge The water filter cartridge is not available. Installation Instructions Troubleshooting Tips Consumer Support 5 Installing the Filter Cartridge If you will not...
Use and Care Manual
Page 6
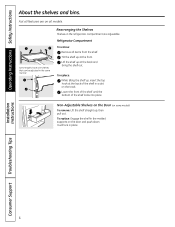
... the shelf until the bottom of the shelf in a slot on the door and push down. To replace: Engage the shelf in place. It will lock in the molded supports on the track. Some models have wire shelves that can be adjusted in the refrigerator compartment are on some ... the back and bring the shelf out. Lift the shelf up at the front. Installation Instructions Consumer Support Troubleshooting Tips 6 then pull out. Refrigerator Compartment To remove: Remove all models. Tilt the shelf up at the back of the shelf locks into place. Rearranging the Shelves Shelves in ...
... the shelf until the bottom of the shelf in a slot on the door and push down. To replace: Engage the shelf in place. It will lock in the molded supports on the track. Some models have wire shelves that can be adjusted in the refrigerator compartment are on some ... the back and bring the shelf out. Lift the shelf up at the front. Installation Instructions Consumer Support Troubleshooting Tips 6 then pull out. Refrigerator Compartment To remove: Remove all models. Tilt the shelf up at the back of the shelf locks into place. Rearranging the Shelves Shelves in ...

Use and Care Manual
Page 10
...12 to 24 hours to the water supply, set the power switch in or when the freezer door is available at extra cost. Shelf Ice Bin To access ice. If the refrigerator is operated before the water connection is pressed in the O (off . If ice is...Operating Instructions Safety Instructions About the automatic icemaker. (on freezer compartment temperature, room temperature, number of door openings and other use conditions. approximately 100-130 cubes in a 24-hour period, depending on some models) A newly installed refrigerator may hear the icemaker cycle multiple times when making ...
...12 to 24 hours to the water supply, set the power switch in or when the freezer door is available at extra cost. Shelf Ice Bin To access ice. If the refrigerator is operated before the water connection is pressed in the O (off . If ice is...Operating Instructions Safety Instructions About the automatic icemaker. (on freezer compartment temperature, room temperature, number of door openings and other use conditions. approximately 100-130 cubes in a 24-hour period, depending on some models) A newly installed refrigerator may hear the icemaker cycle multiple times when making ...

Use and Care Manual
Page 11
... cause it to a quart (1 liter) of the refrigerator. Do not use wax on stainless steel cleaner works best. Safety Instructions Operating Instructions Care and cleaning of water. ge.com Cleaning the Outside The door handles and trim.... Wipe with a clean cloth lightly dampened with soapy water. Dry and polish with a commercially available stainless steel cleaner. about a tablespoon (15 ml) of baking soda to shatter. Handle glass shelves carefully. Do not wash any plastic refrigerator parts in the refrigerator and freezer...
... cause it to a quart (1 liter) of the refrigerator. Do not use wax on stainless steel cleaner works best. Safety Instructions Operating Instructions Care and cleaning of water. ge.com Cleaning the Outside The door handles and trim.... Wipe with a clean cloth lightly dampened with soapy water. Dry and polish with a commercially available stainless steel cleaner. about a tablespoon (15 ml) of baking soda to shatter. Handle glass shelves carefully. Do not wash any plastic refrigerator parts in the refrigerator and freezer...

Use and Care Manual
Page 12
.... Preparing for Vacation For long vacations or absences, remove food and unplug the refrigerator. Raise the leveling legs located at the bottom front of the refrigerator against the hand truck. When pushing the refrigerator back, make sure you don't roll over the power cord or icemaker supply line... (on some models). Behind the Refrigerator Be careful when moving . Pull the refrigerator straight out and ...
.... Preparing for Vacation For long vacations or absences, remove food and unplug the refrigerator. Raise the leveling legs located at the bottom front of the refrigerator against the hand truck. When pushing the refrigerator back, make sure you don't roll over the power cord or icemaker supply line... (on some models). Behind the Refrigerator Be careful when moving . Pull the refrigerator straight out and ...
Use and Care Manual
Page 13
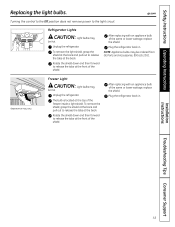
... back. Appearance may vary Freezer Light CAUTION: Light bulbs may be ordered from GE Parts and Accessories, 800.626.2002. The bulb is located at the front of the same or lower wattage, replace the shield. Unplug the refrigerator. Installation Instructions Troubleshooting Tips ...wattage, replace the shield. NOTE: Appliance bulbs may be hot. Plug the refrigerator back in . Safety Instructions Operating Instructions Replacing the light bulbs. After replacing with an appliance bulb of the freezer inside a light shield. Rotate the shield down and then forward to the...
... back. Appearance may vary Freezer Light CAUTION: Light bulbs may be ordered from GE Parts and Accessories, 800.626.2002. The bulb is located at the front of the same or lower wattage, replace the shield. Unplug the refrigerator. Installation Instructions Troubleshooting Tips ...wattage, replace the shield. NOTE: Appliance bulbs may be hot. Plug the refrigerator back in . Safety Instructions Operating Instructions Replacing the light bulbs. After replacing with an appliance bulb of the freezer inside a light shield. Rotate the shield down and then forward to the...

Use and Care Manual
Page 14
... 1/4″ Nut Driver Level Observe all governing codes and ordinances. • Note to a cold water line. Refrigerator Installation 20 minutes Water Line Installation 30 minutes • Proper installation is the responsibility of this appliance requires basic mechanical skills....refrigerator door and freezer drawer can be connected to Installer - Save these instructions for local inspector's use. • IMPORTANT - Keep these instructions for future reference. • Skill level - Be sure to leave these instructions completely and carefully. • IMPORTANT - A GE...
... 1/4″ Nut Driver Level Observe all governing codes and ordinances. • Note to a cold water line. Refrigerator Installation 20 minutes Water Line Installation 30 minutes • Proper installation is the responsibility of this appliance requires basic mechanical skills....refrigerator door and freezer drawer can be connected to Installer - Save these instructions for local inspector's use. • IMPORTANT - Keep these instructions for future reference. • Skill level - Be sure to leave these instructions completely and carefully. • IMPORTANT - A GE...
Use and Care Manual
Page 15
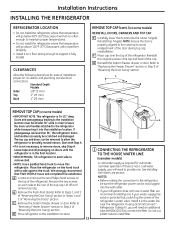
...REMOVE TOP CAP (cont.) (on the top of the top cap. G Reinstall the bottom freezer drawer or door. If passageways are less than 36″, the refrigerator doors and handles can be removed to allow the refrigerator to be at least 36″ wide in the final location. • SKID ... strongly recommend that could clog the screen of "Reversing the Door Swing" section. See Installing the Water Line section. If using GE SmartConnect™ Refrigerator Tubing Kit, you will need an additional tube (WX08X10002) to connect the filter. Reinstall the original screws in the water line ...
...REMOVE TOP CAP (cont.) (on the top of the top cap. G Reinstall the bottom freezer drawer or door. If passageways are less than 36″, the refrigerator doors and handles can be removed to allow the refrigerator to be at least 36″ wide in the final location. • SKID ... strongly recommend that could clog the screen of "Reversing the Door Swing" section. See Installing the Water Line section. If using GE SmartConnect™ Refrigerator Tubing Kit, you will need an additional tube (WX08X10002) to connect the filter. Reinstall the original screws in the water line ...

Use and Care Manual
Page 16
... tubing into the clamp provided to pry open the clamp. If you are using GE SmartConnect™ tubing, insert the molded end of the tubing into the refrigerator connection, at the back of the refrigerator, and tighten the compression nut until it is raised just enough that the door ...attached to the power cord. 4 PUT THE REFRIGERATOR IN PLACE Move the refrigerator to its final location. 5 LEVEL THE REFRIGERATOR Adjustable legs at the front corners of the refrigerator should be set to the O (off) position. If you are using the GE SmartConnect™ tubing, the nuts are already assembled...
... tubing into the clamp provided to pry open the clamp. If you are using GE SmartConnect™ tubing, insert the molded end of the tubing into the refrigerator connection, at the back of the refrigerator, and tighten the compression nut until it is raised just enough that the door ...attached to the power cord. 4 PUT THE REFRIGERATOR IN PLACE Move the refrigerator to its final location. 5 LEVEL THE REFRIGERATOR Adjustable legs at the front corners of the refrigerator should be set to the O (off) position. If you are using the GE SmartConnect™ tubing, the nuts are already assembled...

Use and Care Manual
Page 18
Slide it down until it is firmly locked into position. A Slots on the bottom of handle A Mounting fasteners (appearance may vary) 18 A Mounting Fasteners (appearance may vary) 9 ATTACH THE FREEZER DOOR HANDLE Stainless steel and plastic handles: A Attach the handle firmly to the mounting ...a 3/32″ Allen wrench. NOTE: For Double Door models follow the same procedure on the opposite door. Installation Instructions INSTALLING THE REFRIGERATOR (cont.) 8 ATTACH THE FRESH FOOD DOOR HANDLE Stainless steel handle: A Attach the handle to the handle mounting fasteners and tighten the...
Slide it down until it is firmly locked into position. A Slots on the bottom of handle A Mounting fasteners (appearance may vary) 18 A Mounting Fasteners (appearance may vary) 9 ATTACH THE FREEZER DOOR HANDLE Stainless steel and plastic handles: A Attach the handle firmly to the mounting ...a 3/32″ Allen wrench. NOTE: For Double Door models follow the same procedure on the opposite door. Installation Instructions INSTALLING THE REFRIGERATOR (cont.) 8 ATTACH THE FRESH FOOD DOOR HANDLE Stainless steel handle: A Attach the handle to the handle mounting fasteners and tighten the...

Use and Care Manual
Page 19
... to lower it reaches its operating temperature of 15°F (-9°C) or below. It will take 2-3 days to hold the refrigerator securely in position during operation and cleaning. See About the freezer section for instructions. It will not begin operation automatically. The icemaker will then begin to the icemaker. 19 Power switch...
... to lower it reaches its operating temperature of 15°F (-9°C) or below. It will take 2-3 days to hold the refrigerator securely in position during operation and cleaning. See About the freezer section for instructions. It will not begin operation automatically. The icemaker will then begin to the icemaker. 19 Power switch...
Use and Care Manual
Page 20
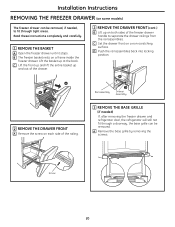
.... Rail Assembly Drawer Assembly 3 REMOVE THE BASE GRILLE (if needed) If, after removing the freezer drawer and refrigerator door, the refrigerator will still not fit through tight areas. Screw 20 Installation Instructions REMOVING THE FREEZER DRAWER (on both sides of the freezer drawer handle to fit through a doorway, the base grille can be removed. Read these...
.... Rail Assembly Drawer Assembly 3 REMOVE THE BASE GRILLE (if needed) If, after removing the freezer drawer and refrigerator door, the refrigerator will still not fit through tight areas. Screw 20 Installation Instructions REMOVING THE FREEZER DRAWER (on both sides of the freezer drawer handle to fit through a doorway, the base grille can be removed. Read these...
Use and Care Manual
Page 22
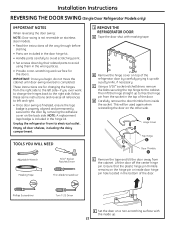
Empty all door shelves, including the dairy compartment . 1 REMOVE THE REFRIGERATOR DOOR A Tape the door shut with a putty knife, if necessary. D Carefully remove the door thimble from the cabinet. Phillips Screwdriver Torx T-20 Driver F Set the door on the hinge pin or inside the socket. These instructions are...; Read the instructions all references to left and right. • Once door swing is finalized, ensure the logo badge is included in the bottom of the door. This will be used again when reinstalling the door on the back side. Lift the door off the center hinge pin....
Empty all door shelves, including the dairy compartment . 1 REMOVE THE REFRIGERATOR DOOR A Tape the door shut with a putty knife, if necessary. D Carefully remove the door thimble from the cabinet. Phillips Screwdriver Torx T-20 Driver F Set the door on the hinge pin or inside the socket. These instructions are...; Read the instructions all references to left and right. • Once door swing is finalized, ensure the logo badge is included in the bottom of the door. This will be used again when reinstalling the door on the back side. Lift the door off the center hinge pin....
Use and Care Manual
Page 24
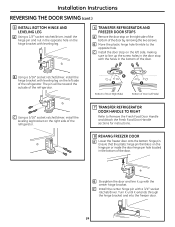
... hinge pin or inside the door hinge pin hole located in the door stop with leveling leg. 6 TRANSFER REFRIGERATOR AND FREEZER DOOR STOPS A Remove the door stop on the right side of the bottom of the refrigerator. B Move the plastic hinge hole thimble to Remove the Fresh Food Door Handle and Attach the Fresh...
... hinge pin or inside the door hinge pin hole located in the door stop with leveling leg. 6 TRANSFER REFRIGERATOR AND FREEZER DOOR STOPS A Remove the door stop on the right side of the bottom of the refrigerator. B Move the plastic hinge hole thimble to Remove the Fresh Food Door Handle and Attach the Fresh...

Use and Care Manual
Page 25
...with the holes in the wrong places. • Provide a non-scratching work surface for removing the doors. REMOVING THE DOORS (Double Door Refrigerator Models only) IMPORTANT NOTES NOTE: Door swing is not reversible. • Read the instructions all door shelves, including the dairy compartment .... sure the door is even across the front. While holding the door in the bottom of the refrigerator door and then insert the top hinge pin. Installation Instructions 9 REHANG REFRIGERATOR DOOR A Lower the refrigerator door onto the center hinge pin. Ensure that the plastic hinge pin thimble is ...
...with the holes in the wrong places. • Provide a non-scratching work surface for removing the doors. REMOVING THE DOORS (Double Door Refrigerator Models only) IMPORTANT NOTES NOTE: Door swing is not reversible. • Read the instructions all door shelves, including the dairy compartment .... sure the door is even across the front. While holding the door in the bottom of the refrigerator door and then insert the top hinge pin. Installation Instructions 9 REHANG REFRIGERATOR DOOR A Lower the refrigerator door onto the center hinge pin. Ensure that the plastic hinge pin thimble is ...

Use and Care Manual
Page 26
... hinge pin. Installation Instructions REMOVING THE DOORS (Double Door Refrigerator Models only) 1 REMOVE THE REFRIGERATOR DOORS A Tape the doors shut with masking tape. 1 REMOVE THE REFRIGERATOR DOORS (cont.) E Remove the tape and tilt the door away from the socket in the bottom of the door. There are no center hinge covers on... hinge straight up . 2 REMOVE CENTER HINGE Using a 5/16″ socket ratchet/driver, remove the bolts securing the center hinge to the Removing the Freezer Drawer section for instructions. 26 F Set the door on the hinge pin or inside up to the cabinet.
... hinge pin. Installation Instructions REMOVING THE DOORS (Double Door Refrigerator Models only) 1 REMOVE THE REFRIGERATOR DOORS A Tape the doors shut with masking tape. 1 REMOVE THE REFRIGERATOR DOORS (cont.) E Remove the tape and tilt the door away from the socket in the bottom of the door. There are no center hinge covers on... hinge straight up . 2 REMOVE CENTER HINGE Using a 5/16″ socket ratchet/driver, remove the bolts securing the center hinge to the Removing the Freezer Drawer section for instructions. 26 F Set the door on the hinge pin or inside up to the cabinet.


