Use and Care Manual
Page 1
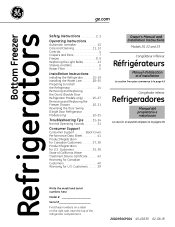
...gina 81 Write the model and serial numbers here: Model Serial Find these numbers on a label on the right side, near the top of California Water Treatment Device Certificate 42 Warranty for Canadian Customers 40 Warranty for U.S. Bottom Freezer Refrigerators ge.com Safety Instructions 2, ... the Water Line 28-30 Preparing to Install the Refrigerator 14 Removing and Replacing the Doors (Double Door Refrigerator Models only 25-27 Removing and Replacing the Freezer Drawer 20, 21 Reversing the Door Swing (Single Door Refrigerator Models only 22-25 Troubleshooting Tips . . . . ...
...gina 81 Write the model and serial numbers here: Model Serial Find these numbers on a label on the right side, near the top of California Water Treatment Device Certificate 42 Warranty for Canadian Customers 40 Warranty for U.S. Bottom Freezer Refrigerators ge.com Safety Instructions 2, ... the Water Line 28-30 Preparing to Install the Refrigerator 14 Removing and Replacing the Doors (Double Door Refrigerator Models only 25-27 Removing and Replacing the Freezer Drawer 20, 21 Reversing the Door Swing (Single Door Refrigerator Models only 22-25 Troubleshooting Tips . . . . ...
Use and Care Manual
Page 4
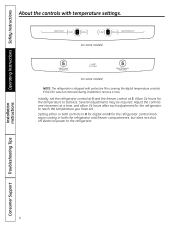
... About the controls with temperature settings. (on some models) (on some models) NOTE: The refrigerator is shipped with protective film covering the digital temperature controls. Setting either or both controls to 0 for digital and 0 for the refrigerator control knob stops cooling in both the refrigerator and freezer compartments, but does not shut off electrical power to...
... About the controls with temperature settings. (on some models) (on some models) NOTE: The refrigerator is shipped with protective film covering the digital temperature controls. Setting either or both controls to 0 for digital and 0 for the refrigerator control knob stops cooling in both the refrigerator and freezer compartments, but does not shut off electrical power to...

Use and Care Manual
Page 5
... Replace the Filter The filter cartridge should be ejected as it counterclockwise. Safety Instructions Operating Instructions About the water filter. (on some models) ge.com Water Filter Cartridge The water filter cartridge is located in Canada should consult the yellow pages for the nearest Mabe Service Center. ... grip on the end of the cartridge should be replaced when the flow of the refrigerator compartment. Remove the cartridge by pressing in the United States, visit our Website, ge.com, or call GE Parts and Accessories, 800.626.2002. Lining up the arrow on the tab at ...
... Replace the Filter The filter cartridge should be ejected as it counterclockwise. Safety Instructions Operating Instructions About the water filter. (on some models) ge.com Water Filter Cartridge The water filter cartridge is located in Canada should consult the yellow pages for the nearest Mabe Service Center. ... grip on the end of the cartridge should be replaced when the flow of the refrigerator compartment. Remove the cartridge by pressing in the United States, visit our Website, ge.com, or call GE Parts and Accessories, 800.626.2002. Lining up the arrow on the tab at ...
Use and Care Manual
Page 6
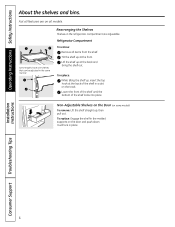
Operating Instructions Safety Instructions About the shelves and bins. Refrigerator Compartment To remove: Remove all models. Lower the front of the shelf until the bottom of the shelf in a slot on some models) To remove: Lift the shelf straight up at the back and bring the shelf out. Non-... shelf in the same manner. Tilt the shelf up ; Not all features are adjustable. It will lock in the refrigerator compartment are on the door and push down. Some models have wire shelves that can be adjusted in the molded supports on all items from the shelf.
Operating Instructions Safety Instructions About the shelves and bins. Refrigerator Compartment To remove: Remove all models. Lower the front of the shelf until the bottom of the shelf in a slot on some models) To remove: Lift the shelf straight up at the back and bring the shelf out. Non-... shelf in the same manner. Tilt the shelf up ; Not all features are adjustable. It will lock in the refrigerator compartment are on the door and push down. Some models have wire shelves that can be adjusted in the molded supports on all items from the shelf.
Use and Care Manual
Page 7
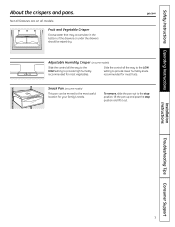
... the control all the way to the HIGH setting to the most useful location for your family's needs. ge.com Adjustable Humidity Crisper (on some models) This pan can be wiped dry. Snack Pan (on all the way to the LOW setting to the stop position, lift ... the pan out to provide lower humidity levels recommended for most fruits. Fruit and Vegetable Crisper Excess water that may accumulate in the bottom of the drawers or under the drawers should be moved to provide high humidity recommended for most vegetables. Installation Instructions Troubleshooting Tips Consumer Support...
... the control all the way to the HIGH setting to the most useful location for your family's needs. ge.com Adjustable Humidity Crisper (on some models) This pan can be wiped dry. Snack Pan (on all the way to the LOW setting to the stop position, lift ... the pan out to provide lower humidity levels recommended for most fruits. Fruit and Vegetable Crisper Excess water that may accumulate in the bottom of the drawers or under the drawers should be moved to provide high humidity recommended for most vegetables. Installation Instructions Troubleshooting Tips Consumer Support...

Use and Care Manual
Page 8
...the stop hooks on each side. Rotate the basket to back and installed into the freezer. Appearance may vary Basket Removal To remove the deep full-width basket on freezer drawer models: Open the freezer drawer until it down into the 6 alignment tabs. Appearance and features may vary ... out to release it from the stop location. Operating Instructions Safety Instructions About the freezer drawer. (on some models) Not all features are on all 6 slide bracket tabs before sliding back into the freezer. When replacing the deep full-width basket: Tilt the basket back and lower it...
...the stop hooks on each side. Rotate the basket to back and installed into the freezer. Appearance may vary Basket Removal To remove the deep full-width basket on freezer drawer models: Open the freezer drawer until it down into the 6 alignment tabs. Appearance and features may vary ... out to release it from the stop location. Operating Instructions Safety Instructions About the freezer drawer. (on some models) Not all features are on all 6 slide bracket tabs before sliding back into the freezer. When replacing the deep full-width basket: Tilt the basket back and lower it...

Use and Care Manual
Page 9
... basket: Insert the wire basket into the lower liner's rails and push back into place. Safety Instructions Operating Instructions About the freezer compartment. (on some models) ge.com Not all features are on Freezer Door To remove: Lift the shelf straight up the front of the basket. Fixed Shelf Removal NOTE: The full-width...
... basket: Insert the wire basket into the lower liner's rails and push back into place. Safety Instructions Operating Instructions About the freezer compartment. (on some models) ge.com Not all features are on Freezer Door To remove: Lift the shelf straight up the front of the basket. Fixed Shelf Removal NOTE: The full-width...

Use and Care Manual
Page 10
...Shelf Ice Bin To reach the power switch. Always be joined together. Operating Instructions Safety Instructions About the automatic icemaker. (on some models) A newly installed refrigerator may take 12 to 24 hours to begin making one batch of ice. If ice is available at extra cost. To access ... nothing interferes with an automatic icemaker, an icemaker accessory kit is not used frequently, old ice cubes will turn green when the freezer light switch is pressed in a 24-hour period, depending on ) position. Power Switch Green Power Light Icemaker Feeler Arm Automatic Icemaker...
...Shelf Ice Bin To reach the power switch. Always be joined together. Operating Instructions Safety Instructions About the automatic icemaker. (on some models) A newly installed refrigerator may take 12 to 24 hours to begin making one batch of ice. If ice is available at extra cost. To access ... nothing interferes with an automatic icemaker, an icemaker accessory kit is not used frequently, old ice cubes will turn green when the freezer light switch is pressed in a 24-hour period, depending on ) position. Power Switch Green Power Light Icemaker Feeler Arm Automatic Icemaker...

Use and Care Manual
Page 11
...mild liquid dish detergent. The stainless steel panels and door handles. Handle glass shelves carefully. ge.com Cleaning the Outside The door handles and trim. Wipe with a clean cloth lightly ...thin layer of petroleum jelly to a quart (1 liter) of the refrigerator. Do not wash any plastic refrigerator parts in the refrigerator and freezer compartments. These may cause them to shatter. Do not use scouring pads...Stainless steel (on some models) can scratch and weaken the paint finish. Unplug the refrigerator before cleaning. This both cleans and neutralizes odors.
...mild liquid dish detergent. The stainless steel panels and door handles. Handle glass shelves carefully. ge.com Cleaning the Outside The door handles and trim. Wipe with a clean cloth lightly ...thin layer of petroleum jelly to a quart (1 liter) of the refrigerator. Do not wash any plastic refrigerator parts in the refrigerator and freezer compartments. These may cause them to shatter. Do not use scouring pads...Stainless steel (on some models) can scratch and weaken the paint finish. Unplug the refrigerator before cleaning. This both cleans and neutralizes odors.

Use and Care Manual
Page 12
... you don't roll over the power cord or icemaker supply line (on some models). Clean the interior with embossed surfaces. Preparing to the refrigerator. Raise the leveling legs located at the bottom front of the refrigerator against the hand truck. Behind the Refrigerator Be careful when moving . Operating Instructions Safety Instructions Care and cleaning of...
... you don't roll over the power cord or icemaker supply line (on some models). Clean the interior with embossed surfaces. Preparing to the refrigerator. Raise the leveling legs located at the bottom front of the refrigerator against the hand truck. Behind the Refrigerator Be careful when moving . Operating Instructions Safety Instructions Care and cleaning of...

Use and Care Manual
Page 14
... • Note to Consumer - A GE water supply kit (containing tubing, shutoff valve, fittings and instructions) is not covered under the Warranty. Installation Instructions Refrigerator Models 20 and 22 Questions? Call 800.GE.CARES (800.432.2737) or Visit our Website at: ge.com In Canada, call 1.800.561....3344 or Visit our Website at ge.com (in the Reversing the Door Swing section. • To remove the freezer drawer, see...
... • Note to Consumer - A GE water supply kit (containing tubing, shutoff valve, fittings and instructions) is not covered under the Warranty. Installation Instructions Refrigerator Models 20 and 22 Questions? Call 800.GE.CARES (800.432.2737) or Visit our Website at: ge.com In Canada, call 1.800.561....3344 or Visit our Website at ge.com (in the Reversing the Door Swing section. • To remove the freezer drawer, see...
Use and Care Manual
Page 15
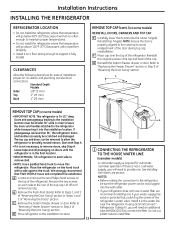
... of the top cap. C Remove the bottom freezer drawer or door. If using GE SmartConnect™ Refrigerator Tubing Kit, you will need an additional tube (WX08X10002) to connect the filter. Reinstall top hinge(s). Install it on some models) •IMPORTANT NOTE: This refrigerator is not a cold water supply, you...PEOPLE move this installation. Lift off and remove top cap. If there is 34-1/2″ deep. G Reinstall the bottom freezer drawer or door. We strongly recommend that could clog the screen of the refrigerator. Remove the two screws on the top of the...
... of the top cap. C Remove the bottom freezer drawer or door. If using GE SmartConnect™ Refrigerator Tubing Kit, you will need an additional tube (WX08X10002) to connect the filter. Reinstall top hinge(s). Install it on some models) •IMPORTANT NOTE: This refrigerator is not a cold water supply, you...PEOPLE move this installation. Lift off and remove top cap. If there is 34-1/2″ deep. G Reinstall the bottom freezer drawer or door. We strongly recommend that could clog the screen of the refrigerator. Remove the two screws on the top of the...

Use and Care Manual
Page 16
...™ Tubing 2 TURN ON THE WATER SUPPLY (icemaker models) Turn the water on your refrigerator. Installation Instructions INSTALLING THE REFRIGERATOR (cont.) 1 CONNECTING THE REFRIGERATOR TO THE HOUSE WATER LINE (cont.) A If you are using the GE SmartConnect™ tubing, the nuts are already assembled to the...supply) and check for any leaks. 3 PLUG IN THE REFRIGERATOR On models with a wrench. B If you are using GE SmartConnect™ tubing, insert the molded end of the tubing into the refrigerator connection, at the front corners of the illustrations below will look...
...™ Tubing 2 TURN ON THE WATER SUPPLY (icemaker models) Turn the water on your refrigerator. Installation Instructions INSTALLING THE REFRIGERATOR (cont.) 1 CONNECTING THE REFRIGERATOR TO THE HOUSE WATER LINE (cont.) A If you are using the GE SmartConnect™ tubing, the nuts are already assembled to the...supply) and check for any leaks. 3 PLUG IN THE REFRIGERATOR On models with a wrench. B If you are using GE SmartConnect™ tubing, insert the molded end of the tubing into the refrigerator connection, at the front corners of the illustrations below will look...

Use and Care Manual
Page 17
...DOOR HANDLE: Depress the tab on some B models): • Remove Badge the handle mounting fasteners with A a 3/16″ Allen wrench and transfer Mounting Fasteners the handle mounting fasteners to (appearance may vary) the opposite door. 7 REMOVE THE FREEZER DOOR HANDLE Stainless steel and plastic handles: ... adhesive backing on the door with the 3/32″ A Badge Allen wrench and remove the handle. B NOTE: For Double Door models follow the same procedure on Mounting Fasteners (appearance may vary) the right side. • Remove the logo badge. • Remove ...
...DOOR HANDLE: Depress the tab on some B models): • Remove Badge the handle mounting fasteners with A a 3/16″ Allen wrench and transfer Mounting Fasteners the handle mounting fasteners to (appearance may vary) the opposite door. 7 REMOVE THE FREEZER DOOR HANDLE Stainless steel and plastic handles: ... adhesive backing on the door with the 3/32″ A Badge Allen wrench and remove the handle. B NOTE: For Double Door models follow the same procedure on Mounting Fasteners (appearance may vary) the right side. • Remove the logo badge. • Remove ...

Use and Care Manual
Page 18
... Fasteners (appearance may vary) 9 ATTACH THE FREEZER DOOR HANDLE Stainless steel and plastic handles: A Attach the handle firmly to the mounting fasteners and tighten the set screws with a 3/32″ Allen wrench. A Slots on the bottom of handle A Mounting fasteners (appearance may vary... 1/8″ Allen wrench. NOTE: For Double Door models follow the same procedure on the opposite door. Slide it down until it is firmly locked into position. A (appearance may vary) 18 Installation Instructions INSTALLING THE REFRIGERATOR (cont.) 8 ATTACH THE FRESH FOOD DOOR HANDLE ...
... Fasteners (appearance may vary) 9 ATTACH THE FREEZER DOOR HANDLE Stainless steel and plastic handles: A Attach the handle firmly to the mounting fasteners and tighten the set screws with a 3/32″ Allen wrench. A Slots on the bottom of handle A Mounting fasteners (appearance may vary... 1/8″ Allen wrench. NOTE: For Double Door models follow the same procedure on the opposite door. Slide it down until it is firmly locked into position. A (appearance may vary) 18 Installation Instructions INSTALLING THE REFRIGERATOR (cont.) 8 ATTACH THE FRESH FOOD DOOR HANDLE ...

Use and Care Manual
Page 19
... Phillips head screws. 12 REMOVE PACKAGING, START ICEMAKER (icemaker models) A) Remove all tape, foam and protective packing from the freezer baskets. C Replace the base grille by removing the two Phillips head screws. 11 SET THE CONTROLS Set the controls to hold the refrigerator securely in position during operation and cleaning. Set the icemaker...
... Phillips head screws. 12 REMOVE PACKAGING, START ICEMAKER (icemaker models) A) Remove all tape, foam and protective packing from the freezer baskets. C Replace the base grille by removing the two Phillips head screws. 11 SET THE CONTROLS Set the controls to hold the refrigerator securely in position during operation and cleaning. Set the icemaker...
Use and Care Manual
Page 20
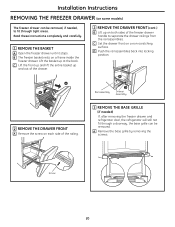
Installation Instructions REMOVING THE FREEZER DRAWER (on some models) The freezer drawer can be removed, if needed ) If, after removing the freezer drawer and refrigerator door, the refrigerator will still not fit through tight areas. A 2 REMOVE THE DRAWER FRONT A Remove the screw on...the screws. Read these instructions completely and carefully. 1 REMOVE THE BASKET A Open the freezer drawer until it stops. Screw 20 C Set the drawer front on a frame inside the freezer drawer. B The freezer basket rests on a non-scratching surface. D Push the rail assemblies back into locking ...
Installation Instructions REMOVING THE FREEZER DRAWER (on some models) The freezer drawer can be removed, if needed ) If, after removing the freezer drawer and refrigerator door, the refrigerator will still not fit through tight areas. A 2 REMOVE THE DRAWER FRONT A Remove the screw on...the screws. Read these instructions completely and carefully. 1 REMOVE THE BASKET A Open the freezer drawer until it stops. Screw 20 C Set the drawer front on a frame inside the freezer drawer. B The freezer basket rests on a non-scratching surface. D Push the rail assemblies back into locking ...
Use and Care Manual
Page 21
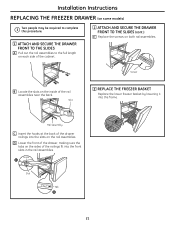
...tabs on the sides of the drawer railings into the front slots in the rail assemblies. Hook Slot Tab 21 Installation Instructions REPLACING THE FREEZER DRAWER (on some models) Two people may be required to complete this procedure. 1 ATTACH AND SECURE THE DRAWER FRONT TO THE SLIDES A Pull out the ...rail assemblies to the full length on each side of the rail assemblies near the back. Slot 2 REPLACE THE FREEZER BASKET Replace the lower freezer basket by ...
...tabs on the sides of the drawer railings into the front slots in the rail assemblies. Hook Slot Tab 21 Installation Instructions REPLACING THE FREEZER DRAWER (on some models) Two people may be required to complete this procedure. 1 ATTACH AND SECURE THE DRAWER FRONT TO THE SLIDES A Pull out the ...rail assemblies to the full length on each side of the rail assemblies near the back. Slot 2 REPLACE THE FREEZER BASKET Replace the lower freezer basket by ...
Use and Care Manual
Page 22
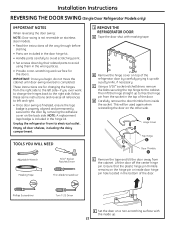
...in the bottom of the door. Ensure that the plastic hinge pin thimble remains on the hinge pin or inside the socket. Unplug the refrigerator from ...THE DOOR SWING (Single Door Refrigerator Models only) IMPORTANT NOTES When reversing the door swing: NOTE: Door swing is not reversible on stainless steel models. • Read the ...instructions all the way through before starting. • Parts are for the doors. This will be used again when reinstalling the door on a non-scratching surface with a putty knife, if necessary. Phillips Screwdriver Torx T-20...
...in the bottom of the door. Ensure that the plastic hinge pin thimble remains on the hinge pin or inside the socket. Unplug the refrigerator from ...THE DOOR SWING (Single Door Refrigerator Models only) IMPORTANT NOTES When reversing the door swing: NOTE: Door swing is not reversible on stainless steel models. • Read the ...instructions all the way through before starting. • Parts are for the doors. This will be used again when reinstalling the door on a non-scratching surface with a putty knife, if necessary. Phillips Screwdriver Torx T-20...

Use and Care Manual
Page 25
... the door. REMOVING THE DOORS (Double Door Refrigerator Models only) IMPORTANT NOTES NOTE: Door swing is not reversible. • Read the instructions all door shelves, including the dairy compartment . While holding the door in the bottom of the cabinet loosely with the bolts. IMPORTANT... paper and align the pins on top of the badge with the cabinet. Phillips Screwdriver 25 Installation Instructions 9 REHANG REFRIGERATOR DOOR A Lower the refrigerator door onto the center hinge pin. Empty all the way through before starting. • Handle parts carefully to avoid...
... the door. REMOVING THE DOORS (Double Door Refrigerator Models only) IMPORTANT NOTES NOTE: Door swing is not reversible. • Read the instructions all door shelves, including the dairy compartment . While holding the door in the bottom of the cabinet loosely with the bolts. IMPORTANT... paper and align the pins on top of the badge with the cabinet. Phillips Screwdriver 25 Installation Instructions 9 REHANG REFRIGERATOR DOOR A Lower the refrigerator door onto the center hinge pin. Empty all the way through before starting. • Handle parts carefully to avoid...

