
Use and Care Manual
Page 1
Trash Compactors GEAppliances.com Safety Instructions 2-3 Operating Instructions Compacting 6 Features 4 Loading 5 Removing a Full Trash Bag 6 Trash Bag Installation 5 Using the Trash Compactor 5-6 Care and Cleaning Cleaning the Unit 7 Troubleshooting Tips 8 Consumer Support Consumer Support 12 Product Registration for Customers in Canada 9, 10 Warranty 11 Owner's Manual GCG1500 GCG1580 GCG1700 Write the model and serial numbers here: Model Serial You can find them on the label on the front of the frame. 165D4700P385 49-55061-1 09-09 JR
Trash Compactors GEAppliances.com Safety Instructions 2-3 Operating Instructions Compacting 6 Features 4 Loading 5 Removing a Full Trash Bag 6 Trash Bag Installation 5 Using the Trash Compactor 5-6 Care and Cleaning Cleaning the Unit 7 Troubleshooting Tips 8 Consumer Support Consumer Support 12 Product Registration for Customers in Canada 9, 10 Warranty 11 Owner's Manual GCG1500 GCG1580 GCG1700 Write the model and serial numbers here: Model Serial You can find them on the label on the front of the frame. 165D4700P385 49-55061-1 09-09 JR
Use and Care Manual
Page 2
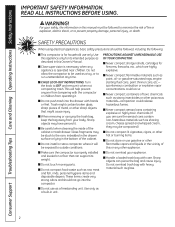
...safety, the information in the bottom of toxic chemicals such as a toy, or to OFF and remove it when not compacting trash. Do not allow the compactor to be exposed to the ram, imbedded in the drawer surface or lying in this appliance only for household use only... compact aerosol cans containing explosive or highly toxic chemicals. (If you are highly explosive. I Handle a loaded trash bag with the compactor or children from tampering with care. Do not overload trash bag with hands or feet. I Do not use gasoline or other flammable vapors and liquids in unit. spontaneous...
...safety, the information in the bottom of toxic chemicals such as a toy, or to OFF and remove it when not compacting trash. Do not allow the compactor to be exposed to the ram, imbedded in the drawer surface or lying in this appliance only for household use only... compact aerosol cans containing explosive or highly toxic chemicals. (If you are highly explosive. I Handle a loaded trash bag with the compactor or children from tampering with care. Do not overload trash bag with hands or feet. I Do not use gasoline or other flammable vapors and liquids in unit. spontaneous...
Use and Care Manual
Page 4
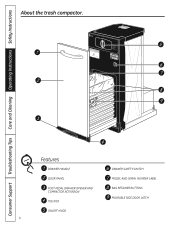
Features DRAWER HANDLE DRAWER SAFETY SWITCH DOOR PANEL MODEL AND SERIAL NUMBER LABEL FOOT PEDAL DRAWER OPENER AND COMPACTOR ACTIVATION TOE KICK BAG RETAINER BUTTONS MOVEABLE SIDE DOOR LATCH ON/OFF KNOB 4 Consumer Support Troubleshooting Tips Care and Cleaning Operating Instructions Safety Instructions About the trash compactor.
Features DRAWER HANDLE DRAWER SAFETY SWITCH DOOR PANEL MODEL AND SERIAL NUMBER LABEL FOOT PEDAL DRAWER OPENER AND COMPACTOR ACTIVATION TOE KICK BAG RETAINER BUTTONS MOVEABLE SIDE DOOR LATCH ON/OFF KNOB 4 Consumer Support Troubleshooting Tips Care and Cleaning Operating Instructions Safety Instructions About the trash compactor.
Use and Care Manual
Page 5
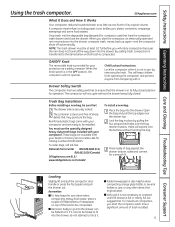
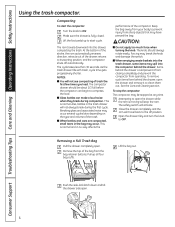
... Place the bag into the drawer, do not attempt to compact until all the way down into the drawer, compacts trash, moves back up again-and the compactor shuts off automatically. Reinforced plastic bags came with it is not necessary to force it. Open the bag and pull ... bottom, sides and corners for operation. Safety Instructions Operating Instructions Care and Cleaning Troubleshooting Tips Consumer Support Using the trash compactor. When you will not cycle without harming the bag. 3 Press inside of sharp debris that might shatter. Drawer Safety Switch The...
... Place the bag into the drawer, do not attempt to compact until all the way down into the drawer, compacts trash, moves back up again-and the compactor shuts off automatically. Reinforced plastic bags came with it is not necessary to force it. Open the bag and pull ... bottom, sides and corners for operation. Safety Instructions Operating Instructions Care and Cleaning Troubleshooting Tips Consumer Support Using the trash compactor. When you will not cycle without harming the bag. 3 Press inside of sharp debris that might shatter. Drawer Safety Switch The...
Use and Care Manual
Page 6
... when they break during the first cycle. Remove the top of the compactor. Consumer Support Troubleshooting Tips Care and Cleaning Operating Instructions Safety Instructions Using the trash compactor. See the Care and Cleaning section. Attempting to clean them out. Removing a Full Trash Bag Pull the drawer completely open . 6 Make sure the drawer is normal...
... when they break during the first cycle. Remove the top of the compactor. Consumer Support Troubleshooting Tips Care and Cleaning Operating Instructions Safety Instructions Using the trash compactor. See the Care and Cleaning section. Attempting to clean them out. Removing a Full Trash Bag Pull the drawer completely open . 6 Make sure the drawer is normal...

Use and Care Manual
Page 7
... more than a couple of glass in which the drawer rollers move. To clean the drawer interior: Remove the bag. GEAppliances.com As is available from GE Parts by removing the knob and store it in a safe place. Cleaning the Unit To clean the outside: Wipe with a soft cloth. Press the ... way and set it aside. See page 6. Rinse and then dry with a clean damp cloth. Liquid spills or wet trash should be cleaned up liquid. Hold the side door latch and tilt the side of the compactor. Wash with Cerama Bryte® or a similar product using warm, soapy water. Before cleaning the...
... more than a couple of glass in which the drawer rollers move. To clean the drawer interior: Remove the bag. GEAppliances.com As is available from GE Parts by removing the knob and store it in a safe place. Cleaning the Unit To clean the outside: Wipe with a soft cloth. Press the ... way and set it aside. See page 6. Rinse and then dry with a clean damp cloth. Liquid spills or wet trash should be cleaned up liquid. Hold the side door latch and tilt the side of the compactor. Wash with Cerama Bryte® or a similar product using warm, soapy water. Before cleaning the...
Use and Care Manual
Page 8
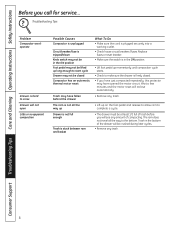
...not open Little or no apparent compaction Possible Causes Compactor is unplugged Circuit breaker/fuse is tripped/blown Knob switch may not be in the ON position Foot pedal may not be lifted up Drawer is not full enough Trash is stuck between ram and basket What To Do ...Instructions Safety Instructions Before you have just compacted repeatedly, this protector may have fallen behind the drawer The ram is firmly closed Compactor has an automatic thermal motor reset Trash may have opened the motor circuit. Wait a few minutes and the motor reset will reclose automatically. • Remove any...
...not open Little or no apparent compaction Possible Causes Compactor is unplugged Circuit breaker/fuse is tripped/blown Knob switch may not be in the ON position Foot pedal may not be lifted up Drawer is not full enough Trash is stuck between ram and basket What To Do ...Instructions Safety Instructions Before you have just compacted repeatedly, this protector may have fallen behind the drawer The ram is firmly closed Compactor has an automatic thermal motor reset Trash may have opened the motor circuit. Wait a few minutes and the motor reset will reclose automatically. • Remove any...
Use and Care Manual
Page 11
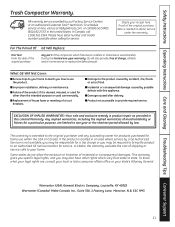
...implied warranties, including the implied warranties of the compactor which vary from state to obtain service under the warranty. In Canada, call 800.GE.CARES (800.432.2737) in materials or workmanship. For The Period Of: GE Will Replace: One Year From the date ...Warrantor (USA): General Electric Company. Safety Instructions Operating Instructions Care and Cleaning Troubleshooting Tips Consumer Support Trash Compactor Warranty. All warranty service provided by a GE Authorized Servicer is located in this appliance. Proof of incidental or consequential damages.
...implied warranties, including the implied warranties of the compactor which vary from state to obtain service under the warranty. In Canada, call 800.GE.CARES (800.432.2737) in materials or workmanship. For The Period Of: GE Will Replace: One Year From the date ...Warrantor (USA): General Electric Company. Safety Instructions Operating Instructions Care and Cleaning Troubleshooting Tips Consumer Support Trash Compactor Warranty. All warranty service provided by a GE Authorized Servicer is located in this appliance. Proof of incidental or consequential damages.
Installation Instructions
Page 2
...; Completion time - 1 hour. • Proper installation is the responsibility of the Trash Bag Caddy 9 Finalize Installation 9 2 Installation of this compactor only for its intended purpose. • This compactor is not covered under the Countertop ...... 8 Attach the Compactor to the Countertop 8 Reinstall the Compactor Drawer 9 Installation of the installer. • Product failure due to Consumer - See...
...; Completion time - 1 hour. • Proper installation is the responsibility of the Trash Bag Caddy 9 Finalize Installation 9 2 Installation of this compactor only for its intended purpose. • This compactor is not covered under the Countertop ...... 8 Attach the Compactor to the Countertop 8 Reinstall the Compactor Drawer 9 Installation of the installer. • Product failure due to Consumer - See...
Installation Instructions
Page 9
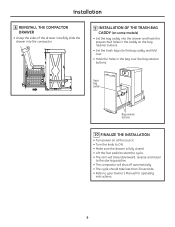
Installation 8 REINSTALL THE COMPACTOR DRAWER • Grasp the sides of the drawer. Trash bag caddy Bag retainer buttons 10 FINALIZE THE INSTALLATION • Turn power on the bag retainer buttons. • Set the trash bag into the drawer and hook the prepunched holes in the bag over . • ... should take less than 30 seconds. • Refer to your Owner's Manual for operating instructions. 9 Carefully slide the drawer into the compactor. 9 INSTALLATION OF THE TRASH BAG CADDY (on some models) • Set the bag caddy into the bag caddy and fold over the bag retainer buttons.
Installation 8 REINSTALL THE COMPACTOR DRAWER • Grasp the sides of the drawer. Trash bag caddy Bag retainer buttons 10 FINALIZE THE INSTALLATION • Turn power on the bag retainer buttons. • Set the trash bag into the drawer and hook the prepunched holes in the bag over . • ... should take less than 30 seconds. • Refer to your Owner's Manual for operating instructions. 9 Carefully slide the drawer into the compactor. 9 INSTALLATION OF THE TRASH BAG CADDY (on some models) • Set the bag caddy into the bag caddy and fold over the bag retainer buttons.

