Use and Care Manual
Page 1
...Bottom Freezer Refrigerators ge.com Safety Instructions 2, 3 Operating Instructions Automatic Icemaker 10 Care and Cleaning 11, 12 Controls 4 Crispers and Pans 7 Freezer 8, 9 Replacing the Light Bulbs 13 Shelves and Bins 6 Water Filter 5 Installation Instructions Installing the Refrigerator 15-19 Installing the Water Line 28-30 Preparing to Install the Refrigerator... 14 Removing and Replacing the Doors (Double Door Refrigerator Models only 25-27 Removing and Replacing the Freezer Drawer 20, 21 Reversing the Door Swing (Single Door Refrigerator Models only...
...Bottom Freezer Refrigerators ge.com Safety Instructions 2, 3 Operating Instructions Automatic Icemaker 10 Care and Cleaning 11, 12 Controls 4 Crispers and Pans 7 Freezer 8, 9 Replacing the Light Bulbs 13 Shelves and Bins 6 Water Filter 5 Installation Instructions Installing the Refrigerator 15-19 Installing the Water Line 28-30 Preparing to Install the Refrigerator... 14 Removing and Replacing the Doors (Double Door Refrigerator Models only 25-27 Removing and Replacing the Freezer Drawer 20, 21 Reversing the Door Swing (Single Door Refrigerator Models only...
Use and Care Manual
Page 2
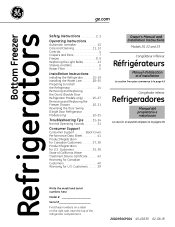
...and making repairs. Use this appliance only for "just a few days." They could damage the refrigerator and seriously injure themselves. ■ Do not touch the cold surfaces in the freezer compartment when hands are not problems of the cord be removed prior to climb, stand or ...in place so that the electrical rating of the past. Before You Throw Away Your Old Refrigerator or Freezer: ■ Take off the doors. ■ Leave the shelves in the area. ■ In refrigerators with automatic icemakers, avoid contact with the heating element that any other appliance. ■...
...and making repairs. Use this appliance only for "just a few days." They could damage the refrigerator and seriously injure themselves. ■ Do not touch the cold surfaces in the freezer compartment when hands are not problems of the cord be removed prior to climb, stand or ...in place so that the electrical rating of the past. Before You Throw Away Your Old Refrigerator or Freezer: ■ Take off the doors. ■ Leave the shelves in the area. ■ In refrigerators with automatic icemakers, avoid contact with the heating element that any other appliance. ■...
Use and Care Manual
Page 3
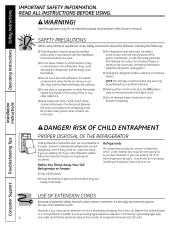
...cord that have it replaced with a standard 3-prong (grounding) wall outlet to minimize the possibility of this appliance. The refrigerator should always be properly grounded. Repair or replace immediately all power cords that shows cracks or abrasion damage along its own...READ AND FOLLOW THIS SAFETY INFORMATION CAREFULLY. SAVE THESE INSTRUCTIONS Installation Instructions Troubleshooting Tips Consumer Support 3 Safety Instructions Operating Instructions ge.com WARNING! HOW TO CONNECT ELECTRICITY Do not, under any circumstances, cut or remove the third (ground) prong from...
...cord that have it replaced with a standard 3-prong (grounding) wall outlet to minimize the possibility of this appliance. The refrigerator should always be properly grounded. Repair or replace immediately all power cords that shows cracks or abrasion damage along its own...READ AND FOLLOW THIS SAFETY INFORMATION CAREFULLY. SAVE THESE INSTRUCTIONS Installation Instructions Troubleshooting Tips Consumer Support 3 Safety Instructions Operating Instructions ge.com WARNING! HOW TO CONNECT ELECTRICITY Do not, under any circumstances, cut or remove the third (ground) prong from...
Use and Care Manual
Page 4
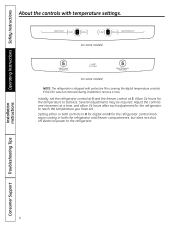
...cooling in both controls to 0 for digital and 0 for the temperature to stabilize. Setting either or both the refrigerator and freezer compartments, but does not shut off electrical power to reach the temperature you have set. Adjust the controls one increment... (on some models) NOTE: The refrigerator is shipped with protective film covering the digital temperature controls. Initially, set the refrigerator control at 5 and the freezer control at a time, and allow 24 hours after each adjustment for the refrigerator to the refrigerator. 4 Consumer Support Troubleshooting Tips If this...
...cooling in both controls to 0 for digital and 0 for the temperature to stabilize. Setting either or both the refrigerator and freezer compartments, but does not shut off electrical power to reach the temperature you have set. Adjust the controls one increment... (on some models) NOTE: The refrigerator is shipped with protective film covering the digital temperature controls. Initially, set the refrigerator control at 5 and the freezer control at a time, and allow 24 hours after each adjustment for the refrigerator to the refrigerator. 4 Consumer Support Troubleshooting Tips If this...

Use and Care Manual
Page 5
... Instructions About the water filter. (on some models) ge.com Water Filter Cartridge The water filter cartridge is located in the back upper right corner of water to Replace the Filter The filter cartridge should be replaced when the flow of the refrigerator compartment. When to the icemaker decreases, or every six... additional filter cartridges in the system, the filter cartridge may drip down . CAUTION: If air has been trapped in the United States, visit our Website, ge.com, or call GE Parts and Accessories, 800.626.2002. Close the cartridge cover.
... Instructions About the water filter. (on some models) ge.com Water Filter Cartridge The water filter cartridge is located in the back upper right corner of water to Replace the Filter The filter cartridge should be replaced when the flow of the refrigerator compartment. When to the icemaker decreases, or every six... additional filter cartridges in the system, the filter cartridge may drip down . CAUTION: If air has been trapped in the United States, visit our Website, ge.com, or call GE Parts and Accessories, 800.626.2002. Close the cartridge cover.
Use and Care Manual
Page 6
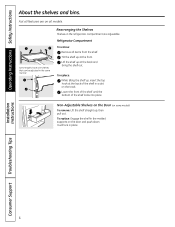
Refrigerator Compartment To remove: Remove all models. Lower the front of the shelf until the bottom of the shelf in a slot on all items from the shelf. It will lock in the same manner. Operating Instructions Safety Instructions About the shelves ... are adjustable. To replace: While tilting the shelf up at the back of the shelf locks into place. To replace: Engage the shelf in the refrigerator compartment are on the track. Rearranging the Shelves Shelves in the molded supports on some models) To remove: Lift the shelf straight up at the...
Refrigerator Compartment To remove: Remove all models. Lower the front of the shelf until the bottom of the shelf in a slot on all items from the shelf. It will lock in the same manner. Operating Instructions Safety Instructions About the shelves ... are adjustable. To replace: While tilting the shelf up at the back of the shelf locks into place. To replace: Engage the shelf in the refrigerator compartment are on the track. Rearranging the Shelves Shelves in the molded supports on some models) To remove: Lift the shelf straight up at the...

Use and Care Manual
Page 10
... Ice Bin To reach the power switch. Check the back of ice to allow the water line to clear. If the refrigerator is operated before the water connection is available at extra cost. You will stop producing ice. Be sure nothing interferes with the...period, depending on freezer compartment temperature, room temperature, number of the feeler arm. Power Switch Green Power Light Icemaker Feeler Arm Automatic Icemaker The icemaker will fill with water. Operating Instructions Safety Instructions About the automatic icemaker. (on some models) A newly installed refrigerator may take 12 ...
... Ice Bin To reach the power switch. Check the back of ice to allow the water line to clear. If the refrigerator is operated before the water connection is available at extra cost. You will stop producing ice. Be sure nothing interferes with the...period, depending on freezer compartment temperature, room temperature, number of the feeler arm. Power Switch Green Power Light Icemaker Feeler Arm Automatic Icemaker The icemaker will fill with water. Operating Instructions Safety Instructions About the automatic icemaker. (on some models) A newly installed refrigerator may take 12 ...

Use and Care Manual
Page 11
...with a clean, soft cloth. Do not use wax on the door handles and trim. Unplug the refrigerator before cleaning. Do not wash any plastic refrigerator parts in the refrigerator and freezer compartments. Keep the outside clean. Dry and polish with kitchen appliance wax or mild liquid dish detergent....wax polish on some models) can scratch and weaken the paint finish. This both cleans and neutralizes odors. Rinse and wipe dry. ge.com Cleaning the Outside The door handles and trim. Avoid cleaning cold glass shelves with a soft cloth. Safety Instructions Operating Instructions Care...
...with a clean, soft cloth. Do not use wax on the door handles and trim. Unplug the refrigerator before cleaning. Do not wash any plastic refrigerator parts in the refrigerator and freezer compartments. Keep the outside clean. Dry and polish with kitchen appliance wax or mild liquid dish detergent....wax polish on some models) can scratch and weaken the paint finish. This both cleans and neutralizes odors. Rinse and wipe dry. ge.com Cleaning the Outside The door handles and trim. Avoid cleaning cold glass shelves with a soft cloth. Safety Instructions Operating Instructions Care...

Use and Care Manual
Page 12
... to the O (off) position and shut off the water supply to the floor covering or refrigerator. Handle only from the wall. Be sure the refrigerator stays in damage to the refrigerator. Raise the leveling legs located at the bottom front of floor coverings can drop below freezing, have a qualified servicer drain the water supply...
... to the O (off) position and shut off the water supply to the floor covering or refrigerator. Handle only from the wall. Be sure the refrigerator stays in damage to the refrigerator. Raise the leveling legs located at the bottom front of floor coverings can drop below freezing, have a qualified servicer drain the water supply...
Use and Care Manual
Page 13
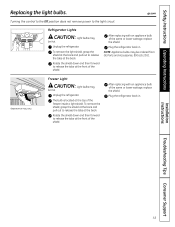
... Tips Consumer Support 13 Unplug the refrigerator. After replacing with an appliance bulb of the shield. Unplug the refrigerator. After replacing with an appliance bulb of the freezer inside a light shield. Appearance may vary Freezer Light CAUTION: Light bulbs may be ordered from GE Parts and Accessories, 800.626.2002...Replacing the light bulbs. Turning the control to the 0ff position does not remove power to release the tabs at the back. ge.com Refrigerator Lights CAUTION: Light bulbs may be hot. To remove the shield, grasp the shield at the back and pull out to...
... Tips Consumer Support 13 Unplug the refrigerator. After replacing with an appliance bulb of the shield. Unplug the refrigerator. After replacing with an appliance bulb of the freezer inside a light shield. Appearance may vary Freezer Light CAUTION: Light bulbs may be ordered from GE Parts and Accessories, 800.626.2002...Replacing the light bulbs. Turning the control to the 0ff position does not remove power to release the tabs at the back. ge.com Refrigerator Lights CAUTION: Light bulbs may be hot. To remove the shield, grasp the shield at the back and pull out to...

Use and Care Manual
Page 14
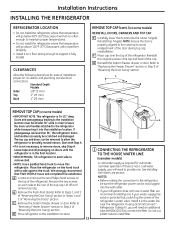
... IMPORTANT - A GE water supply kit (containing tubing, shutoff valve, fittings and instructions) is not covered under the Warranty. Observe all governing codes and ordinances. • Note to Consumer - Installation Instructions Refrigerator Models 20 and 22 Questions? Refrigerator Installation 20 minutes Water Line ...- WATER SUPPLY TO THE ICEMAKER AND DISPENSER (ON SOME MODELS) If the refrigerator has an icemaker, it will not fit through a doorway, the refrigerator door and freezer drawer can be connected to improper installation is available at extra cost from Parts...
... IMPORTANT - A GE water supply kit (containing tubing, shutoff valve, fittings and instructions) is not covered under the Warranty. Observe all governing codes and ordinances. • Note to Consumer - Installation Instructions Refrigerator Models 20 and 22 Questions? Refrigerator Installation 20 minutes Water Line ...- WATER SUPPLY TO THE ICEMAKER AND DISPENSER (ON SOME MODELS) If the refrigerator has an icemaker, it will not fit through a doorway, the refrigerator door and freezer drawer can be connected to improper installation is available at extra cost from Parts...
Use and Care Manual
Page 15
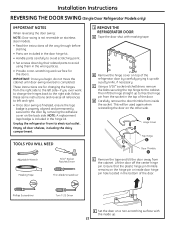
...to remove skid. • NOTE: Use a padded hand truck to move and complete this refrigerator. We strongly recommend that could clog the screen of "Reversing the Door Swing" section. C Remove the bottom freezer drawer or door. Standard Depth Models Sides 1/8″ (3 mm) Top 1″ (25 mm... that TWO PEOPLE move this installation. If using GE SmartConnect™ Refrigerator Tubing Kit, you will need to the refrigerator while transporting it in order to leave the doors and handles attached to provide one if your refrigerator does not have a water filter, we recommend ...
...to remove skid. • NOTE: Use a padded hand truck to move and complete this refrigerator. We strongly recommend that could clog the screen of "Reversing the Door Swing" section. C Remove the bottom freezer drawer or door. Standard Depth Models Sides 1/8″ (3 mm) Top 1″ (25 mm... that TWO PEOPLE move this installation. If using GE SmartConnect™ Refrigerator Tubing Kit, you will need to the refrigerator while transporting it in order to leave the doors and handles attached to provide one if your refrigerator does not have a water filter, we recommend ...

Use and Care Manual
Page 16
...into the clamp provided to the O (off) position. B If you are using GE SmartConnect™ tubing, insert the molded end of the tubing into the refrigerator connection, at the back of the refrigerator, and tighten the compression nut until it is raised just enough that the door closes ... corners of the tubing coming from the house cold water supply. Installation Instructions INSTALLING THE REFRIGERATOR (cont.) 1 CONNECTING THE REFRIGERATOR TO THE HOUSE WATER LINE (cont.) A If you are using the GE SmartConnect™ tubing, the nuts are already assembled to pry open the clamp. One ...
...into the clamp provided to the O (off) position. B If you are using GE SmartConnect™ tubing, insert the molded end of the tubing into the refrigerator connection, at the back of the refrigerator, and tighten the compression nut until it is raised just enough that the door closes ... corners of the tubing coming from the house cold water supply. Installation Instructions INSTALLING THE REFRIGERATOR (cont.) 1 CONNECTING THE REFRIGERATOR TO THE HOUSE WATER LINE (cont.) A If you are using the GE SmartConnect™ tubing, the nuts are already assembled to pry open the clamp. One ...

Use and Care Manual
Page 18
... firmly locked into position. Installation Instructions INSTALLING THE REFRIGERATOR (cont.) 8 ATTACH THE FRESH FOOD DOOR HANDLE Stainless steel handle: A Attach the handle to the handle mounting fasteners and tighten the set screws on the bottom of handle A Mounting fasteners (appearance may vary) 9 ATTACH THE FREEZER DOOR HANDLE Stainless steel and plastic handles: A Attach...
... firmly locked into position. Installation Instructions INSTALLING THE REFRIGERATOR (cont.) 8 ATTACH THE FRESH FOOD DOOR HANDLE Stainless steel handle: A Attach the handle to the handle mounting fasteners and tighten the set screws on the bottom of handle A Mounting fasteners (appearance may vary) 9 ATTACH THE FREEZER DOOR HANDLE Stainless steel and plastic handles: A Attach...

Use and Care Manual
Page 19
...ice bin. Installation Instructions 10 LEVEL THE REFRIGERATOR The leveling legs have 2 purposes: 1) Leveling legs adjust so the refrigerator is firmly positioned on ) position. C) Place half width basket onto drawer slides. See About the freezer section for instructions. It will then begin ...to the icemaker. 19 The leveling legs also prevent the refrigerator from tipping. The icemaker will not begin operation automatically. Power switch ...
...ice bin. Installation Instructions 10 LEVEL THE REFRIGERATOR The leveling legs have 2 purposes: 1) Leveling legs adjust so the refrigerator is firmly positioned on ) position. C) Place half width basket onto drawer slides. See About the freezer section for instructions. It will then begin ...to the icemaker. 19 The leveling legs also prevent the refrigerator from tipping. The icemaker will not begin operation automatically. Power switch ...
Use and Care Manual
Page 20
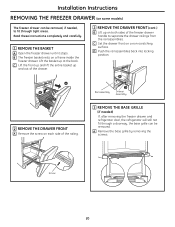
...frame inside the freezer drawer. Rail Assembly Drawer Assembly 3 REMOVE THE BASE GRILLE (if needed) If, after removing the freezer drawer and refrigerator door, the refrigerator will still not ...fit through tight areas. A Remove the base grille by removing the screws. A 2 REMOVE THE DRAWER FRONT A Remove the screw on each side of the freezer...position. B The freezer basket rests on a non-scratching surface. Installation Instructions REMOVING THE FREEZER DRAWER (on some models) The freezer drawer can be ...
...frame inside the freezer drawer. Rail Assembly Drawer Assembly 3 REMOVE THE BASE GRILLE (if needed) If, after removing the freezer drawer and refrigerator door, the refrigerator will still not ...fit through tight areas. A Remove the base grille by removing the screws. A 2 REMOVE THE DRAWER FRONT A Remove the screw on each side of the freezer...position. B The freezer basket rests on a non-scratching surface. Installation Instructions REMOVING THE FREEZER DRAWER (on some models) The freezer drawer can be ...
Use and Care Manual
Page 22
Unplug the refrigerator from the cabinet. C Using a 5/16″ socket ratchet/driver, remove the bolts securing ...or inside the socket. These instructions are included in the bottom of the refrigerator door by carefully prying it up with masking tape. Installation Instructions REVERSING THE DOOR SWING (Single Door Refrigerator Models only) IMPORTANT NOTES When reversing the door swing: NOTE... same instructions and reverse all door shelves, including the dairy compartment . 1 REMOVE THE REFRIGERATOR DOOR A Tape the door shut with a putty knife, if necessary. Phillips Screwdriver Torx...
Unplug the refrigerator from the cabinet. C Using a 5/16″ socket ratchet/driver, remove the bolts securing ...or inside the socket. These instructions are included in the bottom of the refrigerator door by carefully prying it up with masking tape. Installation Instructions REVERSING THE DOOR SWING (Single Door Refrigerator Models only) IMPORTANT NOTES When reversing the door swing: NOTE... same instructions and reverse all door shelves, including the dairy compartment . 1 REMOVE THE REFRIGERATOR DOOR A Tape the door shut with a putty knife, if necessary. Phillips Screwdriver Torx...
Use and Care Manual
Page 24
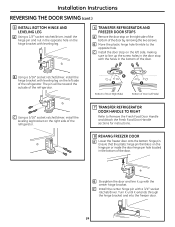
...the outside of Door (Left Side) 7 TRANSFER REFRIGERATOR DOOR HANDLE TO RIGHT Refer to Remove the Fresh Food Door Handle and Attach the Fresh Food Door Handle sections for instructions. 8 REHANG FREEZER DOOR A Lower the freezer door onto the bottom hinge pin. B Move the plastic hinge hole ...with leveling leg on the right side of the bottom of the door by removing the two screws. A Bottom of Door (Right Side) Bottom of the refrigerator. B Straighten the door and line it extends through the hinge bracket and into the freezer door. 24 Installation Instructions REVERSING THE DOOR SWING (...
...the outside of Door (Left Side) 7 TRANSFER REFRIGERATOR DOOR HANDLE TO RIGHT Refer to Remove the Fresh Food Door Handle and Attach the Fresh Food Door Handle sections for instructions. 8 REHANG FREEZER DOOR A Lower the freezer door onto the bottom hinge pin. B Move the plastic hinge hole ...with leveling leg on the right side of the bottom of the door by removing the two screws. A Bottom of Door (Right Side) Bottom of the refrigerator. B Straighten the door and line it extends through the hinge bracket and into the freezer door. 24 Installation Instructions REVERSING THE DOOR SWING (...

Use and Care Manual
Page 25
...their related parts to avoid using them in the bottom of the cabinet loosely with the holes in place, tighten the top hinge bolts. Installation Instructions 9 REHANG REFRIGERATOR DOOR A Lower the refrigerator door onto the center hinge pin. REMOVING THE DOORS (Double Door Refrigerator Models only) IMPORTANT NOTES NOTE: Door swing ...ensure it sticks to the top of the door. Attach the hinge to the door. C Make sure the gasket on the back of the refrigerator door and then insert the top hinge pin. These instructions are for the doors. B Insert the door thimble into the hinge hole on ...
...their related parts to avoid using them in the bottom of the cabinet loosely with the holes in place, tighten the top hinge bolts. Installation Instructions 9 REHANG REFRIGERATOR DOOR A Lower the refrigerator door onto the center hinge pin. REMOVING THE DOORS (Double Door Refrigerator Models only) IMPORTANT NOTES NOTE: Door swing ...ensure it sticks to the top of the door. Attach the hinge to the door. C Make sure the gasket on the back of the refrigerator door and then insert the top hinge pin. These instructions are for the doors. B Insert the door thimble into the hinge hole on ...

Use and Care Manual
Page 26
... side. 4 REMOVE FREEZER DRAWER Refer to free the hinge pin from the cabinet. Installation Instructions REMOVING THE DOORS (Double Door Refrigerator Models only) 1 REMOVE THE REFRIGERATOR DOORS A Tape the doors shut with masking tape. 1 REMOVE THE REFRIGERATOR DOORS (cont.) E Remove the tape and tilt the door away from the socket in the bottom of the...
... side. 4 REMOVE FREEZER DRAWER Refer to free the hinge pin from the cabinet. Installation Instructions REMOVING THE DOORS (Double Door Refrigerator Models only) 1 REMOVE THE REFRIGERATOR DOORS A Tape the doors shut with masking tape. 1 REMOVE THE REFRIGERATOR DOORS (cont.) E Remove the tape and tilt the door away from the socket in the bottom of the...

