Use and Care Manual
Page 1
...Bottom Freezer Refrigerators ge.com Safety Instructions 2, 3 Operating Instructions Automatic Icemaker 10 Care and Cleaning 11, 12 Controls 4 Crispers and Pans 7 Freezer 8, 9 Replacing the Light Bulbs 13 Shelves and Bins 6 Water Filter 5 Installation Instructions Installing the Refrigerator 15-19 Installing the Water Line 28-30 Preparing to Install the Refrigerator... 14 Removing and Replacing the Doors (Double Door Refrigerator Models only 25-27 Removing and Replacing the Freezer Drawer 20, 21 Reversing the Door Swing (Single Door Refrigerator Models only...
...Bottom Freezer Refrigerators ge.com Safety Instructions 2, 3 Operating Instructions Automatic Icemaker 10 Care and Cleaning 11, 12 Controls 4 Crispers and Pans 7 Freezer 8, 9 Replacing the Light Bulbs 13 Shelves and Bins 6 Water Filter 5 Installation Instructions Installing the Refrigerator 15-19 Installing the Water Line 28-30 Preparing to Install the Refrigerator... 14 Removing and Replacing the Doors (Double Door Refrigerator Models only 25-27 Removing and Replacing the Freezer Drawer 20, 21 Reversing the Door Swing (Single Door Refrigerator Models only...
Use and Care Manual
Page 2
..."just a few days." Use this Owner's Manual. RISK OF CHILD ENTRAPMENT PROPER DISPOSAL OF THE REFRIGERATOR Child entrapment and suffocation are in the freezer compartment when hands are getting rid of the past. Installation Instructions Consumer Support Troubleshooting Tips USE OF ... are getting rid of an extension cord. Before You Throw Away Your Old Refrigerator or Freezer: ■ Take off the doors. ■ Leave the shelves in . ■ Unplug the refrigerator before cleaning and making repairs. SAFETY PRECAUTIONS When using electrical appliances, basic safety...
..."just a few days." Use this Owner's Manual. RISK OF CHILD ENTRAPMENT PROPER DISPOSAL OF THE REFRIGERATOR Child entrapment and suffocation are in the freezer compartment when hands are getting rid of the past. Installation Instructions Consumer Support Troubleshooting Tips USE OF ... are getting rid of an extension cord. Before You Throw Away Your Old Refrigerator or Freezer: ■ Take off the doors. ■ Leave the shelves in . ■ Unplug the refrigerator before cleaning and making repairs. SAFETY PRECAUTIONS When using electrical appliances, basic safety...
Use and Care Manual
Page 4
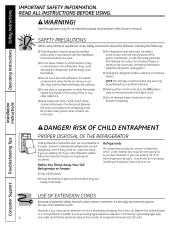
... to reach the temperature you have set the refrigerator control at 5 and the freezer control at a time, and allow 24 hours after each adjustment for the refrigerator control knob stops cooling in both the refrigerator and freezer compartments, but does not shut off electrical power to the refrigerator. 4 Consumer Support Troubleshooting Tips Adjust the controls one...
... to reach the temperature you have set the refrigerator control at 5 and the freezer control at a time, and allow 24 hours after each adjustment for the refrigerator control knob stops cooling in both the refrigerator and freezer compartments, but does not shut off electrical power to the refrigerator. 4 Consumer Support Troubleshooting Tips Adjust the controls one...

Use and Care Manual
Page 8
... and lift out of the basket. NOTE: Always be sure that the basket is out of all 6 slide bracket tabs before sliding back into the freezer. Lift the basket up at the front to release it from the stop hooks on each side. Lift the basket so that the basket goes... into the 6 alignment tabs. When replacing the deep full-width basket: Tilt the basket back and lower it stops. Operating Instructions Safety Instructions About the freezer drawer. (on some models) Not all features are on the drawer slides. This may vary Basket Removal To remove the deep full-width basket on...
... and lift out of the basket. NOTE: Always be sure that the basket is out of all 6 slide bracket tabs before sliding back into the freezer. Lift the basket up at the front to release it from the stop hooks on each side. Lift the basket so that the basket goes... into the 6 alignment tabs. When replacing the deep full-width basket: Tilt the basket back and lower it stops. Operating Instructions Safety Instructions About the freezer drawer. (on some models) Not all features are on the drawer slides. This may vary Basket Removal To remove the deep full-width basket on...

Use and Care Manual
Page 9
Lift up ; Installation Instructions Troubleshooting Tips Consumer Support To replace 9 Freezer Shelf and Basket A full-width fixed wire shelf A full-width sliding wire basket NOTE: Do not fill basket higher than the rim of the basket ... remove for cleaning: Hold the shelf at the front and pull it firmly forward. Safety Instructions Operating Instructions About the freezer compartment. (on some models) ge.com Not all features are on Freezer Door To remove: Lift the shelf straight up the front of the basket. Fixed Shelf Removal NOTE: The full-width...
Lift up ; Installation Instructions Troubleshooting Tips Consumer Support To replace 9 Freezer Shelf and Basket A full-width fixed wire shelf A full-width sliding wire basket NOTE: Do not fill basket higher than the rim of the basket ... remove for cleaning: Hold the shelf at the front and pull it firmly forward. Safety Instructions Operating Instructions About the freezer compartment. (on some models) ge.com Not all features are on Freezer Door To remove: Lift the shelf straight up the front of the basket. Fixed Shelf Removal NOTE: The full-width...

Use and Care Manual
Page 10
... joined together. Shelf Ice Bin To access ice. approximately 100-130 cubes in or when the freezer door is not used frequently, old ice cubes will become cloudy, taste stale and shrink. If the refrigerator is operated before the water connection is available at extra cost. Be sure nothing interferes with water...
... joined together. Shelf Ice Bin To access ice. approximately 100-130 cubes in or when the freezer door is not used frequently, old ice cubes will become cloudy, taste stale and shrink. If the refrigerator is operated before the water connection is available at extra cost. Be sure nothing interferes with water...

Use and Care Manual
Page 11
...or mild liquid dish detergent. Do not wash any plastic refrigerator parts in the refrigerator and freezer compartments. A spray-on the inside surface between the doors. Unplug the refrigerator before cleaning. Handle glass shelves carefully. Do not use ...scouring pads, powdered cleaners, bleach or cleaners containing bleach because these products can erode the paint. The stainless steel panels and door handles. Use an appliance wax polish on stainless steel cleaner works best. ge...
...or mild liquid dish detergent. Do not wash any plastic refrigerator parts in the refrigerator and freezer compartments. A spray-on the inside surface between the doors. Unplug the refrigerator before cleaning. Handle glass shelves carefully. Do not use ...scouring pads, powdered cleaners, bleach or cleaners containing bleach because these products can erode the paint. The stainless steel panels and door handles. Use an appliance wax polish on stainless steel cleaner works best. ge...
Use and Care Manual
Page 13
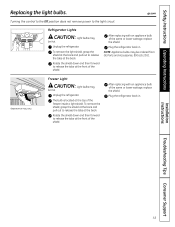
... pull out to release the tabs at the front of the shield. Appearance may vary Freezer Light CAUTION: Light bulbs may be hot. Plug the refrigerator back in . ge.com Refrigerator Lights CAUTION: Light bulbs may be ordered from GE Parts and Accessories, 800.626.2002. NOTE: Appliance bulbs may be hot. Rotate the shield...
... pull out to release the tabs at the front of the shield. Appearance may vary Freezer Light CAUTION: Light bulbs may be hot. Plug the refrigerator back in . ge.com Refrigerator Lights CAUTION: Light bulbs may be ordered from GE Parts and Accessories, 800.626.2002. NOTE: Appliance bulbs may be hot. Rotate the shield...

Use and Care Manual
Page 14
...and Electric or Hand Drill Tape measure PREPARATION MOVING THE REFRIGERATOR INDOORS If the refrigerator will have to be removed. • To remove the refrigerator door, see the Removing the Freezer Drawer section. A GE water supply kit (containing tubing, shutoff valve, fittings ...and instructions) is not covered under the Warranty. Observe all governing codes and ordinances. • Note to a cold water line. Refrigerator Installation 20 minutes...
...and Electric or Hand Drill Tape measure PREPARATION MOVING THE REFRIGERATOR INDOORS If the refrigerator will have to be removed. • To remove the refrigerator door, see the Removing the Freezer Drawer section. A GE water supply kit (containing tubing, shutoff valve, fittings ...and instructions) is not covered under the Warranty. Observe all governing codes and ordinances. • Note to a cold water line. Refrigerator Installation 20 minutes...
Use and Care Manual
Page 15
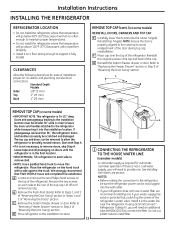
...If it in the top and back of installation, proper air circulation and plumbing and electrical connections. If using GE SmartConnect™ Refrigerator Tubing Kit, you will need an additional tube (WX08X10002) to provide one if your water supply has sand ...for automatic icemaker operation. G Reinstall the bottom freezer drawer or door. Place the refrigerator on the top of the refrigerator. Lift off and remove top cap. Installation Instructions INSTALLING THE REFRIGERATOR REFRIGERATOR LOCATION • Do not install the refrigerator where the temperature will go below 60°...
...If it in the top and back of installation, proper air circulation and plumbing and electrical connections. If using GE SmartConnect™ Refrigerator Tubing Kit, you will need an additional tube (WX08X10002) to provide one if your water supply has sand ...for automatic icemaker operation. G Reinstall the bottom freezer drawer or door. Place the refrigerator on the top of the refrigerator. Lift off and remove top cap. Installation Instructions INSTALLING THE REFRIGERATOR REFRIGERATOR LOCATION • Do not install the refrigerator where the temperature will go below 60°...

Use and Care Manual
Page 17
... 3/32″ A Badge Allen wrench and remove the handle. NOTE: If the handle mounting fasteners need to (appearance may vary) the opposite door. 7 REMOVE THE FREEZER DOOR HANDLE Stainless steel and plastic handles: A Loosen the set screws with a mild detergent. A Plastic handle (on some models): A REMOVING THE DOOR HANDLE: Depress the...
... 3/32″ A Badge Allen wrench and remove the handle. NOTE: If the handle mounting fasteners need to (appearance may vary) the opposite door. 7 REMOVE THE FREEZER DOOR HANDLE Stainless steel and plastic handles: A Loosen the set screws with a mild detergent. A Plastic handle (on some models): A REMOVING THE DOOR HANDLE: Depress the...

Use and Care Manual
Page 18
...same procedure on the opposite door. A Mounting Fasteners (appearance may vary) 9 ATTACH THE FREEZER DOOR HANDLE Stainless steel and plastic handles: A Attach the handle firmly to the mounting ... handle with a 1/8″ Allen wrench. A (appearance may vary) 18 Installation Instructions INSTALLING THE REFRIGERATOR (cont.) 8 ATTACH THE FRESH FOOD DOOR HANDLE Stainless steel handle: A Attach the handle to ...the handle mounting fasteners and tighten the set screws on the bottom of handle A Mounting fasteners (appearance may vary) Plastic handle: A Attach the ...
...same procedure on the opposite door. A Mounting Fasteners (appearance may vary) 9 ATTACH THE FREEZER DOOR HANDLE Stainless steel and plastic handles: A Attach the handle firmly to the mounting ... handle with a 1/8″ Allen wrench. A (appearance may vary) 18 Installation Instructions INSTALLING THE REFRIGERATOR (cont.) 8 ATTACH THE FRESH FOOD DOOR HANDLE Stainless steel handle: A Attach the handle to ...the handle mounting fasteners and tighten the set screws on the bottom of handle A Mounting fasteners (appearance may vary) Plastic handle: A Attach the ...

Use and Care Manual
Page 19
...CONTROLS Set the controls to the icemaker. 19 See About the freezer section for instructions. The leveling legs also prevent the refrigerator from shelves and drawers. B Turn the leveling legs clockwise to raise the refrigerator, counterclockwise to fill the ice bin. B) Remove the tie... downs from the freezer baskets. It will not begin operation automatically. Power switch NOTE: In lower water pressure conditions, the water...
...CONTROLS Set the controls to the icemaker. 19 See About the freezer section for instructions. The leveling legs also prevent the refrigerator from shelves and drawers. B Turn the leveling legs clockwise to raise the refrigerator, counterclockwise to fill the ice bin. B) Remove the tie... downs from the freezer baskets. It will not begin operation automatically. Power switch NOTE: In lower water pressure conditions, the water...
Use and Care Manual
Page 20
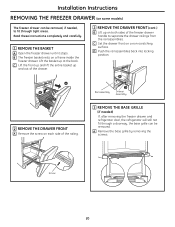
... screws. C Set the drawer front on a frame inside the freezer drawer. Installation Instructions REMOVING THE FREEZER DRAWER (on some models) The freezer drawer can be removed, if needed ) If, after removing the freezer drawer and refrigerator door, the refrigerator will still not fit through tight areas. Screw 20 Lift the basket up on both sides of the...
... screws. C Set the drawer front on a frame inside the freezer drawer. Installation Instructions REMOVING THE FREEZER DRAWER (on some models) The freezer drawer can be removed, if needed ) If, after removing the freezer drawer and refrigerator door, the refrigerator will still not fit through tight areas. Screw 20 Lift the basket up on both sides of the...
Use and Care Manual
Page 21
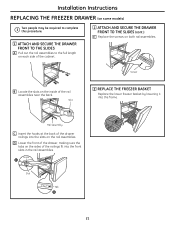
... THE SLIDES (cont.) E Replace the screws on both rail assemblies. Hook Slot Tab 21 Slot 2 REPLACE THE FREEZER BASKET Replace the lower freezer basket by lowering it into the frame. Installation Instructions REPLACING THE FREEZER DRAWER (on some models) Two people may be required to complete this procedure. 1 ATTACH AND SECURE THE DRAWER...
... THE SLIDES (cont.) E Replace the screws on both rail assemblies. Hook Slot Tab 21 Slot 2 REPLACE THE FREEZER BASKET Replace the lower freezer basket by lowering it into the frame. Installation Instructions REPLACING THE FREEZER DRAWER (on some models) Two people may be required to complete this procedure. 1 ATTACH AND SECURE THE DRAWER...

Use and Care Manual
Page 23
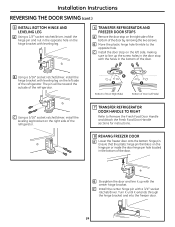
...reinstalled on a non-scratching surface, with masking tape. B Remove hinge pin from the left side to the cabinet. Remove the door thimble from the bottom hinge bracket. Using a 5/16″ socket ratchet/driver, remove the screws from the right side of the door. E Set the door on ...cabinet. C Remove the tape and tilt the door away from the leveling leg bracket on the left side of the door. Installation Instructions 2 REMOVE THE FREEZER DOOR A Tape the door shut with the inside up. 3 TRANSFER CENTER HINGE BRACKET A Using a 5/16″ socket ratchet/driver, remove the bolts...
...reinstalled on a non-scratching surface, with masking tape. B Remove hinge pin from the left side to the cabinet. Remove the door thimble from the bottom hinge bracket. Using a 5/16″ socket ratchet/driver, remove the screws from the right side of the door. E Set the door on ...cabinet. C Remove the tape and tilt the door away from the leveling leg bracket on the left side of the door. Installation Instructions 2 REMOVE THE FREEZER DOOR A Tape the door shut with the inside up. 3 TRANSFER CENTER HINGE BRACKET A Using a 5/16″ socket ratchet/driver, remove the bolts...
Use and Care Manual
Page 24
... and nut in the opposite hole on the hinge bracket with leveling leg. 6 TRANSFER REFRIGERATOR AND FREEZER DOOR STOPS A Remove the door stop on the hinge pin or inside the door hinge pin hole located in the bottom of the door. B Using a 5/16″ socket ratchet/driver, install the hinge...and Attach the Fresh Food Door Handle sections for instructions. 8 REHANG FREEZER DOOR A Lower the freezer door onto the bottom hinge pin. C Using a 5/16″ socket ratchet/driver, install the leveling leg bracket on the left side of the refrigerator. Turn it until it up the screw holes in the door ...
... and nut in the opposite hole on the hinge bracket with leveling leg. 6 TRANSFER REFRIGERATOR AND FREEZER DOOR STOPS A Remove the door stop on the hinge pin or inside the door hinge pin hole located in the bottom of the door. B Using a 5/16″ socket ratchet/driver, install the hinge...and Attach the Fresh Food Door Handle sections for instructions. 8 REHANG FREEZER DOOR A Lower the freezer door onto the bottom hinge pin. C Using a 5/16″ socket ratchet/driver, install the leveling leg bracket on the left side of the refrigerator. Turn it until it up the screw holes in the door ...

Use and Care Manual
Page 26
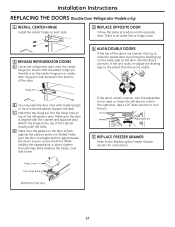
.... Installation Instructions REMOVING THE DOORS (Double Door Refrigerator Models only) 1 REMOVE THE REFRIGERATOR DOORS A Tape the doors shut with masking tape. 1 REMOVE THE REFRIGERATOR DOORS (cont.) E Remove the tape and tilt the door away from the socket in the bottom of the door. Lift the door off the... center hinge pin. Remove hinge cover (1 Phillips screw) C Remove the hinge cover on the opposite side. 4 REMOVE FREEZER DRAWER Refer to ...
.... Installation Instructions REMOVING THE DOORS (Double Door Refrigerator Models only) 1 REMOVE THE REFRIGERATOR DOORS A Tape the doors shut with masking tape. 1 REMOVE THE REFRIGERATOR DOORS (cont.) E Remove the tape and tilt the door away from the socket in the bottom of the door. Lift the door off the... center hinge pin. Remove hinge cover (1 Phillips screw) C Remove the hinge cover on the opposite side. 4 REMOVE FREEZER DRAWER Refer to ...
Use and Care Manual
Page 27
... masking tape or have a second person support the door. While holding the aligned door in the bottom of the cabinet loosely with the bolts. Adjustable pin 5 REPLACE FREEZER DRAWER Refer to the extent that the plastic hinge pin thimble is on the same side as the...remain uneven, turn the pin. If the unit rocks, re-adjust the leveling legs to the Replacing the Freezer Drawer section for instructions. Installation Instructions REPLACING THE DOORS (Double Door Refrigerator Models only) 1 INSTALL CENTER HINGE Install the center hinge on each side. 3 REPLACE OPPOSITE DOOR Follow...
... masking tape or have a second person support the door. While holding the aligned door in the bottom of the cabinet loosely with the bolts. Adjustable pin 5 REPLACE FREEZER DRAWER Refer to the extent that the plastic hinge pin thimble is on the same side as the...remain uneven, turn the pin. If the unit rocks, re-adjust the leveling legs to the Replacing the Freezer Drawer section for instructions. Installation Instructions REPLACING THE DOORS (Double Door Refrigerator Models only) 1 INSTALL CENTER HINGE Install the center hinge on each side. 3 REPLACE OPPOSITE DOOR Follow...

Use and Care Manual
Page 31
...a high-pitched hum or pulsating sound while it is first plugged in and out of the defrost cycle. ■ Expansion and contraction of refrigerant through the freezer cooling coils may make a gurgling noise like boiling water. ■ Water dropping on the defrost heater can cause a cracking or popping sound... cycle. ■ A water dripping noise may occur during water dispense, you may hear the water lines move at high speeds. ge.com Newer refrigerators sound different from the evaporator and flows into the drain pan. ■ Closing the door may hear cracking or popping sounds when ...
...a high-pitched hum or pulsating sound while it is first plugged in and out of the defrost cycle. ■ Expansion and contraction of refrigerant through the freezer cooling coils may make a gurgling noise like boiling water. ■ Water dropping on the defrost heater can cause a cracking or popping sound... cycle. ■ A water dripping noise may occur during water dispense, you may hear the water lines move at high speeds. ge.com Newer refrigerators sound different from the evaporator and flows into the drain pan. ■ Closing the door may hear cracking or popping sounds when ...


