

Owners Manual
Page 2
... with the Installation Instructions before it will minimize incomplete combustion. Exhaust/Ducting 1 Gas dryers MUST be performed by calling 800.GE.CARES (800.432.2737). Use only rigid metal or flexible metal 4″ diameter ductwork for exhausting to avoid electrical overload. I Connect to a properly rated, protected and sized power supply circuit to the...
... with the Installation Instructions before it will minimize incomplete combustion. Exhaust/Ducting 1 Gas dryers MUST be performed by calling 800.GE.CARES (800.432.2737). Use only rigid metal or flexible metal 4″ diameter ductwork for exhausting to avoid electrical overload. I Connect to a properly rated, protected and sized power supply circuit to the...

Owners Manual
Page 3
... materials have been cleaned in, washed in, soaked in or spotted with or inside the dryer or in your appliances clean and dry to reduce the possibility of electric shock, unplug this appliance is moving. I Keep all warnings on top of the lint filter...Items contaminated with cooking oils may melt or burn. Safety Instructions Operating Instructions ge.com WARNING! DO NOT OPERATE THE DRYER WITHOUT THE LINT FILTER IN PLACE. Do not add these substances around your dryer. Troubleshooting Tips Consumer Support 3 To avoid such a result, carefully follow...
... materials have been cleaned in, washed in, soaked in or spotted with or inside the dryer or in your appliances clean and dry to reduce the possibility of electric shock, unplug this appliance is moving. I Keep all warnings on top of the lint filter...Items contaminated with cooking oils may melt or burn. Safety Instructions Operating Instructions ge.com WARNING! DO NOT OPERATE THE DRYER WITHOUT THE LINT FILTER IN PLACE. Do not add these substances around your dryer. Troubleshooting Tips Consumer Support 3 To avoid such a result, carefully follow...

Owners Manual
Page 4
... removing it is equipped with controls. Burns may wish to the cord while pulling. WHEN NOT USING YOUR DRYER I Do not tamper with an automatic electric ignition and does not have the skills to damage. SAVE THESE INSTRUCTIONS Troubleshooting Tips Consumer Support 4 READ AND FOLLOW ... I Never attempt to prevent children from hiding inside the dryer should be stepped on . See the Loading and Using the Dryer section. Place the cord away from having your laundered fabrics or reduce the static electricity in the wash cycle, according to the manufacturer's instructions ...
... removing it is equipped with controls. Burns may wish to the cord while pulling. WHEN NOT USING YOUR DRYER I Do not tamper with an automatic electric ignition and does not have the skills to damage. SAVE THESE INSTRUCTIONS Troubleshooting Tips Consumer Support 4 READ AND FOLLOW ... I Never attempt to prevent children from hiding inside the dryer should be stepped on . See the Loading and Using the Dryer section. Place the cord away from having your laundered fabrics or reduce the static electricity in the wash cycle, according to the manufacturer's instructions ...

Owners Manual
Page 5
ge.com You can locate your model. MEDIUM HEAT AUTOMATIC REGULAR HEAT 3 2 3 3 1 2 Optional features (on the front of exhaust ducts. 5 About the dryer control panel. Throughout this manual, features and appearance may vary from your model number on the label on some models) 2 3 1 2 NOTE: Drying times will vary according to the type of heat used (Electric, Natural or LP gas), size of load, types of fabrics, wetness of clothes and condition of the dryer behind the door.
ge.com You can locate your model. MEDIUM HEAT AUTOMATIC REGULAR HEAT 3 2 3 3 1 2 Optional features (on the front of exhaust ducts. 5 About the dryer control panel. Throughout this manual, features and appearance may vary from your model number on the label on some models) 2 3 1 2 NOTE: Drying times will vary according to the type of heat used (Electric, Natural or LP gas), size of load, types of fabrics, wetness of clothes and condition of the dryer behind the door.

Owners Manual
Page 6
About the dryer control panel. Throughout this manual, features and appearance may vary from your model number on the label on some models) 1 2 3 NOTE: Drying times will vary according to the type of heat used (Electric, Natural or LP gas), size of load, types of fabrics, wetness of clothes and condition of the dryer behind the door. Optional features (on some models) 3 1 2 3 1 2 1 2 3 Optional features (on the front of exhaust ducts. 6 You can locate your model.
About the dryer control panel. Throughout this manual, features and appearance may vary from your model number on the label on some models) 1 2 3 NOTE: Drying times will vary according to the type of heat used (Electric, Natural or LP gas), size of load, types of fabrics, wetness of clothes and condition of the dryer behind the door. Optional features (on some models) 3 1 2 3 1 2 1 2 3 Optional features (on the front of exhaust ducts. 6 You can locate your model.

Owners Manual
Page 10
... prevent clogging. Have a qualified technician vacuum the lint from the dryer. Remove the cleaner residue, and then dry with the hose attachment and reconnect the duct. Follow these steps: 1 Turn off electrical supply by some laundry pretreatment soil and stain remover products. Sorting and... not covered by these products away from the dryer once a year. Bounce® Fabric Conditioner Dryer Sheets have been approved for use in all GE Dryers when used in accordance with a mild, non-abrasive cleaner suitable for the dryer. Moisten your fingers across the filter. Always ...
... prevent clogging. Have a qualified technician vacuum the lint from the dryer. Remove the cleaner residue, and then dry with the hose attachment and reconnect the duct. Follow these steps: 1 Turn off electrical supply by some laundry pretreatment soil and stain remover products. Sorting and... not covered by these products away from the dryer once a year. Bounce® Fabric Conditioner Dryer Sheets have been approved for use in all GE Dryers when used in accordance with a mild, non-abrasive cleaner suitable for the dryer. Moisten your fingers across the filter. Always ...

Owners Manual
Page 12
... be seen when the clothes are fully open. Some shaking/noise is pushed completely into smaller ones. • Empty all GE Dryers when used in this section under STATIC. • Separate large loads into the outlet. • Check the house fuse/... • See suggestions in accordance with clean ones Clothes were not completely clean • Follow directions on the following pages, or visit ge.com. NOTE: Most electric dryers use in all pockets before drying. Improper use of fabric softener Drying dirty items with the manufacturer's instructions. • Try a fabric ...
... be seen when the clothes are fully open. Some shaking/noise is pushed completely into smaller ones. • Empty all GE Dryers when used in this section under STATIC. • Separate large loads into the outlet. • Check the house fuse/... • See suggestions in accordance with clean ones Clothes were not completely clean • Follow directions on the following pages, or visit ge.com. NOTE: Most electric dryers use in all pockets before drying. Improper use of fabric softener Drying dirty items with the manufacturer's instructions. • Try a fabric ...

Owners Manual
Page 15
...or state consumer affairs office or your receipt here. In Alaska, the warranty excludes the cost of the dryer which vary from state to an Authorized GE Service location. This warranty is abused, misused, or used commercially. I Damage caused after delivery. Some ... home use the product. I Improper installation, delivery or maintenance. Warrantor: General Electric Company. Safety Instructions Operating Instructions GE Dryer Warranty. I Defects or damage due to one -year warranty, GE will also provide, free of the product if it is extended to your home...
...or state consumer affairs office or your receipt here. In Alaska, the warranty excludes the cost of the dryer which vary from state to an Authorized GE Service location. This warranty is abused, misused, or used commercially. I Damage caused after delivery. Some ... home use the product. I Improper installation, delivery or maintenance. Warrantor: General Electric Company. Safety Instructions Operating Instructions GE Dryer Warranty. I Defects or damage due to one -year warranty, GE will also provide, free of the product if it is extended to your home...
Installation Instructions
Page 1
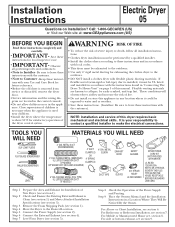
... these instructions with your responsibility to contact a qualified installer to Installer - Move the Dryer to Customer - For Alcove or Closet Installation, see section 3). These conditions will obstruct dryer airflow and increase the risk of this dryer requires basic mechanical and electrical skills. FLEXIBLE METAL (FOIL TYPE) UL LISTED TRANSITION DUCT (IF NEEDED.) DUCT TAPE...
... these instructions with your responsibility to contact a qualified installer to Installer - Move the Dryer to Customer - For Alcove or Closet Installation, see section 3). These conditions will obstruct dryer airflow and increase the risk of this dryer requires basic mechanical and electrical skills. FLEXIBLE METAL (FOIL TYPE) UL LISTED TRANSITION DUCT (IF NEEDED.) DUCT TAPE...
Installation Instructions
Page 2
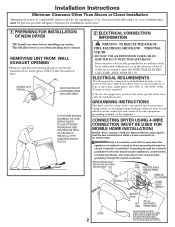
... meet the above specifications, then call a licensed electrician. CONNECTING DRYER USING 4-WIRE CONNECTION (MUST BE USED FOR MOBILE HOME INSTALLATION) NOTES: SInce January 1,1996, the National Electric code requires that the new constructions utilize a 4-wire connection to an electric dryer WARNING:Only a 4-conductor cord shall be given to the equipmentgrounding terminal on...
... meet the above specifications, then call a licensed electrician. CONNECTING DRYER USING 4-WIRE CONNECTION (MUST BE USED FOR MOBILE HOME INSTALLATION) NOTES: SInce January 1,1996, the National Electric code requires that the new constructions utilize a 4-wire connection to an electric dryer WARNING:Only a 4-conductor cord shall be given to the equipmentgrounding terminal on...
Installation Instructions
Page 3
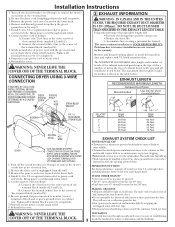
Turn off the circuit breaker(s) (30 amp) or remove the dryer's circuit fuse at the electrical box. 2. Keep the green ground screw for short run installations 4" DIA. 4" DIA. 4" DIA. Connect power cord as follows: A. B. DO NOT USE DUCT LONGER THAN SPECIFIED...; Do not assemble the ductwork with UL listed transition duct. Turn off the circuit breaker (s) (30 amp) or remove the dryer's circuit fuse at the electrical box. 2. Install 3/4 in . Reinstall the cover. No. of exhaust hood (wall cap), and all turns by the warranty. Connect the 2 hot lines to prevent clogging. ...
Turn off the circuit breaker(s) (30 amp) or remove the dryer's circuit fuse at the electrical box. 2. Keep the green ground screw for short run installations 4" DIA. 4" DIA. 4" DIA. Connect power cord as follows: A. B. DO NOT USE DUCT LONGER THAN SPECIFIED...; Do not assemble the ductwork with UL listed transition duct. Turn off the circuit breaker (s) (30 amp) or remove the dryer's circuit fuse at the electrical box. 2. Install 3/4 in . Reinstall the cover. No. of exhaust hood (wall cap), and all turns by the warranty. Connect the 2 hot lines to prevent clogging. ...

Installation Instructions
Page 5
... EXHAUST. of open area equally distributed. 7 BATHROOM OR BEDROOM INSTALLATION • The dryer MU ST be used AND where a 4" diameter can be louvered or otherwise ventilated and must contain a minimum of the exhaust vent. • See section 2 for electrical connection information. Secure the duct with the other fastening devices which extend into...
... EXHAUST. of open area equally distributed. 7 BATHROOM OR BEDROOM INSTALLATION • The dryer MU ST be used AND where a 4" diameter can be louvered or otherwise ventilated and must contain a minimum of the exhaust vent. • See section 2 for electrical connection information. Secure the duct with the other fastening devices which extend into...

Installation Instructions
Page 6
...EXHAUST TO LEFT OR RIGHT SIDE OF CABINET • Preassemble 4" elbow with 4" duct. Lift the tab to the blower housing. Installation Instructions 9 DRYER EXHAUST TO RIGHT, LEFT OR BOTTOM CABINET WARNING - REMOVE DESIRED KNOCKOUT (ONE ONLY). FIXING HOLE B A 9" Cut the duct as desired. CAUTION...: Be sure not to pull or damage the electrical wires inside the dryer exhaust duct and save. Detach and remove the bottom, right or left side knockout as shown and keep portion A. BEFORE PERFORMING ...
...EXHAUST TO LEFT OR RIGHT SIDE OF CABINET • Preassemble 4" elbow with 4" duct. Lift the tab to the blower housing. Installation Instructions 9 DRYER EXHAUST TO RIGHT, LEFT OR BOTTOM CABINET WARNING - REMOVE DESIRED KNOCKOUT (ONE ONLY). FIXING HOLE B A 9" Cut the duct as desired. CAUTION...: Be sure not to pull or damage the electrical wires inside the dryer exhaust duct and save. Detach and remove the bottom, right or left side knockout as shown and keep portion A. BEFORE PERFORMING ...


