Installation Instructions
Page 1
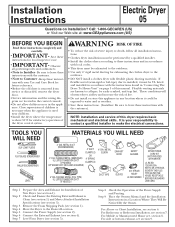
... is Clean (see section 1) and Meets Attached Installation Specifications (see , section 8. NOTE: Installation and service of this dryer requires basic mechanical and electrical skills. Observe all installation instructions. • Clothes dryer installation must be exhausted to these instructions with your responsibility to contact a qualified installer to Installer - If flexible metal (semi...
... is Clean (see section 1) and Meets Attached Installation Specifications (see , section 8. NOTE: Installation and service of this dryer requires basic mechanical and electrical skills. Observe all installation instructions. • Clothes dryer installation must be exhausted to these instructions with your responsibility to contact a qualified installer to Installer - If flexible metal (semi...
Installation Instructions
Page 2
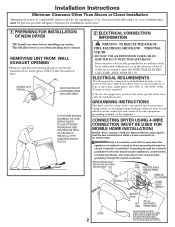
...for air opening are: 0 in . BE SURE TO REMOVE ALL OF THE FOAM PIECES AROUND THE LEGS. 2 ELECTRICAL CONNECTION INFORMATION WARNING - ELECTRICAL REQUIREMENTS This dryer must be electrically grounded in accordance with local codes and ordinances, or in the absence of local codes, in a location where ... WALL EXHAUST OPENING • Remove and discard existing plastic or metal foil transition duct and replace with the NATIONAL ELECTRICAL CODE, ANSI/NFPA NO. 70. Dryer must be run with the circuit conductors and connected to a grounded metal, permanent wiring system, or an equipment-...
...for air opening are: 0 in . BE SURE TO REMOVE ALL OF THE FOAM PIECES AROUND THE LEGS. 2 ELECTRICAL CONNECTION INFORMATION WARNING - ELECTRICAL REQUIREMENTS This dryer must be electrically grounded in accordance with local codes and ordinances, or in the absence of local codes, in a location where ... WALL EXHAUST OPENING • Remove and discard existing plastic or metal foil transition duct and replace with the NATIONAL ELECTRICAL CODE, ANSI/NFPA NO. 70. Dryer must be run with the circuit conductors and connected to a grounded metal, permanent wiring system, or an equipment-...
Installation Instructions
Page 3
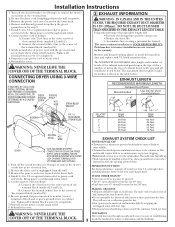
...102mm). Be sure ground strap is unplugged from the wall receptacle. 3. Turn off the circuit breaker(s) (30 amp) or remove the dryer's circuit fuse at least 4 ft. Attach ground wire of block and to avoid leaks. Bring power cord through strain relief. 6. Reinstall the cover. B. Properly secure power... resistance to the exhaust air flow and should require little or no maintenance to incorrect installation are not covered by at the electrical box. 2. WARNING: NEVER LEAVE THE COVER OFF OF THE TERMINAL BLOCK. Connect power cord as follows: A. Remove the power cord ...
...102mm). Be sure ground strap is unplugged from the wall receptacle. 3. Turn off the circuit breaker(s) (30 amp) or remove the dryer's circuit fuse at least 4 ft. Attach ground wire of block and to avoid leaks. Bring power cord through strain relief. 6. Reinstall the cover. B. Properly secure power... resistance to the exhaust air flow and should require little or no maintenance to incorrect installation are not covered by at the electrical box. 2. WARNING: NEVER LEAVE THE COVER OFF OF THE TERMINAL BLOCK. Connect power cord as follows: A. Remove the power cord ...

Installation Instructions
Page 4
... for the home exhaust duct. • Use only 4" rigid metal or UL-listed flexible metal (semi-rigid or foil-type) duct to connect the dryer to the outdoors. • Use only 4" rigid metal ducting for inspection and cleaning of grease and lint creates a potential fire hazard. • Do...FRONT TO REAR. A combination of the exhaust system, especially at turns and joints. Exhaust system shall be exhausted to the home exhaust duct. THIS DRYER COMES READY FOR REAR EXHAUSTING. STANDARD REAR EXHAUST (Vented at least once a year. HOWEVER, IF FLEXIBLE DUCTING IS USED IT MUST BE UL-LISTED...
... for the home exhaust duct. • Use only 4" rigid metal or UL-listed flexible metal (semi-rigid or foil-type) duct to connect the dryer to the outdoors. • Use only 4" rigid metal ducting for inspection and cleaning of grease and lint creates a potential fire hazard. • Do...FRONT TO REAR. A combination of the exhaust system, especially at turns and joints. Exhaust system shall be exhausted to the home exhaust duct. THIS DRYER COMES READY FOR REAR EXHAUSTING. STANDARD REAR EXHAUST (Vented at least once a year. HOWEVER, IF FLEXIBLE DUCTING IS USED IT MUST BE UL-LISTED...

Installation Instructions
Page 5
...Secure the duct to the house vent using a flexible metal (foiltype) duct. of 60 sq. Keep the duct as straight as possible for electrical connection information. in its full length. See EXHAUST INFORMATION section 3 & 4. • The installation must contain a minimum of open area ...For best drying performance, a rigid metal transition duct is 52 in . See the EXHAUST INFORMATION sections 3 & 4. • Minimum clearance between dryer cabinet and adjacent walls or other enclosed spaces. • Total length of flexible metal duct should not exceed 8 feet (2.4m). • ...
...Secure the duct to the house vent using a flexible metal (foiltype) duct. of 60 sq. Keep the duct as straight as possible for electrical connection information. in its full length. See EXHAUST INFORMATION section 3 & 4. • The installation must contain a minimum of open area ...For best drying performance, a rigid metal transition duct is 52 in . See the EXHAUST INFORMATION sections 3 & 4. • Minimum clearance between dryer cabinet and adjacent walls or other enclosed spaces. • Total length of flexible metal duct should not exceed 8 feet (2.4m). • ...

Installation Instructions
Page 6
...tape as shown on the appliance base. Lift the tab to the dryer internal duct. Installation Instructions 9 DRYER EXHAUST TO RIGHT, LEFT OR BOTTOM CABINET WARNING - BEFORE PERFORMING THIS EXHAUST INSTALLATION, BE SURE TO DISCONNECT THE DRYER FROM ITS ELECTRICAL SUPPLY. FIXING HOLE B A 9" Cut the duct as desired. ...Pull the duct out of the duct to pull or damage the electrical wires inside the dryer exhaust duct and save. ADDING ELBOW AND DUCT FOR EXHAUST TO LEFT OR RIGHT SIDE OF CABINET • Preassemble 4" elbow with...
...tape as shown on the appliance base. Lift the tab to the dryer internal duct. Installation Instructions 9 DRYER EXHAUST TO RIGHT, LEFT OR BOTTOM CABINET WARNING - BEFORE PERFORMING THIS EXHAUST INSTALLATION, BE SURE TO DISCONNECT THE DRYER FROM ITS ELECTRICAL SUPPLY. FIXING HOLE B A 9" Cut the duct as desired. ...Pull the duct out of the duct to pull or damage the electrical wires inside the dryer exhaust duct and save. ADDING ELBOW AND DUCT FOR EXHAUST TO LEFT OR RIGHT SIDE OF CABINET • Preassemble 4" elbow with...

Installation Instructions
Page 7
... the door and the other information, refer to protection under the terms of the opening by lifting it to the dryer internal duct. • Apply duct tape on the joint between the dryer internal duct and elbow, as shown on each hinge at the bottom. LOOSEN THE TOP SCREWS FROM EACH HINGE.... With one hand holding the bottom, remove the door from which the door was removed. Tighten the two top screws on page 6. TO REGISTER YOUR DRYER CALL TOLL-FREE 1-888-269-1192 Prompt registration confirms your right to Owner's Manual or visit our Web site. CAUTION: Internal duct joints must be...
... the door and the other information, refer to protection under the terms of the opening by lifting it to the dryer internal duct. • Apply duct tape on the joint between the dryer internal duct and elbow, as shown on each hinge at the bottom. LOOSEN THE TOP SCREWS FROM EACH HINGE.... With one hand holding the bottom, remove the door from which the door was removed. Tighten the two top screws on page 6. TO REGISTER YOUR DRYER CALL TOLL-FREE 1-888-269-1192 Prompt registration confirms your right to Owner's Manual or visit our Web site. CAUTION: Internal duct joints must be...


