Installation Instructions
Page 1
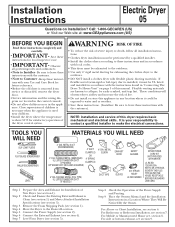
... listed and installed in accordance with the customer. • Note to leave these instructions for exhausting the clothes dryer to make the electrical connections. Connect the Power Supply (see section 9. Be sure to these instructions with the instructions found in ... Note to the Desired Location. METAL ELBOW 4" DIA. Step 8 Step 9 Check the Operation of this dryer requires basic mechanical and electrical skills. Installation Instructions Electric Dryer 05 Questions on page 5 of this manual. Place the Owners Manual and the Installation Instructions in "Connecting...
... listed and installed in accordance with the customer. • Note to leave these instructions for exhausting the clothes dryer to make the electrical connections. Connect the Power Supply (see section 9. Be sure to these instructions with the instructions found in ... Note to the Desired Location. METAL ELBOW 4" DIA. Step 8 Step 9 Check the Operation of this dryer requires basic mechanical and electrical skills. Installation Instructions Electric Dryer 05 Questions on page 5 of this manual. Place the Owners Manual and the Installation Instructions in "Connecting...
Installation Instructions
Page 2
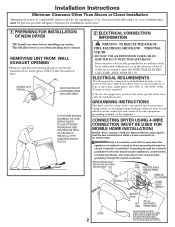
...WIRE CONNECTION (MUST BE USED FOR MOBILE HOME INSTALLATION) NOTES: SInce January 1,1996, the National Electric code requires that the new constructions utilize a 4-wire connection to an electric dryer WARNING:Only a 4-conductor cord shall be connected to an individual branch circuit, protected by the ...required time-delay fuses or circuit breakers. If the electric supply does not meet the above specifications, ...
...WIRE CONNECTION (MUST BE USED FOR MOBILE HOME INSTALLATION) NOTES: SInce January 1,1996, the National Electric code requires that the new constructions utilize a 4-wire connection to an electric dryer WARNING:Only a 4-conductor cord shall be connected to an individual branch circuit, protected by the ...required time-delay fuses or circuit breakers. If the electric supply does not meet the above specifications, ...
Installation Instructions
Page 3
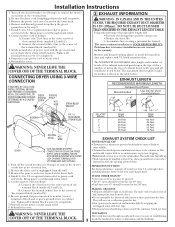
... LIST HOOD OR WALL CAP • Terminate in the table below . Turn off the circuit breaker(s) (30 amp) or remove the dryer's circuit fuse at the electrical box. 2. WARNING: NEVER LEAVE THE COVER OFF OF THE TERMINAL BLOCK. IN CANADA AND IN THE UNITED STATES, THE REQUIRED EXHAUST DUCT...leaks. UL recognized strain relief to strain relief. 8. Be sure ground strap is unplugged from the dryer. • Do not assemble the ductwork with duct tape. • Horizontal runs should be installed at least 4 ft. Attach ground wire of 45º or less may be ignored. • Two 45º...
... LIST HOOD OR WALL CAP • Terminate in the table below . Turn off the circuit breaker(s) (30 amp) or remove the dryer's circuit fuse at the electrical box. 2. WARNING: NEVER LEAVE THE COVER OFF OF THE TERMINAL BLOCK. IN CANADA AND IN THE UNITED STATES, THE REQUIRED EXHAUST DUCT...leaks. UL recognized strain relief to strain relief. 8. Be sure ground strap is unplugged from the dryer. • Do not assemble the ductwork with duct tape. • Horizontal runs should be installed at least 4 ft. Attach ground wire of 45º or less may be ignored. • Two 45º...

Installation Instructions
Page 5
... off and remove excess duct. DO NOT CRUSH FLEXIBLE EXHAUST AGAINST WALL. 6 ALCOVE OR CLOSET INSTALLATION • If your dryer is approved for electrical connection information. in . Installation Instructions, Indoor Exhausting CONNECTING THE DRYER TO HOUSE VENT RIGID METAL TRANSITION DUCT • For best drying performance, a rigid metal transition duct is recommended. •...
... off and remove excess duct. DO NOT CRUSH FLEXIBLE EXHAUST AGAINST WALL. 6 ALCOVE OR CLOSET INSTALLATION • If your dryer is approved for electrical connection information. in . Installation Instructions, Indoor Exhausting CONNECTING THE DRYER TO HOUSE VENT RIGID METAL TRANSITION DUCT • For best drying performance, a rigid metal transition duct is recommended. •...

Installation Instructions
Page 6
BEFORE PERFORMING THIS EXHAUST INSTALLATION, BE SURE TO DISCONNECT THE DRYER FROM ITS ELECTRICAL SUPPLY. BE SURE TO WEAR GLOVES ADDING NEW DUCT FIXING HOLE PORTION "A" REMOVE SCREW AND SAVE. Remove the screw inside the dryer when inserting the duct. REMOVE DESIRED KNOCKOUT (ONE ONLY). FIXING HOLE B A 9" ...duct. Pull the duct out of the duct to pull or damage the electrical wires inside the dryer exhaust duct and save. TAB LOCATION RIGHT OR LEFT SIDE EXHAUST Reconnect the cut portion (A) of the dryer. ADDING ELBOW AND DUCT FOR EXHAUST TO LEFT OR RIGHT SIDE OF ...
BEFORE PERFORMING THIS EXHAUST INSTALLATION, BE SURE TO DISCONNECT THE DRYER FROM ITS ELECTRICAL SUPPLY. BE SURE TO WEAR GLOVES ADDING NEW DUCT FIXING HOLE PORTION "A" REMOVE SCREW AND SAVE. Remove the screw inside the dryer when inserting the duct. REMOVE DESIRED KNOCKOUT (ONE ONLY). FIXING HOLE B A 9" ...duct. Pull the duct out of the duct to pull or damage the electrical wires inside the dryer exhaust duct and save. TAB LOCATION RIGHT OR LEFT SIDE EXHAUST Reconnect the cut portion (A) of the dryer. ADDING ELBOW AND DUCT FOR EXHAUST TO LEFT OR RIGHT SIDE OF ...


