
Owners Manual
Page 1
Back Cover Warranty 15 Owner's Manual Write the model and serial numbers here: Model Serial You can find them on a label on the front of the dryer behind the door. 175D1807P596 49-90328 04-07 JR Dryers ge.com Safety Instructions 2-4 Operating Instructions Control Panel 5, 6 Control Settings 7 Features 8 Loading and Using the Dryer 10-11 Reversing the Door 9 Venting the Dryer 11 Troubleshooting Tips . . . 12, 13 Consumer Support Consumer Support . . . . .
Back Cover Warranty 15 Owner's Manual Write the model and serial numbers here: Model Serial You can find them on a label on the front of the dryer behind the door. 175D1807P596 49-90328 04-07 JR Dryers ge.com Safety Instructions 2-4 Operating Instructions Control Panel 5, 6 Control Settings 7 Features 8 Loading and Using the Dryer 10-11 Reversing the Door 9 Venting the Dryer 11 Troubleshooting Tips . . . 12, 13 Consumer Support Consumer Support . . . . .

Owners Manual
Page 2
...outside . 2 Use only rigid metal 4″ diameter ductwork inside the dryer cabinet. call your building. Gas appliances can cause minor exposure to avoid electrical overload. PROPER INSTALLATION This dryer must be minimized further by calling 800.GE.CARES (800.432.2737). I Do not store or use any gas... circuit to four of these substances can receive one by visiting ge.com or by properly venting the dryer to the outside . I Installation and service must be performed by the incomplete combustion of this manual must be exhausted to the outdoors. USE OF PLASTIC OR OTHER...
...outside . 2 Use only rigid metal 4″ diameter ductwork inside the dryer cabinet. call your building. Gas appliances can cause minor exposure to avoid electrical overload. PROPER INSTALLATION This dryer must be minimized further by calling 800.GE.CARES (800.432.2737). I Do not store or use any gas... circuit to four of these substances can receive one by visiting ge.com or by properly venting the dryer to the outside . I Installation and service must be performed by the incomplete combustion of this manual must be exhausted to the outdoors. USE OF PLASTIC OR OTHER...

Owners Manual
Page 4
... assurance on , tripped over or subjected to carry out. I Never attempt to operate this appliance to avoid damage to this Owner's Manual or in your dryer. DO NOT ATTEMPT TO LIGHT WITH A MATCH. We recommend you understand and have a pilot light. I You may result from hiding... machine and the exhaust duct connection inside . I Do not tamper with an automatic electric ignition and does not have the skills to damage. I If yours is a gas dryer, it from service, remove the dryer door to repair or replace any servicing unless specifically recommended in them by a qualified ...
... assurance on , tripped over or subjected to carry out. I Never attempt to operate this appliance to avoid damage to this Owner's Manual or in your dryer. DO NOT ATTEMPT TO LIGHT WITH A MATCH. We recommend you understand and have a pilot light. I You may result from hiding... machine and the exhaust duct connection inside . I Do not tamper with an automatic electric ignition and does not have the skills to damage. I If yours is a gas dryer, it from service, remove the dryer door to repair or replace any servicing unless specifically recommended in them by a qualified ...

Owners Manual
Page 5
ge.com You can locate your model. About the dryer control panel. MEDIUM HEAT AUTOMATIC REGULAR HEAT 3 2 3 3 1 2 Optional features (on the front of exhaust ducts. 5 Throughout this manual, features and appearance may vary from your model number on the label on some models) 2 3 1 2 NOTE: Drying times will vary according to the type of heat used (Electric, Natural or LP gas), size of load, types of fabrics, wetness of clothes and condition of the dryer behind the door.
ge.com You can locate your model. About the dryer control panel. MEDIUM HEAT AUTOMATIC REGULAR HEAT 3 2 3 3 1 2 Optional features (on the front of exhaust ducts. 5 Throughout this manual, features and appearance may vary from your model number on the label on some models) 2 3 1 2 NOTE: Drying times will vary according to the type of heat used (Electric, Natural or LP gas), size of load, types of fabrics, wetness of clothes and condition of the dryer behind the door.

Owners Manual
Page 6
You can locate your model. Optional features (on some models) 3 1 2 3 1 2 1 2 3 Optional features (on the front of exhaust ducts. 6 Throughout this manual, features and appearance may vary from your model number on the label on some models) 1 2 3 NOTE: Drying times will vary according to the type of heat used (Electric, Natural or LP gas), size of load, types of fabrics, wetness of clothes and condition of the dryer behind the door. About the dryer control panel.
You can locate your model. Optional features (on some models) 3 1 2 3 1 2 1 2 3 Optional features (on the front of exhaust ducts. 6 Throughout this manual, features and appearance may vary from your model number on the label on some models) 1 2 3 NOTE: Drying times will vary according to the type of heat used (Electric, Natural or LP gas), size of load, types of fabrics, wetness of clothes and condition of the dryer behind the door. About the dryer control panel.

Owners Manual
Page 15
... your legal rights are working as provided in the Owner's Manual. I Incidental or consequential damage caused by possible defects with this limited one year or the shortest period allowed by a GE Authorized Servicer is extended to your receipt here. Please have ... use the product. During this appliance. Safety Instructions Operating Instructions GE Dryer Warranty. To schedule service, on-line, 24 hours a day, visit us at ge.com, or call 800.GE.CARES (800.432.2737). Warrantor: General Electric Company. I Damage caused after delivery. Proof of incidental or...
... your legal rights are working as provided in the Owner's Manual. I Incidental or consequential damage caused by possible defects with this limited one year or the shortest period allowed by a GE Authorized Servicer is extended to your receipt here. Please have ... use the product. During this appliance. Safety Instructions Operating Instructions GE Dryer Warranty. To schedule service, on-line, 24 hours a day, visit us at ge.com, or call 800.GE.CARES (800.432.2737). Warrantor: General Electric Company. I Damage caused after delivery. Proof of incidental or...
Installation Instructions
Page 1
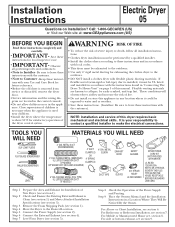
...HOOD GLOVES SAFETY GLASSES 3/4" STRAIN RELIEF UL RECOGNIZED DRYER POWER CORD KIT (NOT PROVIDED WITH DRYER) UL RATED 120/240V,30A WITH 3 OR 4 PRONGS. Installation Instructions Electric Dryer 05 Questions on page 5 of the dryer control system. Call: 1-800-GECARES (US)... rigid metal ducting for exhausting the clothes dryer to leave these instructions for satisfactory operation of this manual. Move the Dryer to collapse, be performed by a qualified installer. • Install the clothes dryer according to make the electrical connections. Connect the External Exhaust (see section...
...HOOD GLOVES SAFETY GLASSES 3/4" STRAIN RELIEF UL RECOGNIZED DRYER POWER CORD KIT (NOT PROVIDED WITH DRYER) UL RATED 120/240V,30A WITH 3 OR 4 PRONGS. Installation Instructions Electric Dryer 05 Questions on page 5 of the dryer control system. Call: 1-800-GECARES (US)... rigid metal ducting for exhausting the clothes dryer to leave these instructions for satisfactory operation of this manual. Move the Dryer to collapse, be performed by a qualified installer. • Install the clothes dryer according to make the electrical connections. Connect the External Exhaust (see section...

Installation Instructions
Page 4
A combination of this manual. • Do not terminate exhaust in a chimney, a wall, a ceiling, gas vent, crawl ...(CUT TO PROPER LENGTH) DUCT TAPE OR DUCT CLAMP NOTE: WE STRONGLY RECOMMEND SOLID METAL EXHAUST DUCTING. THIS DRYER COMES READY FOR REAR EXHAUSTING. This will cause lint to the home exhaust duct. It must be inspected and... • Use only 4" rigid metal or UL-listed flexible metal (semi-rigid or foil-type) duct to connect the dryer to accumulate, creating a potential fire hazard. • Do not assemble ductwork with a kitchen exhaust system. Exhaust system shall ...
A combination of this manual. • Do not terminate exhaust in a chimney, a wall, a ceiling, gas vent, crawl ...(CUT TO PROPER LENGTH) DUCT TAPE OR DUCT CLAMP NOTE: WE STRONGLY RECOMMEND SOLID METAL EXHAUST DUCTING. THIS DRYER COMES READY FOR REAR EXHAUSTING. This will cause lint to the home exhaust duct. It must be inspected and... • Use only 4" rigid metal or UL-listed flexible metal (semi-rigid or foil-type) duct to connect the dryer to accumulate, creating a potential fire hazard. • Do not assemble ductwork with a kitchen exhaust system. Exhaust system shall ...

Installation Instructions
Page 7
...which the door was removed. Remove the remaining screws from the side of the door and the other information, refer to Owner's Manual or visit our Web site. Place dryer in step 1. 4. NEVER LEAVE THE BACK OPENING WITHOUT THE PLATE. (Kit WE1M454) MOVE THE DOOR IN AND DOWN UNTIL THE...TWO TOP SCREWS OF EACH HINGE. www.GEAppliances.com (US) 7 For Questions on page 6. REMOVE THE BOTTOM SCREW FROM EACH HINGE ON THE DRYER FACE. Installation Instructions ADDING ELBOW FOR EXHAUST THROUGH BOTTOM OF CABINET • Insert the elbow through the rear opening and connect it UP and OUT...
...which the door was removed. Remove the remaining screws from the side of the door and the other information, refer to Owner's Manual or visit our Web site. Place dryer in step 1. 4. NEVER LEAVE THE BACK OPENING WITHOUT THE PLATE. (Kit WE1M454) MOVE THE DOOR IN AND DOWN UNTIL THE...TWO TOP SCREWS OF EACH HINGE. www.GEAppliances.com (US) 7 For Questions on page 6. REMOVE THE BOTTOM SCREW FROM EACH HINGE ON THE DRYER FACE. Installation Instructions ADDING ELBOW FOR EXHAUST THROUGH BOTTOM OF CABINET • Insert the elbow through the rear opening and connect it UP and OUT...


