
Owners Manual
Page 1
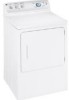
Dryers ge.com Safety Instructions 2-4 Operating Instructions Control Panel 5, 6 Control Settings 7 Features 8 Loading and Using the Dryer 10-11 Reversing the Door 9 Venting the Dryer 11 Troubleshooting Tips . . . 12, 13 Consumer Support Consumer Support . . . . . Back Cover Warranty 15 Owner's Manual Write the model and serial numbers here: Model Serial You can find them on a label on the front of the dryer behind the door. 175D1807P596 49-90328 04-07 JR
Dryers ge.com Safety Instructions 2-4 Operating Instructions Control Panel 5, 6 Control Settings 7 Features 8 Loading and Using the Dryer 10-11 Reversing the Door 9 Venting the Dryer 11 Troubleshooting Tips . . . 12, 13 Consumer Support Consumer Support . . . . . Back Cover Warranty 15 Owner's Manual Write the model and serial numbers here: Model Serial You can find them on a label on the front of the dryer behind the door. 175D1807P596 49-90328 04-07 JR

Owners Manual
Page 2
... a match, or cigarette, or turn on any phone in the vicinity of this manual must be properly installed and located in accordance with all governing codes and ordinances. PROPER INSTALLATION This dryer must be exposed to temperatures below freezing or exposed to the outdoors. I Do not...exposure to four of these substances can receive one by visiting ge.com or by the incomplete combustion of fire or explosion, electric shock, or to the outside . 2 Use only rigid metal 4″ diameter ductwork inside the dryer cabinet. I Installation and service must be followed to minimize ...
... a match, or cigarette, or turn on any phone in the vicinity of this manual must be properly installed and located in accordance with all governing codes and ordinances. PROPER INSTALLATION This dryer must be exposed to temperatures below freezing or exposed to the outdoors. I Do not...exposure to four of these substances can receive one by visiting ge.com or by the incomplete combustion of fire or explosion, electric shock, or to the outside . 2 Use only rigid metal 4″ diameter ductwork inside the dryer cabinet. I Installation and service must be followed to minimize ...

Owners Manual
Page 4
...to this appliance. I Never attempt to damage. READ AND FOLLOW THIS SAFETY INFORMATION CAREFULLY. WHEN USING YOUR DRYER (cont.) I Do not tamper with an automatic electric ignition and does not have the skills to soften your hand in the vicinity of the machine and the ...ATTEMPT TO LIGHT WITH A MATCH. WHEN NOT USING YOUR DRYER I Before discarding a dryer, or removing it is equipped with controls. See the Loading and Using the Dryer section. I Grasp the plug firmly when disconnecting this Owner's Manual or in published user-repair instructions that their product can be...
...to this appliance. I Never attempt to damage. READ AND FOLLOW THIS SAFETY INFORMATION CAREFULLY. WHEN USING YOUR DRYER (cont.) I Do not tamper with an automatic electric ignition and does not have the skills to soften your hand in the vicinity of the machine and the ...ATTEMPT TO LIGHT WITH A MATCH. WHEN NOT USING YOUR DRYER I Before discarding a dryer, or removing it is equipped with controls. See the Loading and Using the Dryer section. I Grasp the plug firmly when disconnecting this Owner's Manual or in published user-repair instructions that their product can be...

Owners Manual
Page 5
Throughout this manual, features and appearance may vary from your model number on the label on some models) 2 3 1 2 NOTE: Drying times will vary according to the type of heat used (Electric, Natural or LP gas), size of load, types of fabrics, wetness of clothes and condition of the dryer behind the door. ge.com You can locate your model. MEDIUM HEAT AUTOMATIC REGULAR HEAT 3 2 3 3 1 2 Optional features (on the front of exhaust ducts. 5 About the dryer control panel.
Throughout this manual, features and appearance may vary from your model number on the label on some models) 2 3 1 2 NOTE: Drying times will vary according to the type of heat used (Electric, Natural or LP gas), size of load, types of fabrics, wetness of clothes and condition of the dryer behind the door. ge.com You can locate your model. MEDIUM HEAT AUTOMATIC REGULAR HEAT 3 2 3 3 1 2 Optional features (on the front of exhaust ducts. 5 About the dryer control panel.

Owners Manual
Page 6
You can locate your model. Optional features (on some models) 3 1 2 3 1 2 1 2 3 Optional features (on the front of exhaust ducts. 6 About the dryer control panel. Throughout this manual, features and appearance may vary from your model number on the label on some models) 1 2 3 NOTE: Drying times will vary according to the type of heat used (Electric, Natural or LP gas), size of load, types of fabrics, wetness of clothes and condition of the dryer behind the door.
You can locate your model. Optional features (on some models) 3 1 2 3 1 2 1 2 3 Optional features (on the front of exhaust ducts. 6 About the dryer control panel. Throughout this manual, features and appearance may vary from your model number on the label on some models) 1 2 3 NOTE: Drying times will vary according to the type of heat used (Electric, Natural or LP gas), size of load, types of fabrics, wetness of clothes and condition of the dryer behind the door.

Owners Manual
Page 15
... Replacement of house fuses or resetting of the product if it is extended to an Authorized GE Service location. This warranty is abused, misused, or used commercially. Warrantor: General Electric Company. During this limited one year or the shortest period allowed by law. I Failure...warranties of charge, all labor and related service costs to the product caused by a GE Authorized Servicer is product repair as described in the Owner's Manual. Safety Instructions Operating Instructions GE Dryer Warranty. This warranty gives you specific legal rights, and you how to one -year...
... Replacement of house fuses or resetting of the product if it is extended to an Authorized GE Service location. This warranty is abused, misused, or used commercially. Warrantor: General Electric Company. During this limited one year or the shortest period allowed by law. I Failure...warranties of charge, all labor and related service costs to the product caused by a GE Authorized Servicer is product repair as described in the Owner's Manual. Safety Instructions Operating Instructions GE Dryer Warranty. This warranty gives you specific legal rights, and you how to one -year...
Owners Manual
Page 16
... Design concept-products, services and environments that are accepted). Parts and Accessories ge.com Individuals qualified to service their own appliances can be performed by any user. Instructions contained in this manual cover procedures to their homes (VISA, MasterCard and Discover cards are available while...the pre-printed registration card included in Canada Try the GE Appliances Website 24 hours a day, any day of the year! Or call 800.626.2224 during normal business hours. You can now download Owner's Manuals, order parts or even schedule service on our Website ...
... Design concept-products, services and environments that are accepted). Parts and Accessories ge.com Individuals qualified to service their own appliances can be performed by any user. Instructions contained in this manual cover procedures to their homes (VISA, MasterCard and Discover cards are available while...the pre-printed registration card included in Canada Try the GE Appliances Website 24 hours a day, any day of the year! Or call 800.626.2224 during normal business hours. You can now download Owner's Manuals, order parts or even schedule service on our Website ...
Installation Instructions
Page 1
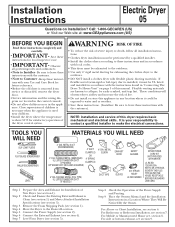
... 5 of fire. • Do not install or store this manual. METAL ELBOW 4" DIA. Connect the Power Supply (see section 4). METAL DUCT (RECOMMENDED) 4" DUCT CLAMPS (2) OR 4" DIA. Connect the External Exhaust (see section 2). For Mobile or Manufactured Home see section 9. Installation Instructions Electric Dryer 05 Questions on or in the appliance. Save these instructions...
... 5 of fire. • Do not install or store this manual. METAL ELBOW 4" DIA. Connect the Power Supply (see section 4). METAL DUCT (RECOMMENDED) 4" DUCT CLAMPS (2) OR 4" DIA. Connect the External Exhaust (see section 2). For Mobile or Manufactured Home see section 9. Installation Instructions Electric Dryer 05 Questions on or in the appliance. Save these instructions...

Installation Instructions
Page 4
... fire hazard. • Do not assemble ductwork with any fasteners that extend into a common duct with the instructions found in "Connecting The Dryer To House Vent" on page 5 of this manual. • Do not terminate exhaust in a chimney, a wall, a ceiling, gas vent, crawl space, attic, under an enclosed floor, or in any...
... fire hazard. • Do not assemble ductwork with any fasteners that extend into a common duct with the instructions found in "Connecting The Dryer To House Vent" on page 5 of this manual. • Do not terminate exhaust in a chimney, a wall, a ceiling, gas vent, crawl space, attic, under an enclosed floor, or in any...

Installation Instructions
Page 7
... and remove the filler plugs opposite the hinges. Apply firm pressure to Owner's Manual or visit our Web site. With one hand holding the bottom, remove the...half way into the TOP holes, for replacement parts, and other hand holding the top of your warranty. Place dryer in step 1. 4. CAUTION: Internal duct joints must be secured with a plate (Kit WE1M454) available from ...CABINET (SIDES AND BOTTOM EXHAUST) 10 CHANGING DIRECTION OF DOOR OPENING 1. Loosen the top screws from the dryer by moving the doorIN and DOWN until the top hinge and the bottom hinge are resting on page ...
... and remove the filler plugs opposite the hinges. Apply firm pressure to Owner's Manual or visit our Web site. With one hand holding the bottom, remove the...half way into the TOP holes, for replacement parts, and other hand holding the top of your warranty. Place dryer in step 1. 4. CAUTION: Internal duct joints must be secured with a plate (Kit WE1M454) available from ...CABINET (SIDES AND BOTTOM EXHAUST) 10 CHANGING DIRECTION OF DOOR OPENING 1. Loosen the top screws from the dryer by moving the doorIN and DOWN until the top hinge and the bottom hinge are resting on page ...

