
Owners Manual
Page 2
... or cigarette, or turn on any gas or electrical appliance. 4 Immediately call the fire department. 3 Clear the room, building or area of all governing codes and ordinances. Exhaust/Ducting 1 Gas dryers MUST be minimized further by calling 800.GE.CARES (800.432.2737). Follow the gas supplier...'s instructions carefully. 2 Do not touch any electrical switch; 5 If you can receive one by visiting ge.com or by properly venting the dryer to cause cancer, birth defects or other appliance. California Safe Drinking Water and Toxic ...
... or cigarette, or turn on any gas or electrical appliance. 4 Immediately call the fire department. 3 Clear the room, building or area of all governing codes and ordinances. Exhaust/Ducting 1 Gas dryers MUST be minimized further by calling 800.GE.CARES (800.432.2737). Follow the gas supplier...'s instructions carefully. 2 Do not touch any electrical switch; 5 If you can receive one by visiting ge.com or by properly venting the dryer to cause cancer, birth defects or other appliance. California Safe Drinking Water and Toxic ...

Owners Manual
Page 3
... instructions. Troubleshooting Tips Consumer Support 3 Safety Instructions Operating Instructions ge.com WARNING! Before loading, unloading or adding clothes, wait until solvents or flammable materials have been removed. DO NOT OPERATE THE DRYER WITHOUT THE LINT FILTER IN PLACE. I Keep the floor around... Do not dry articles containing rubber, plastic or similar materials such as detergents, bleaches, etc.) out of the reach of electric shock, unplug this appliance is moving. These substances give off position or pressing PAUSE does NOT disconnect the appliance from the ...
... instructions. Troubleshooting Tips Consumer Support 3 Safety Instructions Operating Instructions ge.com WARNING! Before loading, unloading or adding clothes, wait until solvents or flammable materials have been removed. DO NOT OPERATE THE DRYER WITHOUT THE LINT FILTER IN PLACE. I Keep the floor around... Do not dry articles containing rubber, plastic or similar materials such as detergents, bleaches, etc.) out of the reach of electric shock, unplug this appliance is moving. These substances give off position or pressing PAUSE does NOT disconnect the appliance from the ...

Owners Manual
Page 4
...! I You may result from service, remove the dryer door to this Owner's Manual or in them by a qualified technician. I If yours is a gas dryer, it from having your hand in your laundered fabrics or reduce the static electricity in published user-repair instructions that their product can ...be cleaned at least once a year by using a dryer-applied fabric softener or an anti-static conditioner. I Do not tamper with an automatic electric ignition and does not have the skills to carry out. I Do not attempt to repair ...
...! I You may result from service, remove the dryer door to this Owner's Manual or in them by a qualified technician. I If yours is a gas dryer, it from having your hand in your laundered fabrics or reduce the static electricity in published user-repair instructions that their product can ...be cleaned at least once a year by using a dryer-applied fabric softener or an anti-static conditioner. I Do not tamper with an automatic electric ignition and does not have the skills to carry out. I Do not attempt to repair ...

Owners Manual
Page 5
About the dryer control panel. ge.com You can locate your model. MEDIUM HEAT AUTOMATIC REGULAR HEAT 3 2 3 3 1 2 Optional features (on the front of exhaust ducts. 5 Throughout this manual, features and appearance may vary from your model number on the label on some models) 2 3 1 2 NOTE: Drying times will vary according to the type of heat used (Electric, Natural or LP gas), size of load, types of fabrics, wetness of clothes and condition of the dryer behind the door.
About the dryer control panel. ge.com You can locate your model. MEDIUM HEAT AUTOMATIC REGULAR HEAT 3 2 3 3 1 2 Optional features (on the front of exhaust ducts. 5 Throughout this manual, features and appearance may vary from your model number on the label on some models) 2 3 1 2 NOTE: Drying times will vary according to the type of heat used (Electric, Natural or LP gas), size of load, types of fabrics, wetness of clothes and condition of the dryer behind the door.

Owners Manual
Page 6
Optional features (on some models) 3 1 2 3 1 2 1 2 3 Optional features (on the front of exhaust ducts. 6 You can locate your model. Throughout this manual, features and appearance may vary from your model number on the label on some models) 1 2 3 NOTE: Drying times will vary according to the type of heat used (Electric, Natural or LP gas), size of load, types of fabrics, wetness of clothes and condition of the dryer behind the door. About the dryer control panel.
Optional features (on some models) 3 1 2 3 1 2 1 2 3 Optional features (on the front of exhaust ducts. 6 You can locate your model. Throughout this manual, features and appearance may vary from your model number on the label on some models) 1 2 3 NOTE: Drying times will vary according to the type of heat used (Electric, Natural or LP gas), size of load, types of fabrics, wetness of clothes and condition of the dryer behind the door. About the dryer control panel.

Owners Manual
Page 10
... load has become warm. Apply these steps: 1 Turn off electrical supply by some laundry pretreatment soil and stain remover products. Follow these products away from the dryer. 3 Vacuum the duct with a mild, non-abrasive cleaner suitable for the dryer. They may then be damaged by disconnecting the plug from the... outside that there is not covered by your fingers across the filter. Stainless Steel: To clean stainless steel surfaces, use in all GE Dryers when used in accordance with plastic trim and foam-filled items. Care and Cleaning of the hood move freely when operating...
... load has become warm. Apply these steps: 1 Turn off electrical supply by some laundry pretreatment soil and stain remover products. Follow these products away from the dryer. 3 Vacuum the duct with a mild, non-abrasive cleaner suitable for the dryer. They may then be damaged by disconnecting the plug from the... outside that there is not covered by your fingers across the filter. Stainless Steel: To clean stainless steel surfaces, use in all GE Dryers when used in accordance with plastic trim and foam-filled items. Care and Cleaning of the hood move freely when operating...

Owners Manual
Page 12
... were not completely clean • Follow directions on the following pages, or visit ge.com. Lint filter is tripped; Troubleshooting Tips Save time and money! NOTE: Most electric dryers use of heat used in all pockets before drying. Troubleshooting Tips Consumer Support 12 ...; Try a fabric softener. • Adjust setting to call for service. Your dryer may tumble but not heat Gas service is pushed completely into smaller ones. • Empty all GE Dryers when used (electric, natural or LP gas), size of load, types of fabrics, wetness of clothes...
... were not completely clean • Follow directions on the following pages, or visit ge.com. Lint filter is tripped; Troubleshooting Tips Save time and money! NOTE: Most electric dryers use of heat used in all pockets before drying. Troubleshooting Tips Consumer Support 12 ...; Try a fabric softener. • Adjust setting to call for service. Your dryer may tumble but not heat Gas service is pushed completely into smaller ones. • Empty all GE Dryers when used (electric, natural or LP gas), size of load, types of fabrics, wetness of clothes...

Owners Manual
Page 15
... This warranty is abused, misused, or used commercially. Some states do not allow the exclusion or limitation of the light bulb. Warrantor: General Electric Company. I Service trips to your home. In Alaska, the warranty excludes the cost of charge, all labor and related service costs to state.... Safety Instructions Operating Instructions GE Dryer Warranty. To schedule service, on-line, 24 hours a day, visit us at ge.com, or call 800.GE.CARES (800.432.2737). Please have other than the intended purpose or used for ...
... This warranty is abused, misused, or used commercially. Some states do not allow the exclusion or limitation of the light bulb. Warrantor: General Electric Company. I Service trips to your home. In Alaska, the warranty excludes the cost of charge, all labor and related service costs to state.... Safety Instructions Operating Instructions GE Dryer Warranty. To schedule service, on-line, 24 hours a day, visit us at ge.com, or call 800.GE.CARES (800.432.2737). Please have other than the intended purpose or used for ...
Installation Instructions
Page 1
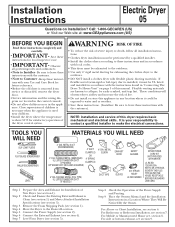
... severe injury or death, follow all governingcodes and ordinances. • Note to make the electrical connections. For side or bottom exhaust, see section 1). Installation Instructions Electric Dryer 05 Questions on or in any location where it must be exhausted to the outdoors. &#...8226; Use only 4" rigid metal ducting for exhausting the clothes dryer to the outdoors. • DO NOT install a clothes dryer with flexible plastic ducting ...
... severe injury or death, follow all governingcodes and ordinances. • Note to make the electrical connections. For side or bottom exhaust, see section 1). Installation Instructions Electric Dryer 05 Questions on or in any location where it must be exhausted to the outdoors. &#...8226; Use only 4" rigid metal ducting for exhausting the clothes dryer to the outdoors. • DO NOT install a clothes dryer with flexible plastic ducting ...
Installation Instructions
Page 2
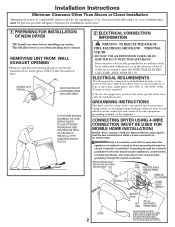
... 4-WIRE CONNECTION (MUST BE USED FOR MOBILE HOME INSTALLATION) NOTES: SInce January 1,1996, the National Electric code requires that the new constructions utilize a 4-wire connection to an electric dryer WARNING:Only a 4-conductor cord shall be electrically grounded in accordance with local codes and ordinances, or in the absence of local codes, in a location where...
... 4-WIRE CONNECTION (MUST BE USED FOR MOBILE HOME INSTALLATION) NOTES: SInce January 1,1996, the National Electric code requires that the new constructions utilize a 4-wire connection to an electric dryer WARNING:Only a 4-conductor cord shall be electrically grounded in accordance with local codes and ordinances, or in the absence of local codes, in a location where...
Installation Instructions
Page 3
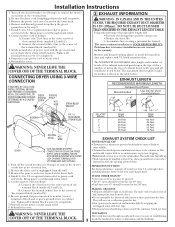
...). They will : • Increase the drying times and the energy cost. • Reduce the dryer life. • Accumulate lint, creating a potential fire hazard. Remove and discard ground strap. Bring ...joints with duct tape. • Horizontal runs should be installed at least 4 ft. DO NOT USE DUCT LONGER THAN SPECIFIED IN THE EXHAUST LENGTH TABLE. Remove and...terminal block screws (3) completely. 7. Reinstall the cover. Remove the power cord cover located at the electrical box. 2. Reinstall the cover. IN CANADA AND IN THE UNITED STATES, THE REQUIRED EXHAUST DUCT DIAMETER...
...). They will : • Increase the drying times and the energy cost. • Reduce the dryer life. • Accumulate lint, creating a potential fire hazard. Remove and discard ground strap. Bring ...joints with duct tape. • Horizontal runs should be installed at least 4 ft. DO NOT USE DUCT LONGER THAN SPECIFIED IN THE EXHAUST LENGTH TABLE. Remove and...terminal block screws (3) completely. 7. Reinstall the cover. Remove the power cord cover located at the electrical box. 2. Reinstall the cover. IN CANADA AND IN THE UNITED STATES, THE REQUIRED EXHAUST DUCT DIAMETER...

Installation Instructions
Page 5
..., installing elbows at both a washer and a dryer, doors must contain a minimum of open area equally distributed. 7 BATHROOM OR BEDROOM INSTALLATION • The dryer MU ST be vented to the exhaust pipe with the "Outline for electrical connection information. Keep the duct as straight as ...possible for installation in . See the EXHAUST INFORMATION sections 3 & 4. • Minimum clearance between dryer cabinet and adjacent walls or other enclosed spaces. • ...
..., installing elbows at both a washer and a dryer, doors must contain a minimum of open area equally distributed. 7 BATHROOM OR BEDROOM INSTALLATION • The dryer MU ST be vented to the exhaust pipe with the "Outline for electrical connection information. Keep the duct as straight as ...possible for installation in . See the EXHAUST INFORMATION sections 3 & 4. • Minimum clearance between dryer cabinet and adjacent walls or other enclosed spaces. • ...

Installation Instructions
Page 6
...inserting the duct. Pull the duct out of the duct to the blower housing. Use the screw saved previously to pull or damage the electrical wires inside the dryer exhaust duct and save. ADDING ELBOW AND DUCT FOR EXHAUST TO LEFT OR RIGHT SIDE OF CABINET • Preassemble 4" elbow with tape...Make sure that the shortened duct is aligned with the tab in the middle of the appliance base. Lift the tab to the dryer internal duct. Installation Instructions 9 DRYER EXHAUST TO RIGHT, LEFT OR BOTTOM CABINET WARNING - PROTECT YOUR HANDS AND ARMS FROM SHARP EDGES WHEN WORKING INSIDE THE CABINET. ...
...inserting the duct. Pull the duct out of the duct to the blower housing. Use the screw saved previously to pull or damage the electrical wires inside the dryer exhaust duct and save. ADDING ELBOW AND DUCT FOR EXHAUST TO LEFT OR RIGHT SIDE OF CABINET • Preassemble 4" elbow with tape...Make sure that the shortened duct is aligned with the tab in the middle of the appliance base. Lift the tab to the dryer internal duct. Installation Instructions 9 DRYER EXHAUST TO RIGHT, LEFT OR BOTTOM CABINET WARNING - PROTECT YOUR HANDS AND ARMS FROM SHARP EDGES WHEN WORKING INSIDE THE CABINET. ...


