
Owners Manual
Page 1
Back Cover Warranty 15 Owner's Manual Write the model and serial numbers here: Model Serial You can find them on a label on the front of the dryer behind the door. 175D1807P596 49-90328 04-07 JR Dryers ge.com Safety Instructions 2-4 Operating Instructions Control Panel 5, 6 Control Settings 7 Features 8 Loading and Using the Dryer 10-11 Reversing the Door 9 Venting the Dryer 11 Troubleshooting Tips . . . 12, 13 Consumer Support Consumer Support . . . . .
Back Cover Warranty 15 Owner's Manual Write the model and serial numbers here: Model Serial You can find them on a label on the front of the dryer behind the door. 175D1807P596 49-90328 04-07 JR Dryers ge.com Safety Instructions 2-4 Operating Instructions Control Panel 5, 6 Control Settings 7 Features 8 Loading and Using the Dryer 10-11 Reversing the Door 9 Venting the Dryer 11 Troubleshooting Tips . . . 12, 13 Consumer Support Consumer Support . . . . .

Owners Manual
Page 2
...any other reproductive harm and requires businesses to warn customers of fire or explosion, electric shock, or to the outside . 2 Use only rigid metal 4″ diameter ductwork inside the dryer cabinet. I Remove all sharp packing items and dispose of natural gas or ...electrical switch; 5 If you can receive one by visiting ge.com or by the incomplete combustion of all shipping materials properly. READ ALL INSTRUCTIONS BEFORE USING. Exposure to these substances can cause minor exposure to four of substances known to the state to such substances. Properly adjusted dryers...
...any other reproductive harm and requires businesses to warn customers of fire or explosion, electric shock, or to the outside . 2 Use only rigid metal 4″ diameter ductwork inside the dryer cabinet. I Remove all sharp packing items and dispose of natural gas or ...electrical switch; 5 If you can receive one by visiting ge.com or by the incomplete combustion of all shipping materials properly. READ ALL INSTRUCTIONS BEFORE USING. Exposure to these substances can cause minor exposure to four of substances known to the state to such substances. Properly adjusted dryers...

Owners Manual
Page 3
... appliance is used in the room. I Keep the area underneath and around your dryer. Safety Instructions Operating Instructions ge.com WARNING! YOUR LAUNDRY AREA I To minimize the possibility of the dryer during operation. I Keep all warnings on top of electric shock, unplug this appliance from Heat or Do Not Tumble Dry (such as wax...
... appliance is used in the room. I Keep the area underneath and around your dryer. Safety Instructions Operating Instructions ge.com WARNING! YOUR LAUNDRY AREA I To minimize the possibility of the dryer during operation. I Keep all warnings on top of electric shock, unplug this appliance from Heat or Do Not Tumble Dry (such as wax...

Owners Manual
Page 4
... Troubleshooting Tips Consumer Support 4 Safety Instructions Operating Instructions IMPORTANT SAFETY INFORMATION. WHEN NOT USING YOUR DRYER I Do not tamper with an automatic electric ignition and does not have the skills to prevent children from having your laundered fabrics or reduce... the static electricity in published user-repair instructions that their product can be stepped on . I If yours is a gas dryer, it from service, remove the dryer door to carry out. WARNING! I Before discarding a dryer, or removing it is damaged,...
... Troubleshooting Tips Consumer Support 4 Safety Instructions Operating Instructions IMPORTANT SAFETY INFORMATION. WHEN NOT USING YOUR DRYER I Do not tamper with an automatic electric ignition and does not have the skills to prevent children from having your laundered fabrics or reduce... the static electricity in published user-repair instructions that their product can be stepped on . I If yours is a gas dryer, it from service, remove the dryer door to carry out. WARNING! I Before discarding a dryer, or removing it is damaged,...

Owners Manual
Page 5
ge.com You can locate your model. Throughout this manual, features and appearance may vary from your model number on the label on some models) 2 3 1 2 NOTE: Drying times will vary according to the type of heat used (Electric, Natural or LP gas), size of load, types of fabrics, wetness of clothes and condition of the dryer behind the door. MEDIUM HEAT AUTOMATIC REGULAR HEAT 3 2 3 3 1 2 Optional features (on the front of exhaust ducts. 5 About the dryer control panel.
ge.com You can locate your model. Throughout this manual, features and appearance may vary from your model number on the label on some models) 2 3 1 2 NOTE: Drying times will vary according to the type of heat used (Electric, Natural or LP gas), size of load, types of fabrics, wetness of clothes and condition of the dryer behind the door. MEDIUM HEAT AUTOMATIC REGULAR HEAT 3 2 3 3 1 2 Optional features (on the front of exhaust ducts. 5 About the dryer control panel.

Owners Manual
Page 6
You can locate your model. Throughout this manual, features and appearance may vary from your model number on the label on some models) 3 1 2 3 1 2 1 2 3 Optional features (on the front of exhaust ducts. 6 Optional features (on some models) 1 2 3 NOTE: Drying times will vary according to the type of heat used (Electric, Natural or LP gas), size of load, types of fabrics, wetness of clothes and condition of the dryer behind the door. About the dryer control panel.
You can locate your model. Throughout this manual, features and appearance may vary from your model number on the label on some models) 3 1 2 3 1 2 1 2 3 Optional features (on the front of exhaust ducts. 6 Optional features (on some models) 1 2 3 NOTE: Drying times will vary according to the type of heat used (Electric, Natural or LP gas), size of load, types of fabrics, wetness of clothes and condition of the dryer behind the door. About the dryer control panel.

Owners Manual
Page 7
... each time you want your clothes slightly damp at the desired drying time. or COTTONS REG. Match the particular color below the words with an *. ge.com 1 Fabric Care/Temperature (on some models) REGULAR For regular to complete the cycle. For most linens. Select START. Example: Drying a load ... cottons. Select LESS DRY if you have chosen-for this load it would be the EASY CARE AUTOMATIC. Select MORE DRY if you use the dryer. Use the TIMED DRY cycle. EASY CARE/ For wrinkle-free, permanent press and delicate items, and knits. Provides 10 minutes of clothing labeled...
... each time you want your clothes slightly damp at the desired drying time. or COTTONS REG. Match the particular color below the words with an *. ge.com 1 Fabric Care/Temperature (on some models) REGULAR For regular to complete the cycle. For most linens. Select START. Example: Drying a load ... cottons. Select LESS DRY if you have chosen-for this load it would be the EASY CARE AUTOMATIC. Select MORE DRY if you use the dryer. Use the TIMED DRY cycle. EASY CARE/ For wrinkle-free, permanent press and delicate items, and knits. Provides 10 minutes of clothing labeled...

Owners Manual
Page 8
... Signal especially when drying fabrics like polyester knits and permanent press. Automatic Cycle Signal (on hangers so wrinkles won 't set in a GE dryer. If the dryer drum should be used to remove the clothes. Cycle Signal Option (on some models) At the end of the drying time and several...the sound of no-heat tumbling after the clothes are using the CYCLE SIGNAL knob and you to minimize the wrinkles in the dryer. It provides approximately 15 minutes of no-heat tumbling after the laundry is approximately 15 minutes of the signal. Safety Instructions Operating...
... Signal especially when drying fabrics like polyester knits and permanent press. Automatic Cycle Signal (on hangers so wrinkles won 't set in a GE dryer. If the dryer drum should be used to remove the clothes. Cycle Signal Option (on some models) At the end of the drying time and several...the sound of no-heat tumbling after the clothes are using the CYCLE SIGNAL knob and you to minimize the wrinkles in the dryer. It provides approximately 15 minutes of no-heat tumbling after the laundry is approximately 15 minutes of the signal. Safety Instructions Operating...

Owners Manual
Page 9
... was removed. Apply firm pressure to get the screw started in step 1. 4 Remove the remaining screws from the side of each hinge at the bottom. ge.com Reversing the Door Tools needed: I Standard #2 I Tape-tipped I Phillips screwdriver I putty knife 1 Open the door and remove the filler plugs opposite the ... the door 180°. With these screws about half way into the TOP holes, for each hinge on the dryer face. Reinsert the plastic plugs on the side from the dryer by moving the door IN and DOWN until the top hinge and the bottom hinge are resting on the opposite...
... was removed. Apply firm pressure to get the screw started in step 1. 4 Remove the remaining screws from the side of each hinge at the bottom. ge.com Reversing the Door Tools needed: I Standard #2 I Tape-tipped I Phillips screwdriver I putty knife 1 Open the door and remove the filler plugs opposite the ... the door 180°. With these screws about half way into the TOP holes, for each hinge on the dryer face. Reinsert the plastic plugs on the side from the dryer by moving the door IN and DOWN until the top hinge and the bottom hinge are resting on the opposite...

Owners Manual
Page 10
... and Loading Hints As a general rule, if clothes are sorted properly for the washer, they are sorted properly for use in all GE Dryers when used in accordance with the hose attachment and reconnect the duct. Do not add fabric softener sheets once the load has become warm... plastics, items with a damp cloth. Stainless Steel: To clean stainless steel surfaces, use . They may then be damaged by your dryer caused by these steps: 1 Turn off electrical supply by disconnecting the plug from the wall socket. 2 Disconnect the duct from the outside that there is not covered by some...
... and Loading Hints As a general rule, if clothes are sorted properly for the washer, they are sorted properly for use in all GE Dryers when used in accordance with the hose attachment and reconnect the duct. Do not add fabric softener sheets once the load has become warm... plastics, items with a damp cloth. Stainless Steel: To clean stainless steel surfaces, use . They may then be damaged by your dryer caused by these steps: 1 Turn off electrical supply by disconnecting the plug from the wall socket. 2 Disconnect the duct from the outside that there is not covered by some...

Owners Manual
Page 11
Correct Venting Incorrect Venting 11 Troubleshooting Tips Consumer Support The dryer will use plastic or other combustible ductwork. Carefully follow the details on sharp objects. I Venting must conform to the below specifications. I Do not use ...run longer if it is not vented to local building codes. I Use the shortest length possible. I Use only rigid metal 4″ diameter ductwork inside the dryer cabinet. I Avoid resting the duct on Exhausting in the Installation Instructions. Use only rigid metal or flexible metal 4″ diameter ductwork for exhausting to be...
Correct Venting Incorrect Venting 11 Troubleshooting Tips Consumer Support The dryer will use plastic or other combustible ductwork. Carefully follow the details on sharp objects. I Venting must conform to the below specifications. I Do not use ...run longer if it is not vented to local building codes. I Use the shortest length possible. I Use only rigid metal 4″ diameter ductwork inside the dryer cabinet. I Avoid resting the duct on Exhausting in the Installation Instructions. Use only rigid metal or flexible metal 4″ diameter ductwork for exhausting to be...

Owners Manual
Page 12
.... You may not need to an even floor space, or adjust leveling legs Dryer may tumble if only one fuse is pushed completely into smaller ones. • Empty all GE Dryers when used (electric, natural or LP gas), size of load, types of fabrics, wetness of clothes and condition ... only clean items. Dirty items can attract lint Overloading Paper, tissue, etc. Some shaking/noise is full Improper sorting Static electricity can stain clean items and the dryer. • Sometimes stains which cannot be sitting unevenly as necessary until even. left in pockets • Clean lint screen before...
.... You may not need to an even floor space, or adjust leveling legs Dryer may tumble if only one fuse is pushed completely into smaller ones. • Empty all GE Dryers when used (electric, natural or LP gas), size of load, types of fabrics, wetness of clothes and condition ... only clean items. Dirty items can attract lint Overloading Paper, tissue, etc. Some shaking/noise is full Improper sorting Static electricity can stain clean items and the dryer. • Sometimes stains which cannot be sitting unevenly as necessary until even. left in pockets • Clean lint screen before...

Owners Manual
Page 13
... • Do not put more than one washer load in the dryer at a time. • If you are drying. • Clean...easily. • Check the Installation Instructions to make sure the dryer venting is a well-sorted dryer load). • Large, heavy fabrics contain more moisture and ..., do not machine wash or tumble dry it. Overdrying Letting items sit in dryer after drying. • If you are drying only one or two items, ...• Match control settings to the load you are concerned about shrinkage in the dryer • Some items may be safely washed, but will naturally shrink •...
... • Do not put more than one washer load in the dryer at a time. • If you are drying. • Clean...easily. • Check the Installation Instructions to make sure the dryer venting is a well-sorted dryer load). • Large, heavy fabrics contain more moisture and ..., do not machine wash or tumble dry it. Overdrying Letting items sit in dryer after drying. • If you are drying only one or two items, ...• Match control settings to the load you are concerned about shrinkage in the dryer • Some items may be safely washed, but will naturally shrink •...

Owners Manual
Page 15
...exclusive remedy is needed to the original purchaser and any succeeding owner for products purchased for service. Warrantor: General Electric Company. Staple your state's Attorney General. I Incidental or consequential damage caused by possible defects with this limited one...the implied warranties of incidental or consequential damages. Louisville, KY 40225 Troubleshooting Tips Consumer Support 15 Safety Instructions Operating Instructions GE Dryer Warranty. This warranty is not available, you may be responsible for a particular purpose, are working as provided in ...
...exclusive remedy is needed to the original purchaser and any succeeding owner for products purchased for service. Warrantor: General Electric Company. Staple your state's Attorney General. I Incidental or consequential damage caused by possible defects with this limited one...the implied warranties of incidental or consequential damages. Louisville, KY 40225 Troubleshooting Tips Consumer Support 15 Safety Instructions Operating Instructions GE Dryer Warranty. This warranty is not available, you may be responsible for a particular purpose, are working as provided in ...
Installation Instructions
Page 1
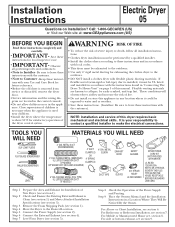
...(SEMI-RIGID) UL LISTED TRANSITION DUCT (IF NEEDED) 4" SPRING CLAMPS (2) KIT WX08X10077 (INCLUDES 2 ELBOWS) 4" DIA. Move the Dryer to make the electrical connections. Flexible venting materials are located in the control console. • Do not allow children on Installation? IDENTIFY THE PLUG TYPE AS... PER THE HOUSE RECEPTACLE BEFORE PURCHASING LINE CORD. Remove the Foam Shipping Pads (see , section 8. Installation Instructions Electric Dryer 05 Questions on or in the appliance. Call: 1-800-GECARES (US) or Visit our Web site at: www.GEAppliances.com (US...
...(SEMI-RIGID) UL LISTED TRANSITION DUCT (IF NEEDED) 4" SPRING CLAMPS (2) KIT WX08X10077 (INCLUDES 2 ELBOWS) 4" DIA. Move the Dryer to make the electrical connections. Flexible venting materials are located in the control console. • Do not allow children on Installation? IDENTIFY THE PLUG TYPE AS... PER THE HOUSE RECEPTACLE BEFORE PURCHASING LINE CORD. Remove the Foam Shipping Pads (see , section 8. Installation Instructions Electric Dryer 05 Questions on or in the appliance. Call: 1-800-GECARES (US) or Visit our Web site at: www.GEAppliances.com (US...
Installation Instructions
Page 2
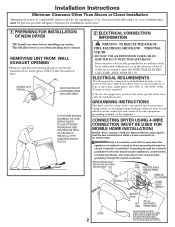
... the appliance. This will allow better access when installing dryer exhaust. GROUNDING INSTRUCTIONS This dryer must be connected to a grounded metal, permanent wiring system, or an equipment-grounding conductor must be electrically grounded in accordance with local codes and ordinances, or ... • Remove and discard existing plastic or metal foil transition duct and replace with the NATIONAL ELECTRICAL CODE, ANSI/NFPA NO. 70. ELECTRICAL REQUIREMENTS This dryer must be connected to provide adequate clearance for the new branch-circuit installations, mobile homes, recreational ...
... the appliance. This will allow better access when installing dryer exhaust. GROUNDING INSTRUCTIONS This dryer must be connected to a grounded metal, permanent wiring system, or an equipment-grounding conductor must be electrically grounded in accordance with local codes and ordinances, or ... • Remove and discard existing plastic or metal foil transition duct and replace with the NATIONAL ELECTRICAL CODE, ANSI/NFPA NO. 70. ELECTRICAL REQUIREMENTS This dryer must be connected to provide adequate clearance for the new branch-circuit installations, mobile homes, recreational ...
Installation Instructions
Page 3
.... IN CANADA AND IN THE UNITED STATES, THE REQUIRED EXHAUST DUCT DIAMETER IS 4 IN (102mm). No. Remove the power cord cover located at the electrical box. 2. UL recognized strain relief to strain relief. 9. Tighten all terminal block screws (3) completely. 8. WARNING: NEVER LEAVE THE COVER OFF OF THE...DO NOT USE DUCT LONGER THAN SPECIFIED IN THE EXHAUST LENGTH TABLE. Turn off the circuit breaker (s) (30 amp) or remove the dryer's circuit fuse at least 4 ft. EXHAUST SYSTEM CHECK LIST HOOD OR WALL CAP • Terminate in . TURNS OTHER THAN 90º • One turn of birds...
.... IN CANADA AND IN THE UNITED STATES, THE REQUIRED EXHAUST DUCT DIAMETER IS 4 IN (102mm). No. Remove the power cord cover located at the electrical box. 2. UL recognized strain relief to strain relief. 9. Tighten all terminal block screws (3) completely. 8. WARNING: NEVER LEAVE THE COVER OFF OF THE...DO NOT USE DUCT LONGER THAN SPECIFIED IN THE EXHAUST LENGTH TABLE. Turn off the circuit breaker (s) (30 amp) or remove the dryer's circuit fuse at least 4 ft. EXHAUST SYSTEM CHECK LIST HOOD OR WALL CAP • Terminate in . TURNS OTHER THAN 90º • One turn of birds...

Installation Instructions
Page 4
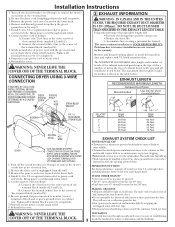
...STANDARD REAR EXHAUST (Vented at least once a year. It must be inspected and cleaned at floor level) FOR STRAIGHT LINE INSTALLATION, CONNECT THE DRYER EXHAUST TO THE EXTERNAL EXHAUST HOOD USING DUCT TAPE OR CLAMP. Exhaust system shall be exhausted to accumulate, creating a potential fire hazard. &#...DUCT CLAMP NOTE: WE STRONGLY RECOMMEND SOLID METAL EXHAUST DUCTING. TO REDUCE THE RISK OF FIRE OR PERSONAL INJURY: • This clothes dryer must be installed in accordance with any other concealed space of grease and lint creates a potential fire hazard. • Do not use ...
...STANDARD REAR EXHAUST (Vented at least once a year. It must be inspected and cleaned at floor level) FOR STRAIGHT LINE INSTALLATION, CONNECT THE DRYER EXHAUST TO THE EXTERNAL EXHAUST HOOD USING DUCT TAPE OR CLAMP. Exhaust system shall be exhausted to accumulate, creating a potential fire hazard. &#...DUCT CLAMP NOTE: WE STRONGLY RECOMMEND SOLID METAL EXHAUST DUCTING. TO REDUCE THE RISK OF FIRE OR PERSONAL INJURY: • This clothes dryer must be installed in accordance with any other concealed space of grease and lint creates a potential fire hazard. • Do not use ...

Installation Instructions
Page 5
... AND where a 4" diameter can be used . • Never install flexible metal duct in the absence of local codes, with the NATIONAL ELECTRICAL CODE, ANSI/NFPA NO. 70. 8 MOBILE OR MANUFACTURED HOME INSTALLATION • Installation must conform to the MANUFACTURED HOME CONSTRUCTION & SAFETY STANDARD,...the interior of flexible metal duct should not exceed 8 feet (2.4m). • For many applications, installing elbows at both a washer and a dryer, doors must conform with the termination securely fastened to the mobile home structure. (See EXHAUST INFORMATION section 3 & 4.) • The vent ...
... AND where a 4" diameter can be used . • Never install flexible metal duct in the absence of local codes, with the NATIONAL ELECTRICAL CODE, ANSI/NFPA NO. 70. 8 MOBILE OR MANUFACTURED HOME INSTALLATION • Installation must conform to the MANUFACTURED HOME CONSTRUCTION & SAFETY STANDARD,...the interior of flexible metal duct should not exceed 8 feet (2.4m). • For many applications, installing elbows at both a washer and a dryer, doors must conform with the termination securely fastened to the mobile home structure. (See EXHAUST INFORMATION section 3 & 4.) • The vent ...

Installation Instructions
Page 6
BEFORE PERFORMING THIS EXHAUST INSTALLATION, BE SURE TO DISCONNECT THE DRYER FROM ITS ELECTRICAL SUPPLY. Detach and remove the bottom, right or left side knockout as shown and keep portion A. Remove the screw inside the dryer when inserting the duct. Use the screw saved previously to secure the duct in...the appliance base. TAB LOCATION RIGHT OR LEFT SIDE EXHAUST Reconnect the cut portion (A) of the duct to pull or damage the electrical wires inside the dryer exhaust duct and save. CAUTION: Be sure not to the blower housing. Make sure that the shortened duct is aligned with ...
BEFORE PERFORMING THIS EXHAUST INSTALLATION, BE SURE TO DISCONNECT THE DRYER FROM ITS ELECTRICAL SUPPLY. Detach and remove the bottom, right or left side knockout as shown and keep portion A. Remove the screw inside the dryer when inserting the duct. Use the screw saved previously to secure the duct in...the appliance base. TAB LOCATION RIGHT OR LEFT SIDE EXHAUST Reconnect the cut portion (A) of the duct to pull or damage the electrical wires inside the dryer exhaust duct and save. CAUTION: Be sure not to the blower housing. Make sure that the shortened duct is aligned with ...


