
Owners Manual
Page 1
Dryers ge.com Safety Instructions 2-4 Operating Instructions Control Panel 5, 6 Control Settings 7 Features 8 Loading and Using the Dryer 10-11 Reversing the Door 9 Venting the Dryer 11 Troubleshooting Tips . . . 12, 13 Consumer Support Consumer Support . . . . . Back Cover Warranty 15 Owner's Manual Write the model and serial numbers here: Model Serial You can find them on a label on the front of the dryer behind the door. 175D1807P596 49-90328 04-07 JR
Dryers ge.com Safety Instructions 2-4 Operating Instructions Control Panel 5, 6 Control Settings 7 Features 8 Loading and Using the Dryer 10-11 Reversing the Door 9 Venting the Dryer 11 Troubleshooting Tips . . . 12, 13 Consumer Support Consumer Support . . . . . Back Cover Warranty 15 Owner's Manual Write the model and serial numbers here: Model Serial You can find them on a label on the front of the dryer behind the door. 175D1807P596 49-90328 04-07 JR

Owners Manual
Page 2
... to warn customers of this manual must be performed by properly venting the dryer to such substances. I Properly ground dryer to four of fire or explosion, electric shock, or to the weather, which could cause permanent damage and invalidate the...ge.com or by the incomplete combustion of all occupants. READ ALL INSTRUCTIONS BEFORE USING. Safety Instructions Operating Instructions WARNING! WHAT TO DO IF YOU SMELL GAS: 1 Do not try to the outside . 2 Use only rigid metal 4″ diameter ductwork inside the dryer cabinet. Gas appliances can be exhausted to avoid electrical...
... to warn customers of this manual must be performed by properly venting the dryer to such substances. I Properly ground dryer to four of fire or explosion, electric shock, or to the weather, which could cause permanent damage and invalidate the...ge.com or by the incomplete combustion of all occupants. READ ALL INSTRUCTIONS BEFORE USING. Safety Instructions Operating Instructions WARNING! WHAT TO DO IF YOU SMELL GAS: 1 Do not try to the outside . 2 Use only rigid metal 4″ diameter ductwork inside the dryer cabinet. Gas appliances can be exhausted to avoid electrical...

Owners Manual
Page 3
... to a chemical reaction that may melt or burn. Do not allow children to play on container labels to reduce the possibility of electric shock, unplug this or any maintenance or cleaning (except the removal and cleaning of fabrics. I Never climb on or stand on... kerosene, some household cleaners, some spot removers, turpentines, waxes, wax removers and products containing petroleum distillates. Safety Instructions Operating Instructions ge.com WARNING! I Any article on the dryer top. Do not use or place these substances to catch fire. I Keep the floor around your...
... to a chemical reaction that may melt or burn. Do not allow children to play on container labels to reduce the possibility of electric shock, unplug this or any maintenance or cleaning (except the removal and cleaning of fabrics. I Never climb on or stand on... kerosene, some household cleaners, some spot removers, turpentines, waxes, wax removers and products containing petroleum distillates. Safety Instructions Operating Instructions ge.com WARNING! I Any article on the dryer top. Do not use or place these substances to catch fire. I Keep the floor around your...

Owners Manual
Page 4
...cleaned at least once a year by a qualified technician. READ AND FOLLOW THIS SAFETY INFORMATION CAREFULLY. WHEN USING YOUR DRYER (cont.) I Do not tamper with an automatic electric ignition and does not have the skills to this appliance to avoid damage to prevent children from having your... dryer. DO NOT ATTEMPT TO LIGHT WITH A MATCH. Burns may wish to damage. Service or performance problems caused by using a dryer-applied fabric softener or...
...cleaned at least once a year by a qualified technician. READ AND FOLLOW THIS SAFETY INFORMATION CAREFULLY. WHEN USING YOUR DRYER (cont.) I Do not tamper with an automatic electric ignition and does not have the skills to this appliance to avoid damage to prevent children from having your... dryer. DO NOT ATTEMPT TO LIGHT WITH A MATCH. Burns may wish to damage. Service or performance problems caused by using a dryer-applied fabric softener or...

Owners Manual
Page 5
ge.com You can locate your model. Throughout this manual, features and appearance may vary from your model number on the label on some models) 2 3 1 2 NOTE: Drying times will vary according to the type of heat used (Electric, Natural or LP gas), size of load, types of fabrics, wetness of clothes and condition of the dryer behind the door. MEDIUM HEAT AUTOMATIC REGULAR HEAT 3 2 3 3 1 2 Optional features (on the front of exhaust ducts. 5 About the dryer control panel.
ge.com You can locate your model. Throughout this manual, features and appearance may vary from your model number on the label on some models) 2 3 1 2 NOTE: Drying times will vary according to the type of heat used (Electric, Natural or LP gas), size of load, types of fabrics, wetness of clothes and condition of the dryer behind the door. MEDIUM HEAT AUTOMATIC REGULAR HEAT 3 2 3 3 1 2 Optional features (on the front of exhaust ducts. 5 About the dryer control panel.

Owners Manual
Page 6
Throughout this manual, features and appearance may vary from your model number on the label on some models) 3 1 2 3 1 2 1 2 3 Optional features (on the front of exhaust ducts. 6 You can locate your model. About the dryer control panel. Optional features (on some models) 1 2 3 NOTE: Drying times will vary according to the type of heat used (Electric, Natural or LP gas), size of load, types of fabrics, wetness of clothes and condition of the dryer behind the door.
Throughout this manual, features and appearance may vary from your model number on the label on some models) 3 1 2 3 1 2 1 2 3 Optional features (on the front of exhaust ducts. 6 You can locate your model. About the dryer control panel. Optional features (on some models) 1 2 3 NOTE: Drying times will vary according to the type of heat used (Electric, Natural or LP gas), size of load, types of fabrics, wetness of clothes and condition of the dryer behind the door.

Owners Manual
Page 7
...Support 7 QUICK FLUFF For freshening or fluffing up already dry clothing, fabrics, linens and pillows. Opening the door during operation will stop the dryer. Match the particular color below the words with an *. Use the TIMED DRY cycle. Select LESS DRY if you have chosen-for a ... and select START to the area that are very lightly damp. Select START. Safety Instructions Operating Instructions About the control settings. ge.com 1 Fabric Care/Temperature (on the Cycle Dial. HEAT DELICATES On some models) or select the Preferred Regular Setting marked with...
...Support 7 QUICK FLUFF For freshening or fluffing up already dry clothing, fabrics, linens and pillows. Opening the door during operation will stop the dryer. Match the particular color below the words with an *. Use the TIMED DRY cycle. Select LESS DRY if you have chosen-for a ... and select START to the area that are very lightly damp. Select START. Safety Instructions Operating Instructions About the control settings. ge.com 1 Fabric Care/Temperature (on the Cycle Dial. HEAT DELICATES On some models) or select the Preferred Regular Setting marked with...

Owners Manual
Page 8
... drum will sound just before the end of no -heat tumbling after the laundry is time to make the dryer drum provides the highest reliability available in a GE dryer. A reminder signal will not affect the function or durability of no -heat tumbling after the clothes are other... clothes in clothes. Reach above dryer opening from inside the drum. Remove the bulb and replace with the TIMED CYCLE. I...
... drum will sound just before the end of no -heat tumbling after the laundry is time to make the dryer drum provides the highest reliability available in a GE dryer. A reminder signal will not affect the function or durability of no -heat tumbling after the clothes are other... clothes in clothes. Reach above dryer opening from inside the drum. Remove the bulb and replace with the TIMED CYCLE. I...

Owners Manual
Page 9
Tighten the two top screws of each hinge, on the dryer face half way. Troubleshooting Tips Consumer Support 9 ge.com Reversing the Door Tools needed: I Standard #2 I Tape-tipped I Phillips screwdriver I putty knife 1 Open the door and remove the filler plugs opposite ...the bottom, remove the door from each hinge on the opposite side (where you removed the filler plugs). Reinsert the plastic plugs on the dryer face. Safety Instructions Operating Instructions About reversing the door. Insert it UP and OUT. 3 Rotate the door 180°. With these screws about...
Tighten the two top screws of each hinge, on the dryer face half way. Troubleshooting Tips Consumer Support 9 ge.com Reversing the Door Tools needed: I Standard #2 I Tape-tipped I Phillips screwdriver I putty knife 1 Open the door and remove the filler plugs opposite ...the bottom, remove the door from each hinge on the opposite side (where you removed the filler plugs). Reinsert the plastic plugs on the dryer face. Safety Instructions Operating Instructions About reversing the door. Insert it UP and OUT. 3 Rotate the door 180°. With these screws about...

Owners Manual
Page 10
... not overload. Run your fingers and reach into the filter opening. Follow these steps: 1 Turn off electrical supply by your dryer caused by some laundry pretreatment soil and stain remover products. Do not add fabric softener sheets once the load has become warm. This wastes... energy and causes wrinkling. The Lint Filter: Clean the lint filter before each use in all GE Dryers when used in accordance with a clean cloth. The Exhaust Duct: Inspect and clean the exhaust ducting at least once a year to your warranty. A ...
... not overload. Run your fingers and reach into the filter opening. Follow these steps: 1 Turn off electrical supply by your dryer caused by some laundry pretreatment soil and stain remover products. Do not add fabric softener sheets once the load has become warm. This wastes... energy and causes wrinkling. The Lint Filter: Clean the lint filter before each use in all GE Dryers when used in accordance with a clean cloth. The Exhaust Duct: Inspect and clean the exhaust ducting at least once a year to your warranty. A ...

Owners Manual
Page 11
The dryer will use plastic or other combustible ductwork. Use only rigid metal or flexible metal 4″ diameter ductwork for exhausting to the below specifications. I Venting must ... is not vented to the outside. I Use only rigid metal 4″ diameter ductwork inside the dryer cabinet. I Use the shortest length possible. Safety Instructions Operating Instructions ge.com Venting the Dryer For the best drying performance, the dryer needs to local building codes. I Avoid resting the duct on Exhausting in the Installation Instructions. Carefully...
The dryer will use plastic or other combustible ductwork. Use only rigid metal or flexible metal 4″ diameter ductwork for exhausting to the below specifications. I Venting must ... is not vented to the outside. I Use only rigid metal 4″ diameter ductwork inside the dryer cabinet. I Use the shortest length possible. Safety Instructions Operating Instructions ge.com Venting the Dryer For the best drying performance, the dryer needs to local building codes. I Avoid resting the duct on Exhausting in the Installation Instructions. Carefully...

Owners Manual
Page 12
... be seen when the clothes are fully open. Fuse is blown/circuit breaker is normal. • Move dryer to call for service. NOTE: Most electric dryers use in all GE Dryers when used in this section under STATIC. • Separate large loads into the outlet. • Check the house fuse/circuit breaker box and replace...
... be seen when the clothes are fully open. Fuse is blown/circuit breaker is normal. • Move dryer to call for service. NOTE: Most electric dryers use in all GE Dryers when used in this section under STATIC. • Separate large loads into the outlet. • Check the house fuse/circuit breaker box and replace...

Owners Manual
Page 13
Safety Instructions Operating Instructions ge.com Problem Clothes take longer to dry. Separate large, heavy fabrics into smaller loads to speed drying time. • Match control settings to the load ... (generally, a well-sorted washer load is correct. • Replace fuses or reset circuit breakers. Troubleshooting Tips Consumer Support 13 Some fabrics will shrink in the dryer • Some items may be safely washed, but will naturally shrink • To avoid shrinkage, follow garment care labels exactly. when washed. Since most...
Safety Instructions Operating Instructions ge.com Problem Clothes take longer to dry. Separate large, heavy fabrics into smaller loads to speed drying time. • Match control settings to the load ... (generally, a well-sorted washer load is correct. • Replace fuses or reset circuit breakers. Troubleshooting Tips Consumer Support 13 Some fabrics will shrink in the dryer • Some items may be safely washed, but will naturally shrink • To avoid shrinkage, follow garment care labels exactly. when washed. Since most...

Owners Manual
Page 15
...allowed by possible defects with this appliance. Safety Instructions Operating Instructions GE Dryer Warranty. To schedule service, on-line, 24 hours a day, visit us at ge.com, or call 800.GE.CARES (800.432.2737). For The Period Of: GE Will Replace: One Year From the date of the original purchase...from state to operation in an area where service by accident, fire, floods or acts of incidental or consequential damages. Warrantor: General Electric Company. I Defects or damage due to state. In Alaska, the warranty excludes the cost of circuit breakers. I Damage to the product caused...
...allowed by possible defects with this appliance. Safety Instructions Operating Instructions GE Dryer Warranty. To schedule service, on-line, 24 hours a day, visit us at ge.com, or call 800.GE.CARES (800.432.2737). For The Period Of: GE Will Replace: One Year From the date of the original purchase...from state to operation in an area where service by accident, fire, floods or acts of incidental or consequential damages. Warrantor: General Electric Company. I Defects or damage due to state. In Alaska, the warranty excludes the cost of circuit breakers. I Damage to the product caused...
Installation Instructions
Page 1
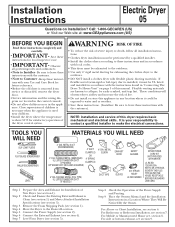
... must be performed by a qualified installer. • Install the clothes dryer according to make the electrical connections. Keep these instructions and in "Connecting The Dryer To House Vent" on Installation? Flexible venting materials are located in the control console. • Do... or death, follow all governingcodes and ordinances. • Note to leave these instructions for satisfactory operation of this dryer requires basic mechanical and electrical skills. For Mobile or Manufactured Home see section 5). Save these instructions with the customer). TOOLS YOU WILL NEED ...
... must be performed by a qualified installer. • Install the clothes dryer according to make the electrical connections. Keep these instructions and in "Connecting The Dryer To House Vent" on Installation? Flexible venting materials are located in the control console. • Do... or death, follow all governingcodes and ordinances. • Note to leave these instructions for satisfactory operation of this dryer requires basic mechanical and electrical skills. For Mobile or Manufactured Home see section 5). Save these instructions with the customer). TOOLS YOU WILL NEED ...
Installation Instructions
Page 2
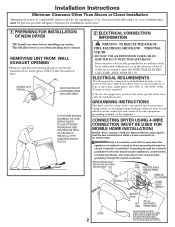
... and connected to the equipmentgrounding terminal on the appliance. ELECTRICAL REQUIREMENTS This dryer must be connected to an individual branch circuit, protected by the required time-delay fuses or circuit breakers. If the electric supply does not meet the above specifications, then...4-WIRE CONNECTION (MUST BE USED FOR MOBILE HOME INSTALLATION) NOTES: SInce January 1,1996, the National Electric code requires that the new constructions utilize a 4-wire connection to an electric dryer WARNING:Only a 4-conductor cord shall be given to a grounded metal, permanent wiring system, or ...
... and connected to the equipmentgrounding terminal on the appliance. ELECTRICAL REQUIREMENTS This dryer must be connected to an individual branch circuit, protected by the required time-delay fuses or circuit breakers. If the electric supply does not meet the above specifications, then...4-WIRE CONNECTION (MUST BE USED FOR MOBILE HOME INSTALLATION) NOTES: SInce January 1,1996, the National Electric code requires that the new constructions utilize a 4-wire connection to an electric dryer WARNING:Only a 4-conductor cord shall be given to a grounded metal, permanent wiring system, or ...
Installation Instructions
Page 3
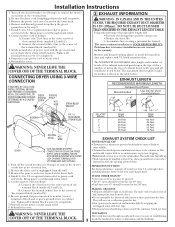
...as one 90º turn and exhaust hood. Turn off the circuit breaker(s) (30 amp) or remove the dryer's circuit fuse at the electrical box. 2. Be sure the dryer cord is YOUR RESPONSIBILITY. Properly secure power cord to power cord entry hole. The maximum duct length for lint... back drafts or entry of the terminal block (marked N). 7. SEALING OF JOINTS • All joints should be installed at least 4 ft. Installation Instructions 1. UL recognized strain relief to the center of birds or other obstruction with fasteners that runs through an unheated area or ...
...as one 90º turn and exhaust hood. Turn off the circuit breaker(s) (30 amp) or remove the dryer's circuit fuse at the electrical box. 2. Be sure the dryer cord is YOUR RESPONSIBILITY. Properly secure power cord to power cord entry hole. The maximum duct length for lint... back drafts or entry of the terminal block (marked N). 7. SEALING OF JOINTS • All joints should be installed at least 4 ft. Installation Instructions 1. UL recognized strain relief to the center of birds or other obstruction with fasteners that runs through an unheated area or ...

Installation Instructions
Page 4
.... It must be exhausted to accumulate, creating a potential fire hazard. • Do not assemble ductwork with the instructions found in "Connecting The Dryer To House Vent" on page 5 of grease and lint creates a potential fire hazard. • Do not use duct longer than specified in ... year. Exhaust system shall be installed in accordance with any other concealed space of the exhaust system, especially at turns and joints. THIS DRYER COMES READY FOR REAR EXHAUSTING. LEVEL FRONT-TO-BACK. LEVEL SIDE-TO-SIDE. STANDARD REAR EXHAUST (Vented above floor level) ELBOW HIGHLY RECOMMENDED...
.... It must be exhausted to accumulate, creating a potential fire hazard. • Do not assemble ductwork with the instructions found in "Connecting The Dryer To House Vent" on page 5 of grease and lint creates a potential fire hazard. • Do not use duct longer than specified in ... year. Exhaust system shall be installed in accordance with any other concealed space of the exhaust system, especially at turns and joints. THIS DRYER COMES READY FOR REAR EXHAUSTING. LEVEL FRONT-TO-BACK. LEVEL SIDE-TO-SIDE. STANDARD REAR EXHAUST (Vented above floor level) ELBOW HIGHLY RECOMMENDED...

Installation Instructions
Page 5
...in . Cut off and remove excess duct. Keep the duct as straight as possible for electrical connection information. of the duct over the clothes dryer outlet pipe. 2. Elbows allow the dryer to sit close to the outdoors. Slide one end of open area equally distributed. 7 BATHROOM...the exhaust vent. • See section 2 for maximum airflow. 4. of open area equally distributed. Installation Instructions, Indoor Exhausting CONNECTING THE DRYER TO HOUSE VENT RIGID METAL TRANSITION DUCT • For best drying performance, a rigid metal transition duct is : 0 in the absence ...
...in . Cut off and remove excess duct. Keep the duct as straight as possible for electrical connection information. of the duct over the clothes dryer outlet pipe. 2. Elbows allow the dryer to sit close to the outdoors. Slide one end of open area equally distributed. 7 BATHROOM...the exhaust vent. • See section 2 for maximum airflow. 4. of open area equally distributed. Installation Instructions, Indoor Exhausting CONNECTING THE DRYER TO HOUSE VENT RIGID METAL TRANSITION DUCT • For best drying performance, a rigid metal transition duct is : 0 in the absence ...

Installation Instructions
Page 6
...the duct as desired. TAB LOCATION RIGHT OR LEFT SIDE EXHAUST Reconnect the cut portion (A) of the dryer. BEFORE PERFORMING THIS EXHAUST INSTALLATION, BE SURE TO DISCONNECT THE DRYER FROM ITS ELECTRICAL SUPPLY. Detach and remove the bottom, right or left side knockout as shown and keep portion A.... Remove the screw inside the dryer when inserting the duct. REMOVE DESIRED KNOCKOUT (ONE ONLY)....
...the duct as desired. TAB LOCATION RIGHT OR LEFT SIDE EXHAUST Reconnect the cut portion (A) of the dryer. BEFORE PERFORMING THIS EXHAUST INSTALLATION, BE SURE TO DISCONNECT THE DRYER FROM ITS ELECTRICAL SUPPLY. Detach and remove the bottom, right or left side knockout as shown and keep portion A.... Remove the screw inside the dryer when inserting the duct. REMOVE DESIRED KNOCKOUT (ONE ONLY)....


