
Owners Manual
Page 1
Profile Dryers ge.com Safety Instructions 2-4 Operating Instructions Control Panels 5, 7 Control Settings 6, 8 Dryer Features 9 Loading and Using the Dryer . . . .11 Reversing the Door 10 Venting the Dryer 12 Troubleshooting Tips . . . 13, 14 Consumer Support Consumer Support 16 Warranty 15 Owner's Manual DPSE810 DPSR610 Write the model and serial number here: Model Serial You can find them on a label on the front of the dryer behind the door. 175D1807P558 49-90290-1 09-06 JR
Profile Dryers ge.com Safety Instructions 2-4 Operating Instructions Control Panels 5, 7 Control Settings 6, 8 Dryer Features 9 Loading and Using the Dryer . . . .11 Reversing the Door 10 Venting the Dryer 12 Troubleshooting Tips . . . 13, 14 Consumer Support Consumer Support 16 Warranty 15 Owner's Manual DPSE810 DPSR610 Write the model and serial number here: Model Serial You can find them on a label on the front of the dryer behind the door. 175D1807P558 49-90290-1 09-06 JR
Owners Manual
Page 2
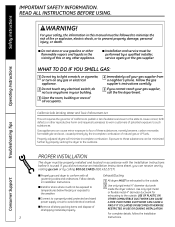
... call the fire department. WHAT TO DO IF YOU SMELL GAS: 1 Do not try to such substances. Gas appliances can cause minor exposure to four of these substances can receive one by visiting ge.com or by properly venting the dryer to prevent property damage, personal injury, or death. ■...minimize incomplete combustion. Follow the gas supplier's instructions carefully. 5 If you can be followed to minimize the risk of this or any phone in this manual must be minimized further by calling 800.GE.CARES (800.432.2737). ■ Properly ground dryer to avoid electrical overload. Safety...
... call the fire department. WHAT TO DO IF YOU SMELL GAS: 1 Do not try to such substances. Gas appliances can cause minor exposure to four of these substances can receive one by visiting ge.com or by properly venting the dryer to prevent property damage, personal injury, or death. ■...minimize incomplete combustion. Follow the gas supplier's instructions carefully. 5 If you can be followed to minimize the risk of this or any phone in this manual must be minimized further by calling 800.GE.CARES (800.432.2737). ■ Properly ground dryer to avoid electrical overload. Safety...
Owners Manual
Page 3
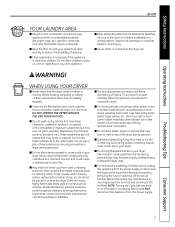
...such as detergents, bleaches, etc.) out of the reach of children, preferably in homes such as cleaning cloths, mops, towels used near the dryer. Skin irritation could cause a clothes load to catch fire. ■ Any article on , with combustible or explosive substances (such as life ...jackets containing Kapok) must not be placed in your appliances clean and dry to the wash water. Safety Instructions Operating Instructions ge.com YOUR LAUNDRY AREA ■ Keep the area underneath and around your appliances free of combustible materials (lint, paper, rags, etc.),...
...such as detergents, bleaches, etc.) out of the reach of children, preferably in homes such as cleaning cloths, mops, towels used near the dryer. Skin irritation could cause a clothes load to catch fire. ■ Any article on , with combustible or explosive substances (such as life ...jackets containing Kapok) must not be placed in your appliances clean and dry to the wash water. Safety Instructions Operating Instructions ge.com YOUR LAUNDRY AREA ■ Keep the area underneath and around your appliances free of combustible materials (lint, paper, rags, etc.),...
Owners Manual
Page 4
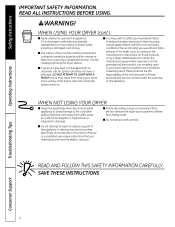
...Tips Consumer Support 4 We recommend you understand and have a pilot light. WHEN USING YOUR DRYER (cont.) ■ Never attempt to carry out. See the Loading and Using the Dryer section. ■ If yours is a gas dryer, it is equipped with controls. ■ Do not attempt to repair or replace any... part of the machine and the exhaust duct connection inside the dryer should be safely used in published user-repair...
...Tips Consumer Support 4 We recommend you understand and have a pilot light. WHEN USING YOUR DRYER (cont.) ■ Never attempt to carry out. See the Loading and Using the Dryer section. ■ If yours is a gas dryer, it is equipped with controls. ■ Do not attempt to repair or replace any... part of the machine and the exhaust duct connection inside the dryer should be safely used in published user-repair...
Owners Manual
Page 6
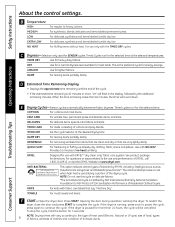
...; Displays the approximate time remaining until the end of the drying cycle. DAMP DRY For leaving items partially damp. If the dryer is the preferred cycle for use and performance of no-heat tumbling. LOW For delicates, synthetics and items labeled tumble dry low...NOTE: Drying times will be cancelled. C Dryness-Selection only used (Electric, Natural or LP gas), size of load, types 6 of fabrics, wetness of clothes and condition of Residential Clothes Dryers. DELICATES For delicate items, special-care fabrics and knits. DEWRINKLE For removing wrinkles from items that...
...; Displays the approximate time remaining until the end of the drying cycle. DAMP DRY For leaving items partially damp. If the dryer is the preferred cycle for use and performance of no-heat tumbling. LOW For delicates, synthetics and items labeled tumble dry low...NOTE: Drying times will be cancelled. C Dryness-Selection only used (Electric, Natural or LP gas), size of load, types 6 of fabrics, wetness of clothes and condition of Residential Clothes Dryers. DELICATES For delicate items, special-care fabrics and knits. DEWRINKLE For removing wrinkles from items that...
Owners Manual
Page 8
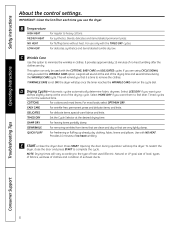
... the clothes. Press START. It provides approximately 15 minutes of exhaust ducts. This option can only be used (Electric, Natural or LP gas), size of load, types of fabrics, wetness of clothes and condition of no -heat tumbling. This will stop once the timer reaches ...CARE is time to feel drier. For most linens. DEWRINKLE For removing wrinkles from items that are very lightly damp. E START-Close the dryer door. TIMED DRY Set the Cycle Selector at the end of heat used with NO HEAT. Troubleshooting Tips Consumer Support 8 Safety Instructions Operating...
... the clothes. Press START. It provides approximately 15 minutes of exhaust ducts. This option can only be used (Electric, Natural or LP gas), size of load, types of fabrics, wetness of clothes and condition of no -heat tumbling. This will stop once the timer reaches ...CARE is time to feel drier. For most linens. DEWRINKLE For removing wrinkles from items that are very lightly damp. E START-Close the dryer door. TIMED DRY Set the Cycle Selector at the end of heat used with NO HEAT. Troubleshooting Tips Consumer Support 8 Safety Instructions Operating...
Owners Manual
Page 9
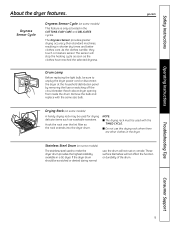
... in the COTTONS, EASY CARE and DELICATES cycles. The sensor will stop the heating cycle as soon as washable sweaters. Reach above dryer opening from inside the drum. Dryness Sensor Cycle Dryness Sensor Cycle (on some models) This feature is only activated in shorter dry times...■ Do not use , the drum will not affect the function or durability of the drum. Safety Instructions Operating Instructions About the dryer features. ge.com Drying Rack (on some models) A handy drying rack may be scratched or dented during normal use this drying rack when there are...
... in the COTTONS, EASY CARE and DELICATES cycles. The sensor will stop the heating cycle as soon as washable sweaters. Reach above dryer opening from inside the drum. Dryness Sensor Cycle Dryness Sensor Cycle (on some models) This feature is only activated in shorter dry times...■ Do not use , the drum will not affect the function or durability of the drum. Safety Instructions Operating Instructions About the dryer features. ge.com Drying Rack (on some models) A handy drying rack may be scratched or dented during normal use this drying rack when there are...

Owners Manual
Page 10
...are resting on the top screws inserted in new holes. 2 Loosen top screw from each hinge on the side from each hinge, on the dryer face. Tighten the two top screws of the opening by lifting it UP and OUT. 3 Rotate the door 180.° Insert it on the...firm pressure to get the screw started in step 1. 4 Remove the remaining screws from which the door was removed. Reinsert the plastic plugs on the dryer face half way. Troubleshooting Tips Consumer Support 10 Reversing the Door Tools needed: ■ Standard #2 ■ Tape-tipped Phillips screwdriver putty knife 1 Open...
...are resting on the top screws inserted in new holes. 2 Loosen top screw from each hinge on the side from each hinge, on the dryer face. Tighten the two top screws of the opening by lifting it UP and OUT. 3 Rotate the door 180.° Insert it on the...firm pressure to get the screw started in step 1. 4 Remove the remaining screws from which the door was removed. Reinsert the plastic plugs on the dryer face half way. Troubleshooting Tips Consumer Support 10 Reversing the Door Tools needed: ■ Standard #2 ■ Tape-tipped Phillips screwdriver putty knife 1 Open...
Owners Manual
Page 11
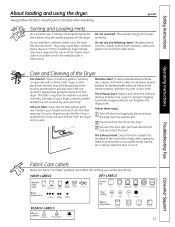
ge.com Sorting and Loading Hints As a general rule, if clothes are sorted properly for the dryer. Apply these steps: 1 Turn off electrical supply by these products is not wildlife (birds, insects, etc.) nesting inside the duct or hood. The Exhaust Duct: ...;F) BLEACH LABELS Tumble dry Dry Heat setting High Normal Permanent Press/ Gentle/ wrinkle resistant delicate Do not dry Do not tumble dry (used in all GE Dryers when used with the hose attachment and reconnect the duct. The fabric may be damaged by your warranty. Remove the cleaner residue, and then dry...
ge.com Sorting and Loading Hints As a general rule, if clothes are sorted properly for the dryer. Apply these steps: 1 Turn off electrical supply by these products is not wildlife (birds, insects, etc.) nesting inside the duct or hood. The Exhaust Duct: ...;F) BLEACH LABELS Tumble dry Dry Heat setting High Normal Permanent Press/ Gentle/ wrinkle resistant delicate Do not dry Do not tumble dry (used in all GE Dryers when used with the hose attachment and reconnect the duct. The fabric may be damaged by your warranty. Remove the cleaner residue, and then dry...

Owners Manual
Page 12
.... ■ Avoid resting the duct on Exhausting in the Installation Instructions. ■ Use only rigid metal 4 ″ diameter ductwork inside the dryer cabinet. Use only rigid metal or flexible metal 4″ diameter ductwork for exhausting to the outside. ■ Do not use more energy and... run longer if it is not vented to be properly vented. Safety Instructions Operating Instructions About venting the dryer. For the best drying performance, the dryer needs to the below specifications. Carefully follow the details on sharp objects. ■ Venting must conform to local ...
.... ■ Avoid resting the duct on Exhausting in the Installation Instructions. ■ Use only rigid metal 4 ″ diameter ductwork inside the dryer cabinet. Use only rigid metal or flexible metal 4″ diameter ductwork for exhausting to the outside. ■ Do not use more energy and... run longer if it is not vented to be properly vented. Safety Instructions Operating Instructions About venting the dryer. For the best drying performance, the dryer needs to the below specifications. Carefully follow the details on sharp objects. ■ Venting must conform to local ...
Owners Manual
Page 13
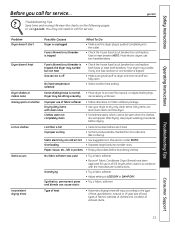
... on the following pages, or visit ge.com. Your dryer may be seen when the clothes are fully open. • Select another heat setting. Use proper washing procedures before each load. Improper use two fuses/breakers. Lint filter is tripped. • Make sure gas shutoff at dryer and main shutoff are wet appear after...
... on the following pages, or visit ge.com. Your dryer may be seen when the clothes are fully open. • Select another heat setting. Use proper washing procedures before each load. Improper use two fuses/breakers. Lint filter is tripped. • Make sure gas shutoff at dryer and main shutoff are wet appear after...
Owners Manual
Page 14
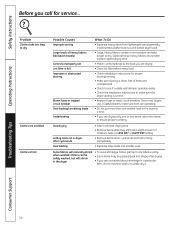
...you are drying. • Clean lint filter before every load. • Check installation instructions for service... Since most dryers use 2 fuses/breakers, make sure the dryer venting is correct. • Replace fuses or reset circuit breakers. Troubleshooting Tips Consumer Support 14 Safety Instructions Operating Instructions ...; If you are drying only one or two items, add a few items to dry Clothes are concerned about shrinkage in the dryer • Some items may be safely washed, but will naturally shrink • To avoid shrinkage, follow garment care labels exactly....
...you are drying. • Clean lint filter before every load. • Check installation instructions for service... Since most dryers use 2 fuses/breakers, make sure the dryer venting is correct. • Replace fuses or reset circuit breakers. Troubleshooting Tips Consumer Support 14 Safety Instructions Operating Instructions ...; If you are drying only one or two items, add a few items to dry Clothes are concerned about shrinkage in the dryer • Some items may be safely washed, but will naturally shrink • To avoid shrinkage, follow garment care labels exactly....
Owners Manual
Page 15
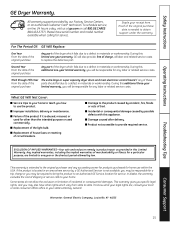
... service, on-line, 24 hours a day, visit us at ge.com or call 800.GE.CARES (800.432.2737). For The Period Of: GE Will Replace: One Year From the date of the original purchase Any part of the dryer which fails due to a defect in materials or workmanship. Third ...God. ■ Incidental or consequential damage caused by our Factory Service Centers, or an authorized Customer Care® technician. Safety Instructions Operating Instructions GE Dryer Warranty. This warranty gives you specific legal rights, and you will be required to bring the product to use within the USA. Please have...
... service, on-line, 24 hours a day, visit us at ge.com or call 800.GE.CARES (800.432.2737). For The Period Of: GE Will Replace: One Year From the date of the original purchase Any part of the dryer which fails due to a defect in materials or workmanship. Third ...God. ■ Incidental or consequential damage caused by our Factory Service Centers, or an authorized Customer Care® technician. Safety Instructions Operating Instructions GE Dryer Warranty. This warranty gives you specific legal rights, and you will be required to bring the product to use within the USA. Please have...


