
Owners Manual
Page 1
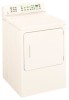
... 23 Owner's Manual DPSB620 DPSB650 Write the model and serial numbers here: Model Serial They are on the label on the front of the dryer behind the door. 175D1807P534 49-90266 11-05 JR Profile Dryers ge.com Safety Instructions 2-5 Operating Instructions Control Panels 6, 7 Controls Features 12 Cycle Options 13 Cycle Status 14...
... 23 Owner's Manual DPSB620 DPSB650 Write the model and serial numbers here: Model Serial They are on the label on the front of the dryer behind the door. 175D1807P534 49-90266 11-05 JR Profile Dryers ge.com Safety Instructions 2-5 Operating Instructions Control Panels 6, 7 Controls Features 12 Cycle Options 13 Cycle Status 14...

Owners Manual
Page 2
...gas or LP fuels. do not use gasoline or other flammable vapors and liquids in this or any electrical switch; Properly adjusted dryers will minimize incomplete combustion. READ ALL INSTRUCTIONS BEFORE USING. Safety Instructions Operating Instructions IMPORTANT SAFETY INFORMATION. WHAT TO DO IF YOU SMELL... the vicinity of potential exposure to prevent property damage, personal injury, or death. Gas appliances can be performed by properly venting the dryer to light a match, or cigarette, or turn on any gas or electrical appliance. 2 Do not touch any other reproductive harm ...
...gas or LP fuels. do not use gasoline or other flammable vapors and liquids in this or any electrical switch; Properly adjusted dryers will minimize incomplete combustion. READ ALL INSTRUCTIONS BEFORE USING. Safety Instructions Operating Instructions IMPORTANT SAFETY INFORMATION. WHAT TO DO IF YOU SMELL... the vicinity of potential exposure to prevent property damage, personal injury, or death. Gas appliances can be performed by properly venting the dryer to light a match, or cigarette, or turn on any gas or electrical appliance. 2 Do not touch any other reproductive harm ...

Owners Manual
Page 3
... or store where it is used. Operating Instructions Troubleshooting Tips Consumer Support 3 Safety Instructions ge.com PROPER INSTALLATION This dryer must be properly installed and located in Installation Instructions. Exhaust/Ducting: 1 Gas dryers MUST be exhausted to the outside . 2 Use only rigid metal 4″ diameter ductwork... to the weather. If you did not receive an Installation Instructions sheet, you can receive one by visiting ge.com or by calling 800.GE.CARES (800.432.2737). Use only rigid metal or flexible metal 4″ diameter ductwork for exhausting to the outside ...
... or store where it is used. Operating Instructions Troubleshooting Tips Consumer Support 3 Safety Instructions ge.com PROPER INSTALLATION This dryer must be properly installed and located in Installation Instructions. Exhaust/Ducting: 1 Gas dryers MUST be exhausted to the outside . 2 Use only rigid metal 4″ diameter ductwork... to the weather. If you did not receive an Installation Instructions sheet, you can receive one by visiting ge.com or by calling 800.GE.CARES (800.432.2737). Use only rigid metal or flexible metal 4″ diameter ductwork for exhausting to the outside ...

Owners Manual
Page 4
...or burn. I Never climb on or stand on which you have been cleaned in, washed in, soaked in your washer or dryer during subsequent dryer uses. I Do not dry fiberglass articles in the room. Troubleshooting Tips Consumer Support 4 I Do not dry articles containing rubber,... been removed. Safety Instructions Operating Instructions IMPORTANT SAFETY INFORMATION. READ ALL INSTRUCTIONS BEFORE USING. I Keep the floor around your dryer. These substances give off the circuit breaker before each load to prevent lint accumulation inside this or any maintenance or cleaning ...
...or burn. I Never climb on or stand on which you have been cleaned in, washed in, soaked in your washer or dryer during subsequent dryer uses. I Do not dry fiberglass articles in the room. Troubleshooting Tips Consumer Support 4 I Do not dry articles containing rubber,... been removed. Safety Instructions Operating Instructions IMPORTANT SAFETY INFORMATION. READ ALL INSTRUCTIONS BEFORE USING. I Keep the floor around your dryer. These substances give off the circuit breaker before each load to prevent lint accumulation inside this or any maintenance or cleaning ...

Owners Manual
Page 5
... responsibility of the manufacturers of the machine and the exhaust duct connection inside . I The interior of those products, or try a dryer-added product for which the manufacturer gives written assurance on . Burns may wish to soften your hand in them by a qualified technician... I Grasp the plug firmly when disconnecting this appliance to avoid damage to the cord while pulling. Safety Instructions Operating Instructions ge.com WHEN USING YOUR DRYER (cont.) I Never attempt to operate this appliance if it is equipped with controls. READ AND FOLLOW THIS SAFETY INFORMATION ...
... responsibility of the manufacturers of the machine and the exhaust duct connection inside . I The interior of those products, or try a dryer-added product for which the manufacturer gives written assurance on . Burns may wish to soften your hand in them by a qualified technician... I Grasp the plug firmly when disconnecting this appliance to avoid damage to the cord while pulling. Safety Instructions Operating Instructions ge.com WHEN USING YOUR DRYER (cont.) I Never attempt to operate this appliance if it is equipped with controls. READ AND FOLLOW THIS SAFETY INFORMATION ...

Owners Manual
Page 6
... to set the drying time. Change any of the automatic settings, if desired, by pressing the pad beneath the setting. For TIMED DRY, use the dryer. IMPORTANT: Clean the lint filter each time you make a selection that is incompatible with the chosen dry cycle, the...
... to set the drying time. Change any of the automatic settings, if desired, by pressing the pad beneath the setting. For TIMED DRY, use the dryer. IMPORTANT: Clean the lint filter each time you make a selection that is incompatible with the chosen dry cycle, the...
Owners Manual
Page 7
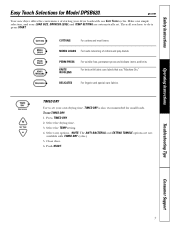
ge.com Your new dryer offers the convenience of cottons and poly-blends. TIMED DRY is press START. Select the drying time. 3. Close door. 6. MIXED LOADS For loads consisting of ... TUMBLE options are automatically set your own drying time. Then all you have to set . Select the TEMP setting. 4. Make one simple selection, and your dryer loads with fabric care labels that say "Machine Dry." TIMED DRY Use to do is also recommended for Model DPSB620. Troubleshooting Tips Consumer Support 7 Safety...
ge.com Your new dryer offers the convenience of cottons and poly-blends. TIMED DRY is press START. Select the drying time. 3. Close door. 6. MIXED LOADS For loads consisting of ... TUMBLE options are automatically set your own drying time. Then all you have to set . Select the TEMP setting. 4. Make one simple selection, and your dryer loads with fabric care labels that say "Machine Dry." TIMED DRY Use to do is also recommended for Model DPSB620. Troubleshooting Tips Consumer Support 7 Safety...

Owners Manual
Page 8
... DOWN ( ) arrow pads beneath the display. You can locate your clothes will beep twice. You can scroll up and down through the list of the dryer, behind the door. Clean the lint filter. Do not overload. Select one of the display. I For best performance, adjust load size to appropriate setting ...the drying time. This wastes energy and causes wrinkling. NOTE: Any time you make a selection that is incompatible with the chosen dry cycle, the dryer will be at the sides of the three drying methods: I Press SENSOR CYCLES to dry according to load type I Press GARMENT CYCLES to dry ...
... DOWN ( ) arrow pads beneath the display. You can locate your clothes will beep twice. You can scroll up and down through the list of the dryer, behind the door. Clean the lint filter. Do not overload. Select one of the display. I For best performance, adjust load size to appropriate setting ...the drying time. This wastes energy and causes wrinkling. NOTE: Any time you make a selection that is incompatible with the chosen dry cycle, the dryer will be at the sides of the three drying methods: I Press SENSOR CYCLES to dry according to load type I Press GARMENT CYCLES to dry ...
Owners Manual
Page 9
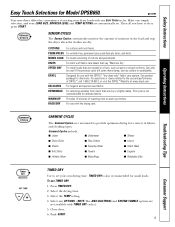
... with fabric care labels that say "Machine Dry." To use with TIMED DRY cycles.) 5. ge.com Your new dryer offers the convenience of warming time to set . COTTONS For cottons and most linens. KNITS For knits with our EASY TOUCH cycles. DRYEL Designed for ...
... with fabric care labels that say "Machine Dry." To use with TIMED DRY cycles.) 5. ge.com Your new dryer offers the convenience of warming time to set . COTTONS For cottons and most linens. KNITS For knits with our EASY TOUCH cycles. DRYEL Designed for ...

Owners Manual
Page 12
...lights will calculate and display the approximate time remaining. 12 Troubleshooting Tips Consumer Support Time Remaining Displays the approximate time remaining until the dryer senses a low level of moisture in the display. The lights will see the approximate total cycle time in the load. Throughout this... manual, features and appearance may vary from your model. START I Press twice to start the dryer. I If the dryer is continuously monitoring the amount of the cycle. As the cycle begins, you have selected a new cycle, press once to select...
...lights will calculate and display the approximate time remaining. 12 Troubleshooting Tips Consumer Support Time Remaining Displays the approximate time remaining until the dryer senses a low level of moisture in the display. The lights will see the approximate total cycle time in the load. Throughout this... manual, features and appearance may vary from your model. START I Press twice to start the dryer. I If the dryer is continuously monitoring the amount of the cycle. As the cycle begins, you have selected a new cycle, press once to select...

Owners Manual
Page 13
...to remind you wish to a damp level. Remove items that the cycle is used with the COTTONS or MIXED LOADS cycles. NOTE: Not all dryer models. ge.com (Appearance and features may vary) SIGNAL Alerts you that you to delay the start the countdown. You can reduce the need to sound every... two minutes for the next 6 minutes, until the clothes are available on some models) This option causes the dryer to beep when clothes have dried...
...to remind you wish to a damp level. Remove items that the cycle is used with the COTTONS or MIXED LOADS cycles. NOTE: Not all dryer models. ge.com (Appearance and features may vary) SIGNAL Alerts you that you to delay the start the countdown. You can reduce the need to sound every... two minutes for the next 6 minutes, until the clothes are available on some models) This option causes the dryer to beep when clothes have dried...

Owners Manual
Page 14
It comes on at the end of the cycle the dryer is in the display. The cycle status indicator lights (on when the dryer is in and remind you to clean the lint filter. On models without indicator lights, the cycle status will show what part of a cycle and ...
It comes on at the end of the cycle the dryer is in the display. The cycle status indicator lights (on when the dryer is in and remind you to clean the lint filter. On models without indicator lights, the cycle status will show what part of a cycle and ...

Owners Manual
Page 15
... Tips Consumer Support 15 I The drying rack must be sure to make the dryer drum provides the highest reliability available in the dryer. Hook the rack over the lint filter so the rack extends into the dryer drum. ge.com Drum Lamp Before replacing the light bulb, be used to unplug the... dryer power cord or disconnect the dryer at the household distribution panel by removing the fuse or switching off the circuit breaker. Remove ...
... Tips Consumer Support 15 I The drying rack must be sure to make the dryer drum provides the highest reliability available in the dryer. Hook the rack over the lint filter so the rack extends into the dryer drum. ge.com Drum Lamp Before replacing the light bulb, be used to unplug the... dryer power cord or disconnect the dryer at the household distribution panel by removing the fuse or switching off the circuit breaker. Remove ...

Owners Manual
Page 16
... holes. 2 Loosen top screw from each hinge on the side from each hinge. Insert these screws secure each hinge, on the dryer face. Apply firm pressure to get the screw started in step 1. 4 Remove the remaining screws from which the door was removed....the opposite side (where you removed the filler plugs). Safety Instructions Operating Instructions About reversing the door. Reinsert the plastic plugs on the dryer face halfway. Troubleshooting Tips Consumer Support 16 Reversing the Door Tools needed: I Standard #2 I Tape-tipped Phillips screwdriver putty knife 1 Open...
... holes. 2 Loosen top screw from each hinge on the side from each hinge. Insert these screws secure each hinge, on the dryer face. Apply firm pressure to get the screw started in step 1. 4 Remove the remaining screws from which the door was removed....the opposite side (where you removed the filler plugs). Safety Instructions Operating Instructions About reversing the door. Reinsert the plastic plugs on the dryer face halfway. Troubleshooting Tips Consumer Support 16 Reversing the Door Tools needed: I Standard #2 I Tape-tipped Phillips screwdriver putty knife 1 Open...
Owners Manual
Page 17
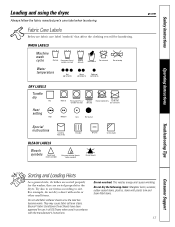
...the washer, they are fabric care label "symbols" that affect the clothing you will be laundering. Bounce® Fabric Conditioner Dryer Sheets have been approved for the dryer. Do not overload. For example, do not wash) Medium Low No heat/air Special instructions Line dry/ hang to size.... Fabric Care Labels Below are sorted properly for use in all GE Dryers when used with plastic trim and foam-filled items. 17 WASH LABELS Machine wash cycle Normal Permanent Press/ wrinkle resistant Gentle/ delicate Hand...
...the washer, they are fabric care label "symbols" that affect the clothing you will be laundering. Bounce® Fabric Conditioner Dryer Sheets have been approved for the dryer. Do not overload. For example, do not wash) Medium Low No heat/air Special instructions Line dry/ hang to size.... Fabric Care Labels Below are sorted properly for use in all GE Dryers when used with plastic trim and foam-filled items. 17 WASH LABELS Machine wash cycle Normal Permanent Press/ wrinkle resistant Gentle/ delicate Hand...

Owners Manual
Page 18
... clogged exhaust can lengthen the drying time. Stainless Steel: To clean stainless steel surfaces, use . Make sure that the flaps of the Dryer The Exterior: Wipe or dust any spills or washing compounds with the hose attachment and reconnect the duct. Always follow the fabric manufacturer's ...cloth with a clean cloth. Run your warranty. The Exhaust Duct: Inspect and clean the exhaust ducting at least once a year to your dryer caused by these steps: 1 Turn off electrical supply by some laundry pretreatment soil and stain remover products. The fabric may be washed and ...
... clogged exhaust can lengthen the drying time. Stainless Steel: To clean stainless steel surfaces, use . Make sure that the flaps of the Dryer The Exterior: Wipe or dust any spills or washing compounds with the hose attachment and reconnect the duct. Always follow the fabric manufacturer's ...cloth with a clean cloth. Run your warranty. The Exhaust Duct: Inspect and clean the exhaust ducting at least once a year to your dryer caused by these steps: 1 Turn off electrical supply by some laundry pretreatment soil and stain remover products. The fabric may be washed and ...

Owners Manual
Page 19
Safety Instructions Operating Instructions Venting the dryer. Carefully follow the details on sharp objects. I Do not crush, kink or collapse the duct. I Use the shortest length possible. I Venting must conform to be ... longer if it is not vented to the outside. I Use only rigid metal 4″ diameter ductwork inside the dryer cabinet. ge.com For the best drying performance, the dryer needs to local building codes. The dryer will use plastic or other combustible ductwork. Use only rigid metal or flexible metal 4″ diameter ductwork for...
Safety Instructions Operating Instructions Venting the dryer. Carefully follow the details on sharp objects. I Do not crush, kink or collapse the duct. I Use the shortest length possible. I Venting must conform to be ... longer if it is not vented to the outside. I Use only rigid metal 4″ diameter ductwork inside the dryer cabinet. ge.com For the best drying performance, the dryer needs to local building codes. The dryer will use plastic or other combustible ductwork. Use only rigid metal or flexible metal 4″ diameter ductwork for...

Owners Manual
Page 20
... vice versa, the drying time could be sitting unevenly as necessary until even. NOTE: Electric dryers use two fuses or breakers. • If the light on the following pages, or visit ge.com. the dryer may tumble if only one fuse is paused. Type of heat Type of moisture in service mode What... To Do • Press STOP. When the dryer senses a low level of load and drying conditions • Drying time...
... vice versa, the drying time could be sitting unevenly as necessary until even. NOTE: Electric dryers use two fuses or breakers. • If the light on the following pages, or visit ge.com. the dryer may tumble if only one fuse is paused. Type of heat Type of moisture in service mode What... To Do • Press STOP. When the dryer senses a low level of load and drying conditions • Drying time...

Owners Manual
Page 21
...are wrinkled Clothes shrink Possible Causes Overdrying Letting items sit in a load, choose MORE DRY. Static electricity can stain clean items and the dryer. • Sometimes stains which cannot be seen when the clothes are wet appear after cycle ends Overloading What To Do • Select a... lint screen before each time a new load The load was then removed from lint collectors (like corduroy). ge.com Safety Instructions Operating Instructions OPERATION Clothes are still wet and dryer shut off after a short time The DRY dryness level was chosen but load is still damp Cannot make ...
...are wrinkled Clothes shrink Possible Causes Overdrying Letting items sit in a load, choose MORE DRY. Static electricity can stain clean items and the dryer. • Sometimes stains which cannot be seen when the clothes are wet appear after cycle ends Overloading What To Do • Select a... lint screen before each time a new load The load was then removed from lint collectors (like corduroy). ge.com Safety Instructions Operating Instructions OPERATION Clothes are still wet and dryer shut off after a short time The DRY dryness level was chosen but load is still damp Cannot make ...
Owners Manual
Page 22
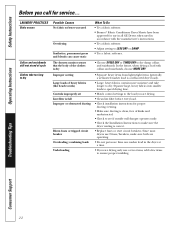
...; If you call for proper ducting/venting. • Make sure ducting is clean, free of the clothes is a well-sorted dryer load). • Large, heavy fabrics contain more than one washer load in accordance with collars and waistbands, choose MORE DRY. Since most... dryers use in all GE Dryers when used in the dryer at end of heavy fabrics (like beach towels) Controls improperly set Lint filter is full Improper or obstructed ducting ...
...; If you call for proper ducting/venting. • Make sure ducting is clean, free of the clothes is a well-sorted dryer load). • Large, heavy fabrics contain more than one washer load in accordance with collars and waistbands, choose MORE DRY. Since most... dryers use in all GE Dryers when used in the dryer at end of heavy fabrics (like beach towels) Controls improperly set Lint filter is full Improper or obstructed ducting ...


