Owners Manual
Page 1
...Safety Instructions 2-5 Operating Instructions Controls 6-8 Cycle Options 9-10 Dryer Features 11 Loading and Using the Dryer 12, 13 Installation Instructions Before You Begin 14-16 Connecting a Gas Dryer 17-20 Connecting an Electric Dryer 21-23 Exhausting the Dryer 24-28 Final Setup 29, 30 Reversing the Door ...Swing . . . . . .31, 32 Troubleshooting Tips 33 Consumer Support Consumer Support 36 Warranty (Canada 35 Warranty (U.S 34 Owner's Manual and Installation...
...Safety Instructions 2-5 Operating Instructions Controls 6-8 Cycle Options 9-10 Dryer Features 11 Loading and Using the Dryer 12, 13 Installation Instructions Before You Begin 14-16 Connecting a Gas Dryer 17-20 Connecting an Electric Dryer 21-23 Exhausting the Dryer 24-28 Final Setup 29, 30 Reversing the Door ...Swing . . . . . .31, 32 Troubleshooting Tips 33 Consumer Support Consumer Support 36 Warranty (Canada 35 Warranty (U.S 34 Owner's Manual and Installation...

Owners Manual
Page 2
... the outdoors. do not use gasoline or other flammable vapors and liquids in this manual must be minimized further by properly venting the dryer to such substances. For your safety, the information in the vicinity of this or any electrical switch; Operating Instructions Safety Instructions IMPORTANT SAFETY INFORMATION. Installation Instructions Consumer Support Troubleshooting...
... the outdoors. do not use gasoline or other flammable vapors and liquids in this manual must be minimized further by properly venting the dryer to such substances. For your safety, the information in the vicinity of this or any electrical switch; Operating Instructions Safety Instructions IMPORTANT SAFETY INFORMATION. Installation Instructions Consumer Support Troubleshooting...
Owners Manual
Page 5
...fabrics or reduce the static electricity in the vicinity of those products, or try a dryer-added product for which the manufacturer gives written assurance on , tripped over or subjected to damage. ■ Before discarding a dryer, or removing it from service, remove the dryer door to prevent children ... with controls. ■ Do not attempt to repair or replace any servicing unless specifically recommended in this Owner's Manual or in your dryer. WHEN NOT USING YOUR DRYER ■ Grasp the plug firmly when disconnecting this appliance to avoid damage to the cord while pulling.
...fabrics or reduce the static electricity in the vicinity of those products, or try a dryer-added product for which the manufacturer gives written assurance on , tripped over or subjected to damage. ■ Before discarding a dryer, or removing it from service, remove the dryer door to prevent children ... with controls. ■ Do not attempt to repair or replace any servicing unless specifically recommended in this Owner's Manual or in your dryer. WHEN NOT USING YOUR DRYER ■ Grasp the plug firmly when disconnecting this appliance to avoid damage to the cord while pulling.
Owners Manual
Page 6
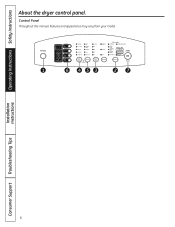
Control Panel Throughout this manual, features and appearance may vary from your model. 1 6 453 27 Installation Instructions Consumer Support Troubleshooting Tips 6 Operating Instructions Safety Instructions About the dryer control panel.
Control Panel Throughout this manual, features and appearance may vary from your model. 1 6 453 27 Installation Instructions Consumer Support Troubleshooting Tips 6 Operating Instructions Safety Instructions About the dryer control panel.

Owners Manual
Page 7
... supply. 2 Cycles The cycle controls the length and tumble speed of time you match the dry setting with the loads. Use for delicate fabrics. Manual Dry Cycles SPEED DRY For small loads that are needed in the idle mode. AIR DRY Use this feature to "wake up" the display. Close... Clothing worn for energy saving. Select the temperature by pressing the TEMP button. 3. This is active, press to set your selected dry level, the dryer will help you want is selected. 2. NOTE: Pressing POWER does not disconnect the appliance from items that are dry or slightly damp. MIXED LOAD For...
... supply. 2 Cycles The cycle controls the length and tumble speed of time you match the dry setting with the loads. Use for delicate fabrics. Manual Dry Cycles SPEED DRY For small loads that are needed in the idle mode. AIR DRY Use this feature to "wake up" the display. Close... Clothing worn for energy saving. Select the temperature by pressing the TEMP button. 3. This is active, press to set your selected dry level, the dryer will help you want is selected. 2. NOTE: Pressing POWER does not disconnect the appliance from items that are dry or slightly damp. MIXED LOAD For...
Owners Manual
Page 14
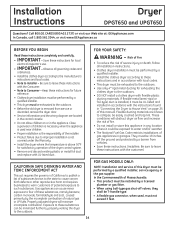
...is necessary when the appliance is above 50°F for local electrical inspector's use. • IMPORTANT - Gas appliances can be ... instructions found in the appliance. Properly adjusted dryers will obstruct dryer airflow and increase the risk of fire. • Do not install or store this manual. Risk of Fire • To reduce ...dryer door. • Service information and the wiring diagram are known to water and/or weather. • The National Fuel Gas Code restricts installations of natural gas or LP fuels. These conditions will minimize incomplete combustion. Call 800.GE...
...is necessary when the appliance is above 50°F for local electrical inspector's use. • IMPORTANT - Gas appliances can be ... instructions found in the appliance. Properly adjusted dryers will obstruct dryer airflow and increase the risk of fire. • Do not install or store this manual. Risk of Fire • To reduce ...dryer door. • Service information and the wiring diagram are known to water and/or weather. • The National Fuel Gas Code restricts installations of natural gas or LP fuels. These conditions will minimize incomplete combustion. Call 800.GE...
Owners Manual
Page 24
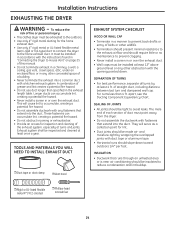
... tape or aluminum tape. • Horizontal runs should require little or no maintenance to the home exhaust duct. Installation Instructions EXHAUSTING THE DRYER WARNING - Longer ducts can accumulate lint, creating a potential fire hazard. • Do not obstruct incoming or exhausted air. •...creates a potential fire hazard. • Do not use duct longer than 4 ft. apart, see the Ducting Component Equivalency Chart. A combination of this manual. • Do not terminate exhaust in a chimney, a wall, a ceiling, gas vent, crawl space, attic, under an enclosed floor, or in ...
... tape or aluminum tape. • Horizontal runs should require little or no maintenance to the home exhaust duct. Installation Instructions EXHAUSTING THE DRYER WARNING - Longer ducts can accumulate lint, creating a potential fire hazard. • Do not obstruct incoming or exhausted air. •...creates a potential fire hazard. • Do not use duct longer than 4 ft. apart, see the Ducting Component Equivalency Chart. A combination of this manual. • Do not terminate exhaust in a chimney, a wall, a ceiling, gas vent, crawl space, attic, under an enclosed floor, or in ...
Owners Manual
Page 30
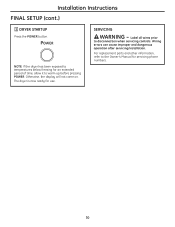
Wiring errors can cause improper and dangerous operation after servicing/installation. SERVICING WARNING - NOTE: If the dryer has been exposed to temperatures below freezing for servicing phone numbers. 30 Label all wires prior to warm up before pressing POWER. For replacement parts and other information, refer to the Owner's Manual for an extended period of time, allow it to disconnection when servicing controls. Otherwise, the display will not come on. The dryer is now ready for use. Installation Instructions FINAL SETUP (cont.) 3 DRYER STARTUP Press the POWER button.
Wiring errors can cause improper and dangerous operation after servicing/installation. SERVICING WARNING - NOTE: If the dryer has been exposed to temperatures below freezing for servicing phone numbers. 30 Label all wires prior to warm up before pressing POWER. For replacement parts and other information, refer to the Owner's Manual for an extended period of time, allow it to disconnection when servicing controls. Otherwise, the display will not come on. The dryer is now ready for use. Installation Instructions FINAL SETUP (cont.) 3 DRYER STARTUP Press the POWER button.
Owners Manual
Page 36
...physical and mental abilities and impairments. E1C 9M3 Extended Warranties In the U.S.: GEAppliances.com Purchase a GE extended warranty and learn about special discounts that can now download Owner's Manuals, order parts or even schedule service on -line and schedule your service at 800.626.2002 ...during normal business hours. GE Consumer Home Services will allow for the nearest Mabe service center, or...
...physical and mental abilities and impairments. E1C 9M3 Extended Warranties In the U.S.: GEAppliances.com Purchase a GE extended warranty and learn about special discounts that can now download Owner's Manuals, order parts or even schedule service on -line and schedule your service at 800.626.2002 ...during normal business hours. GE Consumer Home Services will allow for the nearest Mabe service center, or...

