Owners Manual
Page 1
...Safety Instructions 2-5 Operating Instructions Controls 6-8 Cycle Options 9-10 Dryer Features 11 Loading and Using the Dryer 12, 13 Installation Instructions Before You Begin 14-16 Connecting a Gas Dryer 17-20 Connecting an Electric Dryer 21-23 Exhausting the Dryer 24-28 Final Setup 29, 30 Reversing the Door ...Swing . . . . . .31, 32 Troubleshooting Tips 33 Consumer Support Consumer Support 36 Warranty (Canada 35 Warranty (U.S 34 Owner's Manual and Installation...
...Safety Instructions 2-5 Operating Instructions Controls 6-8 Cycle Options 9-10 Dryer Features 11 Loading and Using the Dryer 12, 13 Installation Instructions Before You Begin 14-16 Connecting a Gas Dryer 17-20 Connecting an Electric Dryer 21-23 Exhausting the Dryer 24-28 Final Setup 29, 30 Reversing the Door ...Swing . . . . . .31, 32 Troubleshooting Tips 33 Consumer Support Consumer Support 36 Warranty (Canada 35 Warranty (U.S 34 Owner's Manual and Installation...

Owners Manual
Page 2
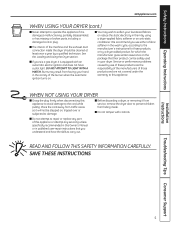
...or use any phone in your gas supplier from a neighbor's phone. Properly adjusted dryers will minimize incomplete combustion. For your safety, the information in the vicinity of this manual must be performed by the incomplete combustion of substances known to the state to ... qualified installer, service agency or the gas supplier. do not use gasoline or other flammable vapors and liquids in this or any electrical switch; Operating Instructions Safety Instructions IMPORTANT SAFETY INFORMATION. Follow the gas supplier's instructions carefully. 5 If you cannot reach your gas ...
...or use any phone in your gas supplier from a neighbor's phone. Properly adjusted dryers will minimize incomplete combustion. For your safety, the information in the vicinity of this manual must be performed by the incomplete combustion of substances known to the state to ... qualified installer, service agency or the gas supplier. do not use gasoline or other flammable vapors and liquids in this or any electrical switch; Operating Instructions Safety Instructions IMPORTANT SAFETY INFORMATION. Follow the gas supplier's instructions carefully. 5 If you cannot reach your gas ...
Owners Manual
Page 5
.... ■ Do not attempt to repair or replace any part of this appliance or attempt any servicing unless specifically recommended in this Owner's Manual or in published user-repair instructions that their product can be cleaned at least once a year by use either a fabric softener in the ... for which the manufacturer gives written assurance on . ■ You may result from hiding inside the dryer should be safely used in your laundered fabrics or reduce the static electricity in the vicinity of these products are not covered under the warranty to this appliance to avoid damage ...
.... ■ Do not attempt to repair or replace any part of this appliance or attempt any servicing unless specifically recommended in this Owner's Manual or in published user-repair instructions that their product can be cleaned at least once a year by use either a fabric softener in the ... for which the manufacturer gives written assurance on . ■ You may result from hiding inside the dryer should be safely used in your laundered fabrics or reduce the static electricity in the vicinity of these products are not covered under the warranty to this appliance to avoid damage ...
Owners Manual
Page 6
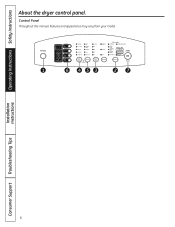
Control Panel Throughout this manual, features and appearance may vary from your model. 1 6 453 27 Installation Instructions Consumer Support Troubleshooting Tips 6 Operating Instructions Safety Instructions About the dryer control panel.
Control Panel Throughout this manual, features and appearance may vary from your model. 1 6 453 27 Installation Instructions Consumer Support Troubleshooting Tips 6 Operating Instructions Safety Instructions About the dryer control panel.

Owners Manual
Page 7
...put the dryer in a hurry, such as sports or school uniforms. Can also be used if the previous cycle left some items damp, such as Spandex. Sensor Cycles COTTONS For cottons and most loads. WRINKLE FREE For wrinkle-free and permanent press items. ACTIVE WEAR Clothing worn for heavy fabrics. Manual Dry... Cycles SPEED DRY For small loads that are needed in the idle mode. When the moisture in the load. VERY DRY MORE DRY NORMAL LESS DRY DAMP DRY Use for active sports exercise and some models) MY CYCLES Press to set your selected dry level, the dryer will help...
...put the dryer in a hurry, such as sports or school uniforms. Can also be used if the previous cycle left some items damp, such as Spandex. Sensor Cycles COTTONS For cottons and most loads. WRINKLE FREE For wrinkle-free and permanent press items. ACTIVE WEAR Clothing worn for heavy fabrics. Manual Dry... Cycles SPEED DRY For small loads that are needed in the idle mode. When the moisture in the load. VERY DRY MORE DRY NORMAL LESS DRY DAMP DRY Use for active sports exercise and some models) MY CYCLES Press to set your selected dry level, the dryer will help...
Owners Manual
Page 14
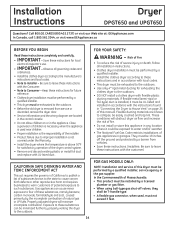
...Installation and service of children is necessary when the appliance is used , must be easily crushed and trap lint. Installation Instructions Dryer DPGT650 and UPGT650 Questions? Call 800.GE.CARES (800.432.2737) or visit our Web site at: GEAppliances.com In Canada, call 1.800.561.3344, or visit....ca BEFORE YOU BEGIN Read these instructions with flexible plastic ducting materials. Be sure to the outdoors. • Before the old dryer is above 50°F for local electrical inspector's use. • IMPORTANT - Close supervision of this manual. FOR YOUR SAFETY: WARNING -
...Installation and service of children is necessary when the appliance is used , must be easily crushed and trap lint. Installation Instructions Dryer DPGT650 and UPGT650 Questions? Call 800.GE.CARES (800.432.2737) or visit our Web site at: GEAppliances.com In Canada, call 1.800.561.3344, or visit....ca BEFORE YOU BEGIN Read these instructions with flexible plastic ducting materials. Be sure to the outdoors. • Before the old dryer is above 50°F for local electrical inspector's use. • IMPORTANT - Close supervision of this manual. FOR YOUR SAFETY: WARNING -
Owners Manual
Page 24
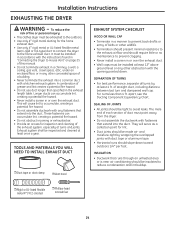
... duct longer than 4 ft. Exhaust system shall be inspected and cleaned at least 12″ above ground level or any other concealed space of this manual. • Do not terminate exhaust in a chimney, a wall, a ceiling, gas vent, crawl space, attic, under an enclosed floor, or in... • Ductwork that extend into a common duct with the opening pointed down toward outdoors 1/4″ per foot. Installation Instructions EXHAUSTING THE DRYER WARNING - It must be installed in accordance with the instructions found in or over the exhaust duct. This will serve as a collection point...
... duct longer than 4 ft. Exhaust system shall be inspected and cleaned at least 12″ above ground level or any other concealed space of this manual. • Do not terminate exhaust in a chimney, a wall, a ceiling, gas vent, crawl space, attic, under an enclosed floor, or in... • Ductwork that extend into a common duct with the opening pointed down toward outdoors 1/4″ per foot. Installation Instructions EXHAUSTING THE DRYER WARNING - It must be installed in accordance with the instructions found in or over the exhaust duct. This will serve as a collection point...
Owners Manual
Page 30
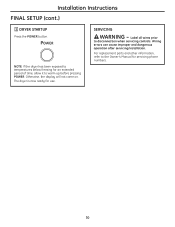
NOTE: If the dryer has been exposed to temperatures below freezing for servicing phone numbers. 30 SERVICING WARNING - Label all wires prior to warm up before pressing POWER. For replacement parts and other information, refer to the Owner's Manual for an extended period of time, allow it to disconnection when servicing controls. Wiring errors can cause improper and dangerous operation after servicing/installation. The dryer is now ready for use. Otherwise, the display will not come on. Installation Instructions FINAL SETUP (cont.) 3 DRYER STARTUP Press the POWER button.
NOTE: If the dryer has been exposed to temperatures below freezing for servicing phone numbers. 30 SERVICING WARNING - Label all wires prior to warm up before pressing POWER. For replacement parts and other information, refer to the Owner's Manual for an extended period of time, allow it to disconnection when servicing controls. Wiring errors can cause improper and dangerous operation after servicing/installation. The dryer is now ready for use. Otherwise, the display will not come on. Installation Instructions FINAL SETUP (cont.) 3 DRYER STARTUP Press the POWER button.
Owners Manual
Page 36
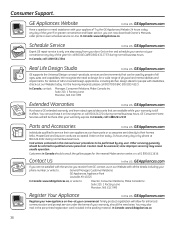
... Register Your Appliance In the U.S.: GEAppliances.com Register your new appliance on our Website with all ages, sizes and capabilities. Try the GE Appliances Website 24 hours a day, any user. In Canada, call 1.800.561.3344 Real Life Design Studio In the U.S.: GEAppliances.com...Suite 310, 1 Factory Lane Moncton, N.B. Contact Us In the U.S.: GEAppliances.com If you can purchase it on -line. You can now download Owner's Manuals, order parts or even schedule service on -line anytime, or call 1.800.661.1616. In Canada: www.GEAppliances.ca 36 In Canada, contact: Manager,...
... Register Your Appliance In the U.S.: GEAppliances.com Register your new appliance on our Website with all ages, sizes and capabilities. Try the GE Appliances Website 24 hours a day, any user. In Canada, call 1.800.561.3344 Real Life Design Studio In the U.S.: GEAppliances.com...Suite 310, 1 Factory Lane Moncton, N.B. Contact Us In the U.S.: GEAppliances.com If you can purchase it on -line. You can now download Owner's Manuals, order parts or even schedule service on -line anytime, or call 1.800.661.1616. In Canada: www.GEAppliances.ca 36 In Canada, contact: Manager,...

