Use and Care Manual
Page 1
Dryers GEAppliances.com Safety Instructions 2-5 Operating Instructions Control Panels 6-9 Cycle Options 10, 11 Dryer Features 11 Reversing the Door Swing . . . .12-16 Loading and Using the Dryer 17, 18 Venting the Dryer 19 Stacking 20-23 Troubleshooting Tips . . . .24-26 Consumer Support Warranty 27 Consumer Support 28 Owner's Manual DBVH520 DCVH640 DCVH680 DHDVH68 GFDN100 GFDN110 Write the model and serial numbers here: Model Serial They are on the label on the front of the dryer behind the door. 364B7130P001 49-90393-2 03/11/10 GE
Dryers GEAppliances.com Safety Instructions 2-5 Operating Instructions Control Panels 6-9 Cycle Options 10, 11 Dryer Features 11 Reversing the Door Swing . . . .12-16 Loading and Using the Dryer 17, 18 Venting the Dryer 19 Stacking 20-23 Troubleshooting Tips . . . .24-26 Consumer Support Warranty 27 Consumer Support 28 Owner's Manual DBVH520 DCVH640 DCVH680 DHDVH68 GFDN100 GFDN110 Write the model and serial numbers here: Model Serial They are on the label on the front of the dryer behind the door. 364B7130P001 49-90393-2 03/11/10 GE
Use and Care Manual
Page 2
...a match, or cigarette, or turn on any gas or electrical appliance. 2 Do not touch any other appliance. Gas appliances can cause minor exposure to four of these substances can be followed to such substances. Troubleshooting Tips Consumer Support 2 California Safe Drinking Water and Toxic Enforcement ..., carbon monoxide, formaldehyde and soot, caused primarily by a qualified installer, service agency or the gas supplier. Properly adjusted dryers will minimize incomplete combustion. Exposure to cause cancer, birth defects or other flammable vapors and liquids in this or any...
...a match, or cigarette, or turn on any gas or electrical appliance. 2 Do not touch any other appliance. Gas appliances can cause minor exposure to four of these substances can be followed to such substances. Troubleshooting Tips Consumer Support 2 California Safe Drinking Water and Toxic Enforcement ..., carbon monoxide, formaldehyde and soot, caused primarily by a qualified installer, service agency or the gas supplier. Properly adjusted dryers will minimize incomplete combustion. Exposure to cause cancer, birth defects or other flammable vapors and liquids in this or any...
Use and Care Manual
Page 3
...supply circuit to the dryer. The lowered protector will not be exposed to temperatures below freezing or exposed to prevent large amounts of all governing codes and ordinances. Operating Instructions Troubleshooting Tips Consumer Support ... Instructions sheet, you can receive one by visiting GEAppliances.com, or by calling 800.GE.CARES (800.432.2737). PuNCTuRED DuCTWORk CAN CAuSE A FIRE IF IT COllAPSES OR ...to its lowest position and connect the exhaust duct to avoid electrical overload. Exhaust/Ducting: 1 Dryers MuST be exhausted to the outside to the weather. uSE OF PlASTIC OR OTHER...
...supply circuit to the dryer. The lowered protector will not be exposed to temperatures below freezing or exposed to prevent large amounts of all governing codes and ordinances. Operating Instructions Troubleshooting Tips Consumer Support ... Instructions sheet, you can receive one by visiting GEAppliances.com, or by calling 800.GE.CARES (800.432.2737). PuNCTuRED DuCTWORk CAN CAuSE A FIRE IF IT COllAPSES OR ...to its lowest position and connect the exhaust duct to avoid electrical overload. Exhaust/Ducting: 1 Dryers MuST be exhausted to the outside to the weather. uSE OF PlASTIC OR OTHER...
Use and Care Manual
Page 4
... stopped. n To minimize the possibility of electric shock, unplug this appliance is used by clothing during subsequent dryer uses. YOUR LAUNDRY AREA n Keep the area underneath and around your dryer. WHEN USING YOUR DRYER n Never reach into the dryer while the drum is necessary if this appliance...before each load to the wash water. n Do not store plastic, paper or clothing that may burn or melt on the dryer top. Troubleshooting Tips Consumer Support 4 NOTE: Pressing START, STOP or POWER does NOT disconnect the appliance from Heat or Do Not Tumble Dry ...
... stopped. n To minimize the possibility of electric shock, unplug this appliance is used by clothing during subsequent dryer uses. YOUR LAUNDRY AREA n Keep the area underneath and around your dryer. WHEN USING YOUR DRYER n Never reach into the dryer while the drum is necessary if this appliance...before each load to the wash water. n Do not store plastic, paper or clothing that may burn or melt on the dryer top. Troubleshooting Tips Consumer Support 4 NOTE: Pressing START, STOP or POWER does NOT disconnect the appliance from Heat or Do Not Tumble Dry ...
Use and Care Manual
Page 5
... conditioner. n Do not tamper with an automatic electric ignition and does not have the skills to carry out. DO NOT ATTEMPT TO lIGHT WITH A MATCH. Burns may wish to soften your hand in them by use either a fabric softener in your dryer. SAVE THESE INSTRuCTIONS Troubleshooting Tips Consumer Support 5 n The interior of the...
... conditioner. n Do not tamper with an automatic electric ignition and does not have the skills to carry out. DO NOT ATTEMPT TO lIGHT WITH A MATCH. Burns may wish to soften your hand in them by use either a fabric softener in your dryer. SAVE THESE INSTRuCTIONS Troubleshooting Tips Consumer Support 5 n The interior of the...
Use and Care Manual
Page 6
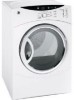
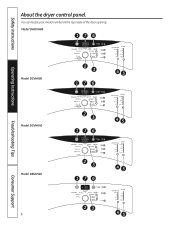
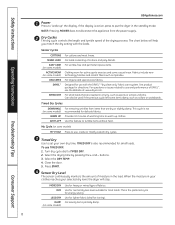
You can locate your model number at the top inside of the door opening. Model DHDVH68 176 Operating Instructions Model DCVH680 2 3 45 176 Troubleshooting Tips Model DCVH640 2 3 45 176 Consumer Support Model DBVH520 6 2 3 45 176 23 45 Safety Instructions About the dryer control panel.
You can locate your model number at the top inside of the door opening. Model DHDVH68 176 Operating Instructions Model DCVH680 2 3 45 176 Troubleshooting Tips Model DCVH640 2 3 45 176 Consumer Support Model DBVH520 6 2 3 45 176 23 45 Safety Instructions About the dryer control panel.
Use and Care Manual
Page 7
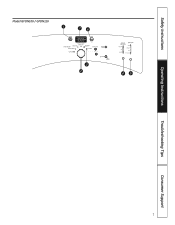
Model GFDN100 / GFDN110 7 Safety Instructions Operating Instructions Troubleshooting Tips Consumer Support
Model GFDN100 / GFDN110 7 Safety Instructions Operating Instructions Troubleshooting Tips Consumer Support
Use and Care Manual
Page 8
... the previous cycle left some casual wear. Use this feature to set your selected dry level, the dryer will help you match the dry setting with the DRYEL™ "dry clean only" fabric care system. Troubleshooting Tips Consumer Support 8 To use with the loads. MORE DRY DRY LESS DRY DAMP (on some.... Select the drying time by pressing the + and - If the display is the preferred cycle for energy saving. This is active, press to put the dryer in your clothes reaches your own dry time.
... the previous cycle left some casual wear. Use this feature to set your selected dry level, the dryer will help you match the dry setting with the DRYEL™ "dry clean only" fabric care system. Troubleshooting Tips Consumer Support 8 To use with the loads. MORE DRY DRY LESS DRY DAMP (on some.... Select the drying time by pressing the + and - If the display is the preferred cycle for energy saving. This is active, press to put the dryer in your clothes reaches your own dry time.

Use and Care Manual
Page 9
...synthetics and items labeled Tumble Dry Low. Change DRy TEMP and SENSOR DRy lEVEl settings to store your selection. Troubleshooting Tips Consumer Support 9 Safety Instructions Operating Instructions About the dryer control panel. 5 Dry Temp You can be displayed until the START button is activated. For synthetics, blends ...restart the dry cycle. My Cycle (on some models) This option may only be used during a portion of Residential Clothes Dryers. Select any drying OPTIONS you have already cleaned the filter (before drying a load. To change the temperature of settings: 1.
...synthetics and items labeled Tumble Dry Low. Change DRy TEMP and SENSOR DRy lEVEl settings to store your selection. Troubleshooting Tips Consumer Support 9 Safety Instructions Operating Instructions About the dryer control panel. 5 Dry Temp You can be displayed until the START button is activated. For synthetics, blends ...restart the dry cycle. My Cycle (on some models) This option may only be used during a portion of Residential Clothes Dryers. Select any drying OPTIONS you have already cleaned the filter (before drying a load. To change the temperature of settings: 1.
Use and Care Manual
Page 10
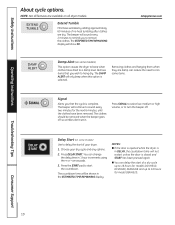
..., DCVH680, DHDVH68 and up to start of your dry cycle and any options. 2. The beeper will continue to remove the clothes. Choose your dryer. 1. Press DElAy START. The countdown time will be removed when the beeper goes off . GEAppliances.com DAMP ALERT Damp Alert (on all features...unless the door is in the ESTIMATED TIME REMAINING display. Press SIGNAl to select low, medium or high volume, or to hang dry. Troubleshooting Tips Consumer Support 10 The ESTIMATED TIME REMAINING display will sound every 2 minutes to remind you wish to turn the beeper off so ...
..., DCVH680, DHDVH68 and up to start of your dry cycle and any options. 2. The beeper will continue to remove the clothes. Choose your dryer. 1. Press DElAy START. The countdown time will be removed when the beeper goes off . GEAppliances.com DAMP ALERT Damp Alert (on all features...unless the door is in the ESTIMATED TIME REMAINING display. Press SIGNAl to select low, medium or high volume, or to hang dry. Troubleshooting Tips Consumer Support 10 The ESTIMATED TIME REMAINING display will sound every 2 minutes to remind you wish to turn the beeper off so ...
Use and Care Manual
Page 11
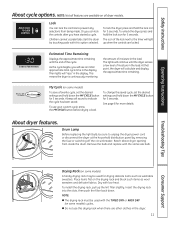
Then lights will calculate and display the approximate time remaining. At that point, the dryer will "race" in the display. To use this option selected. Reach above dryer opening from being made. Troubleshooting Tips Consumer Support Drying Rack (on some models) A handy drying rack may be used with... for 3 seconds. My Cycle (on some models) To save a favorite cycle, set the desired settings and hold down . To unlock the dryer, press and hold the lock icon for 3 seconds. The lights will light up the lint filter slightly. n Do not use your custom cycle...
Then lights will calculate and display the approximate time remaining. At that point, the dryer will "race" in the display. To use this option selected. Reach above dryer opening from being made. Troubleshooting Tips Consumer Support Drying Rack (on some models) A handy drying rack may be used with... for 3 seconds. My Cycle (on some models) To save a favorite cycle, set the desired settings and hold down . To unlock the dryer, press and hold the lock icon for 3 seconds. The lights will light up the lint filter slightly. n Do not use your custom cycle...
Use and Care Manual
Page 12
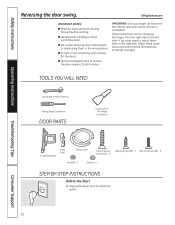
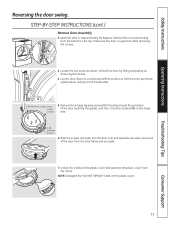
... swing is completed. Unplug the dryer from the right side to the left and right. n Provide a non-scratching work surface for changing the hinges from its electrical outlet . 12 TOOLS YOU WILL NEED Adjustable Crescent Wrench Phillips Head Screwdriver DOOR PARTS Putty Knife or Thin-Blade Screwdriver Troubleshooting Tips Consumer Support Hinge Assembly...
... swing is completed. Unplug the dryer from the right side to the left and right. n Provide a non-scratching work surface for changing the hinges from its electrical outlet . 12 TOOLS YOU WILL NEED Adjustable Crescent Wrench Phillips Head Screwdriver DOOR PARTS Putty Knife or Thin-Blade Screwdriver Troubleshooting Tips Consumer Support Hinge Assembly...
Use and Care Manual
Page 13
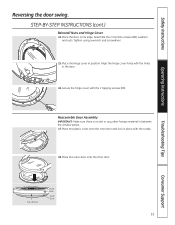
... the door outlining the gasket, and the 2 machine screws (#8) on the plastic cover and separate the plastic cover from the door frame and set aside. 7. Troubleshooting Tips Consumer Support 13 Unlock the 4 tabs on the hinge side. 2 #8 Machine Screws 6. Remove the four screws 3. Loosen the top screw as shown by lifting...
... the door outlining the gasket, and the 2 machine screws (#8) on the plastic cover and separate the plastic cover from the door frame and set aside. 7. Troubleshooting Tips Consumer Support 13 Unlock the 4 tabs on the hinge side. 2 #8 Machine Screws 6. Remove the four screws 3. Loosen the top screw as shown by lifting...
Use and Care Manual
Page 14
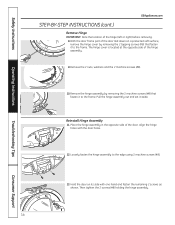
Then tighten the 2 screws (#8) holding the hinge assembly. 14 Troubleshooting Tips Consumer Support Reinstall Hinge Assembly 11. Place the hinge assembly in the opposite side of the door. The hinge cover is located at the ...
Then tighten the 2 screws (#8) holding the hinge assembly. 14 Troubleshooting Tips Consumer Support Reinstall Hinge Assembly 11. Place the hinge assembly in the opposite side of the door. The hinge cover is located at the ...
Use and Care Manual
Page 15
... nuts. Secure the hinge cover with the holes in place with the 4 tabs. 18. STEP-BY-STEP INSTRUCTIONS (cont.) Reinstall Nuts and Hinge Cover 14. Troubleshooting Tips Consumer Support Top of Door Outer Door Inner Door 15 Place the hinge cover in between the window panes. 17. Align the hinge cover...
... nuts. Secure the hinge cover with the holes in place with the 4 tabs. 18. STEP-BY-STEP INSTRUCTIONS (cont.) Reinstall Nuts and Hinge Cover 14. Troubleshooting Tips Consumer Support Top of Door Outer Door Inner Door 15 Place the hinge cover in between the window panes. 17. Align the hinge cover...
Use and Care Manual
Page 16
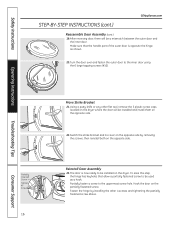
...and fasten the outer door to the uppermost screw hole. Operating Instructions Troubleshooting Tips Partially Inserted Screw Tighten All Screws 16 Move Strike Bracket 21....the opposite side by installing the other flat tool, remove the 5 plastic screw caps located on the dryer. Fasten the hinge by removing the screws; Make sure that allow a partially fastened screw to be used...has keyholes that the handle part of the outer door is now ready to be installed on the dryer where the door will be installed and install them on the opposite side. Using a putty knife ...
...and fasten the outer door to the uppermost screw hole. Operating Instructions Troubleshooting Tips Partially Inserted Screw Tighten All Screws 16 Move Strike Bracket 21....the opposite side by installing the other flat tool, remove the 5 plastic screw caps located on the dryer. Fasten the hinge by removing the screws; Make sure that allow a partially fastened screw to be used...has keyholes that the handle part of the outer door is now ready to be installed on the dryer where the door will be installed and install them on the opposite side. Using a putty knife ...
Use and Care Manual
Page 17
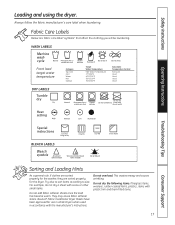
... wastes energy and causes wrinkling. Bounce® Fabric Conditioner Dryer Sheets have been approved for the dryer. Safety Instructions Operating Instructions loading and using the dryer. Fabric Care Labels Below are sorted properly for use in all GE Dryers when used with do not dry a sheet with socks ...Dry at BlEACH lABElS Bleach symbols Any bleach (when needed) Only non-chlorine bleach (when needed) Do not bleach In the shade Troubleshooting Tips Consumer Support Sorting and Loading Hints As a general rule, if clothes are sorted properly for the washer, they are fabric care...
... wastes energy and causes wrinkling. Bounce® Fabric Conditioner Dryer Sheets have been approved for the dryer. Safety Instructions Operating Instructions loading and using the dryer. Fabric Care Labels Below are sorted properly for use in all GE Dryers when used with do not dry a sheet with socks ...Dry at BlEACH lABElS Bleach symbols Any bleach (when needed) Only non-chlorine bleach (when needed) Do not bleach In the shade Troubleshooting Tips Consumer Support Sorting and Loading Hints As a general rule, if clothes are sorted properly for the washer, they are fabric care...
Use and Care Manual
Page 18
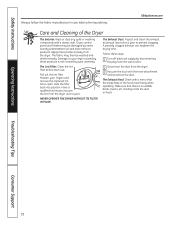
...covered by some laundry pretreatment soil and stain remover products. Moisten your dryer caused by these steps: 1 Turn off electrical supply by disconnecting the plug from the wall socket. 2 Disconnect the duct from the dryer. 3 Vacuum the duct with a damp cloth. Damage to prevent ...the lint from the dryer. Follow these products is no wildlife (birds, insects, etc.) nesting inside flaps of the Dryer The Exterior: Wipe or dust any spills or washing compounds with the hose attachment and reconnect the duct. Operating Instructions Troubleshooting Tips Consumer Support ...
...covered by some laundry pretreatment soil and stain remover products. Moisten your dryer caused by these steps: 1 Turn off electrical supply by disconnecting the plug from the wall socket. 2 Disconnect the duct from the dryer. 3 Vacuum the duct with a damp cloth. Damage to prevent ...the lint from the dryer. Follow these products is no wildlife (birds, insects, etc.) nesting inside flaps of the Dryer The Exterior: Wipe or dust any spills or washing compounds with the hose attachment and reconnect the duct. Operating Instructions Troubleshooting Tips Consumer Support ...
Use and Care Manual
Page 19
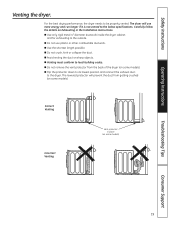
... protector will use plastic or other combustible ductwork. The dryer will prevent the duct from the back of the dryer (on some models). n Avoid resting the duct on Exhausting in place (on some models) Troubleshooting Tips Consumer Support 19 Safety Instructions Operating Instructions Venting the dryer. n Use only rigid metal 4″ diameter ductwork inside...
... protector will use plastic or other combustible ductwork. The dryer will prevent the duct from the back of the dryer (on some models). n Avoid resting the duct on Exhausting in place (on some models) Troubleshooting Tips Consumer Support 19 Safety Instructions Operating Instructions Venting the dryer. n Use only rigid metal 4″ diameter ductwork inside...
Use and Care Manual
Page 20
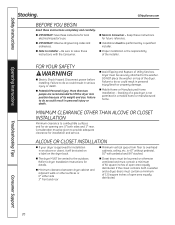
...THAN ALCOVE OR CLOSET INSTALLATION Minimum clearance to Installer - is the responsibility of the installer. Troubleshooting Tips Consumer Support 20 n Note to overhead cabinets, ceiling, etc. FOR YOUR SAFETY WARNING! n Electric Shock Hazard. Failure to do so could result in personal injury/death or property damage.... in serious injury or death. Refer to do so could result in a mobile home or manufactured home. n Minimum clearance between dryer cabinet and adjacent walls or other surfaces is: 0″ either side 3″ front and rear n Closet doors must be louvered...
...THAN ALCOVE OR CLOSET INSTALLATION Minimum clearance to Installer - is the responsibility of the installer. Troubleshooting Tips Consumer Support 20 n Note to overhead cabinets, ceiling, etc. FOR YOUR SAFETY WARNING! n Electric Shock Hazard. Failure to do so could result in personal injury/death or property damage.... in serious injury or death. Refer to do so could result in a mobile home or manufactured home. n Minimum clearance between dryer cabinet and adjacent walls or other surfaces is: 0″ either side 3″ front and rear n Closet doors must be louvered...
