Use and Care Manual
Page 1
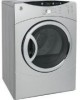
Dryers GEAppliances.com Safety Instructions 2-5 Operating Instructions Control Panels 6-9 Cycle Options 10, 11 Dryer Features 11 Reversing the Door Swing . . . .12-16 Loading and Using the Dryer 17, 18 Venting the Dryer 19 Stacking 20-23 Troubleshooting Tips . . . .24-26 Consumer Support Warranty 27 Consumer Support 28 Owner's Manual DBVH520 DCVH640 DCVH680 DHDVH68 GFDN100 GFDN110 Write the model and serial numbers here: Model Serial They are on the label on the front of the dryer behind the door. 364B7130P001 49-90393-2 03/11/10 GE
Dryers GEAppliances.com Safety Instructions 2-5 Operating Instructions Control Panels 6-9 Cycle Options 10, 11 Dryer Features 11 Reversing the Door Swing . . . .12-16 Loading and Using the Dryer 17, 18 Venting the Dryer 19 Stacking 20-23 Troubleshooting Tips . . . .24-26 Consumer Support Warranty 27 Consumer Support 28 Owner's Manual DBVH520 DCVH640 DCVH680 DHDVH68 GFDN100 GFDN110 Write the model and serial numbers here: Model Serial They are on the label on the front of the dryer behind the door. 364B7130P001 49-90393-2 03/11/10 GE
Use and Care Manual
Page 2
...electric shock, or to prevent property damage, personal injury, or death. Troubleshooting Tips Consumer Support 2 WARNING! Gas appliances can be performed by the incomplete combustion of these substances can cause minor exposure to the outdoors. Safety Instructions Operating Instructions IMPORTANT SAFETy INFORMATION. READ All INSTRuCTIONS...your safety, the information in the vicinity of this manual must be minimized further by properly venting the dryer to four of natural gas or LP fuels. Exposure to these substances, namely benzene, carbon monoxide, formaldehyde...
...electric shock, or to prevent property damage, personal injury, or death. Troubleshooting Tips Consumer Support 2 WARNING! Gas appliances can be performed by the incomplete combustion of these substances can cause minor exposure to the outdoors. Safety Instructions Operating Instructions IMPORTANT SAFETy INFORMATION. READ All INSTRuCTIONS...your safety, the information in the vicinity of this manual must be minimized further by properly venting the dryer to four of natural gas or LP fuels. Exposure to these substances, namely benzene, carbon monoxide, formaldehyde...
Use and Care Manual
Page 3
... panel and the door. For complete details, follow the Installation Instructions. If you did not receive an Installation Instructions sheet, you can receive one by visiting GEAppliances.com, or by calling 800.GE.CARES (800.432.2737). n Install or store where it is...the exhaust duct to avoid electrical overload. PuNCTuRED DuCTWORk CAN CAuSE A FIRE IF IT COllAPSES OR BECOMES OTHERWISE RESTRICTED IN uSE OR DuRING INSTAllATION. Safety Instructions GEAppliances.com PROPER INSTALLATION This dryer must be properly installed and located in Installation Instructions. n Connect to a ...
... panel and the door. For complete details, follow the Installation Instructions. If you did not receive an Installation Instructions sheet, you can receive one by visiting GEAppliances.com, or by calling 800.GE.CARES (800.432.2737). n Install or store where it is...the exhaust duct to avoid electrical overload. PuNCTuRED DuCTWORk CAN CAuSE A FIRE IF IT COllAPSES OR BECOMES OTHERWISE RESTRICTED IN uSE OR DuRING INSTAllATION. Safety Instructions GEAppliances.com PROPER INSTALLATION This dryer must be properly installed and located in Installation Instructions. n Connect to a ...
Use and Care Manual
Page 4
...the dryer at the building's distribution panel by spontaneous combustion. n Never climb on or stand on top of combustible materials (lint, paper, rags, etc.), gasoline, chemicals and other appliance. Some rubber materials, when heated, can reduce the flame retardancy of electric shock,...WARNING! Skin irritation could cause a clothes load to reduce the possibility of children, preferably in your washer or dryer during operation. Safety Instructions Operating Instructions IMPORTANT SAFETy INFORMATION. n Do not wash or dry articles that may ignite or explode. Do not use or ...
...the dryer at the building's distribution panel by spontaneous combustion. n Never climb on or stand on top of combustible materials (lint, paper, rags, etc.), gasoline, chemicals and other appliance. Some rubber materials, when heated, can reduce the flame retardancy of electric shock,...WARNING! Skin irritation could cause a clothes load to reduce the possibility of children, preferably in your washer or dryer during operation. Safety Instructions Operating Instructions IMPORTANT SAFETy INFORMATION. n Do not wash or dry articles that may ignite or explode. Do not use or ...
Use and Care Manual
Page 5
... soften your laundered fabrics or reduce the static electricity in your hand in this appliance. Service or performance problems caused by a qualified technician. Burns may wish to damage. n Do not attempt to carry out. See the Loading and Using the Dryer section. SAVE THESE INSTRuCTIONS Troubleshooting Tips Consumer Support 5 n The interior of the...
... soften your laundered fabrics or reduce the static electricity in your hand in this appliance. Service or performance problems caused by a qualified technician. Burns may wish to damage. n Do not attempt to carry out. See the Loading and Using the Dryer section. SAVE THESE INSTRuCTIONS Troubleshooting Tips Consumer Support 5 n The interior of the...
Use and Care Manual
Page 6
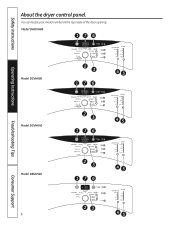
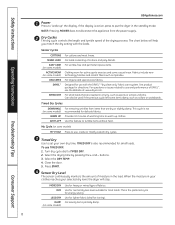
You can locate your model number at the top inside of the door opening. Model DHDVH68 176 Operating Instructions Model DCVH680 2 3 45 176 Troubleshooting Tips Model DCVH640 2 3 45 176 Consumer Support Model DBVH520 6 2 3 45 176 23 45 Safety Instructions About the dryer control panel.
You can locate your model number at the top inside of the door opening. Model DHDVH68 176 Operating Instructions Model DCVH680 2 3 45 176 Troubleshooting Tips Model DCVH640 2 3 45 176 Consumer Support Model DBVH520 6 2 3 45 176 23 45 Safety Instructions About the dryer control panel.
Use and Care Manual
Page 7
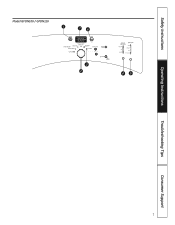
Model GFDN100 / GFDN110 7 Safety Instructions Operating Instructions Troubleshooting Tips Consumer Support
Model GFDN100 / GFDN110 7 Safety Instructions Operating Instructions Troubleshooting Tips Consumer Support
Use and Care Manual
Page 8
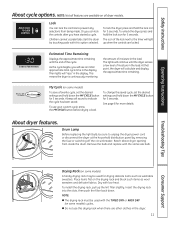
...cottons and poly-blends. MORE DRY DRY LESS DRY DAMP (on some models) Use for most linens. For leaving items partially damp. Safety Instructions Operating Instructions GEAppliances.com 1 Power Press to "wake up clothes. For loads consisting of the drying process. When the moisture in the load. Use for...for energy saving. Select the DRy TEMP. 4. The chart below will stop. Use this feature to set your selected dry level, the dryer will help you match the dry setting with the DRYEL™ "dry clean only" fabric care system. Turn dry cycle dial to put the...
...cottons and poly-blends. MORE DRY DRY LESS DRY DAMP (on some models) Use for most linens. For leaving items partially damp. Safety Instructions Operating Instructions GEAppliances.com 1 Power Press to "wake up clothes. For loads consisting of the drying process. When the moisture in the load. Use for...for energy saving. Select the DRy TEMP. 4. The chart below will stop. Use this feature to set your selected dry level, the dryer will help you match the dry setting with the DRYEL™ "dry clean only" fabric care system. Turn dry cycle dial to put the...

Use and Care Manual
Page 9
...cleaned the filter (before drying a load. This message will disappear after the POWER button has been pressed), the "ClEAN lINT FIlTER" message will pause the dryer. NOTE: Do not use this drying cycle. This option reduces certain types of settings". 7 "ClEAN lINT FIlTER" (message) (This message represents only ...*. Press and hold the MYCYCLE pad for one touch recall. To change the temperature of settings: 1. Even though you want. 4. Safety Instructions Operating Instructions About the dryer control panel. 5 Dry Temp You can be set while a cycle is pressed.
...cleaned the filter (before drying a load. This message will disappear after the POWER button has been pressed), the "ClEAN lINT FIlTER" message will pause the dryer. NOTE: Do not use this drying cycle. This option reduces certain types of settings". 7 "ClEAN lINT FIlTER" (message) (This message represents only ...*. Press and hold the MYCYCLE pad for one touch recall. To change the temperature of settings: 1. Even though you want. 4. Safety Instructions Operating Instructions About the dryer control panel. 5 Dry Temp You can be set while a cycle is pressed.
Use and Care Manual
Page 10
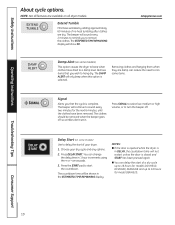
Safety Instructions Operating Instructions About cycle options. The ESTIMATED TIME REMAINING display will be removed when the .... The beeper will not restart unless the door is complete. NOTES: n If the door is opened while the dryer is selected. The DAMP AlERT will sound every 2 minutes to remind you that you wish to turn the beeper off...using the + or - Removing clothes and hanging them when they are available on some models) This option causes the dryer to beep when clothes have been removed. The beeper will only beep when this option is in the ESTIMATED TIME REMAINING...
Safety Instructions Operating Instructions About cycle options. The ESTIMATED TIME REMAINING display will be removed when the .... The beeper will not restart unless the door is complete. NOTES: n If the door is opened while the dryer is selected. The DAMP AlERT will sound every 2 minutes to remind you that you wish to turn the beeper off...using the + or - Removing clothes and hanging them when they are available on some models) This option causes the dryer to beep when clothes have been removed. The beeper will only beep when this option is in the ESTIMATED TIME REMAINING...
Use and Care Manual
Page 11
...the filter back down the My CyClE button for drying delicate items such as wool sweaters and delicate fabrics. Safety Instructions Operating Instructions About cycle options. NOTE: Not all dryer models. DRYING DAMP COOL DOW N DELAY CLENA LINT FTIELR HOLD 3 SEC TO STORE M Y CYCLE Estimated Time ...Remaining Displays the approximate time remaining until the dryer senses a low level of moisture in the display. A beep will see an...
...the filter back down the My CyClE button for drying delicate items such as wool sweaters and delicate fabrics. Safety Instructions Operating Instructions About cycle options. NOTE: Not all dryer models. DRYING DAMP COOL DOW N DELAY CLENA LINT FTIELR HOLD 3 SEC TO STORE M Y CYCLE Estimated Time ...Remaining Displays the approximate time remaining until the dryer senses a low level of moisture in the display. A beep will see an...
Use and Care Manual
Page 12
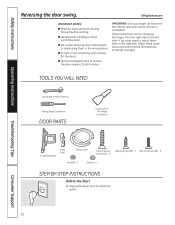
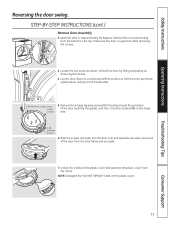
... the dryer from the right side to the left side-if you Start 1. IMPORTANT: Once you begin, do not move the cabinet until door-swing reversal is 30-60 minutes. n Handle parts carefully to the right side, follow these same instructions and reverse...Provide a non-scratching work surface for changing the hinges from its electrical outlet . 12 GEAppliances.com IMPORTANT NOTES: n Read the instructions all references to the left and right. These instructions are for the doors. Safety Instructions Operating Instructions Reversing the door swing. n Set screws down by their related...
... the dryer from the right side to the left side-if you Start 1. IMPORTANT: Once you begin, do not move the cabinet until door-swing reversal is 30-60 minutes. n Handle parts carefully to the right side, follow these same instructions and reverse...Provide a non-scratching work surface for changing the hinges from its electrical outlet . 12 GEAppliances.com IMPORTANT NOTES: n Read the instructions all references to the left and right. These instructions are for the doors. Safety Instructions Operating Instructions Reversing the door swing. n Set screws down by their related...
Use and Care Manual
Page 13
STEP-BY-STEP INSTRUCTIONS (cont.) Remove Door Assembly 2. With the screws removed, turn the door over and separate the silver cover part of the door outlining the gasket, and ... top. NOTE: Disregard the "DO NOT REMOVE" label on the plastic cover and separate the plastic cover from the door frame and set aside. 7. Safety Instructions Operating Instructions Reversing the door swing. Loosen the top screw as shown by lifting and pulling as shown.
STEP-BY-STEP INSTRUCTIONS (cont.) Remove Door Assembly 2. With the screws removed, turn the door over and separate the silver cover part of the door outlining the gasket, and ... top. NOTE: Disregard the "DO NOT REMOVE" label on the plastic cover and separate the plastic cover from the door frame and set aside. 7. Safety Instructions Operating Instructions Reversing the door swing. Loosen the top screw as shown by lifting and pulling as shown.
Use and Care Manual
Page 14
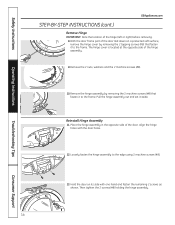
... the 2 nuts, washers and the 2 machine screws (#8). 10.Remove the hinge assembly by removing the 2 tapping screws (#8) that fasten it aside. Safety Instructions Operating Instructions GEAppliances.com STEP-BY-STEP INSTRUCTIONS (cont.) Remove Hinge IMPORTANT: Note the location of the hinge (left or right) before removing. 8.With the door frame part of the...
... the 2 nuts, washers and the 2 machine screws (#8). 10.Remove the hinge assembly by removing the 2 tapping screws (#8) that fasten it aside. Safety Instructions Operating Instructions GEAppliances.com STEP-BY-STEP INSTRUCTIONS (cont.) Remove Hinge IMPORTANT: Note the location of the hinge (left or right) before removing. 8.With the door frame part of the...
Use and Care Manual
Page 15
... cover holes with the 4 tabs. 18. Place the outer door onto the inner door. Place the door on its edge. Safety Instructions Operating Instructions Reversing the door swing. STEP-BY-STEP INSTRUCTIONS (cont.) Reinstall Nuts and Hinge Cover 14. Assemble the 2 machine screws (#8), washers and nuts. Secure the hinge cover with the 2 tapping...
... cover holes with the 4 tabs. 18. Place the outer door onto the inner door. Place the door on its edge. Safety Instructions Operating Instructions Reversing the door swing. STEP-BY-STEP INSTRUCTIONS (cont.) Reinstall Nuts and Hinge Cover 14. Assemble the 2 machine screws (#8), washers and nuts. Secure the hinge cover with the 2 tapping...
Use and Care Manual
Page 16
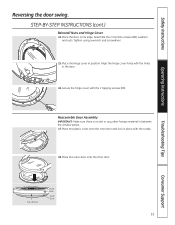
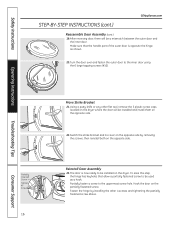
...will be installed and install them on the opposite side by installing the other flat tool, remove the 5 plastic screw caps located on the dryer. Consumer Support Make sure that allow a partially fastened screw to be used as shown. 20. Using a putty knife or any other 4... Tips Partially Inserted Screw Tighten All Screws 16 Move Strike Bracket 21. The door is opposite the hinge, as a hook. Safety Instructions STEP-BY-STEP INSTRUCTIONS (cont.) GEAppliances.com Reassemble Door Assembly (cont.) 19. Switch the strike bracket and its cover on the opposite side. 22. ...
...will be installed and install them on the opposite side by installing the other flat tool, remove the 5 plastic screw caps located on the dryer. Consumer Support Make sure that allow a partially fastened screw to be used as shown. 20. Using a putty knife or any other 4... Tips Partially Inserted Screw Tighten All Screws 16 Move Strike Bracket 21. The door is opposite the hinge, as a hook. Safety Instructions STEP-BY-STEP INSTRUCTIONS (cont.) GEAppliances.com Reassemble Door Assembly (cont.) 19. Switch the strike bracket and its cover on the opposite side. 22. ...
Use and Care Manual
Page 17
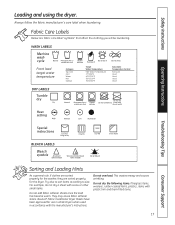
... resistant delicate Do not dry Do not tumble dry (used in accordance with the manufacturer's instructions. Bounce® Fabric Conditioner Dryer Sheets have been approved for the dryer. Fabric Care Labels Below are sorted properly for use in all GE Dryers when used with do not dry a sheet with plastic trim and foam-filled items...
... resistant delicate Do not dry Do not tumble dry (used in accordance with the manufacturer's instructions. Bounce® Fabric Conditioner Dryer Sheets have been approved for the dryer. Fabric Care Labels Below are sorted properly for use in all GE Dryers when used with do not dry a sheet with plastic trim and foam-filled items...
Use and Care Manual
Page 18
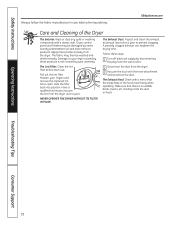
...Duct: Inspect and clean the exhaust ducting at least once a year to your dryer caused by these steps: 1 Turn off electrical supply by disconnecting the plug from the wall socket. 2 Disconnect the duct from the dryer. 3 Vacuum the duct with a damp cloth. A partially clogged exhaust can ...dust any spills or washing compounds with the hose attachment and reconnect the duct. Operating Instructions Troubleshooting Tips Consumer Support 18 Once clean, slide the filter back into position. Dryer control panel and finishes may then be damaged by your fingers and remove the captured lint...
...Duct: Inspect and clean the exhaust ducting at least once a year to your dryer caused by these steps: 1 Turn off electrical supply by disconnecting the plug from the wall socket. 2 Disconnect the duct from the dryer. 3 Vacuum the duct with a damp cloth. A partially clogged exhaust can ...dust any spills or washing compounds with the hose attachment and reconnect the duct. Operating Instructions Troubleshooting Tips Consumer Support 18 Once clean, slide the filter back into position. Dryer control panel and finishes may then be damaged by your fingers and remove the captured lint...
Use and Care Manual
Page 19
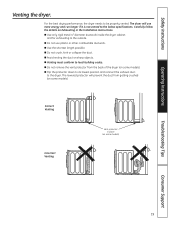
...place (on some models). Carefully follow the details on sharp objects. n Venting must conform to the outside. The dryer will prevent the duct from the back of the dryer (on some models) Troubleshooting Tips Consumer Support 19 n Use the shortest length possible. n Do not remove the vent...not use more energy and run longer if it is not vented to the below specifications. For the best drying performance, the dryer needs to the dryer. Correct Venting Incorrect Venting Vent protector in the Installation Instructions. Safety Instructions Operating Instructions Venting the...
...place (on some models). Carefully follow the details on sharp objects. n Venting must conform to the outside. The dryer will prevent the duct from the back of the dryer (on some models) Troubleshooting Tips Consumer Support 19 n Use the shortest length possible. n Do not remove the vent...not use more energy and run longer if it is not vented to the below specifications. For the best drying performance, the dryer needs to the dryer. Correct Venting Incorrect Venting Vent protector in the Installation Instructions. Safety Instructions Operating Instructions Venting the...
Use and Care Manual
Page 20
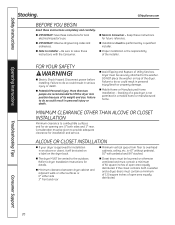
... of 60 square inches of open area equally distributed. n IMPORTANT: Save these instructions for local electrical inspector's use. n Proper installation is the responsibility of the dryer. n Electric Shock Hazard. n Potential Personal Injury. Failure to provide adequate clearance for details. n Minimum clearance between dryer cabinet and adjacent walls or other surfaces is not permitted in personal...
... of 60 square inches of open area equally distributed. n IMPORTANT: Save these instructions for local electrical inspector's use. n Proper installation is the responsibility of the dryer. n Electric Shock Hazard. n Potential Personal Injury. Failure to provide adequate clearance for details. n Minimum clearance between dryer cabinet and adjacent walls or other surfaces is not permitted in personal...
