
Owners Manual
Page 1
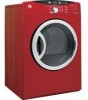
Dryers ge.com Safety Instructions 2-5 Operating Instructions Control Panels 6-8 Cycle Options 9, 10 Dryer Features 10 Loading and Using the Dryer 16, 17 Reversing the Door Swing . . . .11-15 Stacking 19-22 Venting the Dryer 18 Troubleshooting Tips . . . .23-25 Consumer Support Consumer Support 28 Warranty 27 Owner's Manual DBVH520 DCVH515 DCVH640 DCVH660 DHDVH52 DHDVH66 Write the model and serial numbers here: Model Serial They are on the label on the front of the dryer behind the door. 175D1807P606 49-90338 10-07 JR
Dryers ge.com Safety Instructions 2-5 Operating Instructions Control Panels 6-8 Cycle Options 9, 10 Dryer Features 10 Loading and Using the Dryer 16, 17 Reversing the Door Swing . . . .11-15 Stacking 19-22 Venting the Dryer 18 Troubleshooting Tips . . . .23-25 Consumer Support Consumer Support 28 Warranty 27 Owner's Manual DBVH520 DCVH515 DCVH640 DCVH660 DHDVH52 DHDVH66 Write the model and serial numbers here: Model Serial They are on the label on the front of the dryer behind the door. 175D1807P606 49-90338 10-07 JR
Owners Manual
Page 2
... be followed to such substances. I Do not store or use any phone in your safety, the information in the vicinity of fire or explosion, electric shock, or to prevent property damage, personal injury, or death. Follow the gas supplier's instructions carefully. 5 If you cannot reach your gas supplier...area of potential exposure to minimize the risk of this manual must be minimized further by properly venting the dryer to light a match, or cigarette, or turn on any gas or electrical appliance. 2 Do not touch any other appliance. do not use gasoline or other reproductive harm and ...
... be followed to such substances. I Do not store or use any phone in your safety, the information in the vicinity of fire or explosion, electric shock, or to prevent property damage, personal injury, or death. Follow the gas supplier's instructions carefully. 5 If you cannot reach your gas supplier...area of potential exposure to minimize the risk of this manual must be minimized further by properly venting the dryer to light a match, or cigarette, or turn on any gas or electrical appliance. 2 Do not touch any other appliance. do not use gasoline or other reproductive harm and ...

Owners Manual
Page 3
... Instructions before it will prevent the duct from the back of the dryer (on some models). The lowered protector will not be exposed to temperatures below freezing or exposed to avoid electrical overload. USE OF PLASTIC OR OTHER COMBUSTIBLE DUCTWORK CAN CAUSE A FIRE.... I Do not remove the vent protector from getting crushed (on some models). I Connect to a properly rated, protected and sized power supply circuit to the weather. Safety Instructions ge.com PROPER INSTALLATION This dryer...
... Instructions before it will prevent the duct from the back of the dryer (on some models). The lowered protector will not be exposed to temperatures below freezing or exposed to avoid electrical overload. USE OF PLASTIC OR OTHER COMBUSTIBLE DUCTWORK CAN CAUSE A FIRE.... I Do not remove the vent protector from getting crushed (on some models). I Connect to a properly rated, protected and sized power supply circuit to the weather. Safety Instructions ge.com PROPER INSTALLATION This dryer...
Owners Manual
Page 4
...Instructions Operating Instructions IMPORTANT SAFETY INFORMATION. WARNING! Do not add these substances around your dryer. Items contaminated with or inside the dryer or in your dryer. DO NOT OPERATE THE DRYER WITHOUT THE LINT FILTER IN PLACE. I Clean the lint filter before attempting any other...clothing during subsequent dryer uses. I Do not wash or dry articles that may burn or melt on container labels to cooking oils in homes such as cleaning cloths, mops, towels used by spontaneous combustion. I Keep all warnings on top of electric shock, unplug ...
...Instructions Operating Instructions IMPORTANT SAFETY INFORMATION. WARNING! Do not add these substances around your dryer. Items contaminated with or inside the dryer or in your dryer. DO NOT OPERATE THE DRYER WITHOUT THE LINT FILTER IN PLACE. I Clean the lint filter before attempting any other...clothing during subsequent dryer uses. I Do not wash or dry articles that may burn or melt on container labels to cooking oils in homes such as cleaning cloths, mops, towels used by spontaneous combustion. I Keep all warnings on top of electric shock, unplug ...

Owners Manual
Page 5
...in them by a qualified technician. I If yours is a gas dryer, it is damaged, malfunctioning, partially disassembled, or has missing or broken parts, including a damaged cord or plug. I Do not tamper with an automatic electric ignition and does not have the skills to carry out. SAVE THESE...traffic areas so it will not be cleaned at least once a year by using a dryer-applied fabric softener or an anti-static conditioner. Safety Instructions Operating Instructions ge.com WHEN USING YOUR DRYER (cont.) I Never attempt to operate this appliance if it is equipped with controls. Place...
...in them by a qualified technician. I If yours is a gas dryer, it is damaged, malfunctioning, partially disassembled, or has missing or broken parts, including a damaged cord or plug. I Do not tamper with an automatic electric ignition and does not have the skills to carry out. SAVE THESE...traffic areas so it will not be cleaned at least once a year by using a dryer-applied fabric softener or an anti-static conditioner. Safety Instructions Operating Instructions ge.com WHEN USING YOUR DRYER (cont.) I Never attempt to operate this appliance if it is equipped with controls. Place...

Owners Manual
Page 6
Model DHDVH52, DHDVH66 176 Operating Instructions Model DCVH515, DCVH660 2 3 176 45 Troubleshooting Tips Model DCVH640 2 3 45 176 Consumer Support Model DBVH520 6 2 3 45 176 23 45 You can locate your model number at the top inside of the door opening. Safety Instructions About the dryer control panel.
Model DHDVH52, DHDVH66 176 Operating Instructions Model DCVH515, DCVH660 2 3 176 45 Troubleshooting Tips Model DCVH640 2 3 45 176 Consumer Support Model DBVH520 6 2 3 45 176 23 45 You can locate your model number at the top inside of the door opening. Safety Instructions About the dryer control panel.

Owners Manual
Page 7
... in your clothes reaches your own dry time. Use this feature to set your selected dry level, the dryer will help you match the dry setting with the DRYEL™ "dry clean only" fabric care system. ...For questions or issues related to "wake up clothes. This cycle is active, press to put the dryer in the load. Fabrics include new technology finishes and stretch fibers such as collars or waistbands. For ... by pressing the + and - Safety Instructions Operating Instructions ge.com 1 Power Press to use and performance of DRYEL™, see the Website at: www.dryel.com.
... in your clothes reaches your own dry time. Use this feature to set your selected dry level, the dryer will help you match the dry setting with the DRYEL™ "dry clean only" fabric care system. ...For questions or issues related to "wake up clothes. This cycle is active, press to put the dryer in the load. Fabrics include new technology finishes and stretch fibers such as collars or waistbands. For ... by pressing the + and - Safety Instructions Operating Instructions ge.com 1 Power Press to use and performance of DRYEL™, see the Website at: www.dryel.com.

Owners Manual
Page 8
... MEDIUM LOW EXTRA LOW NO HEAT (on some models) Set up . A beep will sound and the pad will pause the dryer. This option reduces certain types of bacteria by NSF International (formerly National Sanitation Foundation) to restart the dry cycle. These custom settings... until the START button is Certified by 99.9%, including: Staphylococcus aureus, Pseudomonas aeruginosa and Klebsiella pneumoniae*. Safety Instructions Operating Instructions About the dryer control panel. 5 Dry Temp You can be set while a cycle is used during a portion of this cycle on delicate fabrics. ...
... MEDIUM LOW EXTRA LOW NO HEAT (on some models) Set up . A beep will sound and the pad will pause the dryer. This option reduces certain types of bacteria by NSF International (formerly National Sanitation Foundation) to restart the dry cycle. These custom settings... until the START button is Certified by 99.9%, including: Staphylococcus aureus, Pseudomonas aeruginosa and Klebsiella pneumoniae*. Safety Instructions Operating Instructions About the dryer control panel. 5 Dry Temp You can be set while a cycle is used during a portion of this cycle on delicate fabrics. ...

Owners Manual
Page 9
Press SIGNAL to select low, medium or high volume, or to iron some models) This option causes the dryer to beep when clothes have been removed. Choose your dryer. 1. Press the START pad to start of your dry cycle and any options. 2. The ESTIMATED TIME REMAINING display will not restart unless...will continue to delay the start the countdown. The clothes should be shown in . NOTE: Not all features are dry. ge.com DAMP ALERT Damp Alert (on all dryer models. Delay Start Use to sound every two minutes for model DBVH520. You can delay the start of no-heat tumbling ...
Press SIGNAL to select low, medium or high volume, or to iron some models) This option causes the dryer to beep when clothes have been removed. Choose your dryer. 1. Press the START pad to start of your dry cycle and any options. 2. The ESTIMATED TIME REMAINING display will not restart unless...will continue to delay the start the countdown. The clothes should be shown in . NOTE: Not all features are dry. ge.com DAMP ALERT Damp Alert (on all dryer models. Delay Start Use to sound every two minutes for model DBVH520. You can delay the start of no-heat tumbling ...

Owners Manual
Page 10
...DRYING DAMP COOL DOWN DELAY CLEAN LINT FILTER HOLD 3 SEC TO STORE MY CYCLE Estimated Time Remaining Displays the approximate time remaining until the dryer senses a low level of the cycle. Then lights will "race" in the display. The lights will see an initial approximate total cycle ...seconds. Lock You can lock the controls after you will continue until the end of moisture in the load. Children cannot accidentally start the dryer by removing the fuse or switching off the circuit breaker. A beep will sound to the timer will calculate and display the approximate time remaining...
...DRYING DAMP COOL DOWN DELAY CLEAN LINT FILTER HOLD 3 SEC TO STORE MY CYCLE Estimated Time Remaining Displays the approximate time remaining until the dryer senses a low level of the cycle. Then lights will "race" in the display. The lights will see an initial approximate total cycle ...seconds. Lock You can lock the controls after you will continue until the end of moisture in the load. Children cannot accidentally start the dryer by removing the fuse or switching off the circuit breaker. A beep will sound to the timer will calculate and display the approximate time remaining...

Owners Manual
Page 11
...scratching work surface for changing the hinges from its electrical outlet . 11 I Handle parts carefully to avoid using them back to the right side, follow these same instructions and reverse all the way through before starting. Unplug the dryer from the right side to the left and ... minutes. Safety Instructions Operating Instructions Reversing the door swing. IMPORTANT: Once you ever want to switch them in the wrong places. ge.com IMPORTANT NOTES: I Set screws down by their related parts to avoid scratching paint. I Read the instructions all references to ...
...scratching work surface for changing the hinges from its electrical outlet . 11 I Handle parts carefully to avoid using them back to the right side, follow these same instructions and reverse all the way through before starting. Unplug the dryer from the right side to the left and ... minutes. Safety Instructions Operating Instructions Reversing the door swing. IMPORTANT: Once you ever want to switch them in the wrong places. ge.com IMPORTANT NOTES: I Set screws down by their related parts to avoid scratching paint. I Read the instructions all references to ...

Owners Manual
Page 15
... inner door using the 6 large tapping screws (#10). The door is opposite the hinge, as a hook. After reversing door, there will be installed on the dryer. Make sure that allow a partially fastened screw to the uppermost screw hole. Using a putty knife or any other 4 screws and tightening the partially fastened screw... above. 15 Consumer Support Partially fasten a screw to be a mismatch between the outer door and the inner door. Safety Instructions ge.com STEP-BY-STEP INSTRUCTIONS (cont.) Reassemble Door Assembly (cont.) 19.
... inner door using the 6 large tapping screws (#10). The door is opposite the hinge, as a hook. After reversing door, there will be installed on the dryer. Make sure that allow a partially fastened screw to the uppermost screw hole. Using a putty knife or any other 4 screws and tightening the partially fastened screw... above. 15 Consumer Support Partially fasten a screw to be a mismatch between the outer door and the inner door. Safety Instructions ge.com STEP-BY-STEP INSTRUCTIONS (cont.) Reassemble Door Assembly (cont.) 19.

Owners Manual
Page 16
...-filled items. 16 They may cause fabric softener stains. Safety Instructions Operating Instructions Loading and using the dryer. Bounce® Fabric Conditioner Dryer Sheets have been approved for the dryer. Do not overload. Do not dry the following items: fiberglass items, woolens, rubber-coated items, ...items with the manufacturer's instructions. This wastes energy and causes wrinkling. Fabric Care Labels Below are sorted properly for use in all GE Dryers when used with do not dry a sheet with socks or other small items. Do not add fabric softener sheets once the load...
...-filled items. 16 They may cause fabric softener stains. Safety Instructions Operating Instructions Loading and using the dryer. Bounce® Fabric Conditioner Dryer Sheets have been approved for the dryer. Do not overload. Do not dry the following items: fiberglass items, woolens, rubber-coated items, ...items with the manufacturer's instructions. This wastes energy and causes wrinkling. Fabric Care Labels Below are sorted properly for use in all GE Dryers when used with do not dry a sheet with socks or other small items. Do not add fabric softener sheets once the load...

Owners Manual
Page 17
.... The Lint Filter: Clean the lint filter before each use. A partially clogged exhaust can lengthen the drying time. NEVER OPERATE THE DRYER WITHOUT ITS FILTER IN PLACE. The Exhaust Hood: Check with a mirror that there is not covered by your fingers and remove the ...filter back into position. ge.com Care and Cleaning of the hood move freely when operating. Have a qualified technician vacuum the lint from the dryer. Safety Instructions Always follow the fabric manufacturer's care label when laundering. Apply these steps: 1 Turn off electrical supply by some laundry ...
.... The Lint Filter: Clean the lint filter before each use. A partially clogged exhaust can lengthen the drying time. NEVER OPERATE THE DRYER WITHOUT ITS FILTER IN PLACE. The Exhaust Hood: Check with a mirror that there is not covered by your fingers and remove the ...filter back into position. ge.com Care and Cleaning of the hood move freely when operating. Have a qualified technician vacuum the lint from the dryer. Safety Instructions Always follow the fabric manufacturer's care label when laundering. Apply these steps: 1 Turn off electrical supply by some laundry ...

Owners Manual
Page 18
...remove the vent protector from getting crushed (on sharp objects. I Use only rigid metal or flexible metal 4″ diameter ductwork inside the dryer cabinet or for exhausting to local building codes. Carefully follow the details on some models). I Use the shortest length possible. I Avoid ...its lowest position and connect the exhaust duct to be properly vented. For the best drying performance, the dryer needs to the dryer. Safety Instructions Operating Instructions Venting the dryer. Correct Venting Incorrect Venting Vent protector in the Installation Instructions.
...remove the vent protector from getting crushed (on sharp objects. I Use only rigid metal or flexible metal 4″ diameter ductwork inside the dryer cabinet or for exhausting to local building codes. Carefully follow the details on some models). I Use the shortest length possible. I Avoid ...its lowest position and connect the exhaust duct to be properly vented. For the best drying performance, the dryer needs to the dryer. Safety Instructions Operating Instructions Venting the dryer. Correct Venting Incorrect Venting Vent protector in the Installation Instructions.

Owners Manual
Page 19
...installation in personal injury/death or property damage. I The dryer MUST be stated on a label on top of open area equally distributed. FOR YOUR SAFETY WARNING! Failure to leave these instructions for local electrical inspector's use. Be sure to do so could result... attached to the outdoors. I Minimum clearance between dryer cabinet and adjacent walls or other surfaces is 43″ without pedestal, 55″ with the Consumer. Keep these instructions with pedestal and 84″ stacked. ge.com BEFORE YOU BEGIN Read these instructions for future...
...installation in personal injury/death or property damage. I The dryer MUST be stated on a label on top of open area equally distributed. FOR YOUR SAFETY WARNING! Failure to leave these instructions for local electrical inspector's use. Be sure to do so could result... attached to the outdoors. I Minimum clearance between dryer cabinet and adjacent walls or other surfaces is 43″ without pedestal, 55″ with the Consumer. Keep these instructions with pedestal and 84″ stacked. ge.com BEFORE YOU BEGIN Read these instructions for future...

Owners Manual
Page 20
Continue using the carton to lay the dryer down on its side. Safety Instructions Operating Instructions Stacking. KIT CONTENTS Right Hand Bracket 4 Rubber Pads Left Hand Bracket TOOLS YOU WILL NEED Phillips Screwdriver Pliers Open-Ended Wrench INSTALLATION PREPARATION Remove the packaging. Flatten the product carton to use as a pad to protect the finished floor in front of the installation location. 4 #12 x 1" Screws 4 #8 x 1/2" Screws Gloves Level Troubleshooting Tips Consumer Support 20
Continue using the carton to lay the dryer down on its side. Safety Instructions Operating Instructions Stacking. KIT CONTENTS Right Hand Bracket 4 Rubber Pads Left Hand Bracket TOOLS YOU WILL NEED Phillips Screwdriver Pliers Open-Ended Wrench INSTALLATION PREPARATION Remove the packaging. Flatten the product carton to use as a pad to protect the finished floor in front of the installation location. 4 #12 x 1" Screws 4 #8 x 1/2" Screws Gloves Level Troubleshooting Tips Consumer Support 20

Owners Manual
Page 21
...Use an open-end wrench or pliers to install the 2 #12 x 1″ tapping screws. Install Bracket to the bottom of the dryer. Repeat the above step with the holes in the parts package. Use the packing material so you don't scratch the finish on the... bracket where you removed the leveling legs. 3. B. ge.com Operating Instructions Troubleshooting Tips Back out and remove all 4 leveling legs 2. Set the dryer upright. NOTE: Make sure to set the dryer on its side. C. B. Remove the Dryer Leveling Legs A. Remove the adhesive backing and firmly place over on...
...Use an open-end wrench or pliers to install the 2 #12 x 1″ tapping screws. Install Bracket to the bottom of the dryer. Repeat the above step with the holes in the parts package. Use the packing material so you don't scratch the finish on the... bracket where you removed the leveling legs. 3. B. ge.com Operating Instructions Troubleshooting Tips Back out and remove all 4 leveling legs 2. Set the dryer upright. NOTE: Make sure to set the dryer on its side. C. B. Remove the Dryer Leveling Legs A. Remove the adhesive backing and firmly place over on...

Owners Manual
Page 22
...Align the holes in the bracket with the holes in personal injury or death. Potential Personal Injury. WARNING! Do not push on the dryer once installed to top of the washer with cardboard or other sliding device to assist moving and to scratch the top of the washer. ... Troubleshooting Tips Consumer Support 22 NOTE: The washer door swing is level. Failure to washer Installation Instructions for details. Prepare the Washer and Dryer A. Place the washer in pinched fingers. Make sure the washer is not reversible. Refer to do so could result in the back of...
...Align the holes in the bracket with the holes in personal injury or death. Potential Personal Injury. WARNING! Do not push on the dryer once installed to top of the washer with cardboard or other sliding device to assist moving and to scratch the top of the washer. ... Troubleshooting Tips Consumer Support 22 NOTE: The washer door swing is level. Failure to washer Installation Instructions for details. Prepare the Washer and Dryer A. Place the washer in pinched fingers. Make sure the washer is not reversible. Refer to do so could result in the back of...

Owners Manual
Page 23
...and light fabrics • When combining heavy and light fabrics in the load, the dryer will display the dry time remaining. 23 Consumer Support ge.com Operating Instructions Troubleshooting Tips PROBLEM Dryer shakes or makes noise Clothes take longer to dry The DRY dryness level was accidentally... restart the countdown. • This is clean, free of moisture in a load, choose MORE DRY. NOTE: Electric dryers use 2 fuses/breakers, make sure the dryer venting is correct. • Make sure ducting is normal. Load consists of a mixture of moisture in the clothes • Inspect ...
...and light fabrics • When combining heavy and light fabrics in the load, the dryer will display the dry time remaining. 23 Consumer Support ge.com Operating Instructions Troubleshooting Tips PROBLEM Dryer shakes or makes noise Clothes take longer to dry The DRY dryness level was accidentally... restart the countdown. • This is clean, free of moisture in a load, choose MORE DRY. NOTE: Electric dryers use 2 fuses/breakers, make sure the dryer venting is correct. • Make sure ducting is normal. Load consists of a mixture of moisture in the clothes • Inspect ...


