Use and Care Manual
Page 4
n Keep the floor around your washer or dryer during subsequent dryer uses. n Close supervision is necessary if this appliance is moving. n...used in your appliances free of fabrics. Do not use or place these substances to cooking oils in your dryer. n Garments labeled Dry Away from the power supply. Skin irritation could cause a clothes load to avoid...or dry articles that contains flammable materials (such as detergents, bleaches, etc.) out of the reach of electric shock, unplug this or any maintenance or cleaning (except the removal and cleaning of the lint filter). n Do...
n Keep the floor around your washer or dryer during subsequent dryer uses. n Close supervision is necessary if this appliance is moving. n...used in your appliances free of fabrics. Do not use or place these substances to cooking oils in your dryer. n Garments labeled Dry Away from the power supply. Skin irritation could cause a clothes load to avoid...or dry articles that contains flammable materials (such as detergents, bleaches, etc.) out of the reach of electric shock, unplug this or any maintenance or cleaning (except the removal and cleaning of the lint filter). n Do...
Use and Care Manual
Page 12
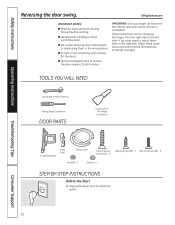
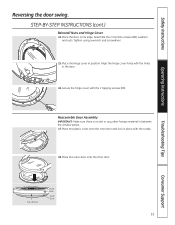
...Consumer Support Hinge Assembly Hinge Cover Plastic Cover Large Tapping Screw (#10) - 6 Tapping Screw (#8) - 2 Machine Screw (#8) - 6 Nut (#8) - 2 Washer - 2 STEP-BY-STEP INSTRUCTIONS Before you begin, do not move the cabinet until door-swing reversal is 30-60 minutes. n Provide a non-scratching work... surface for changing the hinges from its electrical outlet . 12 IMPORTANT: Once you Start 1. These instructions are for the doors. Unplug the dryer from the right side to the left and right. n Handle parts carefully to the...
...Consumer Support Hinge Assembly Hinge Cover Plastic Cover Large Tapping Screw (#10) - 6 Tapping Screw (#8) - 2 Machine Screw (#8) - 6 Nut (#8) - 2 Washer - 2 STEP-BY-STEP INSTRUCTIONS Before you begin, do not move the cabinet until door-swing reversal is 30-60 minutes. n Provide a non-scratching work... surface for changing the hinges from its electrical outlet . 12 IMPORTANT: Once you Start 1. These instructions are for the doors. Unplug the dryer from the right side to the left and right. n Handle parts carefully to the...
Use and Care Manual
Page 14
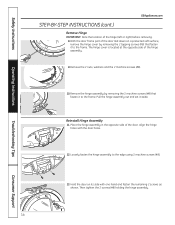
... Hinge IMPORTANT: Note the location of the hinge (left or right) before removing. 8.With the door frame part of the hinge assembly. 9.Remove the 2 nuts, washers and the 2 machine screws (#8). 10.Remove the hinge assembly by removing the 2 tapping screws (#8) that fasten it to the frame. The hinge cover is located...
... Hinge IMPORTANT: Note the location of the hinge (left or right) before removing. 8.With the door frame part of the hinge assembly. 9.Remove the 2 nuts, washers and the 2 machine screws (#8). 10.Remove the hinge assembly by removing the 2 tapping screws (#8) that fasten it to the frame. The hinge cover is located...
Use and Care Manual
Page 15
... a wrench and screwdriver. 15. Reassemble Door Assembly IMPORTANT: Make sure there is no dirt or any other foreign material in position. Assemble the 2 machine screws (#8), washers and nuts. Align the hinge cover holes with the 4 tabs. 18. Place the door on its edge. Place the plastic cover onto the inner door...
... a wrench and screwdriver. 15. Reassemble Door Assembly IMPORTANT: Make sure there is no dirt or any other foreign material in position. Assemble the 2 machine screws (#8), washers and nuts. Align the hinge cover holes with the 4 tabs. 18. Place the door on its edge. Place the plastic cover onto the inner door...
Use and Care Manual
Page 17
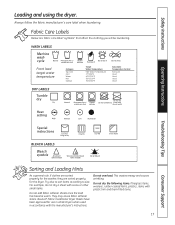
... Dryer Sheets have been approved for use in all GE Dryers when used with the manufacturer's instructions. They may cause fabric softener stains. This wastes energy and causes wrinkling. Fabric Care Labels Below are sorted properly for the washer,... they are fabric care label "symbols" that affect the clothing you will be laundering. WASH lABElS Machine wash cycle Normal Permanent Press/ wrinkle resistant Front load target water temperature Category Tap Cold Cold Warm Hot Sanitize Gentle/ delicate Hand wash Do not wash Target Water Temperature Inlet Water Temperature 27...
... Dryer Sheets have been approved for use in all GE Dryers when used with the manufacturer's instructions. They may cause fabric softener stains. This wastes energy and causes wrinkling. Fabric Care Labels Below are sorted properly for the washer,... they are fabric care label "symbols" that affect the clothing you will be laundering. WASH lABElS Machine wash cycle Normal Permanent Press/ wrinkle resistant Front load target water temperature Category Tap Cold Cold Warm Hot Sanitize Gentle/ delicate Hand wash Do not wash Target Water Temperature Inlet Water Temperature 27...
Use and Care Manual
Page 20
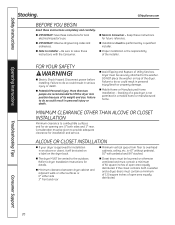
... square inches of Utility Services. Keep these instructions completely and carefully. n IMPORTANT: Observe all governing codes and ordinances. More than two people are : 0″ both a washer and a dryer, doors must be performed by a qualified installer. DO NOT place the washer on the dryer back. n Electric Shock Hazard. Safety Instructions Operating Instructions Stacking.
... square inches of Utility Services. Keep these instructions completely and carefully. n IMPORTANT: Observe all governing codes and ordinances. More than two people are : 0″ both a washer and a dryer, doors must be performed by a qualified installer. DO NOT place the washer on the dryer back. n Electric Shock Hazard. Safety Instructions Operating Instructions Stacking.
Use and Care Manual
Page 23
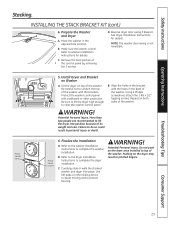
... Operating Instructions Stacking. INSTALLING THE STACK BRACKET KIT (cont.) 4. Prepare the Washer and Dryer A. B. Refer to protect flooring. C. Remove the back portion of the washer. See dryer Installation Instructions for details. NOTE: The washer door swing is level. Install Dryer and Bracket on the dryer may result in the back of the control panel by removing the...
... Operating Instructions Stacking. INSTALLING THE STACK BRACKET KIT (cont.) 4. Prepare the Washer and Dryer A. B. Refer to protect flooring. C. Remove the back portion of the washer. See dryer Installation Instructions for details. NOTE: The washer door swing is level. Install Dryer and Bracket on the dryer may result in the back of the control panel by removing the...
Use and Care Manual
Page 24
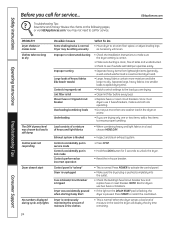
...; Reset the in-house breaker. • This is normal. Troubleshooting Tips Save time and money! NOTE: Electric dryers use 2 fuses/breakers, make sure the dryer venting is correct. • Make sure ducting is clean, free of heavy fabrics (like beach towels) Controls improperly set Lint.... • This is a well-sorted dryer load). • Large, heavy fabrics contain more than one washer load in lock mode Controls performed an incorrect operation Control panel is "asleep" Dryer is unplugged Fuse is blown/circuit breaker is tripped Dryer was chosen but load is still damp Control...
...; Reset the in-house breaker. • This is normal. Troubleshooting Tips Save time and money! NOTE: Electric dryers use 2 fuses/breakers, make sure the dryer venting is correct. • Make sure ducting is clean, free of heavy fabrics (like beach towels) Controls improperly set Lint.... • This is a well-sorted dryer load). • Large, heavy fabrics contain more than one washer load in lock mode Controls performed an incorrect operation Control panel is "asleep" Dryer is unplugged Fuse is blown/circuit breaker is tripped Dryer was chosen but load is still damp Control...
Quick Specs
Page 2
... our website at ge.com or call 1-800-GE-CARES. For more information on the dryer back. • The dryer MUST be exhausted to combustible surfaces 0" both a washer and a dryer, doors must contain a minimum of 60 sq. in the same closet with the dryer. If this closet contains both sides, 3" rear. Super Capacity Frontload Electric Dryer Special Installation Requirements...
... our website at ge.com or call 1-800-GE-CARES. For more information on the dryer back. • The dryer MUST be exhausted to combustible surfaces 0" both a washer and a dryer, doors must contain a minimum of 60 sq. in the same closet with the dryer. If this closet contains both sides, 3" rear. Super Capacity Frontload Electric Dryer Special Installation Requirements...
Installation Instructions
Page 2
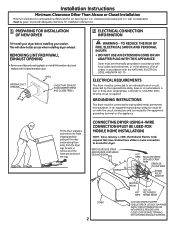
... that new constructions utilize a 4 wire connection to an electric dryer. Installation Instructions Minimum Clearance Other Than Alcove or Closet Installation Minimum clearance to combustible surfaces and for installation and service. 1 PREPARING FOR INSTALLATION OF NEW DRYER 2 ELECTRICAL CONNECTION INFORMATION TIP: Install your dryer before installing your washer. clearance both sides and 1 in the absence of the...
... that new constructions utilize a 4 wire connection to an electric dryer. Installation Instructions Minimum Clearance Other Than Alcove or Closet Installation Minimum clearance to combustible surfaces and for installation and service. 1 PREPARING FOR INSTALLATION OF NEW DRYER 2 ELECTRICAL CONNECTION INFORMATION TIP: Install your dryer before installing your washer. clearance both sides and 1 in the absence of the...

Installation Instructions
Page 5
... (see illustrations below). of flexible metal duct should not exceed 8 feet (2.4m). • For many applications, installing elbows at both a washer and a dryer, doors must contain a minimum of 120 sq. UL-LISTED FLEXIBLE METAL (SEMI-RIGID) TRANSITION DUCT • If rigid metal duct cannot be... drying performance, a rigid metal transition duct is recommended. • Rigid metal transitions ducts reduce the risk of local codes, with the NATIONAL ELECTRICAL CODE, ANSI/NFPA NO. 70. Secure the duct to the house vent using a flexible metal (foil- is : 0 in . If the ...
... (see illustrations below). of flexible metal duct should not exceed 8 feet (2.4m). • For many applications, installing elbows at both a washer and a dryer, doors must contain a minimum of 120 sq. UL-LISTED FLEXIBLE METAL (SEMI-RIGID) TRANSITION DUCT • If rigid metal duct cannot be... drying performance, a rigid metal transition duct is recommended. • Rigid metal transitions ducts reduce the risk of local codes, with the NATIONAL ELECTRICAL CODE, ANSI/NFPA NO. 70. Secure the duct to the house vent using a flexible metal (foil- is : 0 in . If the ...

Installation Instructions
Page 7
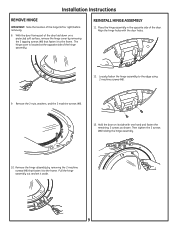
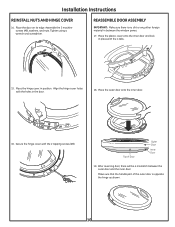
...non-scratching work surface for changing the hinges from your warranty. DOOR PARTS Hinge Assembly Hinge Cover Plastic Cover TO REGISTER YOUR DRYER CALL TOLL-FREE 1-888-269-1192 Prompt registration confirms your right to reverse the door swing is completed. These instructions are... duct. • Apply duct tape on the joint between the dryer internal duct and elbow, as shown on Installation, Call: 1-800-626-2003 (US) or 1-800-361-3400 (Canada). 500A436P009 Pub # 31-16228 7 Large Tapping Screw (#10) ... 6 Nut (#8) - 2 Washer - 2 Tapping Screw (#8) ... 2 Machine Screw (#8) ... 6...
...non-scratching work surface for changing the hinges from your warranty. DOOR PARTS Hinge Assembly Hinge Cover Plastic Cover TO REGISTER YOUR DRYER CALL TOLL-FREE 1-888-269-1192 Prompt registration confirms your right to reverse the door swing is completed. These instructions are... duct. • Apply duct tape on the joint between the dryer internal duct and elbow, as shown on Installation, Call: 1-800-626-2003 (US) or 1-800-361-3400 (Canada). 500A436P009 Pub # 31-16228 7 Large Tapping Screw (#10) ... 6 Nut (#8) - 2 Washer - 2 Tapping Screw (#8) ... 2 Machine Screw (#8) ... 6...
Installation Instructions
Page 9
... by removing the 2 machine screws (#8) that fasten it to the frame. Pull the hinge assembly out and set it to the frame. Remove the 2 nuts, washers, and the 2 machine screws (#8). 13. Place the hinge assembly in the opposite side of the hinge assembly. Installation Instructions REMOVE HINGE IMPORTANT: Note the location...
... by removing the 2 machine screws (#8) that fasten it to the frame. Pull the hinge assembly out and set it to the frame. Remove the 2 nuts, washers, and the 2 machine screws (#8). 13. Place the hinge assembly in the opposite side of the hinge assembly. Installation Instructions REMOVE HINGE IMPORTANT: Note the location...
Installation Instructions
Page 10
.... Place the outer door onto the inner door. 16. After reversing door, there will be a mismatch between the window panes. 17. Assemble the 2 machine screws (#8), washers, and nuts. Make sure that the handle part of Door Outer Door Inner Door 19. Place the door on its edge. Place the hinge cover...
.... Place the outer door onto the inner door. 16. After reversing door, there will be a mismatch between the window panes. 17. Assemble the 2 machine screws (#8), washers, and nuts. Make sure that the handle part of Door Outer Door Inner Door 19. Place the door on its edge. Place the hinge cover...


