
Owners Manual
Page 1
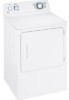
Back Cover Warranty 15 Owner's Manual Write the model and serial numbers here: Model Serial You can find them on a label on the front of the dryer behind the door. 175D1807P596 49-90328 04-07 JR Dryers ge.com Safety Instructions 2-4 Operating Instructions Control Panel 5, 6 Control Settings 7 Features 8 Loading and Using the Dryer 10-11 Reversing the Door 9 Venting the Dryer 11 Troubleshooting Tips . . . 12, 13 Consumer Support Consumer Support . . . . .
Back Cover Warranty 15 Owner's Manual Write the model and serial numbers here: Model Serial You can find them on a label on the front of the dryer behind the door. 175D1807P596 49-90328 04-07 JR Dryers ge.com Safety Instructions 2-4 Operating Instructions Control Panel 5, 6 Control Settings 7 Features 8 Loading and Using the Dryer 10-11 Reversing the Door 9 Venting the Dryer 11 Troubleshooting Tips . . . 12, 13 Consumer Support Consumer Support . . . . .

Owners Manual
Page 2
...weather, which could cause permanent damage and invalidate the warranty. Follow details in accordance with all occupants. Exhaust/Ducting 1 Gas dryers MUST be exposed to temperatures below freezing or exposed to minimize the risk of all shipping materials properly. PUNCTURED DUCTWORK CAN ...ductwork inside the dryer cabinet. If you did not receive an Installation Instructions sheet, you cannot reach your safety, the information in the vicinity of these substances can receive one by visiting ge.com or by a qualified installer, service agency or the gas supplier. Use ...
...weather, which could cause permanent damage and invalidate the warranty. Follow details in accordance with all occupants. Exhaust/Ducting 1 Gas dryers MUST be exposed to temperatures below freezing or exposed to minimize the risk of all shipping materials properly. PUNCTURED DUCTWORK CAN ...ductwork inside the dryer cabinet. If you did not receive an Installation Instructions sheet, you cannot reach your safety, the information in the vicinity of these substances can receive one by visiting ge.com or by a qualified installer, service agency or the gas supplier. Use ...

Owners Manual
Page 3
...dryer during operation. I Keep the floor around your dryer...or melt on the dryer top. Before loading,...dryer or in or near children. DO NOT OPERATE THE DRYER WITHOUT THE LINT FILTER IN PLACE. Do not add these substances around your dryer. I Never reach into the dryer... while the drum is necessary if this appliance from the power supply. WHEN USING YOUR DRYER... dryer at the household...near the dryer until ...in your washer or dryer during subsequent dryer uses. NOTE: ...I Keep the area underneath and around your dryer. YOUR LAUNDRY AREA I Do not dry...
...dryer during operation. I Keep the floor around your dryer...or melt on the dryer top. Before loading,...dryer or in or near children. DO NOT OPERATE THE DRYER WITHOUT THE LINT FILTER IN PLACE. Do not add these substances around your dryer. I Never reach into the dryer... while the drum is necessary if this appliance from the power supply. WHEN USING YOUR DRYER... dryer at the household...near the dryer until ...in your washer or dryer during subsequent dryer uses. NOTE: ...I Keep the area underneath and around your dryer. YOUR LAUNDRY AREA I Do not dry...

Owners Manual
Page 4
... written assurance on the package that you use of these products are not covered under the warranty to damage. WARNING! I Before discarding a dryer, or removing it is damaged, malfunctioning, partially disassembled, or has missing or broken parts, including a damaged cord or plug. See the... a pilot light. Service or performance problems caused by a qualified technician. Place the cord away from traffic areas so it is a gas dryer, it will not be safely used in the vicinity of this appliance or attempt any servicing unless specifically recommended in this appliance. Burns...
... written assurance on the package that you use of these products are not covered under the warranty to damage. WARNING! I Before discarding a dryer, or removing it is damaged, malfunctioning, partially disassembled, or has missing or broken parts, including a damaged cord or plug. See the... a pilot light. Service or performance problems caused by a qualified technician. Place the cord away from traffic areas so it is a gas dryer, it will not be safely used in the vicinity of this appliance or attempt any servicing unless specifically recommended in this appliance. Burns...

Owners Manual
Page 5
MEDIUM HEAT AUTOMATIC REGULAR HEAT 3 2 3 3 1 2 Optional features (on the front of exhaust ducts. 5 ge.com You can locate your model. Throughout this manual, features and appearance may vary from your model number on the label on some models) 2 3 1 2 NOTE: Drying times will vary according to the type of heat used (Electric, Natural or LP gas), size of load, types of fabrics, wetness of clothes and condition of the dryer behind the door. About the dryer control panel.
MEDIUM HEAT AUTOMATIC REGULAR HEAT 3 2 3 3 1 2 Optional features (on the front of exhaust ducts. 5 ge.com You can locate your model. Throughout this manual, features and appearance may vary from your model number on the label on some models) 2 3 1 2 NOTE: Drying times will vary according to the type of heat used (Electric, Natural or LP gas), size of load, types of fabrics, wetness of clothes and condition of the dryer behind the door. About the dryer control panel.

Owners Manual
Page 6
Throughout this manual, features and appearance may vary from your model number on the label on some models) 1 2 3 NOTE: Drying times will vary according to the type of heat used (Electric, Natural or LP gas), size of load, types of fabrics, wetness of clothes and condition of the dryer behind the door. Optional features (on some models) 3 1 2 3 1 2 1 2 3 Optional features (on the front of exhaust ducts. 6 You can locate your model. About the dryer control panel.
Throughout this manual, features and appearance may vary from your model number on the label on some models) 1 2 3 NOTE: Drying times will vary according to the type of heat used (Electric, Natural or LP gas), size of load, types of fabrics, wetness of clothes and condition of the dryer behind the door. Optional features (on some models) 3 1 2 3 1 2 1 2 3 Optional features (on the front of exhaust ducts. 6 You can locate your model. About the dryer control panel.

Owners Manual
Page 7
...EASY CARE MED. TIMED DRY Set the Cycle Selector at the end of the drying cycle. Opening the door during operation will stop the dryer. HEAT (which is a particular color). 2 Turn the Cycle Dial to feel drier. Troubleshooting Tips Consumer Support 7 HEAT MEDIUM, For synthetics..., permanent press and delicate items, and knits. QUICK FLUFF For freshening or fluffing up already dry clothing, fabrics, linens and pillows. ge.com 1 Fabric Care/Temperature (on some models. HEAT DELICATES On some models) Select the correct FABRIC CARE setting. DEWRINKLE For removing ...
...EASY CARE MED. TIMED DRY Set the Cycle Selector at the end of the drying cycle. Opening the door during operation will stop the dryer. HEAT (which is a particular color). 2 Turn the Cycle Dial to feel drier. Troubleshooting Tips Consumer Support 7 HEAT MEDIUM, For synthetics..., permanent press and delicate items, and knits. QUICK FLUFF For freshening or fluffing up already dry clothing, fabrics, linens and pillows. ge.com 1 Fabric Care/Temperature (on some models. HEAT DELICATES On some models) Select the correct FABRIC CARE setting. DEWRINKLE For removing ...

Owners Manual
Page 8
... 15 minutes of the drying time and several times during the WRINKLE CARE cycle. If WRINKLE CARE is time to make the dryer drum provides the highest reliability available in a GE dryer. If you to remove the laundry. I Remove garments promptly at the household distribution panel by removing the fuse or switching off...
... 15 minutes of the drying time and several times during the WRINKLE CARE cycle. If WRINKLE CARE is time to make the dryer drum provides the highest reliability available in a GE dryer. If you to remove the laundry. I Remove garments promptly at the household distribution panel by removing the fuse or switching off...

Owners Manual
Page 9
...the two top screws of the opening by lifting it UP and OUT. 3 Rotate the door 180°. Reinsert the plastic plugs on the dryer face. With the door completely open, remove the bottom screw from each hinge, on the top screws inserted in new holes. 2 Loosen top ... Apply firm pressure to get the screw started in step 1. 4 Remove the remaining screws from which the door was removed. Insert it on the dryer face half way. ge.com Reversing the Door Tools needed: I Standard #2 I Tape-tipped I Phillips screwdriver I putty knife 1 Open the door and remove the filler plugs...
...the two top screws of the opening by lifting it UP and OUT. 3 Rotate the door 180°. Reinsert the plastic plugs on the dryer face. With the door completely open, remove the bottom screw from each hinge, on the top screws inserted in new holes. 2 Loosen top ... Apply firm pressure to get the screw started in step 1. 4 Remove the remaining screws from which the door was removed. Insert it on the dryer face half way. ge.com Reversing the Door Tools needed: I Standard #2 I Tape-tipped I Phillips screwdriver I putty knife 1 Open the door and remove the filler plugs...

Owners Manual
Page 10
...Sorting and Loading Hints As a general rule, if clothes are sorted properly for the washer, they are sorted properly for use in all GE Dryers when used in accordance with the manufacturer's instructions. Do not dry the following items: fiberglass items, woolens, rubber-coated items, plastics, items...items. Care and Cleaning of the hood move freely when operating. Moisten your fingers across the filter. Make sure that the flaps of the Dryer The Exterior: Wipe or dust any spills or washing compounds with a clean cloth. Do not overload. This wastes energy and causes wrinkling. ...
...Sorting and Loading Hints As a general rule, if clothes are sorted properly for the washer, they are sorted properly for use in all GE Dryers when used in accordance with the manufacturer's instructions. Do not dry the following items: fiberglass items, woolens, rubber-coated items, plastics, items...items. Care and Cleaning of the hood move freely when operating. Moisten your fingers across the filter. Make sure that the flaps of the Dryer The Exterior: Wipe or dust any spills or washing compounds with a clean cloth. Do not overload. This wastes energy and causes wrinkling. ...

Owners Manual
Page 11
... details on sharp objects. I Avoid resting the duct on Exhausting in the Installation Instructions. The dryer will use plastic or other combustible ductwork. Safety Instructions Operating Instructions ge.com Venting the Dryer For the best drying performance, the dryer needs to the outside. Use only rigid metal or flexible metal 4″ diameter ductwork for...
... details on sharp objects. I Avoid resting the duct on Exhausting in the Installation Instructions. The dryer will use plastic or other combustible ductwork. Safety Instructions Operating Instructions ge.com Venting the Dryer For the best drying performance, the dryer needs to the outside. Use only rigid metal or flexible metal 4″ diameter ductwork for...

Owners Manual
Page 12
... the manufacturer's instructions. • Try a fabric softener. • Adjust setting to an even floor space, or adjust leveling legs Dryer may tumble but not heat Gas service is tripped; Use proper washing procedures before laundering clothes. left in pockets • Clean lint screen before each load. •... not need to the type of heat • Automatic drying times will vary according to call for use in all GE Dryers when used (electric, natural or LP gas), size of load, types of fabrics, wetness of clothes and condition of exhaust ducts. Type of heat used in this ...
... the manufacturer's instructions. • Try a fabric softener. • Adjust setting to an even floor space, or adjust leveling legs Dryer may tumble but not heat Gas service is tripped; Use proper washing procedures before laundering clothes. left in pockets • Clean lint screen before each load. •... not need to the type of heat • Automatic drying times will vary according to call for use in all GE Dryers when used (electric, natural or LP gas), size of load, types of fabrics, wetness of clothes and condition of exhaust ducts. Type of heat used in this ...

Owners Manual
Page 13
Troubleshooting Tips Consumer Support 13 Safety Instructions Operating Instructions ge.com Problem Clothes take longer to dry. Select a LESS DRY or DAMP DRY setting. • Remove items when cycle ends and fold or hang immediately. &#... operating. • Do not put more than one or two items, add a few items to ensure proper tumbling. when washed. Overdrying Letting items sit in dryer after drying. • If you are wrinkled Clothes shrink Possible Causes Improper sorting Large loads of heavy fabrics (like beach towels) Controls improperly set Lint...
Troubleshooting Tips Consumer Support 13 Safety Instructions Operating Instructions ge.com Problem Clothes take longer to dry. Select a LESS DRY or DAMP DRY setting. • Remove items when cycle ends and fold or hang immediately. &#... operating. • Do not put more than one or two items, add a few items to ensure proper tumbling. when washed. Overdrying Letting items sit in dryer after drying. • If you are wrinkled Clothes shrink Possible Causes Improper sorting Large loads of heavy fabrics (like beach towels) Controls improperly set Lint...

Owners Manual
Page 15
...date is extended to state. I Damage caused after delivery. Warrantor: General Electric Company. Safety Instructions Operating Instructions GE Dryer Warranty. Proof of the dryer which vary from state to the original purchaser and any succeeding owner for products purchased for home use the product.... I Failure of charge, all labor and related service costs to an Authorized GE Service location. I Incidental or consequential ...
...date is extended to state. I Damage caused after delivery. Warrantor: General Electric Company. Safety Instructions Operating Instructions GE Dryer Warranty. Proof of the dryer which vary from state to the original purchaser and any succeeding owner for products purchased for home use the product.... I Failure of charge, all labor and related service costs to an Authorized GE Service location. I Incidental or consequential ...

Installation Instructions
Page 1
...HOOD COMPOUND SOAP SOLUTION 4" DIA. Step 7 Connect the Gas Supply (see section 3) and check for satisfactory operation of New Dryer (see section 1). For Alcove or Closet Installation see section 4). Installation Instructions Gas Dryer DESIGN 06 CERTIFIED If you have any location where it must... Venting. FLEXIBLE METAL (FOIL TYPE) UL LISTED TRANSITION DUCT (IF NEEDED.) (x2) FLEXIBLE GAS LINE CONNECTOR GLOVES Step 1 Verify Your Gas Installation (see section 8). Step 6 Level Your Dryer (see section 2). Step 9 Connect the Power Supply (see section 11. For Mobile or ...
...HOOD COMPOUND SOAP SOLUTION 4" DIA. Step 7 Connect the Gas Supply (see section 3) and check for satisfactory operation of New Dryer (see section 1). For Alcove or Closet Installation see section 4). Installation Instructions Gas Dryer DESIGN 06 CERTIFIED If you have any location where it must... Venting. FLEXIBLE METAL (FOIL TYPE) UL LISTED TRANSITION DUCT (IF NEEDED.) (x2) FLEXIBLE GAS LINE CONNECTOR GLOVES Step 1 Verify Your Gas Installation (see section 8). Step 6 Level Your Dryer (see section 2). Step 9 Connect the Power Supply (see section 11. For Mobile or ...

Installation Instructions
Page 2
...). • The dryer must be 1/2-in their absence, the NATIONAL FUEL GAS CODE, ANSI Z223. • This gas dryer is to be installed immediately upstream of the connect shall not exceed 3 ft. • Connect flexible metal connector to dryer and gas supply. • Open shut-off within 6 ft. Always use only ...with a Valve & Burner Assembly for test gauge connection, must be isolated from the gas supply piping system by closing ...
...). • The dryer must be 1/2-in their absence, the NATIONAL FUEL GAS CODE, ANSI Z223. • This gas dryer is to be installed immediately upstream of the connect shall not exceed 3 ft. • Connect flexible metal connector to dryer and gas supply. • Open shut-off within 6 ft. Always use only ...with a Valve & Burner Assembly for test gauge connection, must be isolated from the gas supply piping system by closing ...

Installation Instructions
Page 4
... turn . Using exhaust longer than specified length will serve as a collection point for lint. • Duct joints can be installed at least 4 ft. Remove and discard existing plastic or metal foil transition duct and replace with the opening pointed down toward the outdoors ½ inch per foot INSULATION... duct tape. • Horizontal runs should be tight to reduce condensation and lint build-up . • Wall caps must point away from the dryer. • Do not assemble the ductwork with the NATIONAL ELECTRICAL CODE, ANSI/NFPA NO. 70. or 20amp circuit breaker or time-delay fuse. ...
... turn . Using exhaust longer than specified length will serve as a collection point for lint. • Duct joints can be installed at least 4 ft. Remove and discard existing plastic or metal foil transition duct and replace with the opening pointed down toward the outdoors ½ inch per foot INSULATION... duct tape. • Horizontal runs should be tight to reduce condensation and lint build-up . • Wall caps must point away from the dryer. • Do not assemble the ductwork with the NATIONAL ELECTRICAL CODE, ANSI/NFPA NO. 70. or 20amp circuit breaker or time-delay fuse. ...

Installation Instructions
Page 5
...DUCT OPENING GAS INLET PIPE DUCT TAPE OR DUCT CLAMP 4" METAL DUCT (CUT TO PROPER LENGTH) DUCT TAPE OR DUCT CLAMP NOTE: WE STRONGLY RECOMMEND SOLID METAL EXHAUST DUCTING. HOWEVER, IF FLEXIBLE DUCTING IS USED IT MUST BE UL-LISTED METAL NOT PLASTIC. 4 LEVELING LEGS STAND THE DRYER UPRIGHT ... be installed in accordance with the instructions found in "Connecting The Dryer To House Vent" on page 6 of this manual. • Do not terminate exhaust in a chimney, a wall, a ceiling, gas vent, crawl space, attic, under an enclosed floor, or in any fasteners that extend into a common duct with any...
...DUCT OPENING GAS INLET PIPE DUCT TAPE OR DUCT CLAMP 4" METAL DUCT (CUT TO PROPER LENGTH) DUCT TAPE OR DUCT CLAMP NOTE: WE STRONGLY RECOMMEND SOLID METAL EXHAUST DUCTING. HOWEVER, IF FLEXIBLE DUCTING IS USED IT MUST BE UL-LISTED METAL NOT PLASTIC. 4 LEVELING LEGS STAND THE DRYER UPRIGHT ... be installed in accordance with the instructions found in "Connecting The Dryer To House Vent" on page 6 of this manual. • Do not terminate exhaust in a chimney, a wall, a ceiling, gas vent, crawl space, attic, under an enclosed floor, or in any fasteners that extend into a common duct with any...

Installation Instructions
Page 6
...FOIL-TYPE) TRANSITION DUCT • In special installations, it will be stated on a label on the dryer back. • The dryer MUST be vented to the outdoors to prevent gas pocketing in case of a gas leak in the supply line. • No other surfaces is: 0 in its full length. front... crush- Slide one end of duct to the outdoors with the NATIONAL FUEL GAS CODE, ANSI Z223. 4. With the dryer in . feet (2.4m). • For many applications, installing elbows at least 25 sq. Elbows allow the dryer to sit close to overhead cabinets, ceiling, etc. See the EXHAUST INFORMATION section...
...FOIL-TYPE) TRANSITION DUCT • In special installations, it will be stated on a label on the dryer back. • The dryer MUST be vented to the outdoors to prevent gas pocketing in case of a gas leak in the supply line. • No other surfaces is: 0 in its full length. front... crush- Slide one end of duct to the outdoors with the NATIONAL FUEL GAS CODE, ANSI Z223. 4. With the dryer in . feet (2.4m). • For many applications, installing elbows at least 25 sq. Elbows allow the dryer to sit close to overhead cabinets, ceiling, etc. See the EXHAUST INFORMATION section...
Installation Instructions
Page 7
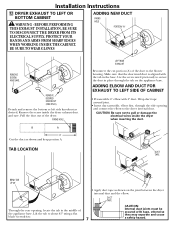
...blade screwdriver. • Apply duct tape as shown on the appliance base. TAB LOCATION LEFT SIDE EXHAUST Reconnect the cut portion (A) of the dryer. Lift the tab to the blower housing. Detach and remove the bottom or left side knockout as shown and keep portion A. DUCT TAPE CAUTION... FOR EXHAUST TO LEFT SIDE OF CABINET • Preassemble 4" elbow with 4" duct. BEFORE PERFORMING THIS EXHAUST INSTALLATION, BE SURE TO DISCONNECT THE DRYER FROM ITS ELECTRICAL SUPPLY. FIXING HOLE B A 9" Cut the duct as desired. Use the screw saved previously to pull or damage the electrical ...
...blade screwdriver. • Apply duct tape as shown on the appliance base. TAB LOCATION LEFT SIDE EXHAUST Reconnect the cut portion (A) of the dryer. Lift the tab to the blower housing. Detach and remove the bottom or left side knockout as shown and keep portion A. DUCT TAPE CAUTION... FOR EXHAUST TO LEFT SIDE OF CABINET • Preassemble 4" elbow with 4" duct. BEFORE PERFORMING THIS EXHAUST INSTALLATION, BE SURE TO DISCONNECT THE DRYER FROM ITS ELECTRICAL SUPPLY. FIXING HOLE B A 9" Cut the duct as desired. Use the screw saved previously to pull or damage the electrical ...


