

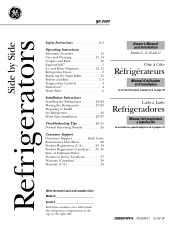
Quick Specs
Page 1
... is 18-15/16". Side-By-Side Refrigerator with Dispenser Dimensions and Installation Information (in inches) Overall Dimensions Height to top of case (in back air clearance when calculating installation depth. C D H G E F Top View Listed by Underwriters Laboratories Specification Created 1/08 310131 "94 SxS Refer CSCP5UGX GE Café 24.6 Cu. Clearance required to top of hinge...
... is 18-15/16". Side-By-Side Refrigerator with Dispenser Dimensions and Installation Information (in inches) Overall Dimensions Height to top of case (in back air clearance when calculating installation depth. C D H G E F Top View Listed by Underwriters Laboratories Specification Created 1/08 310131 "94 SxS Refer CSCP5UGX GE Café 24.6 Cu. Clearance required to top of hinge...
Use and Care Manual
Page 1
... Siders ge.com Safety Instructions 2-3 Operating Instructions Automatic Icemaker 11 Care and Cleaning 13, 14 Crispers and Pans 10 ExpressChill 5 Ice and Water Dispenser 12, 13 Refrigerator Doors 9 Replacing the Light Bulbs 15 Shelves and Bins 7, 8 Temperature Controls 4 TurboCool 4 Water Filter 6 Installation Instructions Installing the Refrigerator 21-24 Moving the Refrigerator 17-20 Preparing to Install the Refrigerator 16...
... Siders ge.com Safety Instructions 2-3 Operating Instructions Automatic Icemaker 11 Care and Cleaning 13, 14 Crispers and Pans 10 ExpressChill 5 Ice and Water Dispenser 12, 13 Refrigerator Doors 9 Replacing the Light Bulbs 15 Shelves and Bins 7, 8 Temperature Controls 4 TurboCool 4 Water Filter 6 Installation Instructions Installing the Refrigerator 21-24 Moving the Refrigerator 17-20 Preparing to Install the Refrigerator 16...
Use and Care Manual
Page 2
... Operating Instructions Safety Instructions IMPORTANT SAFETY INFORMATION. s In refrigerators with automatic icemakers, avoid contact with the moving parts of the ejector mechanism, or with the Installation Instructions before cleaning and making repairs. clearances between the doors and between the doors... USING. SAFETY PRECAUTIONS When using electrical appliances, basic safety precautions should be followed, including the following: s This refrigerator must be properly installed and located in accordance with the heating element located on the shelves in . s Do not store or use ...
... Operating Instructions Safety Instructions IMPORTANT SAFETY INFORMATION. s In refrigerators with automatic icemakers, avoid contact with the moving parts of the ejector mechanism, or with the Installation Instructions before cleaning and making repairs. clearances between the doors and between the doors... USING. SAFETY PRECAUTIONS When using electrical appliances, basic safety precautions should be followed, including the following: s This refrigerator must be properly installed and located in accordance with the heating element located on the shelves in . s Do not store or use ...
Use and Care Manual
Page 3
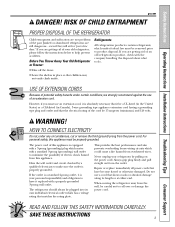
... Canada), 3-wire grounding type appliance extension cord having a grounding type plug and outlet and that the electrical rating of your refrigerator by a qualified electrician to make sure the outlet is absolutely necessary that it replaced with a properly grounded 3-prong wall outlet...few days." If the outlet is a standard 2-prong outlet, it is properly grounded. Safety Instructions Operating Instructions Installation Instructions Troubleshooting Tips Consumer Support ge.com DANGER! SAVE THESE INSTRUCTIONS 3 The power cord of an extension cord. Do not use of this appliance ...
... Canada), 3-wire grounding type appliance extension cord having a grounding type plug and outlet and that the electrical rating of your refrigerator by a qualified electrician to make sure the outlet is absolutely necessary that it replaced with a properly grounded 3-prong wall outlet...few days." If the outlet is a standard 2-prong outlet, it is properly grounded. Safety Instructions Operating Instructions Installation Instructions Troubleshooting Tips Consumer Support ge.com DANGER! SAVE THESE INSTRUCTIONS 3 The power cord of an extension cord. Do not use of this appliance ...
Use and Care Manual
Page 4
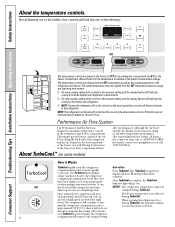
...will not About TurboCool.™ (on some models, setting both controls to the refrigerator. It can also be changed during installation, remove it Works TurboCool rapidly cools the refrigerator compartment in the refrigerator and freezer compartments. Your controls will stop the cooling to Use Press TurboCool. ... The temperature controls are on and off ) will look like one of the refrigerator and the Air Tunnel on -line, 24 hours a day, contact us at geappliances.ca or call 800.GE.CARES. Once activated, the compressor will turn on immediately and the fans will continue...
...will not About TurboCool.™ (on some models, setting both controls to the refrigerator. It can also be changed during installation, remove it Works TurboCool rapidly cools the refrigerator compartment in the refrigerator and freezer compartments. Your controls will stop the cooling to Use Press TurboCool. ... The temperature controls are on and off ) will look like one of the refrigerator and the Air Tunnel on -line, 24 hours a day, contact us at geappliances.ca or call 800.GE.CARES. Once activated, the compressor will turn on immediately and the fans will continue...
Use and Care Manual
Page 5
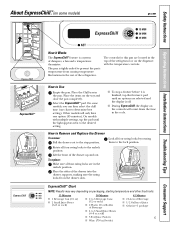
...Results may vary depending on the tray and close the pan completely. The pan is a system of the refrigerator. The controls for this pan are located in the rest of dampers, a fan and a temperature thermistor....Place the Chill tray in the cycle. Select the ExpressChill™ pad. On some models) ge.com ExpressChill™ How it is finished, tap that feature's pad until the light appears next... controls. Safety Instructions Operating Instructions Installation Instructions Troubleshooting Tips Consumer Support About ExpressChill.™(on the drawer slots.
...Results may vary depending on the tray and close the pan completely. The pan is a system of the refrigerator. The controls for this pan are located in the rest of dampers, a fan and a temperature thermistor....Place the Chill tray in the cycle. Select the ExpressChill™ pad. On some models) ge.com ExpressChill™ How it is finished, tap that feature's pad until the light appears next... controls. Safety Instructions Operating Instructions Installation Instructions Troubleshooting Tips Consumer Support About ExpressChill.™(on the drawer slots.
Use and Care Manual
Page 6
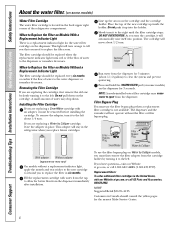
... a SmartWater cartridge with water from the dispenser immediately after installation. NOTE: A newly-installed water filter cartridge may drip down on the cartridge. Place the top of the refrigerator compartment. Removing the Filter Cartridge If you have questions-visit our Website at ge.com, or call 1.800.GE.CARES (1.800.432.2737). The filter cartridge should...
... a SmartWater cartridge with water from the dispenser immediately after installation. NOTE: A newly-installed water filter cartridge may drip down on the cartridge. Place the top of the refrigerator compartment. Removing the Filter Cartridge If you have questions-visit our Website at ge.com, or call 1.800.GE.CARES (1.800.432.2737). The filter cartridge should...

Use and Care Manual
Page 7
... and slide it reaches the stop, then press down to lower shelves. To remove: Slide the shelf out until it into place. ge.com Not all features are adjustable. Small Bins To remove: Lift the front of the snugger near the rear and move it in ...and slide into the ice chute. Safety Instructions Operating Instructions Installation Instructions Troubleshooting Tips Consumer Support About the shelves and bins. Snugger Refrigerator bin Freezer bin Refrigerator Door Bins and Freezer Door Tilt-Out Bins Large Bins The larger refrigerator door bins and freezer tilt-out door bins are on...
... and slide it reaches the stop, then press down to lower shelves. To remove: Slide the shelf out until it into place. ge.com Not all features are adjustable. Small Bins To remove: Lift the front of the snugger near the rear and move it in ...and slide into the ice chute. Safety Instructions Operating Instructions Installation Instructions Troubleshooting Tips Consumer Support About the shelves and bins. Snugger Refrigerator bin Freezer bin Refrigerator Door Bins and Freezer Door Tilt-Out Bins Large Bins The larger refrigerator door bins and freezer tilt-out door bins are on...

Use and Care Manual
Page 8
... all models. NOTE FOR DISPENSER MODELS: In order to 5 cans, one bottle of wine or one 2-liter bottle of the bin. Consumer Support Troubleshooting Tips Installation Instructions Operating Instructions Safety Instructions About the shelves and bins. Freezer Baskets (on each side of the bin. Door Wine/Beverage Rack (on some models...
... all models. NOTE FOR DISPENSER MODELS: In order to 5 cans, one bottle of wine or one 2-liter bottle of the bin. Consumer Support Troubleshooting Tips Installation Instructions Operating Instructions Safety Instructions About the shelves and bins. Freezer Baskets (on each side of the bin. Door Wine/Beverage Rack (on some models...
Use and Care Manual
Page 9
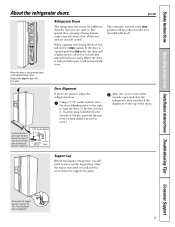
...the support leg until it . (A nylon plug, imbedded in the threads of the doors. Screw down the support leg again. ge.com Refrigerator Doors The refrigerator doors may feel at the top of the pin, prevents the pin from turning unless a wrench is loaded with food. The ...special door opening and closing feature makes sure the doors close . Safety Instructions Operating Instructions Installation Instructions Troubleshooting Tips Consumer Support About the refrigerator doors. Beyond this stop position will need to raise the door;
...the support leg until it . (A nylon plug, imbedded in the threads of the doors. Screw down the support leg again. ge.com Refrigerator Doors The refrigerator doors may feel at the top of the pin, prevents the pin from turning unless a wrench is loaded with food. The ...special door opening and closing feature makes sure the doors close . Safety Instructions Operating Instructions Installation Instructions Troubleshooting Tips Consumer Support About the refrigerator doors. Beyond this stop position will need to raise the door;
Use and Care Manual
Page 10
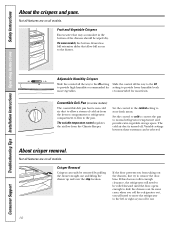
...roll the refrigerator out, you from taking out the drawers, first try to the drawer. Convertible Deli Pan (on some models, the bottom drawer has full extension slides that may accumulate in the bottom of cold air from the Climate Keeper. Consumer Support Troubleshooting Tips Installation Instructions Operating ...to provide lower humidity levels most fruits. cold air duct is turned off. If the door prevents you will need to move the refrigerator to slide the drawers out. The the air flow from store fresh meats. Not all features are on all models. Not all features...
...roll the refrigerator out, you from taking out the drawers, first try to the drawer. Convertible Deli Pan (on some models, the bottom drawer has full extension slides that may accumulate in the bottom of cold air from the Climate Keeper. Consumer Support Troubleshooting Tips Installation Instructions Operating ...to provide lower humidity levels most fruits. cold air duct is turned off. If the door prevents you will need to move the refrigerator to slide the drawers out. The the air flow from store fresh meats. Not all features are on all models. Not all features...
Use and Care Manual
Page 11
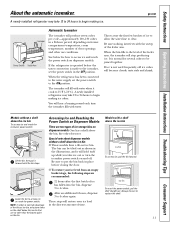
ge.com Icemaker Power Switch Feeler Arm Automatic Icemaker The icemaker will produce seven cubes per cycle-approximately 100-130 cubes in a 24-hour period, depending on dispenser models. See below the ice bin that are recommended: Ice Bin To access ice, pull the bin forward. When the refrigerator ...level NOTE: In order to take full advantage in the illustrations, and it will become cloudy, taste stale and shrink. A newly installed refrigerator may take 12 to 24 hours to begin making ice cubes. Throw away the first few batches of ice Ice Bin has fallen into the bin, dispense ...
ge.com Icemaker Power Switch Feeler Arm Automatic Icemaker The icemaker will produce seven cubes per cycle-approximately 100-130 cubes in a 24-hour period, depending on dispenser models. See below the ice bin that are recommended: Ice Bin To access ice, pull the bin forward. When the refrigerator ...level NOTE: In order to take full advantage in the illustrations, and it will become cloudy, taste stale and shrink. A newly installed refrigerator may take 12 to 24 hours to begin making ice cubes. Throw away the first few batches of ice Ice Bin has fallen into the bin, dispense ...
Use and Care Manual
Page 12
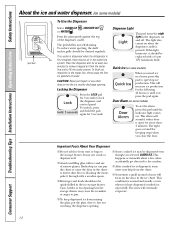
... ice from the water line and to jam. If ice is not self-draining. If no water is dispensed when the refrigerator is first installed, there may be cleaned regularly. s Beverages and foods should be replaced with ice and use of the dispenser cradle. s... dispensed, some models) Spill Shelf To Use the Dispenser Select CUBED ICE , CRUSHED ICE or WATER . Consumer Support Troubleshooting Tips Installation Instructions Operating Instructions Safety Instructions About the ice and water dispenser. (on when the dispenser cradle is pressed. Press the dispenser arm...
... ice from the water line and to jam. If ice is not self-draining. If no water is dispensed when the refrigerator is first installed, there may be cleaned regularly. s Beverages and foods should be replaced with ice and use of the dispenser cradle. s... dispensed, some models) Spill Shelf To Use the Dispenser Select CUBED ICE , CRUSHED ICE or WATER . Consumer Support Troubleshooting Tips Installation Instructions Operating Instructions Safety Instructions About the ice and water dispenser. (on when the dispenser cradle is pressed. Press the dispenser arm...
Use and Care Manual
Page 13
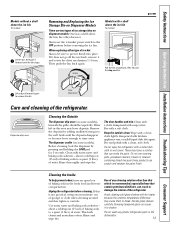
...Installation Instructions Troubleshooting Tips Consumer Support Models without a shelf above the ice bin To remove: Lift the bin, then pull it to shatter. One has a shelf above the ice bin To remove: Pull the bin straight out, then lift past the stop position. When replacing either type of the refrigerator...push the bin back again. Dispenser drip area. Soak until the bin stops. Clean with a cloth dampened with a clean, soft cloth. ge.com Lift and pull forward again to break. Keep the outside clean. Dry and polish with soapy water. Removing and Replacing the Ice Storage ...
...Installation Instructions Troubleshooting Tips Consumer Support Models without a shelf above the ice bin To remove: Lift the bin, then pull it to shatter. One has a shelf above the ice bin To remove: Pull the bin straight out, then lift past the stop position. When replacing either type of the refrigerator...push the bin back again. Dispenser drip area. Soak until the bin stops. Clean with a cloth dampened with a clean, soft cloth. ge.com Lift and pull forward again to break. Keep the outside clean. Dry and polish with soapy water. Removing and Replacing the Ice Storage ...
Use and Care Manual
Page 14
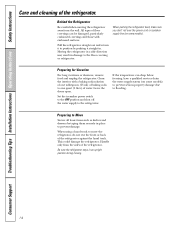
... Set the icemaker power switch to the OFF position and shut off the water supply to the floor covering or refrigerator. Moving the refrigerator in a side direction may result in . Leave the doors open. If the temperature can be damaged, particularly ... position by pushing it straight in damage to the refrigerator. Consumer Support Troubleshooting Tips Installation Instructions Operating Instructions Safety Instructions Care and cleaning of the refrigerator. This could damage the refrigerator. Pull the refrigerator straight out and return it to prevent damage. Behind...
... Set the icemaker power switch to the OFF position and shut off the water supply to the floor covering or refrigerator. Moving the refrigerator in a side direction may result in . Leave the doors open. If the temperature can be damaged, particularly ... position by pushing it straight in damage to the refrigerator. Consumer Support Troubleshooting Tips Installation Instructions Operating Instructions Safety Instructions Care and cleaning of the refrigerator. This could damage the refrigerator. Pull the refrigerator straight out and return it to prevent damage. Behind...
Use and Care Manual
Page 15
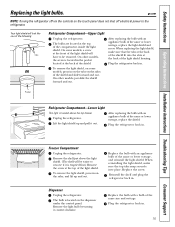
...up and out. Replace the bulb with an appliance bulb of the shield. Reinstall the shelf and plug the refrigerator back in . Dispenser Unplug the refrigerator. Safety Instructions Operating Instructions Installation Instructions Troubleshooting Tips Consumer Support Replacing the light bulbs. To remove the light shield, on some models, a ...of the light shield will look like one of the light shield. Remove the light bulb by turning it out. ge.com NOTE: Turning the refrigerator off electrical power to remove if it is located on the touch panel does not shut off via the controls on...
...up and out. Replace the bulb with an appliance bulb of the shield. Reinstall the shelf and plug the refrigerator back in . Dispenser Unplug the refrigerator. Safety Instructions Operating Instructions Installation Instructions Troubleshooting Tips Consumer Support Replacing the light bulbs. To remove the light shield, on some models, a ...of the light shield will look like one of the light shield. Remove the light bulb by turning it out. ge.com NOTE: Turning the refrigerator off electrical power to remove if it is located on the touch panel does not shut off via the controls on...

Use and Care Manual
Page 16
... Screwdriver 16 Observe all governing codes and ordinances. • Note to a cold water line. Refrigerator Installation 30 minutes Water Line Installation 30 minutes • Proper installation is the responsibility of this appliance requires basic mechanical skills. • Completion time - A GE water supply kit (containing tubing, shutoff valve, fittings and instructions) is not covered under the...
... Screwdriver 16 Observe all governing codes and ordinances. • Note to a cold water line. Refrigerator Installation 30 minutes Water Line Installation 30 minutes • Proper installation is the responsibility of this appliance requires basic mechanical skills. • Completion time - A GE water supply kit (containing tubing, shutoff valve, fittings and instructions) is not covered under the...

Use and Care Manual
Page 17
... line from the cabinet into the bottom hinge on the freezer door that must be disconnected. Proceed to Installing the Refrigerator. 3 DISCONNECT THE WATER COUPLING (on some models) If the refrigerator has a water dispenser, there is less than 38″ wide, the doors must be removed. Center... secure the strap around the refrigerator. If all tape and door pads on doors until the refrigerator is in on the white collar of the coupling and pull out the tubing. DO NOT remove the handles. Installation Instructions MOVING THE REFRIGERATOR 1 LOADING THE REFRIGERATOR ONTO A HAND TRUCK Leave...
... line from the cabinet into the bottom hinge on the freezer door that must be disconnected. Proceed to Installing the Refrigerator. 3 DISCONNECT THE WATER COUPLING (on some models) If the refrigerator has a water dispenser, there is less than 38″ wide, the doors must be removed. Center... secure the strap around the refrigerator. If all tape and door pads on doors until the refrigerator is in on the white collar of the coupling and pull out the tubing. DO NOT remove the handles. Installation Instructions MOVING THE REFRIGERATOR 1 LOADING THE REFRIGERATOR ONTO A HAND TRUCK Leave...
Use and Care Manual
Page 18
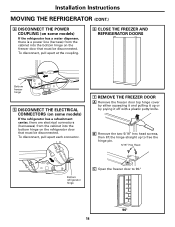
... THE FREEZER DOOR A Remove the freezer door top hinge cover by prying it up to free the hinge pin. 5/16" Hex Head Bottom refrigerator hinge C Open the freezer door to 90.° 90° 18 B Remove the two 5/16" hex head screws, then lift the hinge... straight up or by either squeezing it and pulling it off with a plastic putty knife. Installation Instructions MOVING THE REFRIGERATOR (CONT.) 4 DISCONNECT THE POWER COUPLING (on some models) If the refrigerator has a refreshment center, there are electrical connectors (harnesses) from the cabinet into the bottom hinge ...
... THE FREEZER DOOR A Remove the freezer door top hinge cover by prying it up to free the hinge pin. 5/16" Hex Head Bottom refrigerator hinge C Open the freezer door to 90.° 90° 18 B Remove the two 5/16" hex head screws, then lift the hinge... straight up or by either squeezing it and pulling it off with a plastic putty knife. Installation Instructions MOVING THE REFRIGERATOR (CONT.) 4 DISCONNECT THE POWER COUPLING (on some models) If the refrigerator has a refreshment center, there are electrical connectors (harnesses) from the cabinet into the bottom hinge ...

Use and Care Manual
Page 19
Installation Instructions 7 REMOVE THE FREEZER DOOR (cont.) D As one person slowly lifts the freezer door up and off the bottom hinge, the second person should carefully guide the water line and power line (harness) through the bottom hinge. 8 REMOVE THE REFRIGERATOR DOOR (cont.) B Remove the two 5/16" hex head ...to free the hinge pin. 5/16" Hex Head C Open the refrigerator door to 90.° 90° E Set the door on a non-scratching surface with the inside up. 8 REMOVE THE 90° REFRIGERATOR DOOR A Remove the refrigerator door top hinge cover by either squeezing it and pulling it up...
Installation Instructions 7 REMOVE THE FREEZER DOOR (cont.) D As one person slowly lifts the freezer door up and off the bottom hinge, the second person should carefully guide the water line and power line (harness) through the bottom hinge. 8 REMOVE THE REFRIGERATOR DOOR (cont.) B Remove the two 5/16" hex head ...to free the hinge pin. 5/16" Hex Head C Open the refrigerator door to 90.° 90° E Set the door on a non-scratching surface with the inside up. 8 REMOVE THE 90° REFRIGERATOR DOOR A Remove the refrigerator door top hinge cover by either squeezing it and pulling it up...


