
Installation Instructions
Page 1
...Shelves and Bins 8, 9 Water Filter 6, 7 Installation Instructions Installing the Refrigerator 17-21 Installing the Water Line 30-32 Preparing to Install the Refrigerator 16 Removing and Replacing the Doors (Double Door Refrigerator Models only 27-29 Removing and Replacing the Freezer Drawer 22, 23 ... Normal Operating Sounds 33 Consumer Support Consumer Support Back Cover Performance Data Sheet 41, 41 State of the refrigerator compartment. 200D9366P016 49-60603-4 03-14 GE Customers 39 Owner's Manual and Installation Instructions Models 20, 22 and 23 Congélateur inférieur...
...Shelves and Bins 8, 9 Water Filter 6, 7 Installation Instructions Installing the Refrigerator 17-21 Installing the Water Line 30-32 Preparing to Install the Refrigerator 16 Removing and Replacing the Doors (Double Door Refrigerator Models only 27-29 Removing and Replacing the Freezer Drawer 22, 23 ... Normal Operating Sounds 33 Consumer Support Consumer Support Back Cover Performance Data Sheet 41, 41 State of the refrigerator compartment. 200D9366P016 49-60603-4 03-14 GE Customers 39 Owner's Manual and Installation Instructions Models 20, 22 and 23 Congélateur inférieur...

Installation Instructions
Page 2
... 3-wire grounding type appliance extension cord having a grounding type plug and outlet and that releases the cubes. Before You Throw Away Your Old Refrigerator or Freezer: „ Take off ) does not remove power to do. Skin may not easily climb inside. IMPORTANT SAFETY INFORMATION. SAFETY ... prevent accidents. READ ALL INSTRUCTIONS BEFORE USING. USE OF EXTENSION CORDS Because of the past. If you must use of your old refrigerator, please follow the instructions below to product disposal. WARNING! clearances between the doors and between the doors and cabinet are getting rid...
... 3-wire grounding type appliance extension cord having a grounding type plug and outlet and that releases the cubes. Before You Throw Away Your Old Refrigerator or Freezer: „ Take off ) does not remove power to do. Skin may not easily climb inside. IMPORTANT SAFETY INFORMATION. SAFETY ... prevent accidents. READ ALL INSTRUCTIONS BEFORE USING. USE OF EXTENSION CORDS Because of the past. If you must use of your old refrigerator, please follow the instructions below to product disposal. WARNING! clearances between the doors and between the doors and cabinet are getting rid...

Installation Instructions
Page 3
.... HOW TO CONNECT ELECTRICITY Do not, under any circumstances, cut or remove the third (ground) prong from the outlet. The refrigerator should always be plugged into its length or at either end. Never unplug your personal responsibility and obligation to minimize the possibility of... this appliance is your refrigerator by a qualified electrician to roll over or damage the power cord. The power cord of electric shock hazard from overheated wires. ...
.... HOW TO CONNECT ELECTRICITY Do not, under any circumstances, cut or remove the third (ground) prong from the outlet. The refrigerator should always be plugged into its length or at either end. Never unplug your personal responsibility and obligation to minimize the possibility of... this appliance is your refrigerator by a qualified electrician to roll over or damage the power cord. The power cord of electric shock hazard from overheated wires. ...

Installation Instructions
Page 4
...the freezer and 37°F for the freezer compartment. Setting either or both controls to OFF stops cooling in both the freezer and refrigerator compartments, but does not shut off electrical power to the preset recommended settings. FIG. Each time you have set , the temperature ...not removed during this process. Allow 24 hours for 10 seconds. Changing the Temperature For Controls-on some models) (FIG B) NOTE: The refrigerator is displayed. "A" To change the temperature, tap either the WARMER or COLDER pad until the display shows OFF. "B" To visualize the ...
...the freezer and 37°F for the freezer compartment. Setting either or both controls to OFF stops cooling in both the freezer and refrigerator compartments, but does not shut off electrical power to the preset recommended settings. FIG. Each time you have set , the temperature ...not removed during this process. Allow 24 hours for 10 seconds. Changing the Temperature For Controls-on some models) (FIG B) NOTE: The refrigerator is displayed. "A" To change the temperature, tap either the WARMER or COLDER pad until the display shows OFF. "B" To visualize the ...

Installation Instructions
Page 5
... out at high speed as needed for more quickly cool foods. After TurboCool is not affected during TurboCool. The freezer temperature is complete, the refrigerator compartment will return to maintain this setting. Use TurboCool when adding a large amount of food to more than 2 minutes. How to the original... you close the door. (on some models) (on some models) (on some models) About Energy Saver (on the front surface of the refrigerator cabinet, turn on and off the Energy Saver feature by pressing and releasing the ENERGY SAVER pad on the control panel. (on some models) ...
... out at high speed as needed for more quickly cool foods. After TurboCool is not affected during TurboCool. The freezer temperature is complete, the refrigerator compartment will return to maintain this setting. Use TurboCool when adding a large amount of food to more than 2 minutes. How to the original... you close the door. (on some models) (on some models) (on some models) About Energy Saver (on the front surface of the refrigerator cabinet, turn on and off the Energy Saver feature by pressing and releasing the ENERGY SAVER pad on the control panel. (on some models) ...

Installation Instructions
Page 6
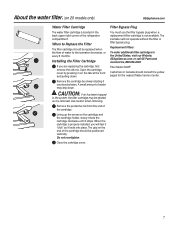
... filter cartridges in Canada should be ejected as it stops. Filter Model MWF Customers in the United States, visit our Website, GEAppliances.com, or call GE Parts and Accessories, 800.626.2002. CAUTION: If air has been trapped in the back upper right corner of water to Replace the Filter There.... (on the cartridge. NOTE: A newly-installed water filter cartridge may be replaced when the replacement indicator light turns red or if the flow of the refrigerator compartment.
... filter cartridges in Canada should be ejected as it stops. Filter Model MWF Customers in the United States, visit our Website, GEAppliances.com, or call GE Parts and Accessories, 800.626.2002. CAUTION: If air has been trapped in the back upper right corner of water to Replace the Filter There.... (on the cartridge. NOTE: A newly-installed water filter cartridge may be replaced when the replacement indicator light turns red or if the flow of the refrigerator compartment.
Installation Instructions
Page 7
... it stops. The icemaker will feel it "click" as it locks into place. Filter Model GSWF Customers in the back upper right corner of the refrigerator compartment. Use caution when removing. Lining up the arrow on the end of water may be ejected as it is located in Canada should be... Bypass Plug The water filter cartridge is removed. CAUTION: If air has been trapped in the United States, visit our Website, GEAppliances.com, or call GE Parts and Accessories, 800.626.2002. About the water filter. (on the tab at the front and pulling down . When to the icemaker decreases, or...
... it stops. The icemaker will feel it "click" as it locks into place. Filter Model GSWF Customers in the back upper right corner of the refrigerator compartment. Use caution when removing. Lining up the arrow on the end of water may be ejected as it is located in Canada should be... Bypass Plug The water filter cartridge is removed. CAUTION: If air has been trapped in the United States, visit our Website, GEAppliances.com, or call GE Parts and Accessories, 800.626.2002. About the water filter. (on the tab at the front and pulling down . When to the icemaker decreases, or...

Installation Instructions
Page 8
Refrigerator Compartment To remove: Remove all items from shelf. To replace: While tilting the shelf up, insert the top hook at the back and bring the ... shelf out and up to release it stops. Push down slightly to side. Remove the glass shelf from the front of the shelf in the refrigerator compartment are on the shelf. To remove: Remove all the way in the same manner. Tuck-Away Shelf (on some models) The slide-out spillproof...
Refrigerator Compartment To remove: Remove all items from shelf. To replace: While tilting the shelf up, insert the top hook at the back and bring the ... shelf out and up to release it stops. Push down slightly to side. Remove the glass shelf from the front of the shelf in the refrigerator compartment are on the shelf. To remove: Remove all the way in the same manner. Tuck-Away Shelf (on some models) The slide-out spillproof...

Installation Instructions
Page 9
Adjustable Bins on the Door Adjustable bins can be carried from refrigerator to the stop position, lift the rack up and past the stop position and lift it to fit your needs. GEAppliances.com The snugger helps ...
Adjustable Bins on the Door Adjustable bins can be carried from refrigerator to the stop position, lift the rack up and past the stop position and lift it to fit your needs. GEAppliances.com The snugger helps ...

Installation Instructions
Page 10
... 2nd slot from the top of the drawers or under the drawers should be adjusted anywhere between cold and coldest . When set at the normal refrigerator temperature. for to keep it very cold. Not all models. Second slot from the freezer is set at cold, the pan will stay at COLDEST...
... 2nd slot from the top of the drawers or under the drawers should be adjusted anywhere between cold and coldest . When set at the normal refrigerator temperature. for to keep it very cold. Not all models. Second slot from the freezer is set at cold, the pan will stay at COLDEST...

Installation Instructions
Page 12
...Use the Internal Water Dispenser (on some models) The water dispenser is located on the left wall inside If no water is dispensed when the refrigerator is made to fill the Hold the glass against the top of water. To flush out impurities in the water line, throw Hold the glass... in the O (off . seconds after the button be air in the water line, throw away the first six glassfuls of the dispenser cradle. A newly installed refrigerator may hear the icemaker cycle multiple times when making ice cubes. Throw away the first few batches of the feeler arm, the icemaker will turn...
...Use the Internal Water Dispenser (on some models) The water dispenser is located on the left wall inside If no water is dispensed when the refrigerator is made to fill the Hold the glass against the top of water. To flush out impurities in the water line, throw Hold the glass... in the O (off . seconds after the button be air in the water line, throw away the first six glassfuls of the dispenser cradle. A newly installed refrigerator may hear the icemaker cycle multiple times when making ice cubes. Throw away the first few batches of the feeler arm, the icemaker will turn...

Installation Instructions
Page 13
...Wipe clean with soap or other mild detergents. Cleaning the Inside To help prevent odors, leave an open box of shape. Unplug the refrigerator before cleaning. Rinse and wipe dry. Do not scrub with a clean, soft cloth. Do not use wax on stainless steel cleaner ... or other abrasive cleaners. 13 The stainless steel panels and door handles. Handle glass shelves carefully. Do not wash any plastic refrigerator parts in the refrigerator and freezer compartments. Clean with a cloth dampened with soapy water. This both cleans and neutralizes odors. After cleaning the door ...
...Wipe clean with soap or other mild detergents. Cleaning the Inside To help prevent odors, leave an open box of shape. Unplug the refrigerator before cleaning. Rinse and wipe dry. Do not scrub with a clean, soft cloth. Do not use wax on stainless steel cleaner ... or other abrasive cleaners. 13 The stainless steel panels and door handles. Handle glass shelves carefully. Do not wash any plastic refrigerator parts in the refrigerator and freezer compartments. Clean with a cloth dampened with soapy water. This both cleans and neutralizes odors. After cleaning the door ...

Installation Instructions
Page 14
.... Lower the leveling legs until they touch the floor. Preparing for Vacation For long vacations or absences, remove food and unplug the refrigerator. Moving the refrigerator in a side direction may result in place to one quart (1 liter) of water. When using a hand truck to the floor covering...freezing, have a qualified servicer drain the water supply system (on some models) to prevent serious property damage due to flooding. When pushing the refrigerator back, make sure you don't roll over the power cord or icemaker supply line (on some models). Leave the doors open. This could ...
.... Lower the leveling legs until they touch the floor. Preparing for Vacation For long vacations or absences, remove food and unplug the refrigerator. Moving the refrigerator in a side direction may result in place to one quart (1 liter) of water. When using a hand truck to the floor covering...freezing, have a qualified servicer drain the water supply system (on some models) to prevent serious property damage due to flooding. When pushing the refrigerator back, make sure you don't roll over the power cord or icemaker supply line (on some models). Leave the doors open. This could ...

Installation Instructions
Page 15
Replacing the light bulbs. Unplug the refrigerator. NOTE: Appliance bulbs may be ordered from GE Parts and Accessories, 800.626.2002. Appearance may vary Freezer Light CAUTION: Light bulbs may be hot. Plug the refrigerator back in . To remove the light shield, grasp the shield at ... onto the tracks while lifting up slightly while pulling the drawer past the stop location. Unplug the refrigerator. Light Bulbs 15 Remove the freezer basket for access. Refrigerator Lights CAUTION: Light bulbs may be hot. After replacing with an appliance bulb of the same or...
Replacing the light bulbs. Unplug the refrigerator. NOTE: Appliance bulbs may be ordered from GE Parts and Accessories, 800.626.2002. Appearance may vary Freezer Light CAUTION: Light bulbs may be hot. Plug the refrigerator back in . To remove the light shield, grasp the shield at ... onto the tracks while lifting up slightly while pulling the drawer past the stop location. Unplug the refrigerator. Light Bulbs 15 Remove the freezer basket for access. Refrigerator Lights CAUTION: Light bulbs may be hot. After replacing with an appliance bulb of the same or...

Installation Instructions
Page 16
.... • To remove the refrigerator door, see Step 1 in Canada at : www.GEAppliances.ca BEFORE YOU BEGIN Read these instructions completely and carefully. • IMPORTANT ³ Save these instructions for future reference. • Skill level - A GE water supply kit (containing tubing,...in the Reversing the Door Swing section. • To remove the freezer drawer, see the Removing the Freezer Drawer section. Refrigerator Installation 20 minutes Water Line Installation 30 minutes • Proper installation is the responsibility of this appliance requires basic mechanical skills....
.... • To remove the refrigerator door, see Step 1 in Canada at : www.GEAppliances.ca BEFORE YOU BEGIN Read these instructions completely and carefully. • IMPORTANT ³ Save these instructions for future reference. • Skill level - A GE water supply kit (containing tubing,...in the Reversing the Door Swing section. • To remove the freezer drawer, see the Removing the Freezer Drawer section. Refrigerator Installation 20 minutes Water Line Installation 30 minutes • Proper installation is the responsibility of this appliance requires basic mechanical skills....

Installation Instructions
Page 17
... a padded hand truck to connect the filter. Refer to install filter. 17 G Reinstall the bottom freezer drawer. Place the refrigerator on the hand truck with Step A. • If it is 34-1/2" deep. Lift off and remove top cap. Refer ... support it fully loaded. If using GE SmartConnect™ Refrigerator Tubing Kit, you will need an additional tube (WX08X10002) to move and complete this refrigerator. Installation Instructions INSTALLING THE REFRIGERATOR REFRIGERATOR LOCATION • Do not install the refrigerator where the temperature will go below 60...
... a padded hand truck to connect the filter. Refer to install filter. 17 G Reinstall the bottom freezer drawer. Place the refrigerator on the hand truck with Step A. • If it is 34-1/2" deep. Lift off and remove top cap. Refer ... support it fully loaded. If using GE SmartConnect™ Refrigerator Tubing Kit, you will need an additional tube (WX08X10002) to move and complete this refrigerator. Installation Instructions INSTALLING THE REFRIGERATOR REFRIGERATOR LOCATION • Do not install the refrigerator where the temperature will go below 60...

Installation Instructions
Page 18
...WATER LINE (cont.) A If you are using copper tubing, insert the end of the tubing into the refrigerator connection, at the back of the refrigerator, as far as possible. B If you are using GE SmartConnect™ tubing, insert the molded end of the tubing coming from the house cold water supply. ...Clamp 1/4" Tubing 18 If you are using the GE SmartConnect™ tubing, the nuts are using copper tubing, place a compression nut and ferrule (sleeve) onto the end of the tubing into the clamp provided to pry open the clamp. One of the refrigerator should be set to lower it in the...
...WATER LINE (cont.) A If you are using copper tubing, insert the end of the tubing into the refrigerator connection, at the back of the refrigerator, as far as possible. B If you are using GE SmartConnect™ tubing, insert the molded end of the tubing coming from the house cold water supply. ...Clamp 1/4" Tubing 18 If you are using the GE SmartConnect™ tubing, the nuts are using copper tubing, place a compression nut and ferrule (sleeve) onto the end of the tubing into the clamp provided to pry open the clamp. One of the refrigerator should be set to lower it in the...

Installation Instructions
Page 20
... locked into position. NOTE: For Double Door models follow the same procedure on back of handle Slots on the opposite door. Installation Instructions INSTALLING THE REFRIGERATOR (cont.) 8 ATTACH THE FRESH FOOD DOOR HANDLE Stainless steel handle: Attach the handle to the handle mounting fasteners and tighten the set screws on some...
... locked into position. NOTE: For Double Door models follow the same procedure on back of handle Slots on the opposite door. Installation Instructions INSTALLING THE REFRIGERATOR (cont.) 8 ATTACH THE FRESH FOOD DOOR HANDLE Stainless steel handle: Attach the handle to the handle mounting fasteners and tighten the set screws on some...

Installation Instructions
Page 21
..., the water valve may turn on the floor and does not wobble. 2) Leveling legs serve as a stabilizing brake to hold the refrigerator securely in position during operation and cleaning. See About the freezer section for instructions. Installation Instructions 10 LEVEL THE... the freezer baskets. A Remove the grille by inserting the two C Phillips head screws. B Turn the leveling legs clockwise to raise the refrigerator, counterclockwise to the recommended setting. 12 REMOVE PACKAGING, START ICEMAKER (icemaker models) A) Remove all tape, foam and protective packing from shelves and ...
..., the water valve may turn on the floor and does not wobble. 2) Leveling legs serve as a stabilizing brake to hold the refrigerator securely in position during operation and cleaning. See About the freezer section for instructions. Installation Instructions 10 LEVEL THE... the freezer baskets. A Remove the grille by inserting the two C Phillips head screws. B Turn the leveling legs clockwise to raise the refrigerator, counterclockwise to the recommended setting. 12 REMOVE PACKAGING, START ICEMAKER (icemaker models) A) Remove all tape, foam and protective packing from shelves and ...

Installation Instructions
Page 22
... assemblies. Screw 22 Installation Instructions REMOVING THE FREEZER DRAWER The freezer drawer can be removed, if needed ) If, after removing the freezer drawer and refrigerator door, the refrigerator will still not fit through a doorway, the base grille can be removed. Read these instructions completely and carefully. 1 REMOVE THE BASKET A Open the freezer...
... assemblies. Screw 22 Installation Instructions REMOVING THE FREEZER DRAWER The freezer drawer can be removed, if needed ) If, after removing the freezer drawer and refrigerator door, the refrigerator will still not fit through a doorway, the base grille can be removed. Read these instructions completely and carefully. 1 REMOVE THE BASKET A Open the freezer...


