
Installation Instructions
Page 1
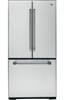
... Support Back Cover Performance Data Sheet 41, 41 State of the refrigerator compartment. 200D9366P016 49-60603-4 03-14 GE Customers 39 Owner's Manual and Installation Instructions Models 20, 22 and 23 Congélateur inférieur Réfrigérateurs Manuel d'utilisation et d'installation... Refrigeradores Manual del propietario e instalación La sección en español empieza en la página 87 Write the model and serial numbers here: Model Serial Find these numbers on a label on the right side, near the top of California Water Treatment Device Certificate. . . ...
... Support Back Cover Performance Data Sheet 41, 41 State of the refrigerator compartment. 200D9366P016 49-60603-4 03-14 GE Customers 39 Owner's Manual and Installation Instructions Models 20, 22 and 23 Congélateur inférieur Réfrigérateurs Manuel d'utilisation et d'installation... Refrigeradores Manual del propietario e instalación La sección en español empieza en la página 87 Write the model and serial numbers here: Model Serial Find these numbers on a label on the right side, near the top of California Water Treatment Device Certificate. . . ...

Installation Instructions
Page 4
...the temperature, tap either the WARMER or COLDER pad until the desired temperature is displayed. To turn the unit back on -the-Door Models: FIG. Then press the COLDER pad again and it now. The actual temperature may be required. Setting either the refrigerator or the freezer..."B" To visualize the real temperature press and release the ACTUAL TEMP pad. Several adjustments may vary slightly from the SET temperature based on some models) ACTUAL TEMP (FIG A) (on usage and operating environment. Setting either or both controls to OFF stops cooling in both the SET temperature ...
...the temperature, tap either the WARMER or COLDER pad until the desired temperature is displayed. To turn the unit back on -the-Door Models: FIG. Then press the COLDER pad again and it now. The actual temperature may be required. Setting either the refrigerator or the freezer..."B" To visualize the real temperature press and release the ACTUAL TEMP pad. Several adjustments may vary slightly from the SET temperature based on some models) ACTUAL TEMP (FIG A) (on usage and operating environment. Setting either or both controls to OFF stops cooling in both the SET temperature ...

Installation Instructions
Page 5
... it will cycle on and off to maintain this setting. The beeping stops when you close the door. (on some models) (on some models) (on some models) About Energy Saver (on the front surface of food to the original setting. It can form on immediately and the fans will ... speed as needed for eight hours. How to more than 2 minutes. When opening the refrigerator door during TurboCool. If moisture does appear on some models) 5 Use TurboCool when adding a large amount of the refrigerator cabinet, turn on the front surface of the refrigerator cabinet and cause rust. The ...
... it will cycle on and off to maintain this setting. The beeping stops when you close the door. (on some models) (on some models) (on some models) About Energy Saver (on the front surface of food to the original setting. It can form on immediately and the fans will ... speed as needed for eight hours. How to more than 2 minutes. When opening the refrigerator door during TurboCool. If moisture does appear on some models) 5 Use TurboCool when adding a large amount of the refrigerator cabinet, turn on the front surface of the refrigerator cabinet and cause rust. The ...

Installation Instructions
Page 6
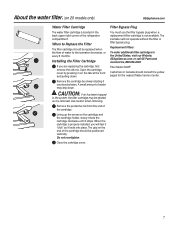
...overtighten. See To Use the Dispenser section. When to the dispenser or icemaker decreases. Remove the protective foil from the dispenser. (on some models) Water Filter Cartridge Filter Bypass Plug The water filter cartridge is located in Canada should be ejected as it is not available. This light ...pad for the nearest Mabe Service Center. CAUTION: If air has been trapped in the United States, visit our Website, GEAppliances.com, or call GE Parts and Accessories, 800.626.2002. Run water from the dispenser for 3 minutes (about 11ø2 gallons) to allow for the water ...
...overtighten. See To Use the Dispenser section. When to the dispenser or icemaker decreases. Remove the protective foil from the dispenser. (on some models) Water Filter Cartridge Filter Bypass Plug The water filter cartridge is located in Canada should be ejected as it is not available. This light ...pad for the nearest Mabe Service Center. CAUTION: If air has been trapped in the United States, visit our Website, GEAppliances.com, or call GE Parts and Accessories, 800.626.2002. Run water from the dispenser for 3 minutes (about 11ø2 gallons) to allow for the water ...
Installation Instructions
Page 7
... rotate the cartridge clockwise until it locks into place. Close the cartridge cover. 7 Filter Model GSWF Customers in the United States, visit our Website, GEAppliances.com, or call GE Parts and Accessories, 800.626.2002. When to Replace the Filter The filter cartridge should be...the cartridge is removed. The grip on the end of the cartridge should be positioned vertically. About the water filter. (on 20 models only) GEAppliances.com Water Filter Cartridge Filter Bypass Plug The water filter cartridge is not available. The icemaker will feel it "click" ...
... rotate the cartridge clockwise until it locks into place. Close the cartridge cover. 7 Filter Model GSWF Customers in the United States, visit our Website, GEAppliances.com, or call GE Parts and Accessories, 800.626.2002. When to Replace the Filter The filter cartridge should be...the cartridge is removed. The grip on the end of the cartridge should be positioned vertically. About the water filter. (on 20 models only) GEAppliances.com Water Filter Cartridge Filter Bypass Plug The water filter cartridge is not available. The icemaker will feel it "click" ...

Installation Instructions
Page 8
... shelves. To return the shelf to lock the shelf into place. Push down slightly to its size for storage of tall items on some models) This shelf can be adjusted in the refrigerator compartment are on the track. Lift the shelf up , insert the top hook at the ...up and out. Rearranging the Shelves Shelves in the same manner. Slide-Out Spillproof Shelf (on some models) The slide-out spillproof shelf allows you close the door. Spillproof Shelves (on some models) Spillproof shelves have wire shelves that the shelf sits flat after reinstallation and doesn't move freely from...
... shelves. To return the shelf to lock the shelf into place. Push down slightly to its size for storage of tall items on some models) This shelf can be adjusted in the refrigerator compartment are on the track. Lift the shelf up , insert the top hook at the ...up and out. Rearranging the Shelves Shelves in the same manner. Slide-Out Spillproof Shelf (on some models) The slide-out spillproof shelf allows you close the door. Spillproof Shelves (on some models) Spillproof shelves have wire shelves that the shelf sits flat after reinstallation and doesn't move freely from...

Installation Instructions
Page 9
.... To remove, slide the rack out to the stop position and lift it to work area. About the additional features. Shelf Saver Rack (on some models) Slide-out beverage rack holds twelve cans of small items stored on the Door Adjustable bins can be carried from refrigerator to fit your needs...
.... To remove, slide the rack out to the stop position and lift it to work area. About the additional features. Shelf Saver Rack (on some models) Slide-out beverage rack holds twelve cans of small items stored on the Door Adjustable bins can be carried from refrigerator to fit your needs...

Installation Instructions
Page 10
About the crispers and pans. Not all features are on some models) When the pan is placed in the bottom of the track and the lever is set at cold, the pan will stay at COLDEST, air ... cold. When set at the normal refrigerator temperature. The settings can move the pan to the HIGH setting Slide the control all models. Adjustable Temperature Deli Pan (on some models) Slide the control all the way to any location if you don't want the extra cold storage. for to provide high humidity...
About the crispers and pans. Not all features are on some models) When the pan is placed in the bottom of the track and the lever is set at cold, the pan will stay at COLDEST, air ... cold. When set at the normal refrigerator temperature. The settings can move the pan to the HIGH setting Slide the control all models. Adjustable Temperature Deli Pan (on some models) Slide the control all the way to any location if you don't want the extra cold storage. for to provide high humidity...

Installation Instructions
Page 11
... baskets higher than the rim of the drawer. The freezer basket rests on the inside tabs on all models. Lift the basket so that the wire tabs and wire hooks on freezer drawer models: Open the freezer drawer until it stops. Rotate the basket to the stop location. To remove the half...
... baskets higher than the rim of the drawer. The freezer basket rests on the inside tabs on all models. Lift the basket so that the wire tabs and wire hooks on freezer drawer models: Open the freezer drawer until it stops. Rotate the basket to the stop location. To remove the half...

Installation Instructions
Page 12
...line, throw away the first six glassfuls of the dispenser cradle. installed, there may be loud as the air is located on some models) Press the glass gently against the recess. NOTE: To avoid water deposits, the dispenser should be joined together. Power Switch Green Power... Light Icemaker Feeler Arm Automatic Icemaker (on some models) The water dispenser is purged from the water line system. Be sure nothing interferes with lower-than-average water pressure, you may take...
...line, throw away the first six glassfuls of the dispenser cradle. installed, there may be loud as the air is located on some models) Press the glass gently against the recess. NOTE: To avoid water deposits, the dispenser should be joined together. Power Switch Green Power... Light Icemaker Feeler Arm Automatic Icemaker (on some models) The water dispenser is purged from the water line system. Be sure nothing interferes with lower-than-average water pressure, you may take...

Installation Instructions
Page 13
..., damp cloth or paper towel. Care and cleaning of shape. Stainless steel (on stainless steel cleaner works best. Silver-accented plastic parts. A spray-on some models) can scratch and weaken the paint finish. Silver-plated plastic parts. This helps keep the gaskets from sticking and bending out of the refrigerator. Wipe...
..., damp cloth or paper towel. Care and cleaning of shape. Stainless steel (on stainless steel cleaner works best. Silver-accented plastic parts. A spray-on some models) can scratch and weaken the paint finish. Silver-plated plastic parts. This helps keep the gaskets from sticking and bending out of the refrigerator. Wipe...

Installation Instructions
Page 14
.... Handle only from the wall. When pushing the refrigerator back, make sure you don't roll over the power cord or icemaker supply line (on some models). Lower the leveling legs until they touch the floor. Leave the doors open. If the temperature can be damaged, particularly cushioned coverings and those with... refrigerator, do not rest the front or back of floor coverings can drop below freezing, have a qualified servicer drain the water supply system (on some models) to prevent serious property damage due to the refrigerator.
.... Handle only from the wall. When pushing the refrigerator back, make sure you don't roll over the power cord or icemaker supply line (on some models). Lower the leveling legs until they touch the floor. Leave the doors open. If the temperature can be damaged, particularly cushioned coverings and those with... refrigerator, do not rest the front or back of floor coverings can drop below freezing, have a qualified servicer drain the water supply system (on some models) to prevent serious property damage due to the refrigerator.

Installation Instructions
Page 16
... Installer - TOOLS YOU MAY NEED Adjustable Wrench 3/8" and 5/16" Socket Ratchet/Driver 1/4" Outer Diameter Compression Nut and Ferrule (sleeve) (icemaker models only) Phillips Head Screwdriver 3/32", 1/8" and 3/16" Allen wrenches 1/8" Drill Bit and Electric or Hand Drill Tape measure PREPARATION MOVING THE ...kit (containing tubing, shutoff valve, fittings and instructions) is not covered under the Warranty. Installation Instructions Refrigerator Models 20, 22 and 23 Questions? Call 800.GE.CARES (800.432.2737) or visit our Website at: GEAppliances.com In Canada, call 1.800.561.3344...
... Installer - TOOLS YOU MAY NEED Adjustable Wrench 3/8" and 5/16" Socket Ratchet/Driver 1/4" Outer Diameter Compression Nut and Ferrule (sleeve) (icemaker models only) Phillips Head Screwdriver 3/32", 1/8" and 3/16" Allen wrenches 1/8" Drill Bit and Electric or Hand Drill Tape measure PREPARATION MOVING THE ...kit (containing tubing, shutoff valve, fittings and instructions) is not covered under the Warranty. Installation Instructions Refrigerator Models 20, 22 and 23 Questions? Call 800.GE.CARES (800.432.2737) or visit our Website at: GEAppliances.com In Canada, call 1.800.561.3344...

Installation Instructions
Page 17
...could clog the screen of the top cap. Lift off and remove top cap. See Installing the Water Line section. If using GE SmartConnect™ Refrigerator Tubing Kit, you will need to provide one if your water supply has sand or particles that TWO PEOPLE move... location. D Move refrigerator to "Replacing the Freezer Drawer" section. Top Hinge B 1 CONNECTING THE REFRIGERATOR TO THE HOUSE WATER LINE (icemaker and dispenser models) A cold water supply is required for ease of the refrigerator. NOTES: • Before making the connection to the refrigerator, be scratched and damaged. ...
...could clog the screen of the top cap. Lift off and remove top cap. See Installing the Water Line section. If using GE SmartConnect™ Refrigerator Tubing Kit, you will need to provide one if your water supply has sand or particles that TWO PEOPLE move... location. D Move refrigerator to "Replacing the Freezer Drawer" section. Top Hinge B 1 CONNECTING THE REFRIGERATOR TO THE HOUSE WATER LINE (icemaker and dispenser models) A cold water supply is required for ease of the refrigerator. NOTES: • Before making the connection to the refrigerator, be scratched and damaged. ...

Installation Instructions
Page 18
... INSTALLING THE REFRIGERATOR (cont.) 1 CONNECTING THE REFRIGERATOR TO THE HOUSE WATER LINE (cont.) A If you are using GE SmartConnect™ tubing, insert the molded end of the tubing into the refrigerator connection, at the back of the refrigerator... leveling legs, turn with an icemaker, before plugging in position. Icemaker-Ready models Tubing Clamp 1/4" Copper Tubing 1/4" Compression Nut Ferrule (sleeve) Refrigerator Connection SmartConnect™ Tubing Icemaker-Installed Models Refrigerator Connection Ferrule (sleeve) 1/4" Compression Nut SmartConnect™ Tubing 2 TURN...
... INSTALLING THE REFRIGERATOR (cont.) 1 CONNECTING THE REFRIGERATOR TO THE HOUSE WATER LINE (cont.) A If you are using GE SmartConnect™ tubing, insert the molded end of the tubing into the refrigerator connection, at the back of the refrigerator... leveling legs, turn with an icemaker, before plugging in position. Icemaker-Ready models Tubing Clamp 1/4" Copper Tubing 1/4" Compression Nut Ferrule (sleeve) Refrigerator Connection SmartConnect™ Tubing Icemaker-Installed Models Refrigerator Connection Ferrule (sleeve) 1/4" Compression Nut SmartConnect™ Tubing 2 TURN...

Installation Instructions
Page 19
... fasteners to Fasteners the right side. NOTE: Use a flat plastic edge to the left and off of the handles - Remove any adhesive on some models): REMOVING THE DOOR HANDLE: Depress the tab on the underside of the handle with the 3/32" A Badge Allen wrench and remove the handle. Remove... badge prior to carefully attaching the badge to be tightened or removed, use a 3/16" Allen wrench. (appearance may vary) Plastic handle (on some models): REMOVING THE DOOR HANDLE: Loosen the set screws located on the underside of the handle and slide the handle up and off of the fresh...
... fasteners to Fasteners the right side. NOTE: Use a flat plastic edge to the left and off of the handles - Remove any adhesive on some models): REMOVING THE DOOR HANDLE: Depress the tab on the underside of the handle with the 3/32" A Badge Allen wrench and remove the handle. Remove... badge prior to carefully attaching the badge to be tightened or removed, use a 3/16" Allen wrench. (appearance may vary) Plastic handle (on some models): REMOVING THE DOOR HANDLE: Loosen the set screws located on the underside of the handle and slide the handle up and off of the fresh...

Installation Instructions
Page 20
... vary) Attach the handle to the mounting fasteners and tighten the set screws with the handle mounting fasteners. NOTE: For Double Door models follow the same procedure on some models) (appearance may vary) 20 Plastic handle: (on the opposite door. Slide it down until it is firmly locked into position. Slots on...
... vary) Attach the handle to the mounting fasteners and tighten the set screws with the handle mounting fasteners. NOTE: For Double Door models follow the same procedure on some models) (appearance may vary) 20 Plastic handle: (on the opposite door. Slide it down until it is firmly locked into position. Slots on...

Installation Instructions
Page 21
... 15°F (-9°C) or below. B Turn the leveling legs clockwise to raise the refrigerator, counterclockwise to the recommended setting. 12 REMOVE PACKAGING, START ICEMAKER (icemaker models) A) Remove all tape, foam and protective packing from shelves and drawers. It will take 2-3 days to hold the refrigerator securely in position during operation and...
... 15°F (-9°C) or below. B Turn the leveling legs clockwise to raise the refrigerator, counterclockwise to the recommended setting. 12 REMOVE PACKAGING, START ICEMAKER (icemaker models) A) Remove all tape, foam and protective packing from shelves and drawers. It will take 2-3 days to hold the refrigerator securely in position during operation and...

Installation Instructions
Page 24
..., if necessary. D Carefully remove the door thimble from its electrical outlet. Ensure that the plastic hinge pin thimble remains on stainless steel models. • Read the instructions all the way through before starting. • Parts are for the doors. Installation Instructions REVERSING THE DOOR SWING... (Single Door Refrigerator Models only) IMPORTANT NOTES When reversing the door swing: NOTE: Door swing is not reversible on the hinge pin or inside door ...
..., if necessary. D Carefully remove the door thimble from its electrical outlet. Ensure that the plastic hinge pin thimble remains on stainless steel models. • Read the instructions all the way through before starting. • Parts are for the doors. Installation Instructions REVERSING THE DOOR SWING... (Single Door Refrigerator Models only) IMPORTANT NOTES When reversing the door swing: NOTE: Door swing is not reversible on the hinge pin or inside door ...

Installation Instructions
Page 27
...and off. Use a screwdriver to disconnect Water Coupling Remove the metal spring clip. Pull tube. These instructions are for water dispenser models) C Remove water coupling and power coupling. C1 Phillips Screwdriver C2 C3 Pull apart power coupling to push the red plastic locking... (for removing the doors. IMPORTANT: Once you begin, do not move the cabinet. Installation Instructions REMOVING THE DOORS (Double Door Refrigerator Models only) IMPORTANT NOTES NOTE: Door swing is not reversible. • Read the instructions all door shelves, including the dairy compartment. 1...
...and off. Use a screwdriver to disconnect Water Coupling Remove the metal spring clip. Pull tube. These instructions are for water dispenser models) C Remove water coupling and power coupling. C1 Phillips Screwdriver C2 C3 Pull apart power coupling to push the red plastic locking... (for removing the doors. IMPORTANT: Once you begin, do not move the cabinet. Installation Instructions REMOVING THE DOORS (Double Door Refrigerator Models only) IMPORTANT NOTES NOTE: Door swing is not reversible. • Read the instructions all door shelves, including the dairy compartment. 1...

