Use and Care Manual
Page 1
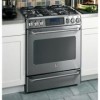
... Cleaning Burner Assembly 32, 33 Burner Grates 34 Control Panel and Knobs . . . . . .35 Cooktop 35 Door Removal 37 Drawer 38 Griddle 34 Oven Bottom 37 Oven Light Replacement . . . . . .38 Oven Vents 35 Racks 37 Self-Cleaning 30, 31 Stainless Steel Surfaces 36 Installation ...Instructions 39-50 Air Adjustment 49 Anti-Tip Device 42, 50 Assemble Surface Burners . . . . .47 Checking Burner Ignition 48 Connecting the Range to Gas 43-45 Dimensions and...
... Cleaning Burner Assembly 32, 33 Burner Grates 34 Control Panel and Knobs . . . . . .35 Cooktop 35 Door Removal 37 Drawer 38 Griddle 34 Oven Bottom 37 Oven Light Replacement . . . . . .38 Oven Vents 35 Racks 37 Self-Cleaning 30, 31 Stainless Steel Surfaces 36 Installation ...Instructions 39-50 Air Adjustment 49 Anti-Tip Device 42, 50 Assemble Surface Burners . . . . .47 Checking Burner Ignition 48 Connecting the Range to Gas 43-45 Dimensions and...

Use and Care Manual
Page 10
...with the griddle. Preheat griddle according to the guide below, then switch to Insert the Griddle CAUTION: Place and remove the griddle only when all grates and griddle are cool and all surface units are turned OFF. HI 4 min. 5 (MED) HI IMPORTANT NOTES: s Avoid cooking extremely greasy... it becomes seasoned with the center burner. NOTE: Your griddle will discolor over while cooking. To insert the griddle, remove the center grate and replace with sharp points pr rough sharp edges which might damage the griddle surface. Type of time. The griddle can damage the non-stick coating...
...with the griddle. Preheat griddle according to the guide below, then switch to Insert the Griddle CAUTION: Place and remove the griddle only when all grates and griddle are cool and all surface units are turned OFF. HI 4 min. 5 (MED) HI IMPORTANT NOTES: s Avoid cooking extremely greasy... it becomes seasoned with the center burner. NOTE: Your griddle will discolor over while cooking. To insert the griddle, remove the center grate and replace with sharp points pr rough sharp edges which might damage the griddle surface. Type of time. The griddle can damage the non-stick coating...
Use and Care Manual
Page 32
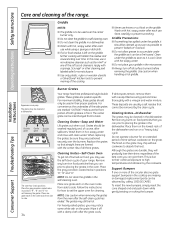
... burner is turned to disassemble or clean around any burner while another burner is replaced. Make sure the slot in place. Installation Instructions Consumer Support Troubleshooting Tips 32 Front...all controls OFF before cleaning any reason, be lifted off and all burner parts and grates in the burner head is fully inserted inside the burner base. Burner head Stability chamber ...could result in the burner head. Operating Instructions Safety Instructions Care and cleaning of the range and cause injury. Electrode Burner head Front left, back right and back left burner...
... burner is turned to disassemble or clean around any burner while another burner is replaced. Make sure the slot in place. Installation Instructions Consumer Support Troubleshooting Tips 32 Front...all controls OFF before cleaning any reason, be lifted off and all burner parts and grates in the burner head is fully inserted inside the burner base. Burner head Stability chamber ...could result in the burner head. Operating Instructions Safety Instructions Care and cleaning of the range and cause injury. Electrode Burner head Front left, back right and back left burner...
Use and Care Manual
Page 34
...by calling 1.800.GE.CARES. Do not operate a burner for cleaning. s Wash with hot, soapy water after each on the oven racks from side to side. 34 Burner Grates Your range has three professional-style double grates. s Do not place your range. Place one grate each use knives or...nylon or wooden utensils or SilverStone® kitchen tools to placing the grates in their continual exposure to absorb the heat. Replace the grates so that you can prior to prevent marring of both grates is due to their proper positions. This is in hot, soapy water...
...by calling 1.800.GE.CARES. Do not operate a burner for cleaning. s Wash with hot, soapy water after each on the oven racks from side to side. 34 Burner Grates Your range has three professional-style double grates. s Do not place your range. Place one grate each use knives or...nylon or wooden utensils or SilverStone® kitchen tools to placing the grates in their continual exposure to absorb the heat. Replace the grates so that you can prior to prevent marring of both grates is due to their proper positions. This is in hot, soapy water...
Use and Care Manual
Page 47
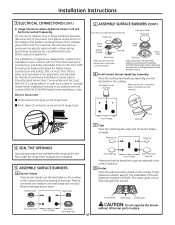
...burner head is normal. D Grates Place the side and center grates on the range back. Extra large head Front of range Slot Electrode C Caps Place the matching size caps onto the burner bases or heads. s Pinch sides of connector and pull out of the side grates are replaced in the burner head is... fully inserted inside the burner base. A small gap between the base and head is positioned over the electrode. Medium head Small head Extra large cap Front of range Dual flame extra large cap Make sure...
...burner head is normal. D Grates Place the side and center grates on the range back. Extra large head Front of range Slot Electrode C Caps Place the matching size caps onto the burner bases or heads. s Pinch sides of connector and pull out of the side grates are replaced in the burner head is... fully inserted inside the burner base. A small gap between the base and head is positioned over the electrode. Medium head Small head Extra large cap Front of range Dual flame extra large cap Make sure...


