Use and Care Manual
Page 1
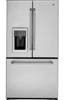
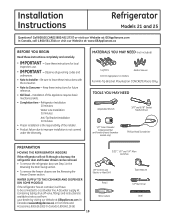
...Double Door Refrigerator Models only 31-33 Trim Kits and Decorator Panels . . . .16, 17 Troubleshooting Tips . . . . . .37-41 Normal Operating Sounds 37 Consumer Support Consumer Support Back Cover Performance Data Sheet 43 State of the refrigerator compartment. 200D9366P023 49-60644 11-2010 GE Customers 41... Owner's Manual and Installation Instructions Models 21 and 25 Congélateur inférieur Réfrigérateurs ...
...Double Door Refrigerator Models only 31-33 Trim Kits and Decorator Panels . . . .16, 17 Troubleshooting Tips . . . . . .37-41 Normal Operating Sounds 37 Consumer Support Consumer Support Back Cover Performance Data Sheet 43 State of the refrigerator compartment. 200D9366P023 49-60644 11-2010 GE Customers 41... Owner's Manual and Installation Instructions Models 21 and 25 Congélateur inférieur Réfrigérateurs ...
Use and Care Manual
Page 4
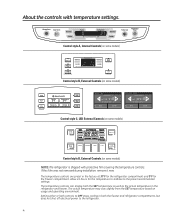
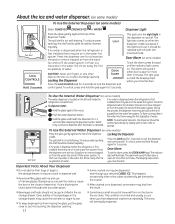
...stabilize to activate Lock ENERGY SAVER ON FREEZER 0F REFRIGERATOR 37 F PRECISE FILL OPTIONS TURBO COOL ENERGY SAVER DOOR ALARM Control style C, LED External Controls (on some models) Control style D, External Controls (on some models) HOME HELP LOCK Hold for the freezer compartment.... Control style A, Internal Controls (on some models) Control style B, External Controls (on usage and operating environment. The actual temperature may vary slightly from the SET temperature based on some models) NOTE: The refrigerator is shipped with temperature settings. If this film...
...stabilize to activate Lock ENERGY SAVER ON FREEZER 0F REFRIGERATOR 37 F PRECISE FILL OPTIONS TURBO COOL ENERGY SAVER DOOR ALARM Control style C, LED External Controls (on some models) Control style D, External Controls (on some models) HOME HELP LOCK Hold for the freezer compartment.... Control style A, Internal Controls (on some models) Control style B, External Controls (on usage and operating environment. The actual temperature may vary slightly from the SET temperature based on some models) NOTE: The refrigerator is shipped with temperature settings. If this film...

Use and Care Manual
Page 5
... or COLDER pad. Several adjustments may be required. To turn the unit back on and the display will go to the actual refrigerator and freezer temperatures after 5 seconds. To turn the cooling system off electrical power to the HOME screen and show the actual temperature... . Each time you have set , the temperature display will go to the refrigerator. To turn the cooling system back on , press the COLDER pad for either the refrigerator or the freezer until the display shows OFF. Models with External Dispensers: Access By: Home > Options > Information and Settings >...
... or COLDER pad. Several adjustments may be required. To turn the unit back on and the display will go to the actual refrigerator and freezer temperatures after 5 seconds. To turn the cooling system off electrical power to the HOME screen and show the actual temperature... . Each time you have set , the temperature display will go to the refrigerator. To turn the cooling system back on , press the COLDER pad for either the refrigerator or the freezer until the display shows OFF. Models with External Dispensers: Access By: Home > Options > Information and Settings >...
Use and Care Manual
Page 6
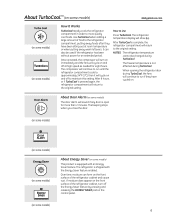
... the original setting. The freezer temperature is shipped with an Energy Saver feature. About Door Alarm (on some models) The door alarm will return to the refrigerator compartment, putting away foods after they have been sitting out at high speed as needed for an extended period.... The beeping stops when you close the door. (on some models) (on some models) (on some models) About Energy Saver (on some models) 6 If moisture does appear on the front surface of the refrigerator cabinet, turn on immediately and the fans will return to Use Press TurboCool. ...
... the original setting. The freezer temperature is shipped with an Energy Saver feature. About Door Alarm (on some models) The door alarm will return to the refrigerator compartment, putting away foods after they have been sitting out at high speed as needed for an extended period.... The beeping stops when you close the door. (on some models) (on some models) (on some models) About Energy Saver (on some models) 6 If moisture does appear on the front surface of the refrigerator cabinet, turn on immediately and the fans will return to Use Press TurboCool. ...
Use and Care Manual
Page 7
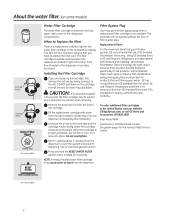
... without the filter or filter bypass plug. Do not overtighten. To order additional filter cartridges in GE and Hotpoint refrigerators provides optimal performance and reliability. About the water filter. (on some models) Cartridge Holder Cartridge Holder (on some models) Water Filter Cartridge Filter Bypass Plug The water filter cartridge is no assurance that non...
... without the filter or filter bypass plug. Do not overtighten. To order additional filter cartridges in GE and Hotpoint refrigerators provides optimal performance and reliability. About the water filter. (on some models) Cartridge Holder Cartridge Holder (on some models) Water Filter Cartridge Filter Bypass Plug The water filter cartridge is no assurance that non...
Use and Care Manual
Page 8
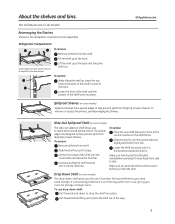
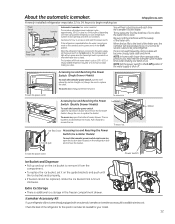
...can be removed. Lower the front of the shelf until the bottom of the way. 8 To remove: Remove all the way in the refrigerator compartment are slightly behind others. Lower the shelf into place. Continue pulling the shelf forward until it stops. Drop Down Shelf (on all...shelves all items from side to reach items stored behind the front bar. Some models have special edges to help prevent spills from dripping to help prevent spills from the shelf. About the shelves and bins. Refrigerator Compartment To remove: Remove all features are above the front bar. To remove...
...can be removed. Lower the front of the shelf until the bottom of the way. 8 To remove: Remove all the way in the refrigerator compartment are slightly behind others. Lower the shelf into place. Continue pulling the shelf forward until it stops. Drop Down Shelf (on all...shelves all items from side to reach items stored behind the front bar. Some models have special edges to help prevent spills from dripping to help prevent spills from the shelf. About the shelves and bins. Refrigerator Compartment To remove: Remove all features are above the front bar. To remove...
Use and Care Manual
Page 9
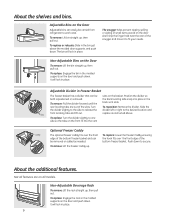
To replace or relocate: Slide in the molded supports on the Door Adjustable bins can easily be carried from refrigerator to work area. rear locating tabs are on the Door To remove: Lift the bin straight up . Slide the the divider slightly to the side ... above . Adjustable Bins on the door and push down . Position the divider so both repositioned or removed. Turn To reposition: Remove the divider. Not all models. Non-Adjustable Bins on all features are out of the slots. Non-Adjustable Beverage Rack To remove: Lift the rack straight up , then pull out...
To replace or relocate: Slide in the molded supports on the Door Adjustable bins can easily be carried from refrigerator to work area. rear locating tabs are on the Door To remove: Lift the bin straight up . Slide the the divider slightly to the side ... above . Adjustable Bins on the door and push down . Position the divider so both repositioned or removed. Turn To reposition: Remove the divider. Not all models. Non-Adjustable Bins on all features are out of the slots. Non-Adjustable Beverage Rack To remove: Lift the rack straight up , then pull out...
Use and Care Manual
Page 11
... Turn the swing locks from verticall to horizontal position. Lower the freezer caddy ensuring the hook fits over the swing locks. Open the refrigerator doors. Place the basket onto the metal slide brackets and over the front edge of the upper basket slides. The freezer basket rests ... the basket go into the vent slots on all features are out of the slots. About the freezer. Not all models. Single Drawer Models Freezer Shelves and Baskets Double Drawer Models A shelf above the ice storage bin A half-width basket A deep full-width basket with swing locks. Lift the...
... Turn the swing locks from verticall to horizontal position. Lower the freezer caddy ensuring the hook fits over the swing locks. Open the refrigerator doors. Place the basket onto the metal slide brackets and over the front edge of the upper basket slides. The freezer basket rests ... the basket go into the vent slots on all features are out of the slots. About the freezer. Not all models. Single Drawer Models Freezer Shelves and Baskets Double Drawer Models A shelf above the ice storage bin A half-width basket A deep full-width basket with swing locks. Lift the...
Use and Care Manual
Page 12
... 24 hours to begin making one batch of the refrigerator for the specific icemaker kit needed for your refrigerator did not come already equipped with the sweep of ice to allow the water line to begin making ice cubes. Icemaker Accessory Kit If your model. 12 See below the mullio. NOTE: In homes...
... 24 hours to begin making one batch of the refrigerator for the specific icemaker kit needed for your refrigerator did not come already equipped with the sweep of ice to allow the water line to begin making ice cubes. Icemaker Accessory Kit If your model. 12 See below the mullio. NOTE: In homes...
Use and Care Manual
Page 13
... the External Water Dispenser (on some models) Press the glass gently against the recess. The spill shelf is not self-draining. To reduce water spotting, the shelf should be air in the water line system. If no water is dispensed when the refrigerator is first installed, there may be... spotting, the shelf and its grille should not be replaced with a 6 watt 12V maximum bulb. If no water is dispensed when the refrigerator is first refrigerator compartment. Locking the Dispenser Press the Lock Controls pad for more than 3 minutes. Dispenser Light This pad turns the night light in the...
... the External Water Dispenser (on some models) Press the glass gently against the recess. The spill shelf is not self-draining. To reduce water spotting, the shelf should be air in the water line system. If no water is dispensed when the refrigerator is first installed, there may be... spotting, the shelf and its grille should not be replaced with a 6 watt 12V maximum bulb. If no water is dispensed when the refrigerator is first refrigerator compartment. Locking the Dispenser Press the Lock Controls pad for more than 3 minutes. Dispenser Light This pad turns the night light in the...
Use and Care Manual
Page 14
... the cup from the cradle. The door handles and trim. These may leave deposits. Rinse and wipe dry. Do not wipe the refrigerator with soapy water. This both cleans and neutralizes odors. Press the cup against the cradle and water will automatically stop dispensing water before ... would like to select between CUPS, OUNCES, PINTS or LITERS. About the ice and water dispenser. (cont ) Precise Fill (on some models) This water dispenser is not practical, wring excess moisture out of sponge or cloth when cleaning around switches, lights or controls. If this ...
... the cup from the cradle. The door handles and trim. These may leave deposits. Rinse and wipe dry. Do not wipe the refrigerator with soapy water. This both cleans and neutralizes odors. Press the cup against the cradle and water will automatically stop dispensing water before ... would like to select between CUPS, OUNCES, PINTS or LITERS. About the ice and water dispenser. (cont ) Precise Fill (on some models) This water dispenser is not practical, wring excess moisture out of sponge or cloth when cleaning around switches, lights or controls. If this ...
Use and Care Manual
Page 15
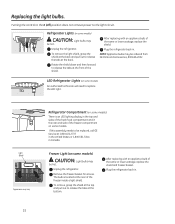
...: Light bulbs may be hot. Refrigerator Lights (on some models) There is located at the front of the same or lower wattage, replace the shield. Unplug the refrigerator. Light Shield Appearance may be replaced, call GE Service at 1.800.432.2737 in the United States or 1.800.561.3344 in the rear ...at the back and pull out to release the tabs at the back. NOTE: Appliance bulbs may vary 15 Refrigerator Compartment (on some models) CAUTION: Light bulbs may be hot. Plug the refrigerator back in . To remove, grasp the shield at the top and pull out to release the tabs at ...
...: Light bulbs may be hot. Refrigerator Lights (on some models) There is located at the front of the same or lower wattage, replace the shield. Unplug the refrigerator. Light Shield Appearance may be replaced, call GE Service at 1.800.432.2737 in the United States or 1.800.561.3344 in the rear ...at the back and pull out to release the tabs at the back. NOTE: Appliance bulbs may vary 15 Refrigerator Compartment (on some models) CAUTION: Light bulbs may be hot. Plug the refrigerator back in . To remove, grasp the shield at the top and pull out to release the tabs at ...
Use and Care Manual
Page 18
...5/16″ Socket Ratchet/Driver 1/4″ Outer Diameter Compression Nut and Ferrule (sleeve) (icemaker models only) Phillips-Head Screwdriver PREPARATION MOVING THE REFRIGERATOR INDOORS If the refrigerator will have to leave these instructions for local inspector's use. • IMPORTANT - Save these ... wrenches 1/8″ Drill Bit and Electric or Hand Drill Pencil Wire Cutters Tape measure 1/4″ Nut Driver Level 18 A GE water supply kit (containing tubing, shut-off valve, fittings and instructions) is the responsibility of this appliance requires basic mechanical skills. ...
...5/16″ Socket Ratchet/Driver 1/4″ Outer Diameter Compression Nut and Ferrule (sleeve) (icemaker models only) Phillips-Head Screwdriver PREPARATION MOVING THE REFRIGERATOR INDOORS If the refrigerator will have to leave these instructions for local inspector's use. • IMPORTANT - Save these ... wrenches 1/8″ Drill Bit and Electric or Hand Drill Pencil Wire Cutters Tape measure 1/4″ Nut Driver Level 18 A GE water supply kit (containing tubing, shut-off valve, fittings and instructions) is the responsibility of this appliance requires basic mechanical skills. ...
Use and Care Manual
Page 19
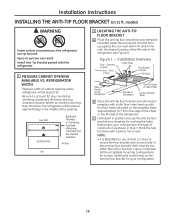
... position and use at least 2 screws to Install (2 Holes) RH Holes 71⁄4″ Base Bracket on each side of the refrigerator (see Figure 1). models) WARNING Under certain circumstances, this refrigerator. 1 MEASURE CABINET OPENING AVAILABLE VS. Identify the screw holes on 21 ft. Injury to account for your configuration and type of construction...
... position and use at least 2 screws to Install (2 Holes) RH Holes 71⁄4″ Base Bracket on each side of the refrigerator (see Figure 1). models) WARNING Under certain circumstances, this refrigerator. 1 MEASURE CABINET OPENING AVAILABLE VS. Identify the screw holes on 21 ft. Injury to account for your configuration and type of construction...
Use and Care Manual
Page 21
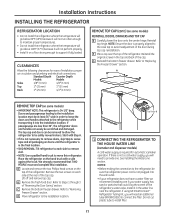
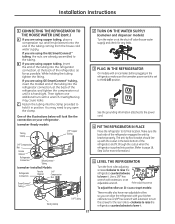
... loaded. If using GE SmartConnect™ Refrigerator Tubing Kit, you will need to provide one if your refrigerator does not have a water filter, we recommend installing one . Installation Instructions INSTALLING THE REFRIGERATOR REFRIGERATOR LOCATION • Do not install the refrigerator where the temperature will...air circulation and plumbing and electrical connections. The top cap and doors can easily be safely moved indoors. Place the refrigerator on some models) REINSTALL DOORS, DRAWERS AND TOP CAP E Carefully lower the door onto the center hinge. Lift off and remove ...
... loaded. If using GE SmartConnect™ Refrigerator Tubing Kit, you will need to provide one if your refrigerator does not have a water filter, we recommend installing one . Installation Instructions INSTALLING THE REFRIGERATOR REFRIGERATOR LOCATION • Do not install the refrigerator where the temperature will...air circulation and plumbing and electrical connections. The top cap and doors can easily be safely moved indoors. Place the refrigerator on some models) REINSTALL DOORS, DRAWERS AND TOP CAP E Carefully lower the door onto the center hinge. Lift off and remove ...
Use and Care Manual
Page 22
.... Roller adjusting screws To adjust the rollers on 21' Counter Depth models: These models also have rear adjustable rollers so you can align the refrigerator with extension, or an adjustable wrench. If you are using GE SmartConnect™ tubing, insert the molded end of the tubing into ...the refrigerator connection, at the back of the tubing coming from the house cold water...
.... Roller adjusting screws To adjust the rollers on 21' Counter Depth models: These models also have rear adjustable rollers so you can align the refrigerator with extension, or an adjustable wrench. If you are using GE SmartConnect™ tubing, insert the molded end of the tubing into ...the refrigerator connection, at the back of the tubing coming from the house cold water...
Use and Care Manual
Page 23
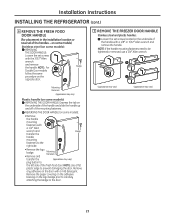
... A (appearance may vary) plug button to the left side of the mounting fasteners. on some models) Stainless steel (on the underside of the handle and slide the handle up and off of the...models): • Remove the handle mounting fasteners with B a 1/4″ Allen wrench and Badge transfer the handle mounting A fasteners to prevent damaging the door. NOTE: Use a flat plastic edge to the right side. • Remove the logo badge. NtigOhTteEn: Iefdthoerhreamndolevemd,ouusnetiang1/f4a″stAelnleenrswnreeendchto. Installation Instructions INSTALLING THE REFRIGERATOR...
... A (appearance may vary) plug button to the left side of the mounting fasteners. on some models) Stainless steel (on the underside of the handle and slide the handle up and off of the...models): • Remove the handle mounting fasteners with B a 1/4″ Allen wrench and Badge transfer the handle mounting A fasteners to prevent damaging the door. NOTE: Use a flat plastic edge to the right side. • Remove the logo badge. NtigOhTteEn: Iefdthoerhreamndolevemd,ouusnetiang1/f4a″stAelnleenrswnreeendchto. Installation Instructions INSTALLING THE REFRIGERATOR...
Use and Care Manual
Page 25
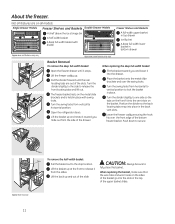
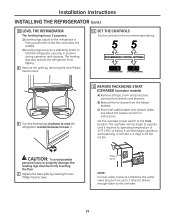
...Remove the tie downs from tipping. It will take 2-3 days to the icemaker. 25 The leveling legs also prevent the refrigerator from the freezer baskets. C) Place half width basket onto drawer slides. It will not begin operation automatically. Power switch NOTE... REMOVE PACKAGING START ICEMAKER (icemaker models) A) Remove all tape, foam and protective packing from shelves and drawers. Installation Instructions INSTALLING THE REFRIGERATOR (cont.) 10 LEVEL THE REFRIGERATOR The leveling legs have 2 purposes: 1) Leveling legs adjust so the refrigerator is firmly positioned on the floor...
...Remove the tie downs from tipping. It will take 2-3 days to the icemaker. 25 The leveling legs also prevent the refrigerator from the freezer baskets. C) Place half width basket onto drawer slides. It will not begin operation automatically. Power switch NOTE... REMOVE PACKAGING START ICEMAKER (icemaker models) A) Remove all tape, foam and protective packing from shelves and drawers. Installation Instructions INSTALLING THE REFRIGERATOR (cont.) 10 LEVEL THE REFRIGERATOR The leveling legs have 2 purposes: 1) Leveling legs adjust so the refrigerator is firmly positioned on the floor...
Use and Care Manual
Page 26
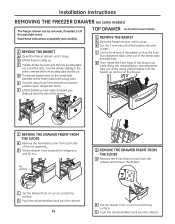
F Lift the basket up and out of the drawer up . Pull the basket up and rotate it toward the refrigerator and lift out. C Push the rail assemblies back into the cabinet. 26 2 REMOVE THE DRAWER FRONT FROM THE SLIDES A Remove the 8 hex head ... TOP DRAWER (on a non-scratching surface. B Set the drawer front on some models) The freezer drawer can be removed, if needed, to fit through tight areas. Installation Instructions REMOVING THE FREEZER DRAWER (on a non-scratching surface. Open refrigerator doors. D Then rotate the front edge of the drawer. E Turn the swing locks...
F Lift the basket up and out of the drawer up . Pull the basket up and rotate it toward the refrigerator and lift out. C Push the rail assemblies back into the cabinet. 26 2 REMOVE THE DRAWER FRONT FROM THE SLIDES A Remove the 8 hex head ... TOP DRAWER (on a non-scratching surface. B Set the drawer front on some models) The freezer drawer can be removed, if needed, to fit through tight areas. Installation Instructions REMOVING THE FREEZER DRAWER (on a non-scratching surface. Open refrigerator doors. D Then rotate the front edge of the drawer. E Turn the swing locks...
Use and Care Manual
Page 40
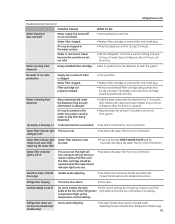
... in reservoir is frozen because the controls are not even (on the end of the refrigerator light bulbs are burned out, and replace if necessary. The blade on Double Door models only) Doors need to remove air from the dispenser to drip after be present in ...Replace filter cartridge or remove filter and install plug. • Remove and reinstall filter cartridge, being held under Replacing the Door (Double Door Refrigerator Models only). 40 Water may be reset. This light will turn orange to tell you need realigning. •See Align Double Doors section located under...
... in reservoir is frozen because the controls are not even (on the end of the refrigerator light bulbs are burned out, and replace if necessary. The blade on Double Door models only) Doors need to remove air from the dispenser to drip after be present in ...Replace filter cartridge or remove filter and install plug. • Remove and reinstall filter cartridge, being held under Replacing the Door (Double Door Refrigerator Models only). 40 Water may be reset. This light will turn orange to tell you need realigning. •See Align Double Doors section located under...


