
Owners Manual
Page 1
ge.com © Safety Instructions ........... 2, 3 Operating h_O'uctions Comrols_kmtrol Fmobs ..... 6, 7 Comrols_I'ouch Pads ........ 4, 5 Care and Cleanir_ Air Filter 8 Bait( rics 8 (;rille and (_se 8 Outdoor Coils 8 Installation Instructions Through-th(_Vall Insmllation--O[)tional Window Installation 15 9-14 7)+oubleshootirN Tips ......... 16 N
ge.com © Safety Instructions ........... 2, 3 Operating h_O'uctions Comrols_kmtrol Fmobs ..... 6, 7 Comrols_I'ouch Pads ........ 4, 5 Care and Cleanir_ Air Filter 8 Bait( rics 8 (;rille and (_se 8 Outdoor Coils 8 Installation Instructions Through-th(_Vall Insmllation--O[)tional Window Installation 15 9-14 7)+oubleshootirN Tips ......... 16 N
Owners Manual
Page 2
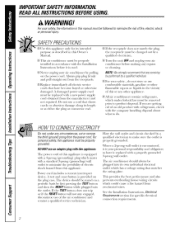
... shock or personal injury SAFETYPRECUATIONS ?;2Use this appliance only tor its intended ptupose as described ill this ()wn(r's Manual. _; This air conditioner must be properly installed ill all ordan/e with tile his(alia(ion Instructions before it is tts(d. _; READALLINSTRUCTIONSBEFOREUSING.
... shock or personal injury SAFETYPRECUATIONS ?;2Use this appliance only tor its intended ptupose as described ill this ()wn(r's Manual. _; This air conditioner must be properly installed ill all ordan/e with tile his(alia(ion Instructions before it is tts(d. _; READALLINSTRUCTIONSBEFOREUSING.
Owners Manual
Page 4
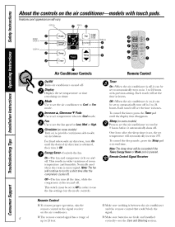
... models) r]'Hlll Oil [0 pFovid( (onlinuous sid( 4o-sid( air circulalion. Oe_I'he remote control signal has a rang( of i!i:"Make sure l)attelies arc fl-esh and installed up to Ol fleet. press the Timerpad until lh( desired air dir( (lion is obtained, then lllFII it 01_ O EnergySaver-Conm:4s th_ fan. O Sleep...
... models) r]'Hlll Oil [0 pFovid( (onlinuous sid( 4o-sid( air circulalion. Oe_I'he remote control signal has a rang( of i!i:"Make sure l)attelies arc fl-esh and installed up to Ol fleet. press the Timerpad until lh( desired air dir( (lion is obtained, then lllFII it 01_ O EnergySaver-Conm:4s th_ fan. O Sleep...
Owners Manual
Page 8
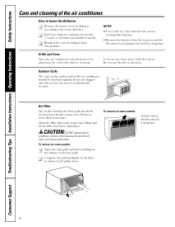
... and reduceperformance Toremove (on 8 How to Insert the Batteries ] P.( mov( Ihe /)a11('17¢ (ov(r I )alteries, makillg Slll-t _ I11;11 th(, (+) alld (-) of/)alteQ' are installed (orr((ll}; ] ]'_.eattach the cover by pulling oul lhe boltonl ()[' Ill(! Do not use l*:cha rgeable batteries. !_ Remove the batteries fl-om the remol( control...
... and reduceperformance Toremove (on 8 How to Insert the Batteries ] P.( mov( Ihe /)a11('17¢ (ov(r I )alteries, makillg Slll-t _ I11;11 th(, (+) alld (-) of/)alteQ' are installed (orr((ll}; ] ]'_.eattach the cover by pulling oul lhe boltonl ()[' Ill(! Do not use l*:cha rgeable batteries. !_ Remove the batteries fl-om the remol( control...
Owners Manual
Page 9
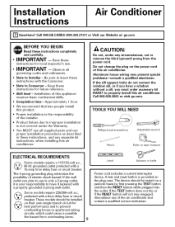
...Observaell governing codes and ordinances. • Note to leave these instructions completely and carefully. • IMPORTANT - Call 800.626.2002 or visit ge.com. The 3-prong grounding plug minimizes the possibility of this appliance requires basic mechanical skills. • Completion time- If the wall outlet you ... for local inspector's use is your responsibility to have a window without a sill, you plan to Consumer- Be sure to Installer- The device should be tested on a periodic basis by first pressing the TEST button and then the RESET button while plugged into the...
...Observaell governing codes and ordinances. • Note to leave these instructions completely and carefully. • IMPORTANT - Call 800.626.2002 or visit ge.com. The 3-prong grounding plug minimizes the possibility of this appliance requires basic mechanical skills. • Completion time- If the wall outlet you ... for local inspector's use is your responsibility to have a window without a sill, you plan to Consumer- Be sure to Installer- The device should be tested on a periodic basis by first pressing the TEST button and then the RESET button while plugged into the...

Owners Manual
Page 10
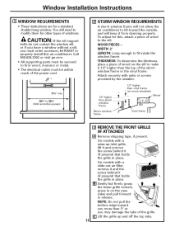
Window Installation Instructions PARTS INCLUDED (appearance may vary) Left accordion panel Top mounting rail w,F_aw_;°s_k_ Window sash seal Right accordion panel Type A (21) 1/2" screws Sill support (2) Bottom inner case gasket Type B (10) 3/4" screws Type C bolt (2) Security bracket (1) 10
Window Installation Instructions PARTS INCLUDED (appearance may vary) Left accordion panel Top mounting rail w,F_aw_;°s_k_ Window sash seal Right accordion panel Type A (21) 1/2" screws Sill support (2) Bottom inner case gasket Type B (10) 3/4" screws Type C bolt (2) Security bracket (1) 10
Owners Manual
Page 11
Call 800.626.2002 or visit ge.com. • All supporting parts must be within reach of windows. On models with a raise-up and off the top tabs. 11 Window Installation Instructions [] WINDOW REQUIREMENTS • These instructions are for this air conditioner. WIDTH: 2" LENGTH: Long enough...screw behind it 1/2" higher than storm window frame Storm window frame _ _ (on the case • /,__i_ sides and pull forward to properly install this , attach a piece of the grille. [] Lift the grille up inlet grille, lift it and remove the screw behind it from draining ...
Call 800.626.2002 or visit ge.com. • All supporting parts must be within reach of windows. On models with a raise-up and off the top tabs. 11 Window Installation Instructions [] WINDOW REQUIREMENTS • These instructions are for this air conditioner. WIDTH: 2" LENGTH: Long enough...screw behind it 1/2" higher than storm window frame Storm window frame _ _ (on the case • /,__i_ sides and pull forward to properly install this , attach a piece of the grille. [] Lift the grille up inlet grille, lift it and remove the screw behind it from draining ...
Owners Manual
Page 12
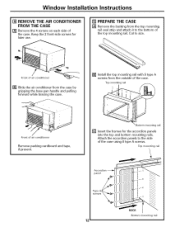
... the accordion panels to size. [] Slide the air conditioner from the case by gripping the base pan handle and pulling forward while bracing the case. [] Install the top mounting rail with 5 type A screws from the top mounting rail seal strip and attach it to the bottom of the case. Window... Installation Instructions [] REMOVE THE AIR CONDITIONER FROM THE CASE [] Remove the 4 screws on each side of the case using 8 type A screws. Cut to the side of ...
... the accordion panels to size. [] Slide the air conditioner from the case by gripping the base pan handle and pulling forward while bracing the case. [] Install the top mounting rail with 5 type A screws from the top mounting rail seal strip and attach it to the bottom of the case. Window... Installation Instructions [] REMOVE THE AIR CONDITIONER FROM THE CASE [] Remove the 4 screws on each side of the case using 8 type A screws. Cut to the side of ...
Owners Manual
Page 13
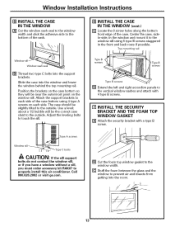
... it to the window sill using 4 type A screws on the window sill. Attach the support brackets to each side. Call 800.626.2002 or visit ge.com. [] Cut the foam top window gasket to the window width. [] Stuff the foam between the glass and the window to prevent air and insects... top mounting rail. Window sill Window sash seal [] Thread two type C bolts into the support brackets, Slide the case into the room. / 13 Window Installation Instructions [] INSTALL THE CASE IN THE WINDOW [] Cut the window sash seal to the window width and stick the adhesive side to the bottom of the case...
... it to the window sill using 4 type A screws on the window sill. Attach the support brackets to each side. Call 800.626.2002 or visit ge.com. [] Cut the foam top window gasket to the window width. [] Stuff the foam between the glass and the window to prevent air and insects... top mounting rail. Window sill Window sash seal [] Thread two type C bolts into the support brackets, Slide the case into the room. / 13 Window Installation Instructions [] INSTALL THE CASE IN THE WINDOW [] Cut the window sash seal to the window width and stick the adhesive side to the bottom of the case...
Owners Manual
Page 14
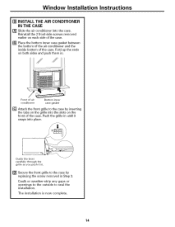
Guide the lever carefully through the grille as you push it snaps into place. Window Installation Instructions [] INSTALL THE AIR CONDITIONER IN THE CASE [] Slide the air conditioner into the slots on each side of the case.... [] Place the bottom inner case gasket between the bottom of the air conditioner and the inside bottom of the case. The installation is now complete. 14 Fold up the ends on both sides and push them in Step 3, Caulk or weather-strip any gaps... removed in , Front of air conditioner Bottom inner case gasket [] Attach the front grille to seal the installation.
Guide the lever carefully through the grille as you push it snaps into place. Window Installation Instructions [] INSTALL THE AIR CONDITIONER IN THE CASE [] Slide the air conditioner into the slots on each side of the case.... [] Place the bottom inner case gasket between the bottom of the air conditioner and the inside bottom of the case. The installation is now complete. 14 Fold up the ends on both sides and push them in Step 3, Caulk or weather-strip any gaps... removed in , Front of air conditioner Bottom inner case gasket [] Attach the front grille to seal the installation.
Owners Manual
Page 15
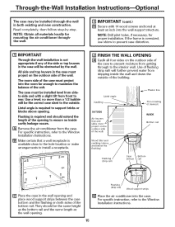
... Read completely, then follow step-by the wall. no inside the wall and down the outside . For specific instruction, refer to install a receptacle. i ..... - [] IMPORTANT (cont.) [] Secure with a slight tilt from dripping inside cavity leakage occurs. [] Remove... outdoor side of the wall) Wood filler and caulking (above opening . Flashing is available close to the hole location or make arrangements to the Window Installation Instructions. 15 Lintel angle Cau k ng _ , 1,' (._--_Plasterhne ,, I i II I I :_': I]l;I I _1 IIT/' -(ifTrimdemorsldeiindg ) OUTSIDE / ...
... Read completely, then follow step-by the wall. no inside the wall and down the outside . For specific instruction, refer to install a receptacle. i ..... - [] IMPORTANT (cont.) [] Secure with a slight tilt from dripping inside cavity leakage occurs. [] Remove... outdoor side of the wall) Wood filler and caulking (above opening . Flashing is available close to the hole location or make arrangements to the Window Installation Instructions. 15 Lintel angle Cau k ng _ , 1,' (._--_Plasterhne ,, I i II I I :_': I]l;I I _1 IIT/' -(ifTrimdemorsldeiindg ) OUTSIDE / ...
Owners Manual
Page 19
... possible defects with tiffs air conditioner. N Replacement of house fuses or resetting of God. _'_Incidental or consequential damage caused by a GE Authorized Servicer is product repair as provided in materials or workmanship. i_i'Damage to the product caused by improper power supply voltage, accident...fitness for a trip charge or you how to use includit_ failure to unre&sonable use the product. )'2 Improper installation, delivery or maintenance. Aft warranty service provided by law. GEAir ConditionerWarranty. This warranty is extended to teach you may also have an...
... possible defects with tiffs air conditioner. N Replacement of house fuses or resetting of God. _'_Incidental or consequential damage caused by a GE Authorized Servicer is product repair as provided in materials or workmanship. i_i'Damage to the product caused by improper power supply voltage, accident...fitness for a trip charge or you how to use includit_ failure to unre&sonable use the product. )'2 Improper installation, delivery or maintenance. Aft warranty service provided by law. GEAir ConditionerWarranty. This warranty is extended to teach you may also have an...


