Use and Care Manual
Page 1
... an ENERGY STAR® partner, GE has determined that this product meets ...manual, visit our Website at GEAppliances.com. Room Air Conditioners GEAppliances.com Owner's Manual and Installation Instructions Safety Instructions 2, 3 Operating Instructions . . . . . .4-9 Care and Cleaning Air Filter 11 Front Grille 10 Grille and Case ...10 Outdoor Coils 10 Installation Instructions Before You Begin 12, 13 Installing a J-Model in an Existing Wall Case 14 Through-the-Wall Installation 15 Window Installation (Optional...
... an ENERGY STAR® partner, GE has determined that this product meets ...manual, visit our Website at GEAppliances.com. Room Air Conditioners GEAppliances.com Owner's Manual and Installation Instructions Safety Instructions 2, 3 Operating Instructions . . . . . .4-9 Care and Cleaning Air Filter 11 Front Grille 10 Grille and Case ...10 Outdoor Coils 10 Installation Instructions Before You Begin 12, 13 Installing a J-Model in an Existing Wall Case 14 Through-the-Wall Installation 15 Window Installation (Optional...
Use and Care Manual
Page 2
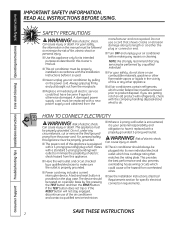
... length or at either the plug or connector end. ■ Turn OFF and unplug your air conditioner before it is your safety, the information in the vicinity of the air conditioner and contact a qualified service technician. ■ Where a 2-prong wall outlet is encountered, it replaced with the company handling disposal about what to minimize the...
... length or at either the plug or connector end. ■ Turn OFF and unplug your air conditioner before it is your safety, the information in the vicinity of the air conditioner and contact a qualified service technician. ■ Where a 2-prong wall outlet is encountered, it replaced with the company handling disposal about what to minimize the...
Use and Care Manual
Page 3
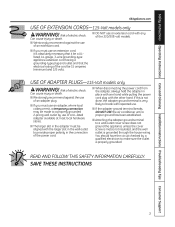
... local hardware stores. ■ The larger slot in place with one hand while pulling the power cord plug with the larger slot in the wall outlet to provide proper polarity in the connection of the power cord. ■ When disconnecting the power cord from the adapter, always hold the... not insulated, and the wall outlet is grounded through the house wiring. Can cause injury or death. ■ We strongly recommend against the use of the 230/208-volt models. ■ If you must use . ■ If the adapter ground terminal breaks, DO NOT USE the air conditioner until a proper ground has...
... local hardware stores. ■ The larger slot in place with one hand while pulling the power cord plug with the larger slot in the wall outlet to provide proper polarity in the connection of the power cord. ■ When disconnecting the power cord from the adapter, always hold the... not insulated, and the wall outlet is grounded through the house wiring. Can cause injury or death. ■ We strongly recommend against the use of the 230/208-volt models. ■ If you must use . ■ If the adapter ground terminal breaks, DO NOT USE the air conditioner until a proper ground has...
Use and Care Manual
Page 8
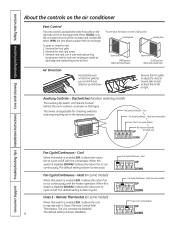
...is disabled (DOWN), it allows the indoor fan to run continuously with a Class 2 Remote Control Wall Thermostat. The unit controls are located behind the front grille on the right side of the air discharge area. Class 2 (on some models) Class 2 - To open or close the vent.... When this figure. Consumer Support Troubleshooting Tips Installation Instructions Care and Cleaning Operating Instructions Safety Instructions About the controls on the air conditioner Vent Control The vent control is located behind the room cabinet-as shown in this switch is disabled (DOWN), it allows ...
...is disabled (DOWN), it allows the indoor fan to run continuously with a Class 2 Remote Control Wall Thermostat. The unit controls are located behind the front grille on the right side of the air discharge area. Class 2 (on some models) Class 2 - To open or close the vent.... When this figure. Consumer Support Troubleshooting Tips Installation Instructions Care and Cleaning Operating Instructions Safety Instructions About the controls on the air conditioner Vent Control The vent control is located behind the room cabinet-as shown in this switch is disabled (DOWN), it allows ...
Use and Care Manual
Page 10
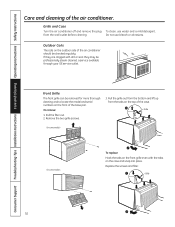
... and serial numbers on the outdoor side of the base pan. Outdoor Coils The coils on the front of the air conditioner should be professionally steam cleaned, a service available through your GE service outlet. Pull the filter out. 2. Replace the screws and filter. Do not use water and a mild ...detergent. Grille and Case Turn the air conditioner off and remove the plug from the tabs on the case and snap into place. If they may be checked regularly. Grille Tab 10 Pull the grille out from the bottom and lift up from the wall outlet before cleaning. Grille Tab ...
... and serial numbers on the outdoor side of the base pan. Outdoor Coils The coils on the front of the air conditioner should be professionally steam cleaned, a service available through your GE service outlet. Pull the filter out. 2. Replace the screws and filter. Do not use water and a mild ...detergent. Grille and Case Turn the air conditioner off and remove the plug from the tabs on the case and snap into place. If they may be checked regularly. Grille Tab 10 Pull the grille out from the bottom and lift up from the wall outlet before cleaning. Grille Tab ...
Use and Care Manual
Page 12
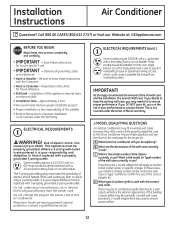
...death. These models should be installed on the power cord of the GE warranty. This is not covered under the terms of this air conditioner. C What is also used with the current wall case? ELECTRICAL REQUIREMENTS WARNING! This appliance must be an architectural grille... The 3-prong grounding plug minimizes the possibility of electric shock. Installation Instructions Air Conditioner Questions? Risk of electric shock hazard. GE strongly recommends the removal of the old wall case and the installation of outdoor grille is your responsibility and obligation to have...
...death. These models should be installed on the power cord of the GE warranty. This is not covered under the terms of this air conditioner. C What is also used with the current wall case? ELECTRICAL REQUIREMENTS WARNING! This appliance must be an architectural grille... The 3-prong grounding plug minimizes the possibility of electric shock. Installation Instructions Air Conditioner Questions? Risk of electric shock hazard. GE strongly recommends the removal of the old wall case and the installation of outdoor grille is your responsibility and obligation to have...
Use and Care Manual
Page 13
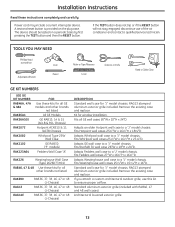
...231⁄ 8″D. Fits the RAB 30 wall case 26″W x 18″H x 24″D. Fits Westinghouse wall cases 257⁄ 8″W x 157⁄ 16″H x 16″D. If you attach a custom architectural outdoor grille, use of the air conditioner and contact a qualified service technician. Architectural louvered... Phillips-head screwdriver Adjustable Wrench Drill Pencil Ruler or Tape Measure Level Scissors or knife Hand or Saber Saw GE KIT NUMBERS USE GE KIT NUMBER: RAB46A, 47A & 48A RAK65A1 RAK56A100 RAK1072 RAK1082 RAK1102 RAK123A64 FOR: Use these instructions completely and...
...231⁄ 8″D. Fits the RAB 30 wall case 26″W x 18″H x 24″D. Fits Westinghouse wall cases 257⁄ 8″W x 157⁄ 16″H x 16″D. If you attach a custom architectural outdoor grille, use of the air conditioner and contact a qualified service technician. Architectural louvered... Phillips-head screwdriver Adjustable Wrench Drill Pencil Ruler or Tape Measure Level Scissors or knife Hand or Saber Saw GE KIT NUMBERS USE GE KIT NUMBER: RAB46A, 47A & 48A RAK65A1 RAK56A100 RAK1072 RAK1082 RAK1102 RAK123A64 FOR: Use these instructions completely and...

Use and Care Manual
Page 14
... and carefully. 1 REMOVE LOCKING PLATE ON FRONT LEFT SIDE Locking plate Remove screw 4 REINSTALL LOCKING PLATE WITH TAB BEHIND WALL CASE FLANGE. Remove shipping pads (if present) 3 CAREFULLY SLIDE AIR CONDITIONER BACK INTO CASE Make sure that the tubing on the bottom of the front grille. TIGHTEN SCREW 5 ATTACH POWER CORD ...TO BASE PAN WITH CLAMP Base pan Power cord Clamp 2 REMOVE ALL SHIPPING PADS (IF PRESENT) INSIDE AIR CONDITIONER NEXT TO COMPRESSOR 6 ATTACH FRONT GRILLE An opening for the power cord is on the unit does not touch the...
... and carefully. 1 REMOVE LOCKING PLATE ON FRONT LEFT SIDE Locking plate Remove screw 4 REINSTALL LOCKING PLATE WITH TAB BEHIND WALL CASE FLANGE. Remove shipping pads (if present) 3 CAREFULLY SLIDE AIR CONDITIONER BACK INTO CASE Make sure that the tubing on the bottom of the front grille. TIGHTEN SCREW 5 ATTACH POWER CORD ...TO BASE PAN WITH CLAMP Base pan Power cord Clamp 2 REMOVE ALL SHIPPING PADS (IF PRESENT) INSIDE AIR CONDITIONER NEXT TO COMPRESSOR 6 ATTACH FRONT GRILLE An opening for the power cord is on the unit does not touch the...
Use and Care Manual
Page 15
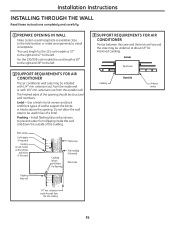
...on all 4 sides on the outside and inside the wall and down the outside wall. Use a lintel in lieu of wall to the left . 2 SUPPORT REQUIREMENTS FOR AIR CONDITIONER The air conditioner wall case may be structural wall members. Do not allow the wall case to be used in brick veneer and brick and...if desired) Room side Flashing (drip rail) 3 SUPPORT REQUIREMENTS FOR AIR CONDITIONER Mortar between the case and the brick wall around the case may be installed with 1/4″ min. extension out from the inside the wall from the outside of the case) Plaster line Caulking (above the...
...on all 4 sides on the outside and inside the wall and down the outside wall. Use a lintel in lieu of wall to the left . 2 SUPPORT REQUIREMENTS FOR AIR CONDITIONER The air conditioner wall case may be structural wall members. Do not allow the wall case to be used in brick veneer and brick and...if desired) Room side Flashing (drip rail) 3 SUPPORT REQUIREMENTS FOR AIR CONDITIONER Mortar between the case and the brick wall around the case may be installed with 1/4″ min. extension out from the inside the wall from the outside of the case) Plaster line Caulking (above the...
Use and Care Manual
Page 16
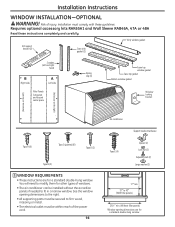
Requires optional accessory kits RAK65A1 and Wall Sleeve RAB46A, 47A or 48A Read these guidelines. You will need to fit in a narrow window. Risk of windows. • The air conditioner can be installed without the accordion panels if needed to modify them for other types of injury...standard double-hung window. See the window opening dimensions to the right. • All supporting parts must be within reach of the power cord. 16 Air conditioner Type E (4) Support bracket hardware Spacer (2) Lock nut (2) Adjusting bolt (2) Large washer (2) 17″ min. 31″ to firm wood, ...
Requires optional accessory kits RAK65A1 and Wall Sleeve RAB46A, 47A or 48A Read these guidelines. You will need to fit in a narrow window. Risk of windows. • The air conditioner can be installed without the accordion panels if needed to modify them for other types of injury...standard double-hung window. See the window opening dimensions to the right. • All supporting parts must be within reach of the power cord. 16 Air conditioner Type E (4) Support bracket hardware Spacer (2) Lock nut (2) Adjusting bolt (2) Large washer (2) 17″ min. 31″ to firm wood, ...
Use and Care Manual
Page 21
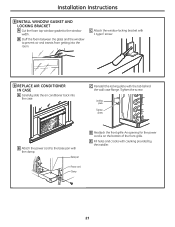
... E Fill holes and cracks with the clamp. C Reinstall the locking plate with 1 type E screw. 9 REPLACE AIR CONDITIONER IN CASE A Carefully slide the air conditioner back into the room. C Attach the window locking bracket with the tab behind the wall case flange. Tighten the screw. Installation Instructions 8 INSTALL WINDOW GASKET AND LOCKING BRACKET A Cut the foam...
... E Fill holes and cracks with the clamp. C Reinstall the locking plate with 1 type E screw. 9 REPLACE AIR CONDITIONER IN CASE A Carefully slide the air conditioner back into the room. C Attach the window locking bracket with the tab behind the wall case flange. Tighten the screw. Installation Instructions 8 INSTALL WINDOW GASKET AND LOCKING BRACKET A Cut the foam...
Quick Specs
Page 1
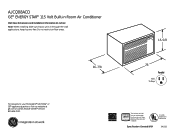
Do not restrict air flow areas. AJCQ08ACD GE® ENERGY STAR® 115 Volt Built-in Room Air Conditioner Wall Case Dimensions and Installation Information (in inches) Note: When installing slide-out chassis units in through -the-wall applications, keep louvers free. Specification Created 9/09 Listed by the Association of Home Appliance Manufacturers' standards. AJCQ12DCD Total volume and...
Do not restrict air flow areas. AJCQ08ACD GE® ENERGY STAR® 115 Volt Built-in Room Air Conditioner Wall Case Dimensions and Installation Information (in inches) Note: When installing slide-out chassis units in through -the-wall applications, keep louvers free. Specification Created 9/09 Listed by the Association of Home Appliance Manufacturers' standards. AJCQ12DCD Total volume and...

Quick Specs
Page 2
...volume and shelf area are coated with a sealing compound to your Monogram,® GE Profile™ or GE® appliance questions, visit our website at ge.com or call GE Answer Center® service, 800.626.2000. Welded areas are calculated by ...S8AT)ApARrip®l r31il0135.10V9.1o99l3t9B3uilt-in Room Air Conditioner Brick Block and Brick Frame Construction Fill open cells with mortar or insulation Dimensions (in lead expansion shields. Standard Wall Case RAB46 Solid-sided wall case fabricated of insulation. rnBBiu6atrsditi3/coiioo3ki6ntnnv7is:/oee3i/Ansn3re7rfseee8in...
...volume and shelf area are coated with a sealing compound to your Monogram,® GE Profile™ or GE® appliance questions, visit our website at ge.com or call GE Answer Center® service, 800.626.2000. Welded areas are calculated by ...S8AT)ApARrip®l r31il0135.10V9.1o99l3t9B3uilt-in Room Air Conditioner Brick Block and Brick Frame Construction Fill open cells with mortar or insulation Dimensions (in lead expansion shields. Standard Wall Case RAB46 Solid-sided wall case fabricated of insulation. rnBBiu6atrsditi3/coiioo3ki6ntnnv7is:/oee3i/Ansn3re7rfseee8in...


