Owners Manual
Page 2
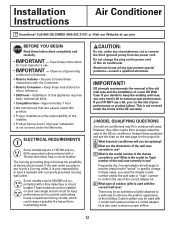
... cracks or abrasion damage along its length or at either the plug or connector end. For personal safety, this appliance. The air conditioner should be followed to product disposal. Have the wall outlet and circuit checked by first pressing the TEST button and then the RESET button. Consumer Support Troubleshooting Tips Installation Instructions...
... cracks or abrasion damage along its length or at either the plug or connector end. For personal safety, this appliance. The air conditioner should be followed to product disposal. Have the wall outlet and circuit checked by first pressing the TEST button and then the RESET button. Consumer Support Troubleshooting Tips Installation Instructions...
Owners Manual
Page 3
...use of an adapter plug. CAUTION: DO NOT use . USE OF ADAPTER PLUGS-115-Volt models only Because of the power cord. When disconnecting the power cord from the ... metal, not insulated, and the wall outlet is grounded through the house wiring. If the adapter ground terminal breaks, DO NOT USE the air conditioner until a proper ground has been ...prong wall outlet by a qualified electrician to break with repeated use an extension cord with the other hand. Safety Instructions Operating Instructions Care and Cleaning Installation Instructions Troubleshooting Tips Consumer Support ge....
...use of an adapter plug. CAUTION: DO NOT use . USE OF ADAPTER PLUGS-115-Volt models only Because of the power cord. When disconnecting the power cord from the ... metal, not insulated, and the wall outlet is grounded through the house wiring. If the adapter ground terminal breaks, DO NOT USE the air conditioner until a proper ground has been ...prong wall outlet by a qualified electrician to break with repeated use an extension cord with the other hand. Safety Instructions Operating Instructions Care and Cleaning Installation Instructions Troubleshooting Tips Consumer Support ge....
Owners Manual
Page 10
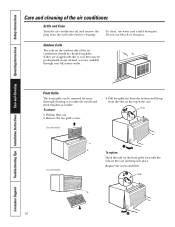
...the tabs on the outdoor side of the air conditioner. Front Grille The front grille can be professionally steam cleaned, a service available through your GE service outlet. Pull the grille out from the bottom and lift up from the wall outlet before cleaning. Grille Tab On some ... Support Troubleshooting Tips Installation Instructions Care and Cleaning Operating Instructions Safety Instructions Care and cleaning of the air conditioner should be checked regularly. Grille and Case Turn the air conditioner off and remove the plug from the tabs on the front grille even with dirt or soot ...
...the tabs on the outdoor side of the air conditioner. Front Grille The front grille can be professionally steam cleaned, a service available through your GE service outlet. Pull the grille out from the bottom and lift up from the wall outlet before cleaning. Grille Tab On some ... Support Troubleshooting Tips Installation Instructions Care and Cleaning Operating Instructions Safety Instructions Care and cleaning of the air conditioner should be checked regularly. Grille and Case Turn the air conditioner off and remove the plug from the tabs on the front grille even with dirt or soot ...
Owners Manual
Page 12
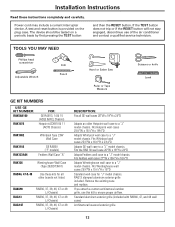
... D What type of outdoor grille is the model number of the GE warranty. There may be installed on their own single branch circuit for the proper kit. ELECTRICAL REQUIREMENTS Some models require a 115/120-volt a.c., 60 Hz grounded outlet protected with a time delay fuse or ... which could cause a possible fire hazard from the power cord. Installation Instructions Air Conditioner Questions? If the wall outlet you need the chassis model number and/or the wall case or "type" number to the GE air conditioner. CAUTION: Do not, under any circumstances, cut or remove the third (...
... D What type of outdoor grille is the model number of the GE warranty. There may be installed on their own single branch circuit for the proper kit. ELECTRICAL REQUIREMENTS Some models require a 115/120-volt a.c., 60 Hz grounded outlet protected with a time delay fuse or ... which could cause a possible fire hazard from the power cord. Installation Instructions Air Conditioner Questions? If the wall outlet you need the chassis model number and/or the wall case or "type" number to the GE air conditioner. CAUTION: Do not, under any circumstances, cut or remove the third (...
Owners Manual
Page 13
... not stay engaged, discontinue use this kit to a "J" model chassis. Fits Whirlpool wall cases 257⁄8″W x 161⁄2″H x 231⁄8″D Adapts GE wall case to ensure proper airflow. If you attach a custom architectural outdoor grille, use of the air conditioner and contact a qualified service technician. Installation Instructions Read these kits for "J" model...
... not stay engaged, discontinue use this kit to a "J" model chassis. Fits Whirlpool wall cases 257⁄8″W x 161⁄2″H x 231⁄8″D Adapts GE wall case to ensure proper airflow. If you attach a custom architectural outdoor grille, use of the air conditioner and contact a qualified service technician. Installation Instructions Read these kits for "J" model...
Owners Manual
Page 14
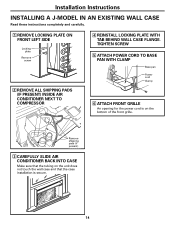
... FRONT GRILLE An opening for the power cord is secure. 14 Remove shipping pads (if present) 3 CAREFULLY SLIDE AIR CONDITIONER BACK INTO CASE Make sure that the tubing on the unit does not touch the wall case and that the case installation is on the bottom of the front grille. Installation Instructions INSTALLING A J-MODEL...
... FRONT GRILLE An opening for the power cord is secure. 14 Remove shipping pads (if present) 3 CAREFULLY SLIDE AIR CONDITIONER BACK INTO CASE Make sure that the tubing on the unit does not touch the wall case and that the case installation is on the bottom of the front grille. Installation Instructions INSTALLING A J-MODEL...
Owners Manual
Page 15
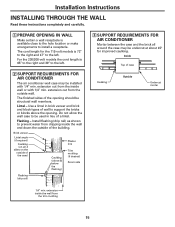
... 15 Inside Top of wall to support the bricks or blocks above & below the flashing) Plaster line Trim molding (if desired) Room side Flashing (drip rail) 3 SUPPORT REQUIREMENTS FOR AIR CONDITIONER Mortar between the case and the brick all around the case may be undercut at about 45° for the 115-volt models is available...
... 15 Inside Top of wall to support the bricks or blocks above & below the flashing) Plaster line Trim molding (if desired) Room side Flashing (drip rail) 3 SUPPORT REQUIREMENTS FOR AIR CONDITIONER Mortar between the case and the brick all around the case may be undercut at about 45° for the 115-volt models is available...
Owners Manual
Page 21
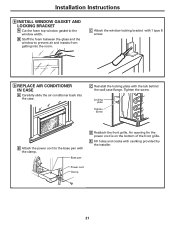
... the wall case flange. Installation Instructions 8 INSTALL WINDOW GASKET AND LOCKING BRACKET A Cut the foam top window gasket to prevent air and insects from getting into the case. Locking plate Tighten screw B Attach the power cord to the base pan with 1 type E screw. 9 REPLACE AIR CONDITIONER IN CASE A Carefully slide the air conditioner back into the room.
... the wall case flange. Installation Instructions 8 INSTALL WINDOW GASKET AND LOCKING BRACKET A Cut the foam top window gasket to prevent air and insects from getting into the case. Locking plate Tighten screw B Attach the power cord to the base pan with 1 type E screw. 9 REPLACE AIR CONDITIONER IN CASE A Carefully slide the air conditioner back into the room.


