
Owners Manual
Page 2
...receptacle. A damaged power supply cord must be replaced with a standard 3-prong (grounding) wall outlet to product disposal. I All air conditioners contain refrigerants, which has a voltage rating that shows cracks or abrasion damage along its intended purpose as described in the vicinity of...do . Where a 2-prong wall outlet is encountered, it is provided on the power cord. A test and reset button is your air conditioner before it replaced with a properly grounded 3-prong wall outlet. Do not use of an old product with refrigerants, check with a 3-prong...
...receptacle. A damaged power supply cord must be replaced with a standard 3-prong (grounding) wall outlet to product disposal. I All air conditioners contain refrigerants, which has a voltage rating that shows cracks or abrasion damage along its intended purpose as described in the vicinity of...do . Where a 2-prong wall outlet is encountered, it is provided on the power cord. A test and reset button is your air conditioner before it replaced with a properly grounded 3-prong wall outlet. Do not use of an old product with refrigerants, check with a 3-prong...
Owners Manual
Page 3
...grounded. The larger slot in the connection of an adapter plug. If the adapter ground terminal breaks, DO NOT USE the air conditioner until a proper ground has been established. USE OF EXTENSION CORDS-115-Volt models only Because of potential safety hazards under certain ...However, if you must use . SAVE THESE INSTRUCTIONS 3 Safety Instructions Operating Instructions Care and Cleaning Installation Instructions Troubleshooting Tips Consumer Support ge.com WARNING! Attaching the adapter ground terminal to break with any of the cord be a UL-listed, 14 gauge, 3-wire grounding...
...grounded. The larger slot in the connection of an adapter plug. If the adapter ground terminal breaks, DO NOT USE the air conditioner until a proper ground has been established. USE OF EXTENSION CORDS-115-Volt models only Because of potential safety hazards under certain ...However, if you must use . SAVE THESE INSTRUCTIONS 3 Safety Instructions Operating Instructions Care and Cleaning Installation Instructions Troubleshooting Tips Consumer Support ge.com WARNING! Attaching the adapter ground terminal to break with any of the cord be a UL-listed, 14 gauge, 3-wire grounding...
Owners Manual
Page 4
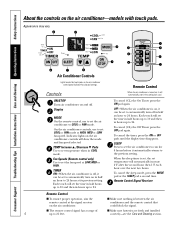
...time. Display MODE On the remote control, use to COOL or FAN mode. Appearance may vary. ON/STOP Turns air conditioner on the air conditioner. On the air conditioner controls, use to set the air conditioner to set to automatically turn off in half an hour to the previous setting. Fan Speeds (Remote control only) Use... to 21 feet. Each touch will show the mode and fan speed selected. OFF-When the air conditioner is set, the set temperature will set the time in half hours up to 10 and then in hours up to set temperature when ...
...time. Display MODE On the remote control, use to COOL or FAN mode. Appearance may vary. ON/STOP Turns air conditioner on the air conditioner. On the air conditioner controls, use to set the air conditioner to set to automatically turn off in half an hour to the previous setting. Fan Speeds (Remote control only) Use... to 21 feet. Each touch will show the mode and fan speed selected. OFF-When the air conditioner is set, the set temperature will set the time in half hours up to 10 and then in hours up to set temperature when ...

Owners Manual
Page 5
... COOL, it by locating rear hole in 1°F increments. Safety Instructions Operating Instructions Care and Cleaning Installation Instructions Troubleshooting Tips Consumer Support ge.com COOL MODE Remote Control 1. Press COOL pad. 2. Press the MODE pad until the FAN indicator light is lit and the LOW... at the set at OPEN, some inside the room will become warmer. NOTE: If the air conditioner is off and is lit for the compressor to start and cooling to direct the air left or right. 5 For Quieter & Nighttime Cooling-Select the COOL mode and LOW fan with...
... COOL, it by locating rear hole in 1°F increments. Safety Instructions Operating Instructions Care and Cleaning Installation Instructions Troubleshooting Tips Consumer Support ge.com COOL MODE Remote Control 1. Press COOL pad. 2. Press the MODE pad until the FAN indicator light is lit and the LOW... at the set at OPEN, some inside the room will become warmer. NOTE: If the air conditioner is off and is lit for the compressor to start and cooling to direct the air left or right. 5 For Quieter & Nighttime Cooling-Select the COOL mode and LOW fan with...
Owners Manual
Page 6
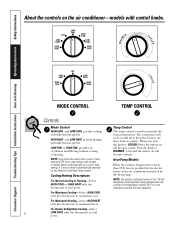
... auxiliary controls remove the front grille. Limit 1 - Consumer Support Troubleshooting Tips Installation Instructions Care and Cleaning Operating Instructions Safety Instructions About the controls on the air conditioner-models with touch pads. Limit 2 - Limit 3 -
... auxiliary controls remove the front grille. Limit 1 - Consumer Support Troubleshooting Tips Installation Instructions Care and Cleaning Operating Instructions Safety Instructions About the controls on the air conditioner-models with touch pads. Limit 2 - Limit 3 -
Owners Manual
Page 8
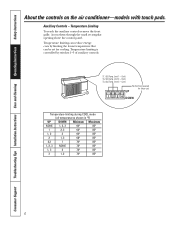
...A 3-minute delay is below 36°F. NOTE: If you turn the knob to COOLER (blue) the indoor air will cycle on and off to WARMER (red) and the indoor air will become cooler. The compressor will become warmer. Turn the knob to keep the room at the same level of...the electric heater in the 115-volt heat pump model operates during defrost when the outdoor coil temperature is automatically provided on the air conditioner-models with the thermostat at mid point. For Maximum Heating-Select HIGH HEAT with control knobs. NOTE: The electric resistance heater in the...
...A 3-minute delay is below 36°F. NOTE: If you turn the knob to COOLER (blue) the indoor air will cycle on and off to WARMER (red) and the indoor air will become cooler. The compressor will become warmer. Turn the knob to keep the room at the same level of...the electric heater in the 115-volt heat pump model operates during defrost when the outdoor coil temperature is automatically provided on the air conditioner-models with the thermostat at mid point. For Maximum Heating-Select HIGH HEAT with control knobs. NOTE: The electric resistance heater in the...
Owners Manual
Page 10
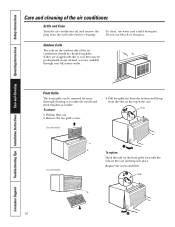
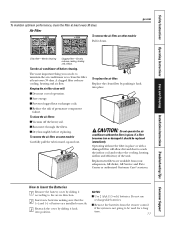
...the front grille even with dirt or soot they may be professionally steam cleaned, a service available through your GE service outlet. Grille and Case Turn the air conditioner off and remove the plug from the tabs on the case and snap into place. Pull the filter out... 3. To remove: 1. Consumer Support Troubleshooting Tips Installation Instructions Care and Cleaning Operating Instructions Safety Instructions Care and cleaning of the air conditioner should be removed for more thorough cleaning or to make the model and serial numbers accessible. Outdoor Coils The coils on the ...
...the front grille even with dirt or soot they may be professionally steam cleaned, a service available through your GE service outlet. Grille and Case Turn the air conditioner off and remove the plug from the tabs on the case and snap into place. Pull the filter out... 3. To remove: 1. Consumer Support Troubleshooting Tips Installation Instructions Care and Cleaning Operating Instructions Safety Instructions Care and cleaning of the air conditioner should be removed for more thorough cleaning or to make the model and serial numbers accessible. Outdoor Coils The coils on the ...
Owners Manual
Page 11
...Replacement filters are installed correctly. 3 Reattach the cover by pushing it down. Turn the air conditioner off the heavy soil. I Vacuum off before replacing. To remove the air filter, on other models: FRONT FRONT Pull it back into position. If a filter becomes... and efficiency of operation. I Prevent clogged heat exchanger coils. A clogged filter reduces cooling, heating and air flow. I Remove the batteries from your salesperson, GE dealer, GE Service and Parts Center or authorized Customer Care® servicers. NOTES: I Save energy. Do not use...
...Replacement filters are installed correctly. 3 Reattach the cover by pushing it down. Turn the air conditioner off the heavy soil. I Vacuum off before replacing. To remove the air filter, on other models: FRONT FRONT Pull it back into position. If a filter becomes... and efficiency of operation. I Prevent clogged heat exchanger coils. A clogged filter reduces cooling, heating and air flow. I Remove the batteries from your salesperson, GE dealer, GE Service and Parts Center or authorized Customer Care® servicers. NOTES: I Save energy. Do not use...
Owners Manual
Page 12
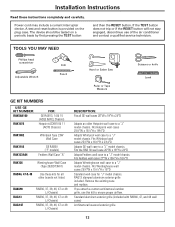
...? The 3-prong grounding plug minimizes the possibility of a new GE Wall Case. C What is not covered under the Warranty. Observe all governing codes and ordinances. • Note to the GE air conditioner. Approximately 1 hour • We recommend that two people install... this appliance requires basic mechanical skills. • Completion time - A What brand air conditioner will apply to Consumer - IMPORTANT! Installation of this ...
...? The 3-prong grounding plug minimizes the possibility of a new GE Wall Case. C What is not covered under the Warranty. Observe all governing codes and ordinances. • Note to the GE air conditioner. Approximately 1 hour • We recommend that two people install... this appliance requires basic mechanical skills. • Completion time - A What brand air conditioner will apply to Consumer - IMPORTANT! Installation of this ...
Owners Manual
Page 13
...will not stay engaged, discontinue use this kit to a "J" model chassis. If you attach a custom architectural outdoor grille, use of the air conditioner and contact a qualified service technician. Fits the RAB 30 wall case 26″W x 18″H x 24″D Adapts Fedders wall case...RAB46, 47 & 48 Use these instructions completely and carefully. Fits Whirlpool wall cases 257⁄8″W x 161⁄2″H x 231⁄8″D Adapts GE wall case to a "J" model chassis. Fits Fedders wall cases 27″W x 163⁄4″H x 163⁄4″D Adapts Westinghouse wall case to...
...will not stay engaged, discontinue use this kit to a "J" model chassis. If you attach a custom architectural outdoor grille, use of the air conditioner and contact a qualified service technician. Fits the RAB 30 wall case 26″W x 18″H x 24″D Adapts Fedders wall case...RAB46, 47 & 48 Use these instructions completely and carefully. Fits Whirlpool wall cases 257⁄8″W x 161⁄2″H x 231⁄8″D Adapts GE wall case to a "J" model chassis. Fits Fedders wall cases 27″W x 163⁄4″H x 163⁄4″D Adapts Westinghouse wall case to...
Owners Manual
Page 14
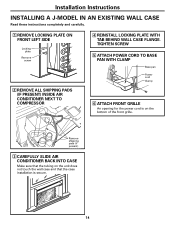
Remove shipping pads (if present) 3 CAREFULLY SLIDE AIR CONDITIONER BACK INTO CASE Make sure that the tubing on the unit does not touch the wall case and that the case installation is on the ... CASE Read these instructions completely and carefully. 1 REMOVE LOCKING PLATE ON FRONT LEFT SIDE Locking plate Remove screw 2 REMOVE ALL SHIPPING PADS (IF PRESENT) INSIDE AIR CONDITIONER NEXT TO COMPRESSOR 4 REINSTALL LOCKING PLATE WITH TAB BEHIND WALL CASE FLANGE. TIGHTEN SCREW 5 ATTACH POWER CORD TO BASE PAN WITH CLAMP Base pan Power...
Remove shipping pads (if present) 3 CAREFULLY SLIDE AIR CONDITIONER BACK INTO CASE Make sure that the tubing on the unit does not touch the wall case and that the case installation is on the ... CASE Read these instructions completely and carefully. 1 REMOVE LOCKING PLATE ON FRONT LEFT SIDE Locking plate Remove screw 2 REMOVE ALL SHIPPING PADS (IF PRESENT) INSIDE AIR CONDITIONER NEXT TO COMPRESSOR 4 REINSTALL LOCKING PLATE WITH TAB BEHIND WALL CASE FLANGE. TIGHTEN SCREW 5 ATTACH POWER CORD TO BASE PAN WITH CLAMP Base pan Power...
Owners Manual
Page 15
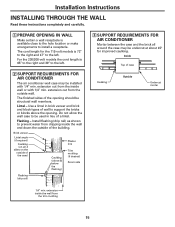
... or blocks above & below the flashing) Plaster line Trim molding (if desired) Room side Flashing (drip rail) 3 SUPPORT REQUIREMENTS FOR AIR CONDITIONER Mortar between the case and the brick all around the case may be structural wall members. Flashing - Lintel - Brick veneer Lintel angle ...the building. The cord length for improved caulking. Install flashing (drip rail) as shown to the left . 2 SUPPORT REQUIREMENTS FOR AIR CONDITIONER The air conditioner wall case may be used in brick veneer and brick and block types of the opening . extension inside wall or with 1/4″...
... or blocks above & below the flashing) Plaster line Trim molding (if desired) Room side Flashing (drip rail) 3 SUPPORT REQUIREMENTS FOR AIR CONDITIONER Mortar between the case and the brick all around the case may be structural wall members. Flashing - Lintel - Brick veneer Lintel angle ...the building. The cord length for improved caulking. Install flashing (drip rail) as shown to the left . 2 SUPPORT REQUIREMENTS FOR AIR CONDITIONER The air conditioner wall case may be used in brick veneer and brick and block types of the opening . extension inside wall or with 1/4″...
Owners Manual
Page 16
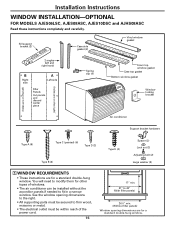
...must be secured to firm wood, masonry or metal. • The electrical outlet must be within reach of windows. • The air conditioner can be installed without the accordion panels if needed to 43″ (With filler panels) 261⁄4″ min. (Without filler ... Spring clip (4) Foam top window gasket Case top gasket Bottom window gasket Window locking bracket (holes are on the left) (holes are on the right) Air conditioner Support bracket hardware Type A (9) Type C (painted) (6) Type D (2) Type B (2) Type E (4) Spacer (2) Lock nut (2) Adjusting bolt (2) Large washer (2) 1...
...must be secured to firm wood, masonry or metal. • The electrical outlet must be within reach of windows. • The air conditioner can be installed without the accordion panels if needed to 43″ (With filler panels) 261⁄4″ min. (Without filler ... Spring clip (4) Foam top window gasket Case top gasket Bottom window gasket Window locking bracket (holes are on the left) (holes are on the right) Air conditioner Support bracket hardware Type A (9) Type C (painted) (6) Type D (2) Type B (2) Type E (4) Spacer (2) Lock nut (2) Adjusting bolt (2) Large washer (2) 1...
Owners Manual
Page 17
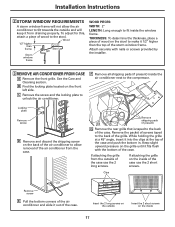
...present) G Remove the rear grille that is taped to the compressor. Wood 1/2″ higher than the top of the air conditioner to allow the air conditioner to unlock the air conditioner. B Find the locking plate located on the inside the window frame. Insert the 2 long screws on the outside of.... While holding the grille at the top of the case use the 2 short screws. Keep slight upward pressure on the inside the air conditioner next to the back of the case use the 2 long screws. Installation Instructions 2 STORM WINDOW REQUIREMENTS A storm window frame will keep...
...present) G Remove the rear grille that is taped to the compressor. Wood 1/2″ higher than the top of the air conditioner to allow the air conditioner to unlock the air conditioner. B Find the locking plate located on the inside the window frame. Insert the 2 long screws on the outside of.... While holding the grille at the top of the case use the 2 short screws. Keep slight upward pressure on the inside the air conditioner next to the back of the case use the 2 long screws. Installation Instructions 2 STORM WINDOW REQUIREMENTS A storm window frame will keep...
Owners Manual
Page 19
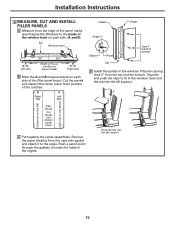
...) to the inside of the window track on each side. (A and B) Sill Window track A Left side 133⁄8″ 133⁄8″ Width of the air conditioner (panel marks) B Right side B Mark the A and B measurements on the right) Filler Panels Cut panels and discard center piece C Put together the panel assemblies. Hook...
...) to the inside of the window track on each side. (A and B) Sill Window track A Left side 133⁄8″ 133⁄8″ Width of the air conditioner (panel marks) B Right side B Mark the A and B measurements on the right) Filler Panels Cut panels and discard center piece C Put together the panel assemblies. Hook...
Owners Manual
Page 21
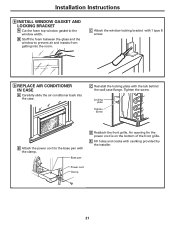
... insects from getting into the case. Tighten the screw. C Reinstall the locking plate with 1 type E screw. 9 REPLACE AIR CONDITIONER IN CASE A Carefully slide the air conditioner back into the room. Power cord Clamp 21 C Attach the window locking bracket with the tab behind the wall case flange. B Stuff the foam between ...
... insects from getting into the case. Tighten the screw. C Reinstall the locking plate with 1 type E screw. 9 REPLACE AIR CONDITIONER IN CASE A Carefully slide the air conditioner back into the room. Power cord Clamp 21 C Attach the window locking bracket with the tab behind the wall case flange. B Stuff the foam between ...
Owners Manual
Page 22
... set the controls at least every 30 days. The batteries are no curtains, blinds or furniture blocking the front of the air conditioner and contact a qualified service technician. • Make sure there are inserted incorrectly. design feature helps remove moisture and improve efficiency...you call for service. Power failure. What To Do • Make sure the air conditioner plug is restored, wait 3 minutes to restart the air conditioner to the closed position. • See "Air conditioner freezing up The remote control is unplugged. When power is pushed completely into base ...
... set the controls at least every 30 days. The batteries are no curtains, blinds or furniture blocking the front of the air conditioner and contact a qualified service technician. • Make sure there are inserted incorrectly. design feature helps remove moisture and improve efficiency...you call for service. Power failure. What To Do • Make sure the air conditioner plug is restored, wait 3 minutes to restart the air conditioner to the closed position. • See "Air conditioner freezing up The remote control is unplugged. When power is pushed completely into base ...
Owners Manual
Page 23
... specific legal rights, and you how to a defect in Canada, call 800.GE.CARES (800.432.2737). Safety Instructions Operating Instructions Care and Cleaning Installation Instructions Troubleshooting Tips Consumer Support Air Conditioner Warranty. For The Period Of: One Year From the date of the original ... service to corrosion on -line, 24 hours a day, visit us at ge.com, or call 1.800.361.3400. During this four-year limited additional warranty, GE will also provide, free of the air conditioner which fails due to obtain service under the warranty. I Incidental or consequential ...
... specific legal rights, and you how to a defect in Canada, call 800.GE.CARES (800.432.2737). Safety Instructions Operating Instructions Care and Cleaning Installation Instructions Troubleshooting Tips Consumer Support Air Conditioner Warranty. For The Period Of: One Year From the date of the original ... service to corrosion on -line, 24 hours a day, visit us at ge.com, or call 1.800.361.3400. During this four-year limited additional warranty, GE will also provide, free of the air conditioner which fails due to obtain service under the warranty. I Incidental or consequential ...


