8512417 - Gateway Setup Guide
Page 2
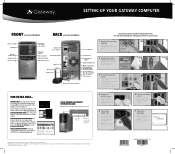
... If you have a speaker bar, follow the instructions that came with it ® into a power supply. SEE YOUR STARTER GUIDE. After setting up your computer, visit the Gateway Support Web site at 800-846-2118 and choose option 7. Memory card reader DVD/CD drive IEEE ...YOUR ONLINE DOCUMENTATION. For help resources and protect your computer during electrical storms, unplug the power cord and the modem and network cables. SERIAL NUMBER AND CONTACT INFORMATION LABEL Gateway Customer Care telephone numbers vary by #. To access these guides, click (Start), All ...
... If you have a speaker bar, follow the instructions that came with it ® into a power supply. SEE YOUR STARTER GUIDE. After setting up your computer, visit the Gateway Support Web site at 800-846-2118 and choose option 7. Memory card reader DVD/CD drive IEEE ...YOUR ONLINE DOCUMENTATION. For help resources and protect your computer during electrical storms, unplug the power cord and the modem and network cables. SERIAL NUMBER AND CONTACT INFORMATION LABEL Gateway Customer Care telephone numbers vary by #. To access these guides, click (Start), All ...

8512418 - Gateway Reference Guide
Page 20
... surge protector and the modem. If you type. • Do not slouch forward or lean far back. Protect your computer normally. 14 An uninterruptible power supply (UPS) supplies battery power to break up the work and shut down your computer and peripheral devices by using a surge protector. Make sure that they are in a relaxed...
... surge protector and the modem. If you type. • Do not slouch forward or lean far back. Protect your computer normally. 14 An uninterruptible power supply (UPS) supplies battery power to break up the work and shut down your computer and peripheral devices by using a surge protector. Make sure that they are in a relaxed...

8512418 - Gateway Reference Guide
Page 21
www.gateway.com Checking the voltage selection Caution If you can connect your computer to a cable or DSL modem or to 230. The power supply should be damaged. To set the voltage selection switch: 1 Disconnect your computer's power cable. 2 Use a tool such as an opened paper clip to slide the voltage selection switch to this...
www.gateway.com Checking the voltage selection Caution If you can connect your computer to a cable or DSL modem or to 230. The power supply should be damaged. To set the voltage selection switch: 1 Disconnect your computer's power cable. 2 Use a tool such as an opened paper clip to slide the voltage selection switch to this...
8512418 - Gateway Reference Guide
Page 23
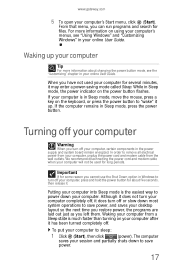
...in Sleep mode, the power indicator on using your computer's menus, see the "Customizing" chapter in your computer, certain components in Sleep mode, press the power button. www.gateway.com 5 To open your online User Guide. If the computer remains in the power supply and system board remain ...energized. In order to remove all electrical power from a Sleep state is the easiest way to power down your desktop layout so...
...in Sleep mode, the power indicator on using your computer's menus, see the "Customizing" chapter in your computer, certain components in Sleep mode, press the power button. www.gateway.com 5 To open your online User Guide. If the computer remains in the power supply and system board remain ...energized. In order to remove all electrical power from a Sleep state is the easiest way to power down your desktop layout so...
8512418 - Gateway Reference Guide
Page 42
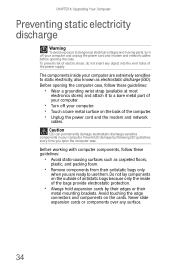
... discharge (ESD). Avoid touching the edge connectors and components on the back of your computer. • Turn off your computer and unplug the power cord and modem and network cables before opening the computer case, follow these guidelines: • Wear a grounding wrist strap (available at most ...only the inside your computer are ready to dangerous electrical voltages and moving parts, turn off your computer. To prevent risk of the power supply. Never slide expansion cards or components over any object into the vent holes of electric shock, do not insert any surface. 34 ...
... discharge (ESD). Avoid touching the edge connectors and components on the back of your computer. • Turn off your computer and unplug the power cord and modem and network cables before opening the computer case, follow these guidelines: • Wear a grounding wrist strap (available at most ...only the inside your computer are ready to dangerous electrical voltages and moving parts, turn off your computer. To prevent risk of the power supply. Never slide expansion cards or components over any object into the vent holes of electric shock, do not insert any surface. 34 ...

8512418 - Gateway Reference Guide
Page 62
... Setup utility. CHAPTER 4: Upgrading Your Computer 9 Make sure that the positive (+) side of the new battery is facing up (usually the side that secure the power supply to your computer, then slide it out of the BIOS Setup utility opens. 14 In the BIOS Setup utility, restore any settings that you wrote... down in Step 3. 15 Save all the power and data cables from the system board, noting their locations and orientation. (You will reconnect the cables after you install the new board.) Tip You...
... Setup utility. CHAPTER 4: Upgrading Your Computer 9 Make sure that the positive (+) side of the new battery is facing up (usually the side that secure the power supply to your computer, then slide it out of the BIOS Setup utility opens. 14 In the BIOS Setup utility, restore any settings that you wrote... down in Step 3. 15 Save all the power and data cables from the system board, noting their locations and orientation. (You will reconnect the cables after you install the new board.) Tip You...
8512418 - Gateway Reference Guide
Page 63
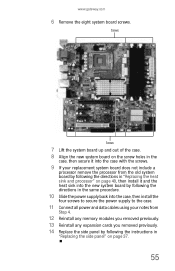
www.gateway.com 6 Remove the eight system board screws. Screws Screws 7 Lift the system board up and out of the case. 8 Align the new system board on ... into the new system board by following the directions in the same procedure. 10 Slide the power supply back into the case, then install the four screws to secure the power supply to the case. 11 Connect all power and data cables using your notes from Step 4. 12 Reinstall any memory modules you removed previously...
www.gateway.com 6 Remove the eight system board screws. Screws Screws 7 Lift the system board up and out of the case. 8 Align the new system board on ... into the new system board by following the directions in the same procedure. 10 Slide the power supply back into the case, then install the four screws to secure the power supply to the case. 11 Connect all power and data cables using your notes from Step 4. 12 Reinstall any memory modules you removed previously...

8512418 - Gateway Reference Guide
Page 82
... and fixing the problem. • If you added or removed peripheral devices, review the installation procedures you performed and make sure that it is supplying power. • If you followed each instruction. • If an error occurs in a program, see "Preventing static electricity discharge" on page 34...these safety guidelines: Warning Never open your computer case while your computer is turned on and while the modem cable, network cable, and power cord are damaged • Liquid has been spilled into your computer • Your computer was dropped • The case was damaged Instead...
... and fixing the problem. • If you added or removed peripheral devices, review the installation procedures you performed and make sure that it is supplying power. • If you followed each instruction. • If an error occurs in a program, see "Preventing static electricity discharge" on page 34...these safety guidelines: Warning Never open your computer case while your computer is turned on and while the modem cable, network cable, and power cord are damaged • Liquid has been spilled into your computer • Your computer was dropped • The case was damaged Instead...
8512418 - Gateway Reference Guide
Page 115
... computer, follow troubleshooting steps. 105 Warning To avoid bodily injury, do not attempt to troubleshoot your computer problem if: • Power cords or plugs are damaged • Liquid has been spilled into your computer • Your computer was dropped • The case... technical support resources. • If you have you follow these recommendations before contacting Gateway Customer Care: • Make sure that is supplying power. www.gateway.com Telephone support Before calling Gateway Customer Care If you have installed it according to the instructions provided with it is...
... computer, follow troubleshooting steps. 105 Warning To avoid bodily injury, do not attempt to troubleshoot your computer problem if: • Power cords or plugs are damaged • Liquid has been spilled into your computer • Your computer was dropped • The case... technical support resources. • If you have you follow these recommendations before contacting Gateway Customer Care: • Make sure that is supplying power. www.gateway.com Telephone support Before calling Gateway Customer Care If you have installed it according to the instructions provided with it is...
8512418 - Gateway Reference Guide
Page 135
www.gateway.com Standby/Resume 7 troubleshooting 90 turning off computer 17 turning on computer 16 power button 7 power supply 15 printer installing 32 setting default 91 troubleshooting 91 USB port 7, 9 programs closing unresponsive 18 opening 23 recovery discs 94, 97 re-installing 93, 94... restarting computer 18 restoring defaults 102 drivers 93, 94 files from Recycle Bin 78 programs 93, 94 software 93, 94 system 93 Windows 93 with Gateway Recovery Center 96 with Windows DVD 103 with Windows System Restore 99 Resume mode 7 right-clicking 23 S S/PDIF out 9 safety avoiding repetitive strain 14 ...
www.gateway.com Standby/Resume 7 troubleshooting 90 turning off computer 17 turning on computer 16 power button 7 power supply 15 printer installing 32 setting default 91 troubleshooting 91 USB port 7, 9 programs closing unresponsive 18 opening 23 recovery discs 94, 97 re-installing 93, 94... restarting computer 18 restoring defaults 102 drivers 93, 94 files from Recycle Bin 78 programs 93, 94 software 93, 94 system 93 Windows 93 with Gateway Recovery Center 96 with Windows DVD 103 with Windows System Restore 99 Resume mode 7 right-clicking 23 S S/PDIF out 9 safety avoiding repetitive strain 14 ...
8512418 - Gateway Reference Guide
Page 137
....gateway.com diskette drive 75 display 76 DSL modem 85 DVD drive 73, 76 Ethernet network 77 faxes 88 files 78 general guidelines 72 hard drive 79 Internet connection 79, 87 keyboard 81 LCD panel 76 memory 84 memory card reader 85 monitor 76 mouse 89 network 77, 90 passwords 90 power... Media Center troubleshooting 82 Windows System Restore 93 creating restore point 101 Windows Update 62 wired Ethernet troubleshooting 77 working safely 12 X xD 28 U uninterruptible power supply (UPS) 14 updating Windows 62 UPS 14 USB port 7, 9, 32 Z Zip drive 66 127
....gateway.com diskette drive 75 display 76 DSL modem 85 DVD drive 73, 76 Ethernet network 77 faxes 88 files 78 general guidelines 72 hard drive 79 Internet connection 79, 87 keyboard 81 LCD panel 76 memory 84 memory card reader 85 monitor 76 mouse 89 network 77, 90 passwords 90 power... Media Center troubleshooting 82 Windows System Restore 93 creating restore point 101 Windows Update 62 wired Ethernet troubleshooting 77 working safely 12 X xD 28 U uninterruptible power supply (UPS) 14 updating Windows 62 UPS 14 USB port 7, 9, 32 Z Zip drive 66 127

8512158 - Gateway Computer User Guide
Page 79
...to your computer. Windows recognizes the new hardware and searches for demonstrative purposes only and may need to install the driver from the disc supplied by the manufacturer or download the driver from the manufacturer's Web site. 5 After the driver is installed, click (Start), Control Panel...see the setup poster or your Reference Guide. 3 Plug the projector's or monitor's power cord into the secondary monitor port on your computer. For the location of your Windows desktop. www.gateway.com Setting up multiple monitors Important The dialog boxes shown in the Display Settings dialog ...
...to your computer. Windows recognizes the new hardware and searches for demonstrative purposes only and may need to install the driver from the disc supplied by the manufacturer or download the driver from the manufacturer's Web site. 5 After the driver is installed, click (Start), Control Panel...see the setup poster or your Reference Guide. 3 Plug the projector's or monitor's power cord into the secondary monitor port on your computer. For the location of your Windows desktop. www.gateway.com Setting up multiple monitors Important The dialog boxes shown in the Display Settings dialog ...

