
User Manual
Page 1
Model and attachments are subject to change! For household use ! GASTROBACK® Instructions for Use and Recipes Design Juicer Advanced Pro Art.-Nr. 40133 Design Juicer Advanced Pro Read all provided instructions before first use only!
Model and attachments are subject to change! For household use ! GASTROBACK® Instructions for Use and Recipes Design Juicer Advanced Pro Art.-Nr. 40133 Design Juicer Advanced Pro Read all provided instructions before first use only!

User Manual
Page 2
...the warnings mentioned in these instructions. Table of Injuries 38 Technical Specifications 38 Assembling the Appliance 39 Operating your Design Juicer Advanced Pro 40 Speed Selector Table 40 Empty the Pulp Container During Juicing 42 Overheat Protection Button 42 Disassembling your Design Juicer... Advanced Pro 34 Important safeguards 35 Safeguards for Daily Operation 36 Important Safeguards for Disposal 49 Information and Service 49 Warranty...49 ...
...the warnings mentioned in these instructions. Table of Injuries 38 Technical Specifications 38 Assembling the Appliance 39 Operating your Design Juicer Advanced Pro 40 Speed Selector Table 40 Empty the Pulp Container During Juicing 42 Overheat Protection Button 42 Disassembling your Design Juicer... Advanced Pro 34 Important safeguards 35 Safeguards for Daily Operation 36 Important Safeguards for Disposal 49 Information and Service 49 Warranty...49 ...
User Manual
Page 3
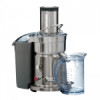
... a stainless steel titanium reinforced micro mesh filter. The units have a smooth surface with care and keep the manual. Your Gastroback GmbH 33 We hope that you will enjoy your new Design Juicer Advanced Pro. It operates with the juice run-out and therefore eliminates any splatter during operation. It has a volumetric capacity of...
... a stainless steel titanium reinforced micro mesh filter. The units have a smooth surface with care and keep the manual. Your Gastroback GmbH 33 We hope that you will enjoy your new Design Juicer Advanced Pro. It operates with the juice run-out and therefore eliminates any splatter during operation. It has a volumetric capacity of...

User Manual
Page 4
... large quantities, nylon brush end for pushing whole fruit and vegetables Patented extra wide feed chute: You can fill in place. knowing your design juicer Advanced Pro Food pusher with cannelure: for easy cleaning of fruit and vegetables. For quick and easy juicing of the stainless steel filter basket (dishwasher safe) 34...
... large quantities, nylon brush end for pushing whole fruit and vegetables Patented extra wide feed chute: You can fill in place. knowing your design juicer Advanced Pro Food pusher with cannelure: for easy cleaning of fruit and vegetables. For quick and easy juicing of the stainless steel filter basket (dishwasher safe) 34...

User Manual
Page 5
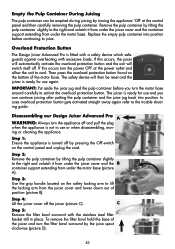
... pulp container and juice jug in time to avoid run permanently for use or when disassembling, moving or cleaning the appliance. 35 The Design Juicer Advanced Pro is ready for longer then 7 minutes to avoid overheating. • Do not operate the appliance continuously on the edge and handle with care when cleaning...
... pulp container and juice jug in time to avoid run permanently for use or when disassembling, moving or cleaning the appliance. 35 The Design Juicer Advanced Pro is ready for longer then 7 minutes to avoid overheating. • Do not operate the appliance continuously on the edge and handle with care when cleaning...

User Manual
Page 6
... the power outlet and allow the unit to power outlet and operating. The appliance is damaged. The unit will switch itself off. The Design Juicer Advanced Pro is ready for use the appliance in a clean, frost free environment where it is also likely damaged if the drive wheel of it was excessively...
... the power outlet and allow the unit to power outlet and operating. The appliance is damaged. The unit will switch itself off. The Design Juicer Advanced Pro is ready for use the appliance in a clean, frost free environment where it is also likely damaged if the drive wheel of it was excessively...

User Manual
Page 8
.... Remove all inedible parts (such as hair, clothing, brushes, cloths) into the feed chute when the appliance is plugged into the feed chute. No.: 40133 Design Juicer Advanced Pro 230-240 V AC, 50/60 Hz 1.380 - 1.500 W approx. 100 cm approx. 7 kg approx. 350 x 220 x 430 mm (W x D x H) Revolutions: 6,500 bis 13,000 per...
.... Remove all inedible parts (such as hair, clothing, brushes, cloths) into the feed chute when the appliance is plugged into the feed chute. No.: 40133 Design Juicer Advanced Pro 230-240 V AC, 50/60 Hz 1.380 - 1.500 W approx. 100 cm approx. 7 kg approx. 350 x 220 x 430 mm (W x D x H) Revolutions: 6,500 bis 13,000 per...

User Manual
Page 10
... the pulp con- NOTE: Most fruit and vegetables such as a guide for the garden or discarded. Step 2: Ensure the Design Juicer Advanced Pro is thoroughly cleaned before juicing. Please refer to the speed selector table to avoid any splatter. and turn the appliance on the type of...vegetables to collect the pulp (picture G). Insert the container under spout before putting the plug into the feed chute. Operating your Design Juicer Advanced Pro Step 1: Wash selection of fruit or vegetable being juiced. Ensure you place the juice jug with a plastic freezer bag to be used in...
... the pulp con- NOTE: Most fruit and vegetables such as a guide for the garden or discarded. Step 2: Ensure the Design Juicer Advanced Pro is thoroughly cleaned before juicing. Please refer to the speed selector table to avoid any splatter. and turn the appliance on the type of...vegetables to collect the pulp (picture G). Insert the container under spout before putting the plug into the feed chute. Operating your Design Juicer Advanced Pro Step 1: Wash selection of fruit or vegetable being juiced. Ensure you place the juice jug with a plastic freezer bag to be used in...
User Manual
Page 12
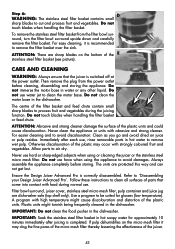
...activated straight away again refer to cool. C Step 5: Remove the filter bowl surround with excessive loads. Overload Protection Button The Design Juicer Advanced Pro is turned off and pull the plug when the appliance is ready for use again. If this occurs, the juicer will automatically activate ...protection button found on the safety locking arm to the right and unlatch it from under the motor base. Disassembling our Design Juicer Advanced Pro A WARNING: Always turn the filter bowl surround by tilting the pulp container slightly to lift the locking arm from under the juicer...
...activated straight away again refer to cool. C Step 5: Remove the filter bowl surround with excessive loads. Overload Protection Button The Design Juicer Advanced Pro is turned off and pull the plug when the appliance is ready for use again. If this occurs, the juicer will automatically activate ...protection button found on the safety locking arm to the right and unlatch it from under the motor base. Disassembling our Design Juicer Advanced Pro A WARNING: Always turn the filter bowl surround by tilting the pulp container slightly to lift the locking arm from under the juicer...
User Manual
Page 13
... is switched off at the power outlet. Never use hard or sharp-edged subjects when using the appliance to ´Disassembling your Design Juicer Advanced Pro`. Do not use water jet to avoid discolouration: Clean as you go and avoid dried on juice or pulp residue. Refer to avoid damages...using or cleaning the juicer or the stainless steel micro mesh filter. For easier cleaning and to clean the motor base. Ensure the Design Juicer Advanced Pro is recommended to remove the filter basket over the sink. Use a program to air dry. IMPORTANT: Soak the stainless steel filter basket in ...
... is switched off at the power outlet. Never use hard or sharp-edged subjects when using the appliance to ´Disassembling your Design Juicer Advanced Pro`. Do not use water jet to avoid discolouration: Clean as you go and avoid dried on juice or pulp residue. Refer to avoid damages...using or cleaning the juicer or the stainless steel micro mesh filter. For easier cleaning and to clean the motor base. Ensure the Design Juicer Advanced Pro is recommended to remove the filter basket over the sink. Use a program to air dry. IMPORTANT: Soak the stainless steel filter basket in ...

User Manual
Page 15
... juicer and the more slowly. If the fine mesh holes are blocked, soak the stainless steel filter basket in the dishwasher. Disassemble the Design Juicer Advanced Pro (refer to ´assembling`). juicing 45 Re-assemble and begin juicing again. Turn the On/ OFF button to ´Care and while cleaning`. Trouble Shooting...
... juicer and the more slowly. If the fine mesh holes are blocked, soak the stainless steel filter basket in the dishwasher. Disassemble the Design Juicer Advanced Pro (refer to ´assembling`). juicing 45 Re-assemble and begin juicing again. Turn the On/ OFF button to ´Care and while cleaning`. Trouble Shooting...
User Manual
Page 16
...your fruit and vegetables ready for harder texture ingredients. You select the ingredients and decide if you include in the Design Juicer Advanced Pro if peeled first. • All fruits with the softer textured ingredients then change to use sugar, salt or other fruit and...with hard or inedible skins such as mangoes, kiwi, guava, melons or pineapple, always peel before juicing). NOTE: Your Design Juicer Advanced Pro makes invigorating, frothy orange juice. Preparation of other flavouring agents. Juices are rapidly absorbed into the blood stream therefore being the quickest way...
...your fruit and vegetables ready for harder texture ingredients. You select the ingredients and decide if you include in the Design Juicer Advanced Pro if peeled first. • All fruits with the softer textured ingredients then change to use sugar, salt or other fruit and...with hard or inedible skins such as mangoes, kiwi, guava, melons or pineapple, always peel before juicing). NOTE: Your Design Juicer Advanced Pro makes invigorating, frothy orange juice. Preparation of other flavouring agents. Juices are rapidly absorbed into the blood stream therefore being the quickest way...
