Flush Mount Template
Page 1
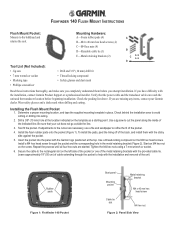
... Cable tie slot M4 hex nut Figure 2: Panel Side View Be sure that the power cable and the transducer cable can reach the unit and the transducer location before you are started. Repeat the process until all four hex nuts are missing any items, contact ...beginning installation. Tighten the M4 hex nuts using a 7 mm wrench or socket. 6. FISHFINDER 140 FLUSH MOUNT INSTRUCTIONS Flush Mount Pocket: Mounts to avoid cutting or drilling into the panel with the installation, contact Garmin Product Support or a professional installer. Wear safety glasses and a dusk mask when drilling ...
... Cable tie slot M4 hex nut Figure 2: Panel Side View Be sure that the power cable and the transducer cable can reach the unit and the transducer location before you are started. Repeat the process until all four hex nuts are missing any items, contact ...beginning installation. Tighten the M4 hex nuts using a 7 mm wrench or socket. 6. FISHFINDER 140 FLUSH MOUNT INSTRUCTIONS Flush Mount Pocket: Mounts to avoid cutting or drilling into the panel with the installation, contact Garmin Product Support or a professional installer. Wear safety glasses and a dusk mask when drilling ...
Owner's Manual
Page 3
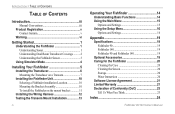
...information about sonar and the Fishfinder. It may result in death... care information. An Index is organized into the following sections. Fishfinder 90/140 Owner's Manual iii If you to indicate a potentially hazardous situation, which , if ...to alert you experience difficulty installing the Fishfinder, contact Garmin Product Support or an installation professional in your unit in the Appendix. ...;nder section provides instruction on installing the Fishfinder and the Transducer. This manual uses the term Caution to avoid unsafe practices. Manual ...
...information about sonar and the Fishfinder. It may result in death... care information. An Index is organized into the following sections. Fishfinder 90/140 Owner's Manual iii If you to indicate a potentially hazardous situation, which , if ...to alert you experience difficulty installing the Fishfinder, contact Garmin Product Support or an installation professional in your unit in the Appendix. ...;nder section provides instruction on installing the Fishfinder and the Transducer. This manual uses the term Caution to avoid unsafe practices. Manual ...
Owner's Manual
Page 4
...iii Product Registration v Contact Garmin v Warning vi Getting Started 1 Understanding the Fishfinder 1 Understanding Sonar 1 Understanding Dual Beam Transducer Coverage ......... 2 Understanding the Fishfinder Screen 3 Using Simulator Mode 4 Installing Your Fishfinder 5 Installing the Transducer 6 Mounting the Transducer on a Transom 7 ... 16 Appendix 19 Specifications 19 Fishfinder 90 19 Fishfinder 140 19 Fishfinder 90 and Fishfinder 140 19 Optional Accessories 19 Caring for the Fishfinder 20 Cleaning the Case 20...
...iii Product Registration v Contact Garmin v Warning vi Getting Started 1 Understanding the Fishfinder 1 Understanding Sonar 1 Understanding Dual Beam Transducer Coverage ......... 2 Understanding the Fishfinder Screen 3 Using Simulator Mode 4 Installing Your Fishfinder 5 Installing the Transducer 6 Mounting the Transducer on a Transom 7 ... 16 Appendix 19 Specifications 19 Fishfinder 90 19 Fishfinder 140 19 Fishfinder 90 and Fishfinder 140 19 Optional Accessories 19 Caring for the Fishfinder 20 Cleaning the Case 20...

Owner's Manual
Page 7
...bit about sonar that you need to a transducer. Understanding Sonar During installation, you connect your specific needs. If you have not used a Fishfinder before , Fishfinder 90/140 Owner's Manual GETTING STARTED > UNDERSTANDING THE FISHFINDER you might see on the Fishfinder... 90 or 140 screen. The transducer sends sound waves down into technical detail about sonar, but it is a fully ...
...bit about sonar that you need to a transducer. Understanding Sonar During installation, you connect your specific needs. If you have not used a Fishfinder before , Fishfinder 90/140 Owner's Manual GETTING STARTED > UNDERSTANDING THE FISHFINDER you might see on the Fishfinder... 90 or 140 screen. The transducer sends sound waves down into technical detail about sonar, but it is a fully ...

Owner's Manual
Page 8
... the transmitted sound waves is determined by the beam width of approximately a 20-foot circle. 2 Fishfinder 90/140 Owner's Manual GETTING STARTED > UNDERSTANDING DUAL BEAM TRANSDUCER COVERAGE wave information, and then sends the information to see and interpret. The narrow beam provides crisp detail of what is...shing in the water, including areas beyond the sides of your boat. At a 30-foot depth, the wide beam covers the area of the transducer and the water depth. Narrow Beam Wide Beam The wide beam is shown on the screen for example, at a 30-foot depth, the narrow...
... the transmitted sound waves is determined by the beam width of approximately a 20-foot circle. 2 Fishfinder 90/140 Owner's Manual GETTING STARTED > UNDERSTANDING DUAL BEAM TRANSDUCER COVERAGE wave information, and then sends the information to see and interpret. The narrow beam provides crisp detail of what is...shing in the water, including areas beyond the sides of your boat. At a 30-foot depth, the wide beam covers the area of the transducer and the water depth. Narrow Beam Wide Beam The wide beam is shown on the screen for example, at a 30-foot depth, the narrow...
Owner's Manual
Page 9
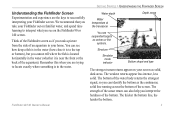
...locate exactly where something is near the front or the back of the aquarium). Fishfinder 90/140 Owner's Manual GETTING STARTED > UNDERSTANDING THE FISHFINDER SCREEN Water depth Water temperature at the transducer Depth range You see how deep a fish is in the water (how close it is in... Think of the bottom. Structure Simulator mode indicator Bottom shape and type The strongest sonar returns appear on the Fishfinder 90 or 140 screen. The strength of the sonar return can also help you cannot tell where the fish is located horizontally in the water. ...
...locate exactly where something is near the front or the back of the aquarium). Fishfinder 90/140 Owner's Manual GETTING STARTED > UNDERSTANDING THE FISHFINDER SCREEN Water depth Water temperature at the transducer Depth range You see how deep a fish is in the water (how close it is in... Think of the bottom. Structure Simulator mode indicator Bottom shape and type The strongest sonar returns appear on the Fishfinder 90 or 140 screen. The strength of the sonar return can also help you cannot tell where the fish is located horizontally in the water. ...

Owner's Manual
Page 10
...setting to see in the previous illustration how the fish are pressed for any other conditions. If the Fishfinder does not detect a transducer at the surface of the Fishfinder. You can obscure your view of arches (Page 16). You can affect water depth return readings. ... appear as perfect arches, due to the bottom can also turn off to alert you might not always appear as arches. Fishfinder 90/140 Owner's Manual they can see a grouping of fish or dense structures close to the speed, fish orientation, or other sonar interference ...
...setting to see in the previous illustration how the fish are pressed for any other conditions. If the Fishfinder does not detect a transducer at the surface of the Fishfinder. You can obscure your view of arches (Page 16). You can affect water depth return readings. ... appear as perfect arches, due to the bottom can also turn off to alert you might not always appear as arches. Fishfinder 90/140 Owner's Manual they can see a grouping of fish or dense structures close to the speed, fish orientation, or other sonar interference ...
Owner's Manual
Page 11
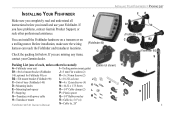
...Fishfinder and transducer locations. optional for Fishfinder 90); INSTALLING YOUR FISHFINDER > PACKING LIST INSTALLING YOUR FISHFINDER A Make sure you completely read and understand all instructions before you have problems, contact Garmin Product Support, or ...spacer O-1/4" Cable clamps (2) L F-Snap ring P-Plastic spacer O G-Transducer with power cable Q-1/4" Rubber washer M H-Transducer mount R-Cable tie, 5.6" (4) Fishfinder 90/140 Owner's Manual S-Cable tie, 20" FE B1 D (Fishfinder 140) C B2 (Fishfinder 90) S H I -Trolling motor...
...Fishfinder and transducer locations. optional for Fishfinder 90); INSTALLING YOUR FISHFINDER > PACKING LIST INSTALLING YOUR FISHFINDER A Make sure you completely read and understand all instructions before you have problems, contact Garmin Product Support, or ...spacer O-1/4" Cable clamps (2) L F-Snap ring P-Plastic spacer O G-Transducer with power cable Q-1/4" Rubber washer M H-Transducer mount R-Cable tie, 5.6" (4) Fishfinder 90/140 Owner's Manual S-Cable tie, 20" FE B1 D (Fishfinder 140) C B2 (Fishfinder 90) S H I -Trolling motor...
Owner's Manual
Page 12
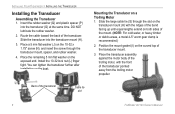
... until equal lengths extend on the transducer mount (H) with the front of the transducer Cable tie slot 6 Fishfinder 90/140 Owner's Manual Insert the rubber washer (Q) and plastic spacer (P) into the transducer mount (H). 3. DO NOT lubricate the rubber washer. 2. INSTALLING YOUR FISHFINDER > INSTALLING THE TRANSDUCER Installing the Transducer Assembling the Transducer 1. Place the remaining 5 mm fl...
... until equal lengths extend on the transducer mount (H) with the front of the transducer Cable tie slot 6 Fishfinder 90/140 Owner's Manual Insert the rubber washer (Q) and plastic spacer (P) into the transducer mount (H). 3. DO NOT lubricate the rubber washer. 2. INSTALLING YOUR FISHFINDER > INSTALLING THE TRANSDUCER Installing the Transducer Assembling the Transducer 1. Place the remaining 5 mm fl...

Owner's Manual
Page 13
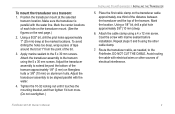
...necessary. INSTALLING YOUR FISHFINDER > INSTALLING THE TRANSDUCER Mounting the Transducer on the opposite end and pull it through until tight. When selecting a transom mount location, consider the following for optimal performance: • For your warranty.) • DO NOT mount the transducer in locations where ..., eroding paint, or anything that it .) 5. Fishfinder 90/140 Owner's Manual 7 Position the transducer so that creates turbulence. • Mount the transducer as close to the center of the transducer mount with the bottom when in calm water. You can fill ...
...necessary. INSTALLING YOUR FISHFINDER > INSTALLING THE TRANSDUCER Mounting the Transducer on the opposite end and pull it through until tight. When selecting a transom mount location, consider the following for optimal performance: • For your warranty.) • DO NOT mount the transducer in locations where ..., eroding paint, or anything that it .) 5. Fishfinder 90/140 Owner's Manual 7 Position the transducer so that creates turbulence. • Mount the transducer as close to the center of the transducer mount with the bottom when in calm water. You can fill ...
Owner's Manual
Page 14
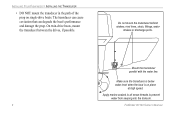
...threads to prevent water from seeping into the transom. 8 Fishfinder 90/140 Owner's Manual The transducer can cause cavitation that can degrade the boat's performance and damage the prop. Make sure the transducer is below water level when the boat is on single-drive boats. Do not... mount the transducer behind strakes, rivet lines, struts, fittings, water intakes or discharge ports. INSTALLING YOUR FISHFINDER > INSTALLING THE TRANSDUCER • DO NOT mount the transducer in the path of the prop on plane at high speed. On ...
...threads to prevent water from seeping into the transom. 8 Fishfinder 90/140 Owner's Manual The transducer can cause cavitation that can degrade the boat's performance and damage the prop. Make sure the transducer is below water level when the boat is on single-drive boats. Do not... mount the transducer behind strakes, rivet lines, struts, fittings, water intakes or discharge ports. INSTALLING YOUR FISHFINDER > INSTALLING THE TRANSDUCER • DO NOT mount the transducer in the path of the prop on plane at high speed. On ...
Owner's Manual
Page 15
... 10-32 locking nut until it touches the mounting bracket, and then tighten 1/4 turn more. (Do not overtighten.) Fishfinder 90/140 Owner's Manual INSTALLING YOUR FISHFINDER > INSTALLING THE TRANSDUCER 5. Repeat steps 5 and 6 using the other sources of the transom. Apply marine sealant to the Fishfinder. Using a 1/8" bit, drill a pilot...
... 10-32 locking nut until it touches the mounting bracket, and then tighten 1/4 turn more. (Do not overtighten.) Fishfinder 90/140 Owner's Manual INSTALLING YOUR FISHFINDER > INSTALLING THE TRANSDUCER 5. Repeat steps 5 and 6 using the other sources of the transom. Apply marine sealant to the Fishfinder. Using a 1/8" bit, drill a pilot...
Owner's Manual
Page 16
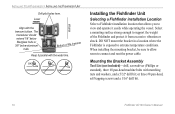
... and rout the power cable. or three #8 pan-head, self-tapping screws and a 1/16" drill bit. 10 Fishfinder 90/140 Owner's Manual Level Vertical Align with the transom bottom. The transducer should extend 1/8" below fiberglass hulls or 3/8" below aluminum hulls. INSTALLING YOUR FISHFINDER > INSTALLING THE FISHFINDER UNIT Drill pilot holes here.
... and rout the power cable. or three #8 pan-head, self-tapping screws and a 1/16" drill bit. 10 Fishfinder 90/140 Owner's Manual Level Vertical Align with the transom bottom. The transducer should extend 1/8" below fiberglass hulls or 3/8" below aluminum hulls. INSTALLING YOUR FISHFINDER > INSTALLING THE FISHFINDER UNIT Drill pilot holes here.
Owner's Manual
Page 18
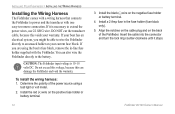
INSTALLING YOUR FISHFINDER > INSTALLING THE WIRING HARNESS Installing the Wiring Harness The Fishfinder comes with a wiring harness that connects the Fishfinder to power and the transducer with the Fishfinder. Install a 2 Amp fuse in -line fuse holder supplied with one easy-to extend ...You can damage the Fishfinder and void the warranty. To install the wiring harness: 1. If your warranty. Fishfinder 90/140 Owner's Manual Determine the polarity of the Fishfinder. If it stops. Install the red (+) wire on the negative fuse holder or...
INSTALLING YOUR FISHFINDER > INSTALLING THE WIRING HARNESS Installing the Wiring Harness The Fishfinder comes with a wiring harness that connects the Fishfinder to power and the transducer with the Fishfinder. Install a 2 Amp fuse in -line fuse holder supplied with one easy-to extend ...You can damage the Fishfinder and void the warranty. To install the wiring harness: 1. If your warranty. Fishfinder 90/140 Owner's Manual Determine the polarity of the Fishfinder. If it stops. Install the red (+) wire on the negative fuse holder or...
Owner's Manual
Page 19
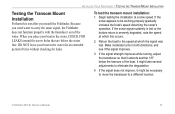
...transom of the water. If the signal does not improve, it extends another 1/8" below the water line. Fishfinder 90/140 Owner's Manual 13 It might be working properly gradually increase the boat's speed observing the sonar's operation. Because you install the Fish... it might take several adjustments to carry the sonar signal, the Fishfinder does not function properly with the transducer out of the boat. INSTALLING YOUR FISHFINDER > TESTING THE TRANSOM MOUNT INSTALLATION Testing the Transom Mount Installation Perform this occurs. 2. To test the transom mount...
...transom of the water. If the signal does not improve, it extends another 1/8" below the water line. Fishfinder 90/140 Owner's Manual 13 It might be working properly gradually increase the boat's speed observing the sonar's operation. Because you install the Fish... it might take several adjustments to carry the sonar signal, the Fishfinder does not function properly with the transducer out of the boat. INSTALLING YOUR FISHFINDER > TESTING THE TRANSOM MOUNT INSTALLATION Testing the Transom Mount Installation Perform this occurs. 2. To test the transom mount...

Owner's Manual
Page 23
...shallow water, even off (default) an alarm that are to that symbol (large, medium, and small sizes). Fishfinder 90/140 Owner's Manual OPERATING YOUR FISHFINDER > USING THE SETUP MENU Beam-controls the angle of the boat appear hollow. When using wide beam, fish symbols that are...choose Narrow (default) beam. Wide beam allows you select a fish symbol, the screen shows only the information related to the sides of the transducer beam. Whiteline Off Whiteline On • On (default)-the bottom return appears as solid black fish symbols. (default) the Fishfinder...
...shallow water, even off (default) an alarm that are to that symbol (large, medium, and small sizes). Fishfinder 90/140 Owner's Manual OPERATING YOUR FISHFINDER > USING THE SETUP MENU Beam-controls the angle of the boat appear hollow. When using wide beam, fish symbols that are...choose Narrow (default) beam. Wide beam allows you select a fish symbol, the screen shows only the information related to the sides of the transducer beam. Whiteline Off Whiteline On • On (default)-the bottom return appears as solid black fish symbols. (default) the Fishfinder...
Owner's Manual
Page 24
...settings are Small and Large (default). Beeper-controls all default settings. 18 Fishfinder 90/140 Owner's Manual The settings are Fahrenheit (default) and Celsius. The settings are High, Medium ...the setting, the less clutter on the screen. This appears only if you have a temperature-capable transducer. See page 4 for light levels or viewing angles. The higher the setting, the greater the...the water temperature appears on the screen. OPERATING YOUR FISHFINDER > USING THE SETUP MENU Auto Gain-controls the aggressiveness of the screen to increase or ...
...settings are Small and Large (default). Beeper-controls all default settings. 18 Fishfinder 90/140 Owner's Manual The settings are Fahrenheit (default) and Celsius. The settings are High, Medium ...the setting, the less clutter on the screen. This appears only if you have a temperature-capable transducer. See page 4 for light levels or viewing angles. The higher the setting, the greater the...the water temperature appears on the screen. OPERATING YOUR FISHFINDER > USING THE SETUP MENU Auto Gain-controls the aggressiveness of the screen to increase or ...
Owner's Manual
Page 25
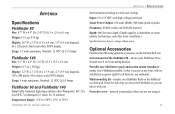
...to change without notice. Optional Accessories Purchase the following optional accessories on the Garmin Web site: Swivel mount for 30 minutes) Temperature Range: +5°F to 158°F (-15°C to 70°C) Fishfinder 90/140 Owner's Manual Internal memory backup to retain user settings Input: 10 to 18... to 1 meter for the Fishfinder 90-allows your product when you can go on any boat, with battery pack and suction mount transducer- makes your fishfinder flush on its mounting bracket. Press the side clips to release the Fishfinder so you...
...to change without notice. Optional Accessories Purchase the following optional accessories on the Garmin Web site: Swivel mount for 30 minutes) Temperature Range: +5°F to 158°F (-15°C to 70°C) Fishfinder 90/140 Owner's Manual Internal memory backup to retain user settings Input: 10 to 18... to 1 meter for the Fishfinder 90-allows your product when you can go on any boat, with battery pack and suction mount transducer- makes your fishfinder flush on its mounting bracket. Press the side clips to release the Fishfinder so you...

Owner's Manual
Page 30
...deep 16 fish 17 shallow 16 Anti-reflective coating 20 arches 4 assembling the transducer 6 B backlight 14 battery alarm 16 battery number 18 Beam 2, 17 beeper setting 18 bottom ... 17 Whiteline 17 H hardness of the bottom 3 I installing the Fishfinder unit 10 the transducer 6 the unit on the mount bracket 11 the wiring harness 12 your Fishfinder 5 K ... 10 M menu main 15 setup 16 menu key 14 mounting the bracket assembly 10 mounting the transducer on a transom 9 mounting the transducer on a trolling motor 6 N narrow beam 2 numbers 18 battery 18 water temperature 18 O ...
...deep 16 fish 17 shallow 16 Anti-reflective coating 20 arches 4 assembling the transducer 6 B backlight 14 battery alarm 16 battery number 18 Beam 2, 17 beeper setting 18 bottom ... 17 Whiteline 17 H hardness of the bottom 3 I installing the Fishfinder unit 10 the transducer 6 the unit on the mount bracket 11 the wiring harness 12 your Fishfinder 5 K ... 10 M menu main 15 setup 16 menu key 14 mounting the bracket assembly 10 mounting the transducer on a transom 9 mounting the transducer on a trolling motor 6 N narrow beam 2 numbers 18 battery 18 water temperature 18 O ...
Owner's Manual
Page 31
...;cations 19 storage 20 strongest sonar returns 3 surface clutter 4 swivel mount bracket 11 T temperature number 18 temperature units 18 testing the transom mount installation 13 transducer 1 assembling 6 installing 6 mounting on a transom 7 mounting on a trolling motor 6 transom mount installation 13 U units 18 depth 18 temperature 18 V view 16 W warning statement vi warranty..., limited 21 water immersion 20 water temperature number 18 weakest sonar returns 3 whiteline 17 wide beam 2 wiring harness 12 Z zoom 16 Fishfinder 90/140 Owner's Manual INDEX 25
...;cations 19 storage 20 strongest sonar returns 3 surface clutter 4 swivel mount bracket 11 T temperature number 18 temperature units 18 testing the transom mount installation 13 transducer 1 assembling 6 installing 6 mounting on a transom 7 mounting on a trolling motor 6 transom mount installation 13 U units 18 depth 18 temperature 18 V view 16 W warning statement vi warranty..., limited 21 water immersion 20 water temperature number 18 weakest sonar returns 3 whiteline 17 wide beam 2 wiring harness 12 Z zoom 16 Fishfinder 90/140 Owner's Manual INDEX 25


