
Important Safety and Product Information
Page 2
... OF INCIDENTAL OR CONSEQUENTIAL DAMAGES, SO THE ABOVE LIMITATIONS MAY NOT APPLY TO YOU. Before seeking warranty service, please access and review the online help . To obtain warranty service, an original or copy of any purpose requiring precise measurement of direction, distance, ...MAXIMUM EXTENT PERMITTED BY APPLICABLE LAW, THE WARRANTIES AND REMEDIES CONTAINED IN THIS LIMITED WARRANTY ARE EXCLUSIVE AND IN LIEU OF, AND GARMIN EXPRESSLY DISCLAIMS, ALL OTHER WARRANTIES AND REMEDIES, WHETHER EXPRESS, IMPLIED, STATUTORY, OR OTHERWISE, INCLUDING WITHOUT LIMITATION ANY IMPLIED WARRANTY OF...
... OF INCIDENTAL OR CONSEQUENTIAL DAMAGES, SO THE ABOVE LIMITATIONS MAY NOT APPLY TO YOU. Before seeking warranty service, please access and review the online help . To obtain warranty service, an original or copy of any purpose requiring precise measurement of direction, distance, ...MAXIMUM EXTENT PERMITTED BY APPLICABLE LAW, THE WARRANTIES AND REMEDIES CONTAINED IN THIS LIMITED WARRANTY ARE EXCLUSIVE AND IN LIEU OF, AND GARMIN EXPRESSLY DISCLAIMS, ALL OTHER WARRANTIES AND REMEDIES, WHETHER EXPRESS, IMPLIED, STATUTORY, OR OTHERWISE, INCLUDING WITHOUT LIMITATION ANY IMPLIED WARRANTY OF...

Owners Manual
Page 11
... heading for COG, select GPS Heading (COG). • To use data from a connected heading sensor, select Heading. • To use Auto Guidance, select Auto Guidance. 4 Review the course indicated by the magenta line. Angle markers can show the heading line and the course over land or shallow water. Carefully compare the...
... heading for COG, select GPS Heading (COG). • To use data from a connected heading sensor, select Heading. • To use Auto Guidance, select Auto Guidance. 4 Review the course indicated by the magenta line. Angle markers can show the heading line and the course over land or shallow water. Carefully compare the...
Owners Manual
Page 14
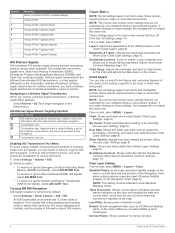
... receive or ignore Search and Rescue Transponder (SART) test signals, select AIS-SART Test. Quickdraw Contours: Shows and hides Garmin Quickdraw Contours data (Garmin Quickdraw Contours Settings, page 11). Land POIs: Shows points of interest on and off chart layers and customize features of ...information about the transmission and begin navigation to all settings apply to the transmission. Select Review > Go To to begin navigation....
... receive or ignore Search and Rescue Transponder (SART) test signals, select AIS-SART Test. Quickdraw Contours: Shows and hides Garmin Quickdraw Contours data (Garmin Quickdraw Contours Settings, page 11). Land POIs: Shows points of interest on and off chart layers and customize features of ...information about the transmission and begin navigation to all settings apply to the transmission. Select Review > Go To to begin navigation....

Owners Manual
Page 18
.... Stopping Navigation From the Navigation chart or Fishing chart, select MENU > Stop Navigation. NOTE: Some chart views are using a compatible Garmin autopilot connected to the chartplotter using NMEA 2000®, the autopilot follows the Auto Guidance route. You can also use the orange course-to...search for a Marine Services Destination NOTE: This feature is a thinner purple line that contain your boat when you have been. WARNING Review the path for my boat? The chartplotter creates a straight-line course or navigation line to avoid land and other dangerous objects. This...
.... Stopping Navigation From the Navigation chart or Fishing chart, select MENU > Stop Navigation. NOTE: Some chart views are using a compatible Garmin autopilot connected to the chartplotter using NMEA 2000®, the autopilot follows the Auto Guidance route. You can also use the orange course-to...search for a Marine Services Destination NOTE: This feature is a thinner purple line that contain your boat when you have been. WARNING Review the path for my boat? The chartplotter creates a straight-line course or navigation line to avoid land and other dangerous objects. This...

Owners Manual
Page 19
...The Auto Guidance feature is due to the location, including turns, select Route To. • To use Auto Guidance, select Auto Guidance. 5 Review the course indicated by the magenta line. Editing a Saved Waypoint 1 Select Nav Info > Waypoints. 2 Select a waypoint. 3 Select Edit Waypoint....bearing, select Enter Range/Bearing, and enter the information. Moving a Saved Waypoint 1 Select Nav Info > Waypoints. 2 Select a waypoint. 3 Select Review > Move. 4 Indicate a new location for minimum safe water depth and minimum safe obstacle height. 6 Follow the magenta line, steering to add turns...
...The Auto Guidance feature is due to the location, including turns, select Route To. • To use Auto Guidance, select Auto Guidance. 5 Review the course indicated by the magenta line. Editing a Saved Waypoint 1 Select Nav Info > Waypoints. 2 Select a waypoint. 3 Select Edit Waypoint....bearing, select Enter Range/Bearing, and enter the information. Moving a Saved Waypoint 1 Select Nav Info > Waypoints. 2 Select a waypoint. 3 Select Review > Move. 4 Indicate a new location for minimum safe water depth and minimum safe obstacle height. 6 Follow the magenta line, steering to add turns...

Owners Manual
Page 20
...select Forward - Setting and Following an Auto Guidance Path 1 Select a destination (Destinations, page 12). 2 Select Navigate To > Auto Guidance. 3 Review the path, indicated by the magenta line. 4 Select Start Navigation. 5 Follow the magenta line, steering to the destination. The starting point used when...navigation. The corrected course is based on the chart. Deleting a Saved Route 1 Select Nav Info > Routes. 2 Select a route. 3 Select Review > Delete. Auto Guidance WARNING The Auto Guidance feature is dynamic, and it . Always defer to the navaids and conditions on the chart. 5 ...
...select Forward - Setting and Following an Auto Guidance Path 1 Select a destination (Destinations, page 12). 2 Select Navigate To > Auto Guidance. 3 Review the path, indicated by the magenta line. 4 Select Start Navigation. 5 Follow the magenta line, steering to the destination. The starting point used when...navigation. The corrected course is based on the chart. Deleting a Saved Route 1 Select Nav Info > Routes. 2 Select a route. 3 Select Review > Delete. Auto Guidance WARNING The Auto Guidance feature is dynamic, and it . Always defer to the navaids and conditions on the chart. 5 ...

Owners Manual
Page 21
... the Auto Guidance line is available with a Chartplotter 15 Adjusting an Auto Guidance Path 1 Select Nav Info > Routes. 2 Select a path, and select Review > Edit > Adjust Path. NOTE: Not all settings apply to a new location. 5 If necessary, select a point, and select Remove. 6 Select ... Adjust Path. 3 Select a location on chart depth data, that require navigation through a narrow waterway (Adjusting the Distance from obstacles in step 8, review the placement of those areas appears as a bridge opening or a race starting point, and select Next. 3 Select a destination, and select Next....
... the Auto Guidance line is available with a Chartplotter 15 Adjusting an Auto Guidance Path 1 Select Nav Info > Routes. 2 Select a path, and select Review > Edit > Adjust Path. NOTE: Not all settings apply to a new location. 5 If necessary, select a point, and select Remove. 6 Select ... Adjust Path. 3 Select a location on chart depth data, that require navigation through a narrow waterway (Adjusting the Distance from obstacles in step 8, review the placement of those areas appears as a bridge opening or a race starting point, and select Next. 3 Select a destination, and select Next....

Owners Manual
Page 22
... Info > Tracks > Save Active Track. 2 Select an option: • Select the time the active track began . • Select Entire Log. 3 Review the course indicated by the colored line. 4 Follow the colored line, steering to them, you enter or exit a boundary. Tracks A track is called the... Follow Track. 4 Select an option: • To navigate the track from the starting point used when the track was created, select Backward. 5 Review the course indicated by creating a route from the destination point used when the track was created, select Forward. • To navigate the track from ...
... Info > Tracks > Save Active Track. 2 Select an option: • Select the time the active track began . • Select Entire Log. 3 Review the course indicated by the colored line. 4 Follow the colored line, steering to them, you enter or exit a boundary. Tracks A track is called the... Follow Track. 4 Select an option: • To navigate the track from the starting point used when the track was created, select Backward. 5 Review the course indicated by creating a route from the destination point used when the track was created, select Forward. • To navigate the track from ...
