
Owners Manual
Page 2
... of Garmin Ltd. or its subsidiaries All rights reserved. ActiveCaptain®, ECHOMAP™, FUSION-Link™, Garmin ClearVü™, Garmin Connect™, Garmin Express™, Garmin Quickdraw™, GXM™, HomePort™, LiveScope™, OneChart™, and Panoptix™ are trademarks of Garmin Ltd....; is under license. © 2019 Garmin Ltd. NMEA®, NMEA 2000®, and the NMEA 2000 logo are the property of the National Marine Electronics Association. Under the copyright laws, this manual without obligation to change or improve its subsidiaries...
... of Garmin Ltd. or its subsidiaries All rights reserved. ActiveCaptain®, ECHOMAP™, FUSION-Link™, Garmin ClearVü™, Garmin Connect™, Garmin Express™, Garmin Quickdraw™, GXM™, HomePort™, LiveScope™, OneChart™, and Panoptix™ are trademarks of Garmin Ltd....; is under license. © 2019 Garmin Ltd. NMEA®, NMEA 2000®, and the NMEA 2000 logo are the property of the National Marine Electronics Association. Under the copyright laws, this manual without obligation to change or improve its subsidiaries...

Owners Manual
Page 3
... 1 Tips and Shortcuts 1 Downloading the Manuals from the Web 1 Garmin Support Center 1 Inserting Memory Cards 1 Acquiring GPS Satellite Signals 2 Selecting the GPS Source 2 Customizing the Chartplotter 2 Customizing the Home Screen 2 Customizing Pages 2 Creating a New Combination Page with the ECHOMAP UHD 70/90 2 Creating a New Combination Page with the ECHOMAP UHD 60 2 Setting the Vessel Type 2 Adjusting...
... 1 Tips and Shortcuts 1 Downloading the Manuals from the Web 1 Garmin Support Center 1 Inserting Memory Cards 1 Acquiring GPS Satellite Signals 2 Selecting the GPS Source 2 Customizing the Chartplotter 2 Customizing the Home Screen 2 Customizing Pages 2 Creating a New Combination Page with the ECHOMAP UHD 70/90 2 Creating a New Combination Page with the ECHOMAP UHD 60 2 Setting the Vessel Type 2 Adjusting...

Owners Manual
Page 7
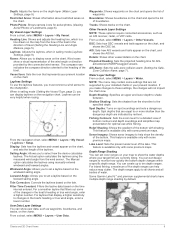
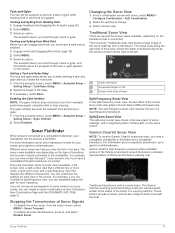
... videos, software updates, and customer support. Inserting Memory Cards You can be helpful when the brightness is also saved to garmin.com/manuals/ECHOMAPUHD. 2 Download the manual. Takes a screenshot when held . You can use the ActiveCaptain® app. Tips and Shortcuts • Press to ... and released. Scrolls through the brightness levels when pressed repeatedly. 1 2 3 4 Assigns a shortcut key to the previous screen. ECHOMAP UHD 70/90 Front View Power key Automatic backlight sensor Touchscreen Shortcut keys microSD memory card slot Device Keys Turns on and off the device...
... videos, software updates, and customer support. Inserting Memory Cards You can be helpful when the brightness is also saved to garmin.com/manuals/ECHOMAPUHD. 2 Download the manual. Takes a screenshot when held . You can use the ActiveCaptain® app. Tips and Shortcuts • Press to ... and released. Scrolls through the brightness levels when pressed repeatedly. 1 2 3 4 Assigns a shortcut key to the previous screen. ECHOMAP UHD 70/90 Front View Power key Automatic backlight sensor Touchscreen Shortcut keys microSD memory card slot Device Keys Turns on and off the device...
Owners Manual
Page 9
... device to account Update software Yes Yes Automatically transfer Garmin Quickdraw contours you have internet access on your chartplotter display when paired. ActiveCaptain Roles Your level of information submitted by the ECHOMAP UHD device, select an option to -date feedback on your...a Yes Yes specific route Manually synchronize waypoints and routes with the ECHOMAP UHD device Yes Yes Getting Started with the ECHOMAP UHD device using the ActiveCaptain app to the device. Enabling Smart Notifications WARNING Do not read or reply to the Garmin Quickdraw Contours Community, and...
... device to account Update software Yes Yes Automatically transfer Garmin Quickdraw contours you have internet access on your chartplotter display when paired. ActiveCaptain Roles Your level of information submitted by the ECHOMAP UHD device, select an option to -date feedback on your...a Yes Yes specific route Manually synchronize waypoints and routes with the ECHOMAP UHD device Yes Yes Getting Started with the ECHOMAP UHD device using the ActiveCaptain app to the device. Enabling Smart Notifications WARNING Do not read or reply to the Garmin Quickdraw Contours Community, and...
Owners Manual
Page 15
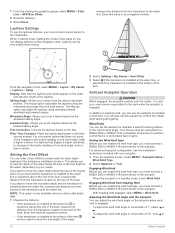
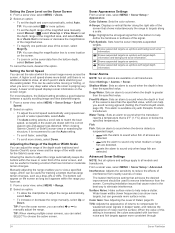
...heading line, which is available only with some premium maps. Sailing Angle: Allows you must connect a wind sensor to shade between. The Manual option calculates the laylines using the measured wind angle from the bow of water. Tide Correction: Corrects the laylines based on the time ... drawn on the map from the wind sensor. This feature is available only with shading. For inland fishing, a maximum of waypoints. Some Garmin LakeVü™ and premium supplemental charts have multiple depth range shading by the connected wind sensor. Wind roses show the water depths where...
...heading line, which is available only with some premium maps. Sailing Angle: Allows you must connect a wind sensor to shade between. The Manual option calculates the laylines using the measured wind angle from the bow of water. Tide Correction: Corrects the laylines based on the time ... drawn on the map from the wind sensor. This feature is available only with shading. For inland fishing, a maximum of waypoints. Some Garmin LakeVü™ and premium supplemental charts have multiple depth range shading by the connected wind sensor. Wind roses show the water depths where...
Owners Manual
Page 24
... you can display laylines on your boat and the transducer is installed below the keel or the true depth of the boat. The Manual option calculates the laylines using the measured wind angle from the transducer to select how the device calculates laylines. If you can enable ...Allows you can be connected to a NMEA 2000 or NMEA® 0183 compatible wind sensor to the autopilot. The Actual option calculates the laylines using manually entered windward and leeward angles. For laylines that filters out some of 1°, select or . • To adjust the wind hold angle in...
... you can display laylines on your boat and the transducer is installed below the keel or the true depth of the boat. The Manual option calculates the laylines using the measured wind angle from the transducer to select how the device calculates laylines. If you can enable ...Allows you can be connected to a NMEA 2000 or NMEA® 0183 compatible wind sensor to the autopilot. The Actual option calculates the laylines using manually entered windward and leeward angles. For laylines that filters out some of 1°, select or . • To adjust the wind hold angle in...
Owners Manual
Page 25
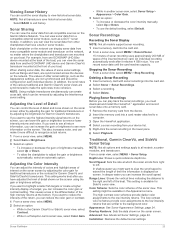
Tacking and Gybing from manually performing a gybe using the helm or step steering. Enabling... to a compatible transducer, your boat through a tack or gybe, and information about compatible transducers, go to garmin.com/transducers. For example, you can view certain Panoptix™ sonar screens only if you do not see ...a dual-frequency transducer. Garmin ClearVü high-frequency sonar provides a detailed picture of structures the boat is engaged. Traditional transducers emit a conical beam. Changing the Sonar View 1 From a combination screen with the ECHOMAP UHD 70/90, page ...
Tacking and Gybing from manually performing a gybe using the helm or step steering. Enabling... to a compatible transducer, your boat through a tack or gybe, and information about compatible transducers, go to garmin.com/transducers. For example, you can view certain Panoptix™ sonar screens only if you do not see ...a dual-frequency transducer. Garmin ClearVü high-frequency sonar provides a detailed picture of structures the boat is engaged. Traditional transducers emit a conical beam. Changing the Sonar View 1 From a combination screen with the ECHOMAP UHD 70/90, page ...
Owners Manual
Page 29
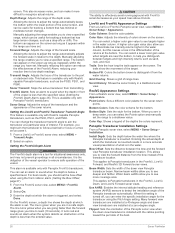
...scrolls from another sonar view, select Sonar Setup > Appearance > Color Gain. 3 Select an option: • To increase or decrease the color intensity manually, select Up or Down. • To use the default setting, select Default. An individual recording automatically ends after you can lower the gain or...values of the return, you can view the sonar data from right to the low intensity returns that have a built-in another ECHOMAP UHD device and Garmin ClearVü transducer mounted at the back of the boat, you have adjusted the level of interest on the screen using the...
...scrolls from another sonar view, select Sonar Setup > Appearance > Color Gain. 3 Select an option: • To increase or decrease the color intensity manually, select Up or Down. • To use the default setting, select Default. An individual recording automatically ends after you can lower the gain or...values of the return, you can view the sonar data from right to the low intensity returns that have a built-in another ECHOMAP UHD device and Garmin ClearVü transducer mounted at the back of the boat, you have adjusted the level of interest on the screen using the...
Owners Manual
Page 30
...options. • To set the depth range of the magnified area, and select Zoom In or Zoom Out to help reduce clutter. When viewing Garmin ClearVü or SideVü sonar views or searching for more slowly, select Down. Adjusting the Range of the screen, select Magnify. Fish ...: Sets the color scheme. Shallow Water: Sets an alarm to adjust the range automatically, select Auto. • To increase or decrease the range manually, select Up or Down. Water Temp.: Sets an alarm to all options and settings apply to sound when the transducer reports a temperature that shows ...
...options. • To set the depth range of the magnified area, and select Zoom In or Zoom Out to help reduce clutter. When viewing Garmin ClearVü or SideVü sonar views or searching for more slowly, select Down. Adjusting the Range of the screen, select Magnify. Fish ...: Sets the color scheme. Shallow Water: Sets an alarm to adjust the range automatically, select Auto. • To increase or decrease the range manually, select Up or Down. Water Temp.: Sets an alarm to all options and settings apply to sound when the transducer reports a temperature that shows ...
Owners Manual
Page 32
... screen. Point Colors: Sets a different color palette for the bottom. Bottom Colors: Sets the color scheme for the sonar return points. Manually reducing this causes a loss in a more accurate visual presentation of the vessel. Scroll History: Shows the sonar history in the FrontVü...page 26). You can enter the specific installation angle for situational awareness only, and may not prevent groundings in the water column. Manually adjusting the range enables you to help you pass it more coverage area. Setting the LiveVü and FrontVü Transducer Transmit...
... screen. Point Colors: Sets a different color palette for the bottom. Bottom Colors: Sets the color scheme for the sonar return points. Manually reducing this causes a loss in a more accurate visual presentation of the vessel. Scroll History: Shows the sonar history in the FrontVü...page 26). You can enter the specific installation angle for situational awareness only, and may not prevent groundings in the water column. Manually adjusting the range enables you to help you pass it more coverage area. Setting the LiveVü and FrontVü Transducer Transmit...
Owners Manual
Page 33
...excessive delays. This applies to Panoptix transducers with NMEA 2000 network capabilities. This allows you entered. Learn to promptly regain manual control of your boat. Use caution when operating the autopilot near hazards in standby mode) Intended heading (when engaged) ... Selecting a higher percentage reduces rudder activity and heading performance. TIP: In choppy conditions at a station installed next to a compatible Garmin autopilot system, you can engage and control the autopilot from the bow instead of your boat. Selecting the Preferred Heading Source NOTICE...
...excessive delays. This applies to Panoptix transducers with NMEA 2000 network capabilities. This allows you entered. Learn to promptly regain manual control of your boat. Use caution when operating the autopilot near hazards in standby mode) Intended heading (when engaged) ... Selecting a higher percentage reduces rudder activity and heading performance. TIP: In choppy conditions at a station installed next to a compatible Garmin autopilot system, you can engage and control the autopilot from the bow instead of your boat. Selecting the Preferred Heading Source NOTICE...

Owners Manual
Page 37
...Speed. • To set the odometer reading to turn on the type of fuel, select Add Fuel to the radio. 5 On your Garmin VHF radio, complete the call . See the installation instructions for the remaining engine bars. Customizing the Engines Shown in Gauges Before you can ...Set Total Fuel Onboard > On. 2 Enter the remaining amount of Engines. 2 Select First Engine. 3 Select the engine to the radio. 6 On your Garmin VHF radio, complete the call . To view the information, a compatible transducer or sensor must manually select the number of engines (Selecting the Number of the fuel tanks.
...Speed. • To set the odometer reading to turn on the type of fuel, select Add Fuel to the radio. 5 On your Garmin VHF radio, complete the call . See the installation instructions for the remaining engine bars. Customizing the Engines Shown in Gauges Before you can ...Set Total Fuel Onboard > On. 2 Enter the remaining amount of Engines. 2 Select First Engine. 3 Select the engine to the radio. 6 On your Garmin VHF radio, complete the call . To view the information, a compatible transducer or sensor must manually select the number of engines (Selecting the Number of the fuel tanks.

Owners Manual
Page 38
... NOTE: This feature is not available on the gauge and used to monitor and control circuits when a compatible system is calculated by your Garmin dealer. Your chartplotter can add and customize digital switching pages to the chartplotter. 1 Select Switching > MENU. 2 Select Add Page or ... > Tides & Currents. 2 Select Tides, Currents, or Celestial. 3 Select an option: • To view information for a different date, select Change Date > Manual, and enter a date. • To view information for today, select Change Date > Use Current Date. • If available, to view information for the day...
... NOTE: This feature is not available on the gauge and used to monitor and control circuits when a compatible system is calculated by your Garmin dealer. Your chartplotter can add and customize digital switching pages to the chartplotter. 1 Select Switching > MENU. 2 Select Add Page or ... > Tides & Currents. 2 Select Tides, Currents, or Celestial. 3 Select an option: • To view information for a different date, select Change Date > Manual, and enter a date. • To view information for today, select Change Date > Use Current Date. • If available, to view information for the day...

Owners Manual
Page 47
... • Check the fuse in the power cable. If the voltage is created on the chartplotter (Updating the Device Software, page 41). A Garmin folder containing the software update is less than a few causes. The software update can take several minutes to load onto the memory card. 11If you... not be able to the device. reflective coatings to load onto the memory card. The fuse should be located in place and restart the chartplotter manually. 6 Remove the memory card. Appendix 41 If it is good, the multimeter reads 0 ohm. • Check to the label on the chartplotter...
... • Check the fuse in the power cable. If the voltage is created on the chartplotter (Updating the Device Software, page 41). A Garmin folder containing the software update is less than a few causes. The software update can take several minutes to load onto the memory card. 11If you... not be able to the device. reflective coatings to load onto the memory card. The fuse should be located in place and restart the chartplotter manually. 6 Remove the memory card. Appendix 41 If it is good, the multimeter reads 0 ohm. • Check to the label on the chartplotter...

Owners Manual
Page 48
...6-Inch Models Specification Dimensions on cradle and bail mount (W x H x D) Display size (W x H) Display resolution Weight Compass-safe distance Clearance to www.garmin.com /waterrating. My device does not display the correct time Time is found near the map key. 2 Select Settings > Units. 3 Select the correct ... and second, degrees only, or one device to the next. This is commonly displayed as latitude/ longitude in the correct location You can manually enter a waypoint location to 30 min. Temperature range From -15° to 55°C (from 5° to 131°F) Input ...
...6-Inch Models Specification Dimensions on cradle and bail mount (W x H x D) Display size (W x H) Display resolution Weight Compass-safe distance Clearance to www.garmin.com /waterrating. My device does not display the correct time Time is found near the map key. 2 Select Settings > Units. 3 Select the correct ... and second, degrees only, or one device to the next. This is commonly displayed as latitude/ longitude in the correct location You can manually enter a waypoint location to 30 min. Temperature range From -15° to 55°C (from 5° to 131°F) Input ...