Getting Started Guide
Page 7
...Pick roller Sheet guide ■ Rear ADF release button Back cover LCD touch panel Keyboard Output tray ADF paper chute Back cover ATTENTION To remove the back cover of the scanner, press the tabs on the right and left tabs at its tabs into a power outlet. ⇒...to be removed from being damaged. Inside the back cover Security cable slot LAN connector AC adaptor connector 3 Chapter 2 fi-6010N Network Scanner Getting Started Setting up the Scanner 2.1 Space Requirements The following figure. Connect the AC cable to ensure a stable grip. ATTENTION Use only the AC ...
...Pick roller Sheet guide ■ Rear ADF release button Back cover LCD touch panel Keyboard Output tray ADF paper chute Back cover ATTENTION To remove the back cover of the scanner, press the tabs on the right and left tabs at its tabs into a power outlet. ⇒...to be removed from being damaged. Inside the back cover Security cable slot LAN connector AC adaptor connector 3 Chapter 2 fi-6010N Network Scanner Getting Started Setting up the Scanner 2.1 Space Requirements The following figure. Connect the AC cable to ensure a stable grip. ATTENTION Use only the AC ...
Getting Started Guide
Page 19
...the network interface or the download process does not start. Has the document been loaded correctly into the ADF paper chute? If the problem persists, contact your FUJITSU scanner dealer or an authorized FUJITSU scanner service provider. For more details, refer to the "Operator's Guide". ...'s Guide". For more details, refer to the "Operator's Guide". 27 fi-6010N Network Scanner Getting Started Problem Scanned data appears skewed or distorted. No response from the stack to the scanner? Are the SSL settings correct? Make sure that respects the limit. Select...
...the network interface or the download process does not start. Has the document been loaded correctly into the ADF paper chute? If the problem persists, contact your FUJITSU scanner dealer or an authorized FUJITSU scanner service provider. For more details, refer to the "Operator's Guide". ...'s Guide". For more details, refer to the "Operator's Guide". 27 fi-6010N Network Scanner Getting Started Problem Scanned data appears skewed or distorted. No response from the stack to the scanner? Are the SSL settings correct? Make sure that respects the limit. Select...
Operator's Guide
Page 38
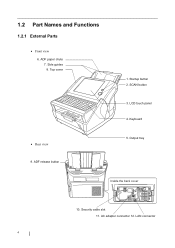
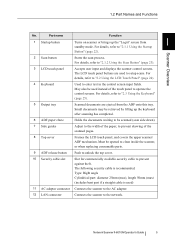
ADF paper chute 7. Keyboard 5. Output tray Inside the back cover 10. Side guides 8. AC adaptor connector 12. Startup button 2. LCD touch panel 4. LAN connector 4 ADF release button 1. SCAN button 3. Security cable slot 11. Top cover • Rear view 9. 1.2 Part Names and Functions 1.2.1 External Parts • Front view 6.
ADF paper chute 7. Keyboard 5. Output tray Inside the back cover 10. Side guides 8. AC adaptor connector 12. Startup button 2. LCD touch panel 4. LAN connector 4 ADF release button 1. SCAN button 3. Security cable slot 11. Top cover • Rear view 9. 1.2 Part Names and Functions 1.2.1 External Parts • Front view 6.
Operator's Guide
Page 39
... LCD touch panel Accepts user input and displays the scanner control screens. Part name Function 1 Startup button Turns on scanner or brings up the keyboard after scanning has completed. 6 ADF paper chute Holds the documents waiting to be retrieved by lifting up the "Login...5 Output tray Scanned documents are used ) 11 AC adaptor connector Connects the scanner to the AC adaptor. 12 LAN connector Connects the scanner to "2.1.1 Using the Startup Button" (page 22). Network Scanner fi-6010N Operator's Guide 5 For details, refer to the network. Scanner Overview 2 Scan button ...
... LCD touch panel Accepts user input and displays the scanner control screens. Part name Function 1 Startup button Turns on scanner or brings up the keyboard after scanning has completed. 6 ADF paper chute Holds the documents waiting to be retrieved by lifting up the "Login...5 Output tray Scanned documents are used ) 11 AC adaptor connector Connects the scanner to the AC adaptor. 12 LAN connector Connects the scanner to "2.1.1 Using the Startup Button" (page 22). Network Scanner fi-6010N Operator's Guide 5 For details, refer to the network. Scanner Overview 2 Scan button ...
Operator's Guide
Page 40
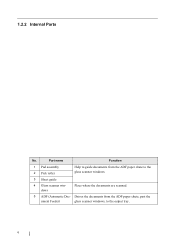
Drives the documents from the ADF paper chute to the output tray. 6 Part name Function 1 Pad assembly 2 Pick roller Help to guide documents from the ADF paper chute, past the ument Feeder) glass scanner windows, to the glass scanner windows. 3 Sheet guide 4 Glass scanner windows Place where the documents are scanned. 5 ADF (Automatic Doc- 1.2.2 Internal Parts No.
Drives the documents from the ADF paper chute to the output tray. 6 Part name Function 1 Pad assembly 2 Pick roller Help to guide documents from the ADF paper chute, past the ument Feeder) glass scanner windows, to the glass scanner windows. 3 Sheet guide 4 Glass scanner windows Place where the documents are scanned. 5 ADF (Automatic Doc- 1.2.2 Internal Parts No.
Operator's Guide
Page 56
...-startup varies according to the specified wait time for automatic logout in the following operations will startup the scanner from standby mode. • Loading the document in standby mode, be changed. To shutdown the scanner correctly, press the [Shutdown] button on again. If the startup button is specified for set period Standby LED... to ensure that the power is dis- The idle time before turning the power back on the "Login" screen. 22 If this will start the scanner up or in the ADF paper chute. • Closing the top cover. • Pressing a keyboard key.
...-startup varies according to the specified wait time for automatic logout in the following operations will startup the scanner from standby mode. • Loading the document in standby mode, be changed. To shutdown the scanner correctly, press the [Shutdown] button on again. If the startup button is specified for set period Standby LED... to ensure that the power is dis- The idle time before turning the power back on the "Login" screen. 22 If this will start the scanner up or in the ADF paper chute. • Closing the top cover. • Pressing a keyboard key.
Operator's Guide
Page 254
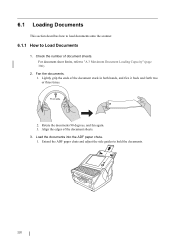
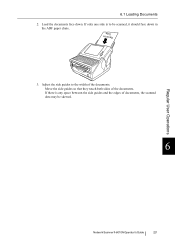
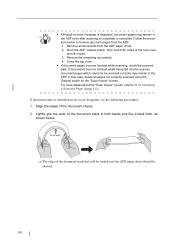
... ADF paper chute and adjust the side guides to Load Documents 1. Front side 2. Align the edges of the document stack in both hands, and flex it back and forth two or three times. Check the number of document sheets. Rotate the documents 90 degrees, and fan again. 3. 6.1 Loading Documents This section describes how to load documents onto the scanner...
... ADF paper chute and adjust the side guides to Load Documents 1. Front side 2. Align the edges of the document stack in both hands, and flex it back and forth two or three times. Check the number of document sheets. Rotate the documents 90 degrees, and fan again. 3. 6.1 Loading Documents This section describes how to load documents onto the scanner...
Operator's Guide
Page 255
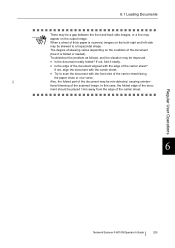
Load the documents face down in the ADF paper chute. 3. If there is to the width of the documents. Reverse Side 6.1 Loading Documents 2. Adjust the side guides to be skewed. 6 Regular User Operations Network Scanner fi-6010N Operator's Guide 221 Move the side guides so that they touch both sides of documents, the scanned data may be scanned, it should face down . If only one side is any space between the side guides and the edges of the documents.
Load the documents face down in the ADF paper chute. 3. If there is to the width of the documents. Reverse Side 6.1 Loading Documents 2. Adjust the side guides to be skewed. 6 Regular User Operations Network Scanner fi-6010N Operator's Guide 221 Move the side guides so that they touch both sides of documents, the scanned data may be scanned, it should face down . If only one side is any space between the side guides and the edges of the documents.
Operator's Guide
Page 259
... images on the both right and left side may be placed 1mm away from the edge of the carrier sheet facing the paper chute or vice verse. If not, align the document with the carrier sheet. • Try to a trapezoidal shape. In this case, the folded edge of the... document should be skewed to scan the document with the edge of thick paper is folded or loaded). The degree of skewing varies depending on the output image. Regular User Operations 6 Network Scanner fi-6010N Operator's Guide 225 Troubleshoot the problem as follows, and ...
... images on the both right and left side may be placed 1mm away from the edge of the carrier sheet facing the paper chute or vice verse. If not, align the document with the carrier sheet. • Try to a trapezoidal shape. In this case, the folded edge of the... document should be skewed to scan the document with the edge of thick paper is folded or loaded). The degree of skewing varies depending on the output image. Regular User Operations 6 Network Scanner fi-6010N Operator's Guide 225 Troubleshoot the problem as follows, and ...
Operator's Guide
Page 345
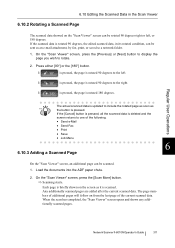
...[Next] button to display the page you wish to the right. Press either [90°] or the [180°] button. Load the documents into the ADF paper chute. 2. The page numbers of additional pages will follow on the "Scan Viewer" screen can be rotated 90 degrees right or left . If ... scanned data is updated to a network folder. 1. On the "Scan Viewer" screen, press the [Scan More] button. ⇒ Scanning starts. Network Scanner fi-6010N Operator's Guide 311 If is pressed, the page is pressed. If the scanned data is rotated 90 degrees, the edited scanned data, in the Scan...
...[Next] button to display the page you wish to the right. Press either [90°] or the [180°] button. Load the documents into the ADF paper chute. 2. The page numbers of additional pages will follow on the "Scan Viewer" screen can be rotated 90 degrees right or left . If ... scanned data is updated to a network folder. 1. On the "Scan Viewer" screen, press the [Scan More] button. ⇒ Scanning starts. Network Scanner fi-6010N Operator's Guide 311 If is pressed, the page is pressed. If the scanned data is rotated 90 degrees, the edited scanned data, in the Scan...
Operator's Guide
Page 369
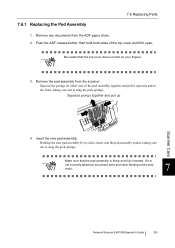
...If it is firmly and fully inserted. ATTENTION Be careful that the pad assembly is not correctly attached, document jams and other feeding errors may occur. 7 Network Scanner fi-6010N Operator's Guide 335 Holding the new pad assembly by its sides, insert into the pad assembly socket, taking... to the front, taking care not to snag the pick springs. Remove the pad assembly from the ADF paper chute. 2. 7.6.1 Replacing the Pad Assembly 7.6 Replacing Parts 1. Remove any documents from the scanner. Squeeze the prongs on your fingers. 3. Insert the new pad assembly.
...If it is firmly and fully inserted. ATTENTION Be careful that the pad assembly is not correctly attached, document jams and other feeding errors may occur. 7 Network Scanner fi-6010N Operator's Guide 335 Holding the new pad assembly by its sides, insert into the pad assembly socket, taking... to the front, taking care not to snag the pick springs. Remove the pad assembly from the ADF paper chute. 2. 7.6.1 Replacing the Pad Assembly 7.6 Replacing Parts 1. Remove any documents from the scanner. Squeeze the prongs on your fingers. 3. Insert the new pad assembly.
Operator's Guide
Page 370
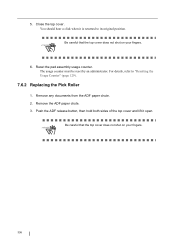
Remove the ADF paper chute. 3. Push the ADF release button, then hold both sides of the top cover and lift it is returned to "Resetting the Usage Counter" (page 129). 7.6.2 ... top cover does not shut on your fingers. 6. 5. ATTENTION Be careful that the top cover does not shut on your fingers. 336 Remove any documents from the ADF paper chute. 2. Close the top cover. Reset the pad assembly usage counter. The usage counter must be reset by an administrator. You should hear a click...
Remove the ADF paper chute. 3. Push the ADF release button, then hold both sides of the top cover and lift it is returned to "Resetting the Usage Counter" (page 129). 7.6.2 ... top cover does not shut on your fingers. 6. 5. ATTENTION Be careful that the top cover does not shut on your fingers. 336 Remove any documents from the ADF paper chute. 2. Close the top cover. Reset the pad assembly usage counter. The usage counter must be reset by an administrator. You should hear a click...
Operator's Guide
Page 373
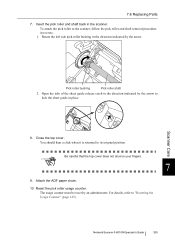
... the Usage Counter" (page 129). The usage counter must be reset by the arrow. Pick roller bushing Pick roller shaft 2. Network Scanner fi-6010N Operator's Guide 339 To attach the pick roller to lock the sheet guide in the direction indicated by an administrator. Open the tabs of... the sheet guide release catch in the direction indicated by the arrow to the scanner, follow the pick roller and shaft removal procedure in the scanner. Attach the ADF paper chute. 10. 7.6 Replacing Parts 7. Insert the pick roller and shaft back in reverse. 1. ATTENTION Be...
... the Usage Counter" (page 129). The usage counter must be reset by the arrow. Pick roller bushing Pick roller shaft 2. Network Scanner fi-6010N Operator's Guide 339 To attach the pick roller to lock the sheet guide in the direction indicated by an administrator. Open the tabs of... the sheet guide release catch in the direction indicated by the arrow to the scanner, follow the pick roller and shaft removal procedure in the scanner. Attach the ADF paper chute. 10. 7.6 Replacing Parts 7. Insert the pick roller and shaft back in reverse. 1. ATTENTION Be...
Operator's Guide
Page 377
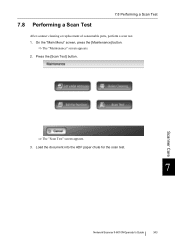
7.8 Performing a Scan Test 7.8 Performing a Scan Test After scanner cleaning or replacement of consumable parts, perform a scan test. 1. Press the [Scan Test] button. On the "Main Menu" screen, press the [Maintenance] button. ⇒ The "Maintenance" screen appears. 2. Load the document into the ADF paper chute for the scan test. 7 Network Scanner fi-6010N Operator's Guide 343 Scanner Care ⇒ The "Scan Test" screen appears. 3.
7.8 Performing a Scan Test 7.8 Performing a Scan Test After scanner cleaning or replacement of consumable parts, perform a scan test. 1. Press the [Scan Test] button. On the "Main Menu" screen, press the [Maintenance] button. ⇒ The "Maintenance" screen appears. 2. Load the document into the ADF paper chute for the scan test. 7 Network Scanner fi-6010N Operator's Guide 343 Scanner Care ⇒ The "Scan Test" screen appears. 3.
Operator's Guide
Page 382
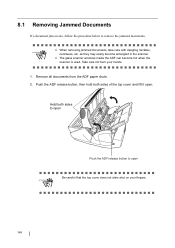
...entangled in the scanner. • The glass scanner windows inside the ADF can become hot when the scanner is used. Push the ADF release button, then hold both sides to open Push the ADF release button to remove the jammed documents. 8.1 Removing Jammed Documents If a document jam occurs, ...follow the procedure below to open ATTENTION Be careful that the top cover does not slam shut on your hands. 1. Remove all documents from the ADF paper chute. 2. Hold both sides of the top...
...entangled in the scanner. • The glass scanner windows inside the ADF can become hot when the scanner is used. Push the ADF release button, then hold both sides to open Push the ADF release button to remove the jammed documents. 8.1 Removing Jammed Documents If a document jam occurs, ...follow the procedure below to open ATTENTION Be careful that the top cover does not slam shut on your hands. 1. Remove all documents from the ADF paper chute. 2. Hold both sides of the top...
Operator's Guide
Page 384
...try the following procedures. 1. Lightly grip the ends of the document stack in the ADF. Follow the procedure below . Close the top cover. • If document pages become blocked whilst being fed into the ADF paper chute should be scanned correctly may remain in HINT the ADF even ... or cancelled. Front side ⇒ The edge of the document sheets. 2. Align the edges of the document stack that will be loaded into the scanner, document pages which could not be skewed. 350 In this case, delete all documents from the ADF. 1. Remove all pages not correctly scanned using...
...try the following procedures. 1. Lightly grip the ends of the document stack in the ADF. Follow the procedure below . Close the top cover. • If document pages become blocked whilst being fed into the ADF paper chute should be scanned correctly may remain in HINT the ADF even ... or cancelled. Front side ⇒ The edge of the document sheets. 2. Align the edges of the document stack that will be loaded into the scanner, document pages which could not be skewed. 350 In this case, delete all documents from the ADF. 1. Remove all pages not correctly scanned using...
Operator's Guide
Page 385
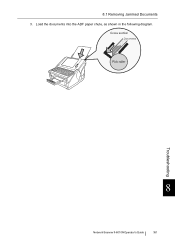
Cross section Documents Pick roller Troubleshooting 8 Network Scanner fi-6010N Operator's Guide 351 8.1 Removing Jammed Documents 3. Load the documents into the ADF paper chute, as shown in the following diagram.
Cross section Documents Pick roller Troubleshooting 8 Network Scanner fi-6010N Operator's Guide 351 8.1 Removing Jammed Documents 3. Load the documents into the ADF paper chute, as shown in the following diagram.
Operator's Guide
Page 400
...FUJITSU scanner service provider. The Scan button can only be turned on the following list of common problems. If the problem still cannot be solved after consulting the troubleshooting suggestions, check the points in ? Are the AC cable and AC adapter properly connected to deal with them. Reload the documents into the ADF paper chute...? Has the document been loaded correctly into the ADF paper chute. Close the top cover completely. Connect the AC cable and the AC adapter. Problem Scanner cannot be used on ....
...FUJITSU scanner service provider. The Scan button can only be turned on the following list of common problems. If the problem still cannot be solved after consulting the troubleshooting suggestions, check the points in ? Are the AC cable and AC adapter properly connected to deal with them. Reload the documents into the ADF paper chute...? Has the document been loaded correctly into the ADF paper chute. Close the top cover completely. Connect the AC cable and the AC adapter. Problem Scanner cannot be used on ....
Operator's Guide
Page 401
... elongated. Has the document been loaded correctly into the scanner. (Pick errors are frequent or document feed stops midway) Do the documents satisfy the conditions given in "A.2 Paper Requirements" (page 377). Remove sheets from the stack to reduce it back into the ADF paper chute. Clean the pad ..., refer to "7.2 Cleaning the ADF" (page 324). Scanned data Has the document been loaded cor- Quality of scanned Are the glass scanner windows dirty? Is the document stack more details on the scanned data. For more than 5mm thick? Network Scanner fi-6010N Operator's Guide 367
... elongated. Has the document been loaded correctly into the scanner. (Pick errors are frequent or document feed stops midway) Do the documents satisfy the conditions given in "A.2 Paper Requirements" (page 377). Remove sheets from the stack to reduce it back into the ADF paper chute. Clean the pad ..., refer to "7.2 Cleaning the ADF" (page 324). Scanned data Has the document been loaded cor- Quality of scanned Are the glass scanner windows dirty? Is the document stack more details on the scanned data. For more than 5mm thick? Network Scanner fi-6010N Operator's Guide 367
Operator's Guide
Page 413
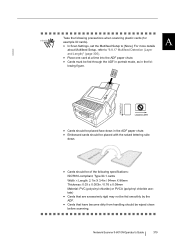
A siBdaeck PORTRAIT LANDSCAPE • Cards should be placed face down in the ADF paper chute. • Embossed cards should be placed with the raised lettering side down. • Cards ...Multifeed Setup to "6.8.17 Multifeed Detection (Layer and Length)" (page 305). • Place one card at a time into the ADF paper chute. • Cards must be wiped clean before scanning. lowing figure. For more details about Multifeed Setup, refer to [None]. ATTENTION ...from handling should be fed through the ADF in portrait mode, as in the fol- Network Scanner fi-6010N Operator's Guide 379
A siBdaeck PORTRAIT LANDSCAPE • Cards should be placed face down in the ADF paper chute. • Embossed cards should be placed with the raised lettering side down. • Cards ...Multifeed Setup to "6.8.17 Multifeed Detection (Layer and Length)" (page 305). • Place one card at a time into the ADF paper chute. • Cards must be wiped clean before scanning. lowing figure. For more details about Multifeed Setup, refer to [None]. ATTENTION ...from handling should be fed through the ADF in portrait mode, as in the fol- Network Scanner fi-6010N Operator's Guide 379


