Use and Care Manual
Page 1
RaGnasge ES530 Control, Self-Cleaning Oven with Bake-n-Warm™ Double Oven Visit the Frigidaire Web Site at: http://www.frigidaire.com Welcome 2 Important Safety Instructions .....2-4 Features at a Glance 5 Before Setting Oven Controls ....... 6 Setting Surface Controls 7 Control Pad Features 8 Setting Oven Controls...-28 Adjusting Oven Temperature....... 29 Questions or for Service Call: 1-800-944-9044 (U.S.) 1-800-668-4606 (Canada) Care & Cleaning 30-32 Before You Call Solutions to Common Problems 33 Warranty Back Page READ AND SAVE THESE INSTRUCTIONS p/n 316417173 (0807)
RaGnasge ES530 Control, Self-Cleaning Oven with Bake-n-Warm™ Double Oven Visit the Frigidaire Web Site at: http://www.frigidaire.com Welcome 2 Important Safety Instructions .....2-4 Features at a Glance 5 Before Setting Oven Controls ....... 6 Setting Surface Controls 7 Control Pad Features 8 Setting Oven Controls...-28 Adjusting Oven Temperature....... 29 Questions or for Service Call: 1-800-944-9044 (U.S.) 1-800-668-4606 (Canada) Care & Cleaning 30-32 Before You Call Solutions to Common Problems 33 Warranty Back Page READ AND SAVE THESE INSTRUCTIONS p/n 316417173 (0807)
Use and Care Manual
Page 5
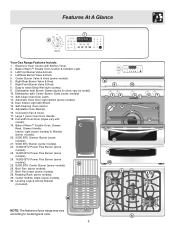
... & colors vary by model). 10. Large 1 piece Oven Door Handle. 18. Leveling Legs & Anti-tip Bracket (included). 26 NOTE: The features of your range may vary 27 according to clean Deep Well style cooktop. 9. Left Front Burner Valve & Knob. 4. Right Front Burner Valve & Knob. 8. Convection Fan & Cover...Oven Interior Light with Shield. 14. Easy to model type & color. 5 8 9 10 34 12 5 11 6 7 13 14 16 15 17 18 19 30 9 10 21 22 25 21 8 23 20 21 21 23 22 24 8 Features At A Glance 1 2 Your Gas Range Features Include: 1. Right Rear Burner Valve & Knob. 7.
... & colors vary by model). 10. Large 1 piece Oven Door Handle. 18. Leveling Legs & Anti-tip Bracket (included). 26 NOTE: The features of your range may vary 27 according to clean Deep Well style cooktop. 9. Left Front Burner Valve & Knob. 4. Right Front Burner Valve & Knob. 8. Convection Fan & Cover...Oven Interior Light with Shield. 14. Easy to model type & color. 5 8 9 10 34 12 5 11 6 7 13 14 16 15 17 18 19 30 9 10 21 22 25 21 8 23 20 21 21 23 22 24 8 Features At A Glance 1 2 Your Gas Range Features Include: 1. Right Rear Burner Valve & Knob. 7.
Use and Care Manual
Page 9
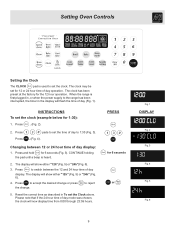
..., the clock will flash the time of day operation. Press to reject 5. Press to set for 1:30): 1. PRESS for the 12 hour operation. When the range is first plugged in, or when the power supply to 1:30 (Fig. 3). . (Fig. 4). The display will show either "12h"(Fig. 5) or "24h"(Fig. 6). 3. ...INSTRUCTIONS To set the Clock above. The clock may be set the time of day to the range has been interrupted, the timer in To set the ...
..., the clock will flash the time of day operation. Press to reject 5. Press to set for 1:30): 1. PRESS for the 12 hour operation. When the range is first plugged in, or when the power supply to 1:30 (Fig. 3). . (Fig. 4). The display will show either "12h"(Fig. 5) or "24h"(Fig. 6). 3. ...INSTRUCTIONS To set the Clock above. The clock may be set the time of day to the range has been interrupted, the timer in To set the ...
Use and Care Manual
Page 14
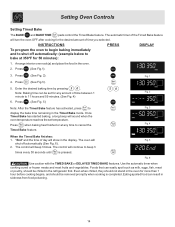
..., a long beep will Fig. 5 shut off automatically: (example below to bake at any amount of the Timed Bake feature will continue to beep 3 times every 30 seconds until is completed. When the Timed Bake finishes: 1. The oven will sound when the oven temperature reaches the set for 50 minutes): 1. Arrange interior...
..., a long beep will Fig. 5 shut off automatically: (example below to bake at any amount of the Timed Bake feature will continue to beep 3 times every 30 seconds until is completed. When the Timed Bake finishes: 1. The oven will sound when the oven temperature reaches the set for 50 minutes): 1. Arrange interior...
Use and Care Manual
Page 15
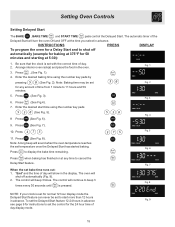
...rack(s) and place the food in the display. Press . (See Fig. 3). "End" and the time of day will continue to beep 3 times every 30 seconds until is set the Delayed Start feature 12-24 hours in advance. Fig. 7 Fig. 8 NOTE: If your clock is set for normal 12 hour... DISPLAY To program the oven for instructions to display the bake time remaining. Press (See Fig.4). 7. Press 10. Press when baking has finished or at 5:30): 1. Press . (See Fig. 1). 4. Setting Oven Controls Setting Delayed Start The BAKE , BAKE TIME and START TIME pads control the Delayed Start. The ...
...rack(s) and place the food in the display. Press . (See Fig. 3). "End" and the time of day will continue to beep 3 times every 30 seconds until is set the Delayed Start feature 12-24 hours in advance. Fig. 7 Fig. 8 NOTE: If your clock is set for normal 12 hour... DISPLAY To program the oven for instructions to display the bake time remaining. Press (See Fig.4). 7. Press 10. Press when baking has finished or at 5:30): 1. Press . (See Fig. 1). 4. Setting Oven Controls Setting Delayed Start The BAKE , BAKE TIME and START TIME pads control the Delayed Start. The ...
Use and Care Manual
Page 17
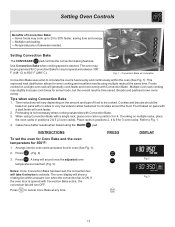
... food to be cooked. Time reductions will vary depending on the amount and type of Convection Bake: -Some foods may cook up to 25 to 30% faster, saving time and energy. -Multiple rack baking. -No special pans or bakeware needed. Place racks in position 3 or 4. Convection Bake air circulation Convection Bake...
... food to be cooked. Time reductions will vary depending on the amount and type of Convection Bake: -Some foods may cook up to 25 to 30% faster, saving time and energy. -Multiple rack baking. -No special pans or bakeware needed. Place racks in position 3 or 4. Convection Bake air circulation Convection Bake...
Use and Care Manual
Page 19
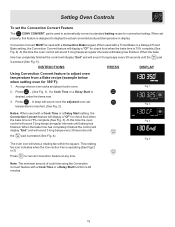
...the adjusted oven set properly, this feature is reached. (See Fig. 2). At this time the oven control will sound 3 long beeps every 30 seconds until baking has finished. If a Cook Time or a Delay Start is pressed (See Fig. 5). When the bake time has completely ...cook time using the Convection Convert feature with a Cook Time or a Delay Start setting, the Convection Convert feature will sound 3 long beeps every 30 seconds until baking has finished. When set Fig. 2 temperature is designed to automatically convert a standard baking recipe for 350°F): 1. When ...
...the adjusted oven set properly, this feature is reached. (See Fig. 2). At this time the oven control will sound 3 long beeps every 30 seconds until baking has finished. If a Cook Time or a Delay Start is pressed (See Fig. 5). When the bake time has completely ...cook time using the Convection Convert feature with a Cook Time or a Delay Start setting, the Convection Convert feature will sound 3 long beeps every 30 seconds until baking has finished. When set Fig. 2 temperature is designed to automatically convert a standard baking recipe for 350°F): 1. When ...
Use and Care Manual
Page 29
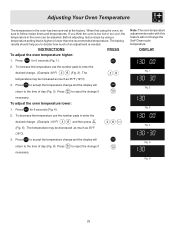
... than the recommended temperature. INSTRUCTIONS PRESS To adjust the oven temperature higher: 1. Press to accept the temperature change and the display will not change . (Example -30°F) and then press (Fig. 5). To decrease the temperature use the number pads to reject the change . (Example...
... than the recommended temperature. INSTRUCTIONS PRESS To adjust the oven temperature higher: 1. Press to accept the temperature change and the display will not change . (Example -30°F) and then press (Fig. 5). To decrease the temperature use the number pads to reject the change . (Example...
Use and Care Manual
Page 30
... vents. If soils are cleaned up immediately. DO NOT immerse the door in the dishwasher and dry upon removal. Your range finish is essential for 30 to the appliance. Care & Cleaning (Cleaning Table) Surfaces Glass, Painted Plastic Body Parts & Control Knobs Painted Control Panels...thoroughly clean the top, sides & front of cleaners containing any other liquid cleaners, abrasive cleaners, scouring pads, or some models) Gas Cooktop and Surface Burners Use soap & water to use ANY store bought cleaners like Stainless Steel cleaners or any abrasive, chlorides, chlorines...
... vents. If soils are cleaned up immediately. DO NOT immerse the door in the dishwasher and dry upon removal. Your range finish is essential for 30 to the appliance. Care & Cleaning (Cleaning Table) Surfaces Glass, Painted Plastic Body Parts & Control Knobs Painted Control Panels...thoroughly clean the top, sides & front of cleaners containing any other liquid cleaners, abrasive cleaners, scouring pads, or some models) Gas Cooktop and Surface Burners Use soap & water to use ANY store bought cleaners like Stainless Steel cleaners or any abrasive, chlorides, chlorines...


