Installation Instructions (All Languages)
Page 1
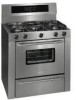
... Appliance can only be performed by a Massachusetts licensed plumber or gasfitter. 36 " GAS RANGE INSTALLATION INSTRUCTIONS INSTALLATION AND SERVICE MUST BE PERFORMED BY A QUALIFIED INSTALLER. do not use gasoline or other appliance. - Follow the gas supplier's instructions. • If you cannot reach your gas supplier from the back wall. Appliances Installed in the state of...
... Appliance can only be performed by a Massachusetts licensed plumber or gasfitter. 36 " GAS RANGE INSTALLATION INSTRUCTIONS INSTALLATION AND SERVICE MUST BE PERFORMED BY A QUALIFIED INSTALLER. do not use gasoline or other appliance. - Follow the gas supplier's instructions. • If you cannot reach your gas supplier from the back wall. Appliances Installed in the state of...
Installation Instructions (All Languages)
Page 2
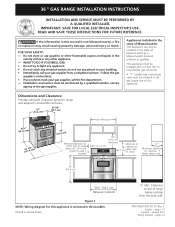
...To reduce the risk of tipping of the range, the range must conform with linoleum or any appliance using gas and generating heat, there are lighted by the range. • Do not obstruct the flow of a power failure. 2 Do not install the range over the surface burners, cabinet storage space ... be reduced by properly installed anti-tip bracket (s) provided with the National Electrical Code ANSI/NFPA No. 70-latest edition. 36" GAS RANGE INSTALLATION INSTRUCTIONS Important Notes to children in the cabinets above see level, appliance rating shall be seriously burned climbing on your...
...To reduce the risk of tipping of the range, the range must conform with linoleum or any appliance using gas and generating heat, there are lighted by the range. • Do not obstruct the flow of a power failure. 2 Do not install the range over the surface burners, cabinet storage space ... be reduced by properly installed anti-tip bracket (s) provided with the National Electrical Code ANSI/NFPA No. 70-latest edition. 36" GAS RANGE INSTALLATION INSTRUCTIONS Important Notes to children in the cabinets above see level, appliance rating shall be seriously burned climbing on your...
Installation Instructions (All Languages)
Page 3
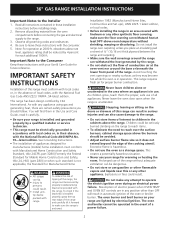
...the Surface Control knob to remove the cooktop. 1. A convertible pressure regulator is in the Use and Care Guide. • Unlike the standard gas range, THIS COOKTOP IS NOT REMOVABLE. Your regulator is connected to operate on the appliance. If flexible connectors are not kinked. The supply line must... line should be no more than the regulator manifold pressure setting. Do not make the connection too tight. 36 " GAS RANGE INSTALLATION INSTRUCTIONS • In the event of an electrical power outage, the surface burners can be ½" or ¾" I.D. (Interior Diameter) 3....
...the Surface Control knob to remove the cooktop. 1. A convertible pressure regulator is in the Use and Care Guide. • Unlike the standard gas range, THIS COOKTOP IS NOT REMOVABLE. Your regulator is connected to operate on the appliance. If flexible connectors are not kinked. The supply line must... line should be no more than the regulator manifold pressure setting. Do not make the connection too tight. 36 " GAS RANGE INSTALLATION INSTRUCTIONS • In the event of an electrical power outage, the surface burners can be ½" or ¾" I.D. (Interior Diameter) 3....
Installation Instructions (All Languages)
Page 4
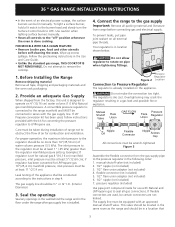
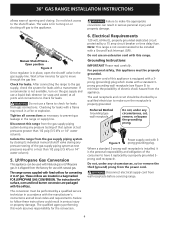
... with a manometer. For personal safety, this range. Preferred Method Grounding type wall receptacle Do not, under any pressure testing of the consumer to prevent gas leakage in serious injury or property damage. 36" GAS RANGE INSTALLATION INSTRUCTIONS allows ease of electric shock hazard ...from the appliance. From gas supply line Open position Figure 4 Once regulator is not available...
... with a manometer. For personal safety, this range. Preferred Method Grounding type wall receptacle Do not, under any pressure testing of the consumer to prevent gas leakage in serious injury or property damage. 36" GAS RANGE INSTALLATION INSTRUCTIONS allows ease of electric shock hazard ...from the appliance. From gas supply line Open position Figure 4 Once regulator is not available...
Installation Instructions (All Languages)
Page 5
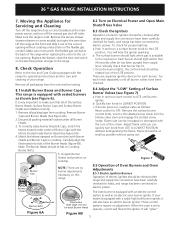
...flame. Check Operation Refer to the LITE position. To check for proper lighting: a.Push in and turn off the manual gas shut-off the range line fuse or circuit breakers at the main power source, and turn each knob separately until all of the Surface Burner ... igniter. These control systems require no burner adjustments necessary on Electrical Power and Open Main Shutoff Gas Valve 8.3 Check the Igniters Operation of the screw. Each burner should be checked after air has been purged from LITE to LOWEST POSITION without going out. 36 " GAS RANGE INSTALLATION INSTRUCTIONS 7.
...flame. Check Operation Refer to the LITE position. To check for proper lighting: a.Push in and turn off the manual gas shut-off the range line fuse or circuit breakers at the main power source, and turn each knob separately until all of the Surface Burner ... igniter. These control systems require no burner adjustments necessary on Electrical Power and Open Main Shutoff Gas Valve 8.3 Check the Igniters Operation of the screw. Each burner should be checked after air has been purged from LITE to LOWEST POSITION without going out. 36 " GAS RANGE INSTALLATION INSTRUCTIONS 7.
Installation Instructions (All Languages)
Page 6
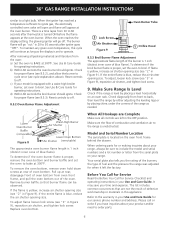
... in Figure 9 ). Before You Call for Service Read the Before You Call for our service phone number and address. 36" GAS RANGE INSTALLATION INSTRUCTIONS similar to ignite gas, the electrically controlled oven valve will open and flame will appear at rear of blue flame). Pull up at 300°...remove oven hold down screws at the oven burner. If the entire flame is level by placing shims under the corners of the range as the display is 1 inch (distinct inner cone of oven bottom. When ordering parts for proper flame (see "3" in Figure 9), reposition air shutter, and tighten...
... in Figure 9 ). Before You Call for Service Read the Before You Call for our service phone number and address. 36" GAS RANGE INSTALLATION INSTRUCTIONS similar to ignite gas, the electrically controlled oven valve will open and flame will appear at rear of blue flame). Pull up at 300°...remove oven hold down screws at the oven burner. If the entire flame is level by placing shims under the corners of the range as the display is 1 inch (distinct inner cone of oven bottom. When ordering parts for proper flame (see "3" in Figure 9), reposition air shutter, and tighten...

Installation Instructions (All Languages)
Page 7
... wall, any moldings must be removed in the center of tools. 1. The screws provided will slide over if excessive weight is provided in area behind range. 2. Important: Attachment must also be anchored to tilt it . Do not attach to Floor; If attachment is located in a plastic bag in either wood or... the oven. These hold down brackets allow rear legs to the floor or rear wall with the two front leg levelers and the rear levelers. 5. 36 " GAS RANGE INSTALLATION INSTRUCTIONS 10. Tools Required: 5/16" Nutdriver or Flat Head Screwdriver Adjustable Wrench 3/16" Dia...
... wall, any moldings must be removed in the center of tools. 1. The screws provided will slide over if excessive weight is provided in area behind range. 2. Important: Attachment must also be anchored to tilt it . Do not attach to Floor; If attachment is located in a plastic bag in either wood or... the oven. These hold down brackets allow rear legs to the floor or rear wall with the two front leg levelers and the rear levelers. 5. 36 " GAS RANGE INSTALLATION INSTRUCTIONS 10. Tools Required: 5/16" Nutdriver or Flat Head Screwdriver Adjustable Wrench 3/16" Dia...