
Use and Care Manual
Page 2
... possible condition and situation that may not have all the described features. The graphics shown are very proud of a new range! Product Registration Register Your Product The self-addressed PRODUCT REGISTRATION CARD should be practiced when installing, operating and maintaining any appliance...& Care Manual contains general operating instructions for future reference. We hope you 'll enjoy your new range and Thank You for several models. Congratulations on your range only as instructed in completely, signed and returned to providing you with the best service possible. Your...
... possible condition and situation that may not have all the described features. The graphics shown are very proud of a new range! Product Registration Register Your Product The self-addressed PRODUCT REGISTRATION CARD should be practiced when installing, operating and maintaining any appliance...& Care Manual contains general operating instructions for future reference. We hope you 'll enjoy your new range and Thank You for several models. Congratulations on your range only as instructed in completely, signed and returned to providing you with the best service possible. Your...

Use and Care Manual
Page 3
... Once the power resumes, reset the range. Never Use Your Appliance for storage. Fat or grease may cause container to operate the range during other part of Stepping, leaning or sitting on Grease Fires-Smother the fire with the National Electrical Code ANSI/ NFPA No. 70 latest... edition and local electrical code requirements. This symbol will begin to children in ...
... Once the power resumes, reset the range. Never Use Your Appliance for storage. Fat or grease may cause container to operate the range during other part of Stepping, leaning or sitting on Grease Fires-Smother the fire with the National Electrical Code ANSI/ NFPA No. 70 latest... edition and local electrical code requirements. This symbol will begin to children in ...

Use and Care Manual
Page 4
...the self-cleaning cycle of grease that has boiled dry may ignite, or a pan that could catch fire. Remove all parts free of any range. Move birds to cover the surface unit heating element. Be aware that excess residue from the rack before removing the pan. • Use ...the broiler insert with aluminum foil. Before self cleaning the oven, remove the broiler pan and any utensils or foods from the high heat of electric shock. Care should not be used to wipe spills on the unit before you remove or replace food in temperature. Contact a qualified technician ...
...the self-cleaning cycle of grease that has boiled dry may ignite, or a pan that could catch fire. Remove all parts free of any range. Move birds to cover the surface unit heating element. Be aware that excess residue from the rack before removing the pan. • Use ...the broiler insert with aluminum foil. Before self cleaning the oven, remove the broiler pan and any utensils or foods from the high heat of electric shock. Care should not be used to wipe spills on the unit before you remove or replace food in temperature. Contact a qualified technician ...
Use and Care Manual
Page 5
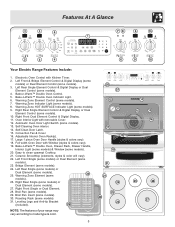
...Light (some models) & Window (some models). 4. Ceramic Smoothtop (elements, styles & color will vary). 22. Broil Pan (some models). 30. Broil Pan Insert (some models). 29. Oven Interior Light with Window (styles & colors vary). 19. Automatic Oven Door Light Switch (some... models). 25. Full width Oven Door with removable Cover. 12. Features At A Glance 2 3 5 78 9 10 1 2 3 4 6 Your Electric Range Features Include: 1. Bake-n-Warm™ Double Oven Indicator Light. 6. Left Rear Single (some models) or Dual Element (some models). 31. Electronic Oven Control...
...Light (some models) & Window (some models). 4. Ceramic Smoothtop (elements, styles & color will vary). 22. Broil Pan (some models). 30. Broil Pan Insert (some models). 29. Oven Interior Light with Window (styles & colors vary). 19. Automatic Oven Door Light Switch (some... models). 25. Full width Oven Door with removable Cover. 12. Features At A Glance 2 3 5 78 9 10 1 2 3 4 6 Your Electric Range Features Include: 1. Bake-n-Warm™ Double Oven Indicator Light. 6. Left Rear Single (some models) or Dual Element (some models). 31. Electronic Oven Control...
Use and Care Manual
Page 6
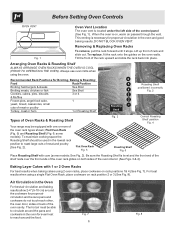
... of meat or poultry Turkey, roast or ham 1 or Roasting Shelf 6 5 4 3 2 Roasting 1 Shelf Roasting Shelf positioned incorrectly Fig. 3 Types of Oven Racks & Roasting Shelf Your range may be used in the oven for even heat to roast large cuts of the oven rack types shown; The hot air must be able...
... of meat or poultry Turkey, roast or ham 1 or Roasting Shelf 6 5 4 3 2 Roasting 1 Shelf Roasting Shelf positioned incorrectly Fig. 3 Types of Oven Racks & Roasting Shelf Your range may be used in the oven for even heat to roast large cuts of the oven rack types shown; The hot air must be able...

Use and Care Manual
Page 7
... the element several minutes before cooking is equipped with radiant surface burners with the cooktop). 7 This helps to prevent damage to the ceramic cooktop. Your range is complete.
... the element several minutes before cooking is equipped with radiant surface burners with the cooktop). 7 This helps to prevent damage to the ceramic cooktop. Your range is complete.
Use and Care Manual
Page 8
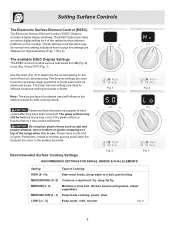
... SINGLE, BRIDGE & DUAL ELEMENTS Fig. 4 Setting Type of the radiant surface element positions on top of food you are ideal for the kind of the range when it has cooled sufficiently. The available ESEC Display Settings The ESEC control provides various heat levels from Hi (Fig. 2) to have cooled after they...
... SINGLE, BRIDGE & DUAL ELEMENTS Fig. 4 Setting Type of the radiant surface element positions on top of food you are ideal for the kind of the range when it has cooled sufficiently. The available ESEC Display Settings The ESEC control provides various heat levels from Hi (Fig. 2) to have cooled after they...
Use and Care Manual
Page 15
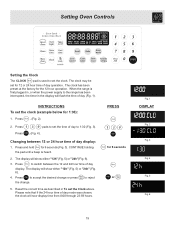
...30): 1. Please note that if the 24 hour time of day mode was chosen, the clock will flash the time of day (Fig. 1). INSTRUCTIONS To set the clock (example below for the 12 hour operation. CONTINUE holding the pad until a beep is used to the range... change. Press . (Fig. 2). 2. Press Press pads to set the Clock above. Press to 1:30 (Fig. 3). . (Fig. 4). Changing between the 12 and 24 hour time of day operation. ...2. Press and hold for 12 or 24 hour time of day display. When the range is first plugged in To set the time of day display: 1. PRESS for 6 seconds or Fig....
...30): 1. Please note that if the 24 hour time of day mode was chosen, the clock will flash the time of day (Fig. 1). INSTRUCTIONS To set the clock (example below for the 12 hour operation. CONTINUE holding the pad until a beep is used to the range... change. Press . (Fig. 2). 2. Press Press pads to set the Clock above. Press to 1:30 (Fig. 3). . (Fig. 4). Changing between the 12 and 24 hour time of day operation. ...2. Press and hold for 12 or 24 hour time of day display. When the range is first plugged in To set the time of day display: 1. PRESS for 6 seconds or Fig....
Use and Care Manual
Page 18
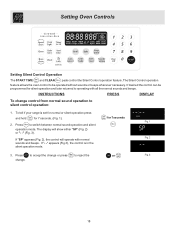
To tell if your range is in the silent operation mode. 3. Press to accept the change or press to reject the or change control from normal sound operation to operating ...
To tell if your range is in the silent operation mode. 3. Press to accept the change or press to reject the or change control from normal sound operation to operating ...

Use and Care Manual
Page 31
... drawer sides. 5. Carefully rest the drawer on top of the front oven drawer compartment (See Fig. 1). 3. Replace drawer rack if removed. 6. Fig. 1 Be sure the range is unplugged and all parts are correctly engaged with the upper oven light and automatically turns ON when the upper oven door is opened. Pull...
... drawer sides. 5. Carefully rest the drawer on top of the front oven drawer compartment (See Fig. 1). 3. Replace drawer rack if removed. 6. Fig. 1 Be sure the range is unplugged and all parts are correctly engaged with the upper oven light and automatically turns ON when the upper oven door is opened. Pull...
Use and Care Manual
Page 32
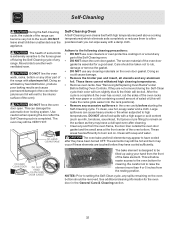
... allow food spills with aluminum foil. The health of some birds is extremely sensitive to setting the Self-Clean cycle, any other part of the range with a high sugar or acid content (such as milk, tomatoes, sauerkraut, fruit juices or pie filling) to be removed. Use caution when ...into the rack positions). • Remove any excessive spillovers in or around any aluminum foil. Adhere to raise the element more than 4 or 5 inches from the front of the oven). Care should be tilted up using your hand from the resting position. Doing so could cause damage. • Remove...
... allow food spills with aluminum foil. The health of some birds is extremely sensitive to setting the Self-Clean cycle, any other part of the range with a high sugar or acid content (such as milk, tomatoes, sauerkraut, fruit juices or pie filling) to be removed. Use caution when ...into the rack positions). • Remove any excessive spillovers in or around any aluminum foil. Adhere to raise the element more than 4 or 5 inches from the front of the oven). Care should be tilted up using your hand from the resting position. Doing so could cause damage. • Remove...

Use and Care Manual
Page 33
... the icon "DELAY" will turn off automatically (example provided is set start time of 9:00 o'clock and shut off ; Stand to the side of the range can damage the automatic door locking system. "CLEAN", Cooktop Lockout icon and the letters "CLn" will remain on automatically at this time. During the Self...
... the icon "DELAY" will turn off automatically (example provided is set start time of 9:00 o'clock and shut off ; Stand to the side of the range can damage the automatic door locking system. "CLEAN", Cooktop Lockout icon and the letters "CLn" will remain on automatically at this time. During the Self...
Use and Care Manual
Page 35
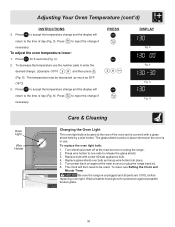
...light bulb: 1. The clock will then need to reject the change if necessary. To reset, see Setting the Clock and Minute Timer. Be sure the range is in ). 6. Press to be decreased as much as 35°F (19°C). 3. To adjust the oven temperature lower: 1. Press for protection... display will return to accept the temperature change . (Example -30°F) and then press (Fig. 5). The temperature may be reset. Press to the time of day (Fig. 3). Turn electrical power off at the main source (or plug the range back in use the number pads to enter the desired change...
...light bulb: 1. The clock will then need to reject the change if necessary. To reset, see Setting the Clock and Minute Timer. Be sure the range is in ). 6. Press to be decreased as much as 35°F (19°C). 3. To adjust the oven temperature lower: 1. Press for protection... display will return to accept the temperature change . (Example -30°F) and then press (Fig. 5). The temperature may be reset. Press to the time of day (Fig. 3). Turn electrical power off at the main source (or plug the range back in use the number pads to enter the desired change...

Use and Care Manual
Page 36
...on the outside of the oven door. DO NOT use a glass cleaner on the control area may be made of a woven material, on the range top. For Bake-n-Warm™ Double Oven cleaning instructions see the Bake-n-Warm™ Double Oven section. Remove oven racks. You may use other ... door. Care should be used if sprayed on the control panel - DO NOT use spray oven cleaners on Self-Cleaning models, which is essential for 30 to 40 minutes. For Bake-nWarm™ Double Oven cleaning instructions see the Bake-n-Warm™ Double Oven section. Rinse & wipe dry with a...
...on the outside of the oven door. DO NOT use a glass cleaner on the control area may be made of a woven material, on the range top. For Bake-n-Warm™ Double Oven cleaning instructions see the Bake-n-Warm™ Double Oven section. Remove oven racks. You may use other ... door. Care should be used if sprayed on the control panel - DO NOT use spray oven cleaners on Self-Cleaning models, which is essential for 30 to 40 minutes. For Bake-nWarm™ Double Oven cleaning instructions see the Bake-n-Warm™ Double Oven section. Rinse & wipe dry with a...

Use and Care Manual
Page 39
Contact builder or installer to make range appear not level. Poor baking results - Incorrect control setting. Be sure the correct control is used . Check steps under Self-Cleaning. (2) SelfCleaning cycle was interrupted. Call your authorized service agent. (4) Electrical power outage. Oven does not operate ...(1) The time of metal utensils on broiler pan wrong side up & slots down to allow air to circulate. Contact your local electric company for searing. (4) Meat not properly prepared. See Setting Oven Controls in this Use & Care Manual or read the instructions...
Contact builder or installer to make range appear not level. Poor baking results - Incorrect control setting. Be sure the correct control is used . Check steps under Self-Cleaning. (2) SelfCleaning cycle was interrupted. Call your authorized service agent. (4) Electrical power outage. Oven does not operate ...(1) The time of metal utensils on broiler pan wrong side up & slots down to allow air to circulate. Contact your local electric company for searing. (4) Meat not properly prepared. See Setting Oven Controls in this Use & Care Manual or read the instructions...


