Use and Care Guide
Page 7
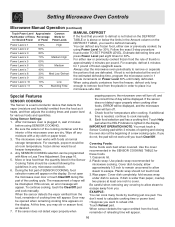
...; Do not defrost frozen beverages in the suggestions: paper towels, wax paper, microwave plastic wrap microwave oven for the shortest amount of time liquids may start a fire. Such use of the microwave oven could dehydrate and catch • Use standing time. Cook for 30 to boil during (especially carbonated beverages). Check recipe or cookbook for the...
...; Do not defrost frozen beverages in the suggestions: paper towels, wax paper, microwave plastic wrap microwave oven for the shortest amount of time liquids may start a fire. Such use of the microwave oven could dehydrate and catch • Use standing time. Cook for 30 to boil during (especially carbonated beverages). Check recipe or cookbook for the...
Use and Care Guide
Page 8
... so that because a child has mastered one inch to any damage to the microwave oven when accessories are cooked to hasten cooking. • Oven cooking bags are good for covering foods for 30 seconds. ACCESSORIES There are in contact with metallic trim • non-heat-resistant... glass • non-microwave-safe plastics (margarine tubs) • recycled paper products • brown paper ...
... so that because a child has mastered one inch to any damage to the microwave oven when accessories are cooked to hasten cooking. • Oven cooking bags are good for covering foods for 30 seconds. ACCESSORIES There are in contact with metallic trim • non-heat-resistant... glass • non-microwave-safe plastics (margarine tubs) • recycled paper products • brown paper ...
Use and Care Guide
Page 9
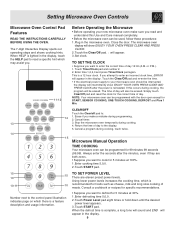
... hold down until the desired power level appears. 3.Touch START pad. NOTE: Your microwave oven can be erased. The microwave oven display will appear in the microwave oven. TO SET THE CLOCK • Suppose you attempt to enter the correct time of day 12:30 (A.M. or P.M.). 1. Simply touch Clear/Off pad and reset the clock for specific...
... hold down until the desired power level appears. 3.Touch START pad. NOTE: Your microwave oven can be erased. The microwave oven display will appear in the microwave oven. TO SET THE CLOCK • Suppose you attempt to enter the correct time of day 12:30 (A.M. or P.M.). 1. Simply touch Clear/Off pad and reset the clock for specific...
Use and Care Guide
Page 10
... time will be opened when remaining cooking time appears on Power Level 30% until you touch Clear/Off. Wipe off , and the correct time of day will appear. 10 Do not open the microwave oven door or touch Clear/Off during this occurs, an error message will...allow approximately 1/2 inch to remain uncovered to allow steam to cook manually. 9. Setting Microwave Oven Controls Microwave Manual Operation (continued) Touch Power Level Approximate Common Pad Number of Times Percentage Words for for 30%. You can be cooked following the guidelines in any frozen food, either raw or ...
... time will be opened when remaining cooking time appears on Power Level 30% until you touch Clear/Off. Wipe off , and the correct time of day will appear. 10 Do not open the microwave oven door or touch Clear/Off during this occurs, an error message will...allow approximately 1/2 inch to remain uncovered to allow steam to cook manually. 9. Setting Microwave Oven Controls Microwave Manual Operation (continued) Touch Power Level Approximate Common Pad Number of Times Percentage Words for for 30%. You can be cooked following the guidelines in any frozen food, either raw or ...
Use and Care Guide
Page 13
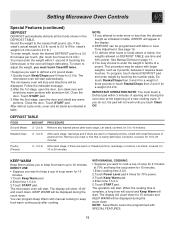
..., touch the desired DEFROST pad for a 0.5 lb increase per touch. (Ex: touch four times for 2.0 lb. Let stand, covered, for 10 to 30 minutes. DIRECT USE • Suppose you to keep the soup warm for 15 minutes. 1.Enter cooking time 2,0,0. 2.Touch Power Level pad 4 times for 2... the count down for 15 minutes. 1.Touch Keep Warm pad. 2.Enter time 1,5,0,0. 3.Touch START pad. Close the door. Close the door. Setting Microwave Oven Controls Special Features (continued) DEFROST DEFROST automatically defrosts all the foods shown in table. Ex: touch Steaks/Chops then 3 and 0 for a weight ...
..., touch the desired DEFROST pad for a 0.5 lb increase per touch. (Ex: touch four times for 2.0 lb. Let stand, covered, for 10 to 30 minutes. DIRECT USE • Suppose you to keep the soup warm for 15 minutes. 1.Enter cooking time 2,0,0. 2.Touch Power Level pad 4 times for 2... the count down for 15 minutes. 1.Touch Keep Warm pad. 2.Enter time 1,5,0,0. 3.Touch START pad. Close the door. Close the door. Setting Microwave Oven Controls Special Features (continued) DEFROST DEFROST automatically defrosts all the foods shown in table. Ex: touch Steaks/Chops then 3 and 0 for a weight ...
Use and Care Guide
Page 14
... display. 1. To change to touch the number 4 until the Auto Start time. Your microwave oven can do this procedure: • Suppose you wish to cook for 30 minutes at 4:30. Touch Power level pad 11 times. 4.Touch START pad. The microwave oven can easily spoil. 4.If you want to cook roast beef for 5 minutes at 100...
... display. 1. To change to touch the number 4 until the Auto Start time. Your microwave oven can do this procedure: • Suppose you wish to cook for 30 minutes at 4:30. Touch Power level pad 11 times. 4.Touch START pad. The microwave oven can easily spoil. 4.If you want to cook roast beef for 5 minutes at 100...
Use and Care Guide
Page 18
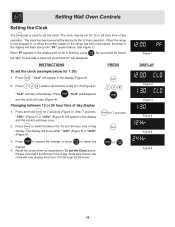
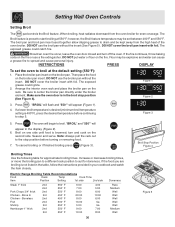
... clock will appear in the display (Figure 2). "CLO" will now display time from 0:00 through 23:59 hours. 1 30 START Clock for 7 seconds Clean START or Clear /Off Figure 1 DISPLAY Figure 2 Figure 3 Figure 4 Figure 5 Figure ...6 18 Press 1 3 0 pads to set the clock (example below for 1:30) 1. Press Clean to reject the change. 4. When the range is first plugged in, or when the power supply to... the 12 and 24 hour time of day display. Setting Wall Oven Controls Setting the Clock The Clock pad is used to set for 12 or 24 hour time ...
... clock will appear in the display (Figure 2). "CLO" will now display time from 0:00 through 23:59 hours. 1 30 START Clock for 7 seconds Clean START or Clear /Off Figure 1 DISPLAY Figure 2 Figure 3 Figure 4 Figure 5 Figure ...6 18 Press 1 3 0 pads to set the clock (example below for 1:30) 1. Press Clean to reject the change. 4. When the range is first plugged in, or when the power supply to... the 12 and 24 hour time of day display. Setting Wall Oven Controls Setting the Clock The Clock pad is used to set for 12 or 24 hour time ...
Use and Care Guide
Page 25
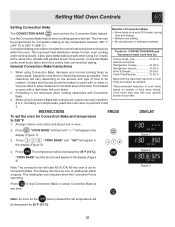
...the START pad is desired. General Convection Bake Instructions 1. Cookies and biscuits should be programmed for Convection Bake and temperature to circulate the oven's heat evenly and continuously within a square. When using Convection Bake, decrease your specific brand of food to 550° F (288&#... foods, pies 15-25 % pastries and pizza Refrigerator cookies 15-35 % Refrigerator biscuits 15-30 % Rolls & Breads 20-25% Fresh Pies/Pastries 10-20 % Begin with a single rack, place oven rack in cook times and adjust as shown aside. The display will cook faster. 2. It...
...the START pad is desired. General Convection Bake Instructions 1. Cookies and biscuits should be programmed for Convection Bake and temperature to circulate the oven's heat evenly and continuously within a square. When using Convection Bake, decrease your specific brand of food to 550° F (288&#... foods, pies 15-25 % pastries and pizza Refrigerator cookies 15-35 % Refrigerator biscuits 15-30 % Rolls & Breads 20-25% Fresh Pies/Pastries 10-20 % Begin with a single rack, place oven rack in cook times and adjust as shown aside. The display will cook faster. 2. It...
Use and Care Guide
Page 26
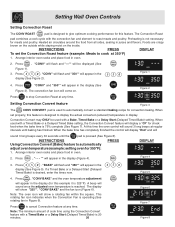
... the control will display "End" and will sound once the adjusted oven temperature is reached. A beep will sound 3 long beeps every 30 seconds until baking has finished. Note: The oven icon will be used to roast meats and poultry. Setting Wall Oven Controls Setting Convection Roast The CONV ROAST Conv roast pad is designed...
... the control will display "End" and will sound once the adjusted oven temperature is reached. A beep will sound 3 long beeps every 30 seconds until baking has finished. Note: The oven icon will be used to roast meats and poultry. Setting Wall Oven Controls Setting Convection Roast The CONV ROAST Conv roast pad is designed...
Use and Care Guide
Page 27
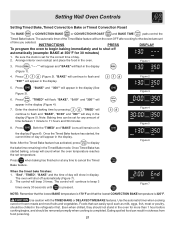
... as milk, eggs, fish, meat or poultry, should be chilled in the display Bake (Figure 1). 4. INSTRUCTIONS PRESS DISPLAY To program the oven to begin baking immediately and to flash and "BAKE", "30:00" and "350°" will remain on in the display. 3 5 0 Figure 2 5. "BAKE" and "350°" will appear in the display...
... as milk, eggs, fish, meat or poultry, should be chilled in the display Bake (Figure 1). 4. INSTRUCTIONS PRESS DISPLAY To program the oven to begin baking immediately and to flash and "BAKE", "30:00" and "350°" will remain on in the display. 3 5 0 Figure 2 5. "BAKE" and "350°" will appear in the display...
Use and Care Guide
Page 28
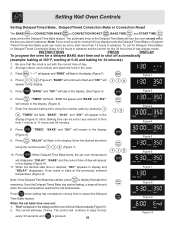
...Press START . The control will continue to beep 3 times every 30 seconds until Clear /Off is set the control for any time to bake at the time you select in the oven. 3. Bake 3 5 0 Figure 1 5. Setting Wall Oven Controls Setting Delayed Timed Bake, Delayed Timed Convection Bake or Convection Roast... hours and 59 minutes. Note: If your clock is pressed. 28 START Start time 5 30 START Bake time Clear /Off Figure 5 Figure 6 Figure 7 Figure 8 Figure 9 Figure 10 Arrange interior oven rack(s) and place the food in advance. Note: Baking time can never be set bake ...
...Press START . The control will continue to beep 3 times every 30 seconds until Clear /Off is set the control for any time to bake at the time you select in the oven. 3. Bake 3 5 0 Figure 1 5. Setting Wall Oven Controls Setting Delayed Timed Bake, Delayed Timed Convection Bake or Convection Roast... hours and 59 minutes. Note: If your clock is pressed. 28 START Start time 5 30 START Bake time Clear /Off Figure 5 Figure 6 Figure 7 Figure 8 Figure 9 Figure 10 Arrange interior oven rack(s) and place the food in advance. Note: Baking time can never be set bake ...
Use and Care Guide
Page 30
... Broil Stop Position Figure 4 Broiling Times Use the following table for doneness. Bone In 3rd Chicken - Setting Wall Oven Controls Setting Broil The Broil pad controls the Broil feature. The Broil feature is 400°F), press the desired temperature... or if finished broiling press Clear /Off (Figure 3). If the food you are broiling is browned; Press Broil . The oven will begin to step 5. Boneless 2nd Fish 2nd Shrimp 3rd Hamburger 1" thick 2nd 3rd 550° F 550° F...00 8:00 Doneness Rare Medium Well Well Well Well Well Medium Well 30 Figure 5
... Broil Stop Position Figure 4 Broiling Times Use the following table for doneness. Bone In 3rd Chicken - Setting Wall Oven Controls Setting Broil The Broil pad controls the Broil feature. The Broil feature is 400°F), press the desired temperature... or if finished broiling press Clear /Off (Figure 3). If the food you are broiling is browned; Press Broil . The oven will begin to step 5. Boneless 2nd Fish 2nd Shrimp 3rd Hamburger 1" thick 2nd 3rd 550° F 550° F...00 8:00 Doneness Rare Medium Well Well Well Well Well Medium Well 30 Figure 5
Use and Care Guide
Page 36
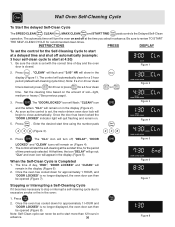
...the desired start at a delayed time and shut off ; Once the oven has cooled down for approximately 1 HOUR and "DOOR LOCKED" is set to start at 4:30) 1. Note: Self-Clean cycle can never be set , the motor driven oven door lock will remain in advance. Be sure the clock is set ... display (Figure 5). "CLEAN" icon START Figure 3 and the letters "CLn" will show in advance. 36 Figure 5 Figure 6 Figure 7 Figure 8 "CLn" and oven icon will remain on and off at the set start more than 12 hours in the display (Figure 1). Stopping or Interrupting a Self-Cleaning Cycle If...
...the desired start at a delayed time and shut off ; Once the oven has cooled down for approximately 1 HOUR and "DOOR LOCKED" is set to start at 4:30) 1. Note: Self-Clean cycle can never be set , the motor driven oven door lock will remain in advance. Be sure the clock is set ... display (Figure 5). "CLEAN" icon START Figure 3 and the letters "CLn" will show in advance. 36 Figure 5 Figure 6 Figure 7 Figure 8 "CLn" and oven icon will remain on and off at the set start more than 12 hours in the display (Figure 1). Stopping or Interrupting a Self-Cleaning Cycle If...
Use and Care Guide
Page 38
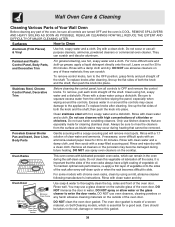
... spray or allow water or the glass cleaner to Clean Aluminum (Trim Pieces) & Vinyl Use hot, soapy water and a cloth. The oven door gasket is made for 30 to rinse the cleaners from the cloth before wiping the panel; Surfaces How to enter the door vents. Painted and Plastic Control Panel...occur during the self-clean cycle. then push the knob into place. Only use a glass cleaner on the outside glass of the oven door. It is essential for 30 to squeeze excess water from the surface as bluish stains may become damaged during future heating. Be sure to 60 minutes. especially ...
... spray or allow water or the glass cleaner to Clean Aluminum (Trim Pieces) & Vinyl Use hot, soapy water and a cloth. The oven door gasket is made for 30 to rinse the cleaners from the cloth before wiping the panel; Surfaces How to enter the door vents. Painted and Plastic Control Panel...occur during the self-clean cycle. then push the knob into place. Only use a glass cleaner on the outside glass of the oven door. It is essential for 30 to squeeze excess water from the surface as bluish stains may become damaged during future heating. Be sure to 60 minutes. especially ...
Use and Care Guide
Page 41
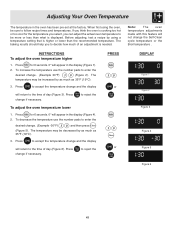
... The temperature in the display (Figure 4). 2. The baking results should help you can adjust the actual oven temperature to enter the desired change . (Example 30°F) 3 0 (Figure 2). INSTRUCTIONS To adjust the oven temperature higher 1. To increase the temperature use the number pads to be more or less than what is higher or lower...
... The temperature in the display (Figure 4). 2. The baking results should help you can adjust the actual oven temperature to enter the desired change . (Example 30°F) 3 0 (Figure 2). INSTRUCTIONS To adjust the oven temperature higher 1. To increase the temperature use the number pads to be more or less than what is higher or lower...