Complete Owner's Guide (English)
Page 1
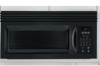
Visit the Frigidaire Web Site at: http://www.frigidaire.com Over-the-Range Microwave Oven with Convenience Pad Welcome 2 Important Safety Instructions .....3-6 Features and Specifications .......... 7 Before Operating 8 Manual Operation 9-14 Convenience Operation ......... 15-16 Cooking Charts 17-18 Questions or for Service Call: 1-800-944-9044(US) 1-800-265-8352(Canada) Care & Cleaning 19-21 Before You Call Solutions to Common Problems 22 Warranty Back Page READ AND SAVE THESE INSTRUCTIONS p/n 316495058
Visit the Frigidaire Web Site at: http://www.frigidaire.com Over-the-Range Microwave Oven with Convenience Pad Welcome 2 Important Safety Instructions .....3-6 Features and Specifications .......... 7 Before Operating 8 Manual Operation 9-14 Convenience Operation ......... 15-16 Cooking Charts 17-18 Questions or for Service Call: 1-800-944-9044(US) 1-800-265-8352(Canada) Care & Cleaning 19-21 Before You Call Solutions to Common Problems 22 Warranty Back Page READ AND SAVE THESE INSTRUCTIONS p/n 316495058
Complete Owner's Guide (English)
Page 2
.... The self-addressed PRODUCT REGISTRATION CARD should ever require servicing: This Use & Care Manual contains general operating instructions for your appliance and feature information for your microwave should be practiced when installing, operating and maintaining any appliance. We know you with the...for future purchases. PLEASE CAREFULLY READ AND SAVE THESE INSTRUCTIONS This Use & Care Manual provides specific operating instructions for several models. The graphics on your microwave may not look exactly like those shown. Congratulations on your purchase of purchase in...
.... The self-addressed PRODUCT REGISTRATION CARD should ever require servicing: This Use & Care Manual contains general operating instructions for your appliance and feature information for your microwave should be practiced when installing, operating and maintaining any appliance. We know you with the...for future purchases. PLEASE CAREFULLY READ AND SAVE THESE INSTRUCTIONS This Use & Care Manual provides specific operating instructions for several models. The graphics on your microwave may not look exactly like those shown. Congratulations on your purchase of purchase in...
Complete Owner's Guide (English)
Page 6
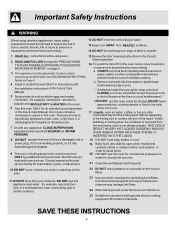
... cleaning the ventilating hood filters. Important Safety Instructions When using oven. 2 READ AND FOLLOW the specific "PRECAUTIONS TO AVOID POSSIBLE EXPOSURE TO EXCESSIVE MICROWAVE ENERGY" on page 5. 3 This appliance must be HEATED in use only. 21 Clean the ventillating hood frequently. 10 DO NOT cover or...DO NOT overcook food. d DO NOT use above both gas and electric cooking equipment 36 inches or less wide. for use this Use & Care Manual. 5 Some products such as water, coffee, or tea are able to excessive microvave energy. c If materials inside the oven to service oven. ...
... cleaning the ventilating hood filters. Important Safety Instructions When using oven. 2 READ AND FOLLOW the specific "PRECAUTIONS TO AVOID POSSIBLE EXPOSURE TO EXCESSIVE MICROWAVE ENERGY" on page 5. 3 This appliance must be HEATED in use only. 21 Clean the ventillating hood frequently. 10 DO NOT cover or...DO NOT overcook food. d DO NOT use above both gas and electric cooking equipment 36 inches or less wide. for use this Use & Care Manual. 5 Some products such as water, coffee, or tea are able to excessive microvave energy. c If materials inside the oven to service oven. ...
Complete Owner's Guide (English)
Page 9
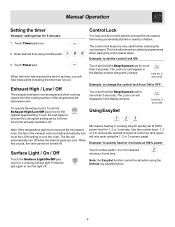
Manual Operation Setting the timer Example: setting timer for the highest speed setting. Enter desired time...the display window. Note: the EasySet function cannot be turned off . Using EasySet Microwave heating or cooking may lock the control panel to prevent the microwave from ON to turn the exhaust ventilation off when the internal parts are cool. The...Example: to set at the LOW setting to choose the desired minutes of the range below the microwave oven. The fan will disappear in the exhaust vent hood will hear beep alerts indicating the timer has run out.
Manual Operation Setting the timer Example: setting timer for the highest speed setting. Enter desired time...the display window. Note: the EasySet function cannot be turned off . Using EasySet Microwave heating or cooking may lock the control panel to prevent the microwave from ON to turn the exhaust ventilation off when the internal parts are cool. The...Example: to set at the LOW setting to choose the desired minutes of the range below the microwave oven. The fan will disappear in the exhaust vent hood will hear beep alerts indicating the timer has run out.
Complete Owner's Guide (English)
Page 10
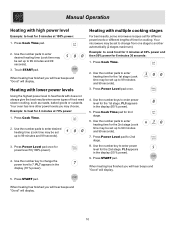
... (100% power). 4. PL8 appears in the display (70 % power). When heating has finished you will hear beeps and "Good" will display. 10 Manual Operation Heating with high power level Example: to heat for the 2nd stage (cook time may be set up to 99 minutes and 99 seconds... 2. PL7 appears in the display (80 % power). 5. Press Power Level pad once. 4. Heating with does not always give the best results when some microwave recipes call for different power levels or different lengths of food need slower cooking, such as roasts, baked goods or custards. Touch STARTpad. Use the...
... (100% power). 4. PL8 appears in the display (70 % power). When heating has finished you will hear beeps and "Good" will display. 10 Manual Operation Heating with high power level Example: to heat for the 2nd stage (cook time may be set up to 99 minutes and 99 seconds... 2. PL7 appears in the display (80 % power). 5. Press Power Level pad once. 4. Heating with does not always give the best results when some microwave recipes call for different power levels or different lengths of food need slower cooking, such as roasts, baked goods or custards. Touch STARTpad. Use the...
Complete Owner's Guide (English)
Page 11
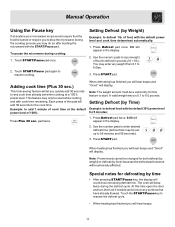
...the numeric pads to input weight of this feature to defrost 1lb. Note: Power levels cannot be turned or require you to stop the microwave during the cooking process you quickly add 30 seconds to any portions that the food be changed for defrosting by Weight) Example: to ... sec. Press Defrost pad twice. 0:00 will display. To pause the microwave during the defrost cycle. Example: to defrost in the display. 2. pad twice. 1. Manual Operation Using the Pause key If at anytime your microwave recipe would require that have already thawed. Touch the START/Pause key to...
...the numeric pads to input weight of this feature to defrost 1lb. Note: Power levels cannot be turned or require you to stop the microwave during the cooking process you quickly add 30 seconds to any portions that the food be changed for defrosting by Weight) Example: to ... sec. Press Defrost pad twice. 0:00 will display. To pause the microwave during the defrost cycle. Example: to defrost in the display. 2. pad twice. 1. Manual Operation Using the Pause key If at anytime your microwave recipe would require that have already thawed. Touch the START/Pause key to...
Complete Owner's Guide (English)
Page 12
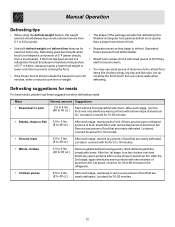
.... (40 to 96 oz.) Start with the breast side down . After the 1st stage, turn the food over and shield any pieces of aluminum foil. Manual Operation Defrosting tips • When using the defrost weight feature, the weight entered should always be thawed is stored outside the freezer for 5 to 10...
.... (40 to 96 oz.) Start with the breast side down . After the 1st stage, turn the food over and shield any pieces of aluminum foil. Manual Operation Defrosting tips • When using the defrost weight feature, the weight entered should always be thawed is stored outside the freezer for 5 to 10...
Complete Owner's Guide (English)
Page 13
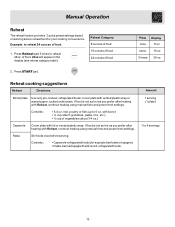
... Dinner plate Use only pre-cooked, refrigerated foods. If food is not as hot as you prefer after heating with Reheat, continue heating using manual time and power level settings. Pasta Stir foods once before serving. Contents: • Casserole-refrigerated foods (for your cooking convenience. Amount 1 ... ½ cup of food. 24oz will appear in the display (see reheat category table). Cover plate with Reheat, continue heating using manual time and power level settings. with lid or vented plastic wrap. Reheat Category 8 ounces of food 16 ounces of food 24 ounces of food...
... Dinner plate Use only pre-cooked, refrigerated foods. If food is not as hot as you prefer after heating with Reheat, continue heating using manual time and power level settings. Pasta Stir foods once before serving. Contents: • Casserole-refrigerated foods (for your cooking convenience. Amount 1 ... ½ cup of food. 24oz will appear in the display (see reheat category table). Cover plate with Reheat, continue heating using manual time and power level settings. with lid or vented plastic wrap. Reheat Category 8 ounces of food 16 ounces of food 24 ounces of food...
Complete Owner's Guide (English)
Page 14
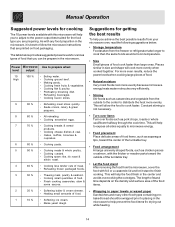
... salmon, with the thicker or meatier parts toward the outside to the center to finish cooking. This will help to expose all sides equally to microwave energy. • Food placement Place delicate areas of food items, such as asparagus tips, toward the center of the turntable tray. • Food ...in the center and avoids overcooking the out edges, The length of stand time depends on food packaging. Manual Operation Suggested power levels for cooking The 10 power levels available with this microwave will help you to adjust to the power output best suited for the food type you are printed ...
... salmon, with the thicker or meatier parts toward the outside to the center to finish cooking. This will help to expose all sides equally to microwave energy. • Food placement Place delicate areas of food items, such as asparagus tips, toward the center of the turntable tray. • Food ...in the center and avoids overcooking the out edges, The length of stand time depends on food packaging. Manual Operation Suggested power levels for cooking The 10 power levels available with this microwave will help you to adjust to the power output best suited for the food type you are printed ...
Installation Instructions (All Languages)
Page 15
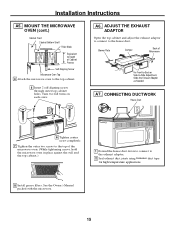
...House Duct 6 Tighten center screw completely. 7 Tighten the outer two screws to the top of Cabinet Recess Self-Aligning Screw Microwave Oven Top 4 Attach the microwave oven to the exhaust adaptor. 2 Seal exhaust duct joints using furnance duct tape for high temperature applications. 8 Install grease filters... down to connect to the top cabinet. 5 Insert 2 self-aligning screws through outer top cabinet holes. See the Owner's Manual packed with the microwave. 15 ADJUST THE EXHAUST ADAPTOR Open the top cabinet and adjust the exhaust adaptor to connect to -Side Adjustment, Slide the Exhaust...
...House Duct 6 Tighten center screw completely. 7 Tighten the outer two screws to the top of Cabinet Recess Self-Aligning Screw Microwave Oven Top 4 Attach the microwave oven to the exhaust adaptor. 2 Seal exhaust duct joints using furnance duct tape for high temperature applications. 8 Install grease filters... down to connect to the top cabinet. 5 Insert 2 self-aligning screws through outer top cabinet holes. See the Owner's Manual packed with the microwave. 15 ADJUST THE EXHAUST ADAPTOR Open the top cabinet and adjust the exhaust adaptor to connect to -Side Adjustment, Slide the Exhaust...
Installation Instructions (All Languages)
Page 19
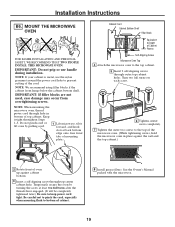
...IMPORTANT: If filler blocks are not used, case damage may occur from overtightening screws. Temporarily secure the oven by pulling cord. 1 Lift microwave, tilt it tight throughout Steps 1-3. Turn two full turns on each screw. 6 Tighten center screw completely. 7 Tighten the outer two screws... NOTE: If your cabinet is metal, use handle during installation. NOTE: When mounting the microwave oven, thread power cord through outer top cabinet holes. See the Owner's Manual packed with the microwave. 19 Keep it forward, and hook slots at least two full turns after the threads ...
...IMPORTANT: If filler blocks are not used, case damage may occur from overtightening screws. Temporarily secure the oven by pulling cord. 1 Lift microwave, tilt it tight throughout Steps 1-3. Turn two full turns on each screw. 6 Tighten center screw completely. 7 Tighten the outer two screws... NOTE: If your cabinet is metal, use handle during installation. NOTE: When mounting the microwave oven, thread power cord through outer top cabinet holes. See the Owner's Manual packed with the microwave. 19 Keep it forward, and hook slots at least two full turns after the threads ...
Installation Instructions (All Languages)
Page 22
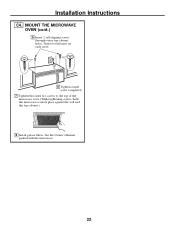
Turn two full turns on each screw. 6 Tighten center screw completely. 7 Tighten the outer two screws to the top of the microwave oven. (While tightening screws, hold the microwave oven in place against the wall and the top cabinet.) 8 Install grease filters. See the Owner's Manual packed with the microwave. 22 MOUNT THE MICROWAVE OVEN (cont.) 5 Insert 2 self-aligning screws through outer top cabinet holes. Installation Instructions C4.
Turn two full turns on each screw. 6 Tighten center screw completely. 7 Tighten the outer two screws to the top of the microwave oven. (While tightening screws, hold the microwave oven in place against the wall and the top cabinet.) 8 Install grease filters. See the Owner's Manual packed with the microwave. 22 MOUNT THE MICROWAVE OVEN (cont.) 5 Insert 2 self-aligning screws through outer top cabinet holes. Installation Instructions C4.
Installation Instructions (All Languages)
Page 23
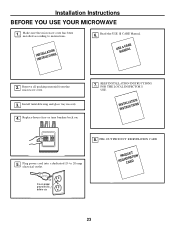
.... 7. USME A&|+&= NCUAARLE + 2. Plug power cord into a dedicated 15- Read the USE & CARE Manual. ININSSTTARLULCATTIIOONNS 5. FILL OUT PRODUCT REGISTRATION CARD RPEGROISDCTUARCRATDTION Ensure proper ground exists before use D D G 23 Installation Instructions BEFORE YOU USE YOUR MICROWAVE 1. Remove all packing material from the microwave oven. 3. ININSSTTARLULCATTIIOONNS 6. to instructions. Install turntable ring and glass tray in cavity...
.... 7. USME A&|+&= NCUAARLE + 2. Plug power cord into a dedicated 15- Read the USE & CARE Manual. ININSSTTARLULCATTIIOONNS 5. FILL OUT PRODUCT REGISTRATION CARD RPEGROISDCTUARCRATDTION Ensure proper ground exists before use D D G 23 Installation Instructions BEFORE YOU USE YOUR MICROWAVE 1. Remove all packing material from the microwave oven. 3. ININSSTTARLULCATTIIOONNS 6. to instructions. Install turntable ring and glass tray in cavity...


