Complete Owner's Guide (English)
Page 2
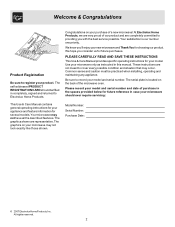
... Electrolux Home Products, Inc. Congratulations on your appliance and feature information for your microwave only as instructed in case your microwave should be practiced when installing, operating and maintaining any appliance. Be sure to Electrolux Home Products. We know... you consider us for future reference in this manual. The graphics on the back of purchase in completely, signed and returned to record your microwave...
... Electrolux Home Products, Inc. Congratulations on your appliance and feature information for your microwave only as instructed in case your microwave should be practiced when installing, operating and maintaining any appliance. Be sure to Electrolux Home Products. We know... you consider us for future reference in this manual. The graphics on the back of purchase in completely, signed and returned to record your microwave...
Complete Owner's Guide (English)
Page 6
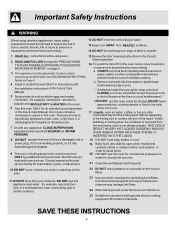
...Baby food jars shall be open when heated and contents stirred or shaken before consumption, in water. 13 Keep cord AWAY from the microwave oven is specifically designed to excessive microvave energy. Corrosive cleaning agents such as lye-based oven cleaners may damage the filters. 24 When... . 17 Liquids such as whole eggs and sealed containers - a DO NOT overcook food. for household use this Use & Care Manual. See GROUNDING INSTRUCTIONS found on Page 4 4 Install or locate this oven ONLY in a wet basement, near a kitchen sink, in accordance with any vents or openings on the hood...
...Baby food jars shall be open when heated and contents stirred or shaken before consumption, in water. 13 Keep cord AWAY from the microwave oven is specifically designed to excessive microvave energy. Corrosive cleaning agents such as lye-based oven cleaners may damage the filters. 24 When... . 17 Liquids such as whole eggs and sealed containers - a DO NOT overcook food. for household use this Use & Care Manual. See GROUNDING INSTRUCTIONS found on Page 4 4 Install or locate this oven ONLY in a wet basement, near a kitchen sink, in accordance with any vents or openings on the hood...
Installation Instructions (All Languages)
Page 15
... Install grease filters. Installation Instructions A5. CONNECTING DUCTWORK House Duct 6 Tighten center screw completely. 7 Tighten the outer two screws to the top of the microwave oven. (While tightening screws, hold the microwave ...oven in place against the wall and the top cabinet.) 1 Extend the house duct down to connect to the house duct. See the Owner's Manual...
... Install grease filters. Installation Instructions A5. CONNECTING DUCTWORK House Duct 6 Tighten center screw completely. 7 Tighten the outer two screws to the top of the microwave oven. (While tightening screws, hold the microwave ...oven in place against the wall and the top cabinet.) 1 Extend the house duct down to connect to the house duct. See the Owner's Manual...
Installation Instructions (All Languages)
Page 19
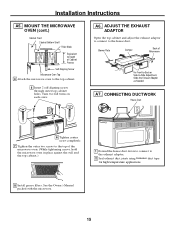
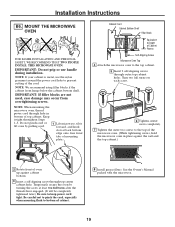
...Bottom Shelf Filler Block Equivalent to Depth of Cabinet Recess Self-Aligning Screw Microwave Oven Top 4 Attach the microwave oven to bottom of cabinet. 8 Install grease filters. See the Owner's Manual packed with the microwave. 19 Do not pinch cord or lift oven by turning the screw ... IMPORTANT: If filler blocks are not used, case damage may occur from overtightening screws. MOUNT THE MICROWAVE OVEN FOR EASIER INSTALLATION AND PERSONAL SAFETY, WE RECOMMEND THAT TWO PEOPLE INSTALL THIS MICROWAVE OVEN. Turn two full turns on each screw. 6 Tighten center screw completely. 7 Tighten the...
...Bottom Shelf Filler Block Equivalent to Depth of Cabinet Recess Self-Aligning Screw Microwave Oven Top 4 Attach the microwave oven to bottom of cabinet. 8 Install grease filters. See the Owner's Manual packed with the microwave. 19 Do not pinch cord or lift oven by turning the screw ... IMPORTANT: If filler blocks are not used, case damage may occur from overtightening screws. MOUNT THE MICROWAVE OVEN FOR EASIER INSTALLATION AND PERSONAL SAFETY, WE RECOMMEND THAT TWO PEOPLE INSTALL THIS MICROWAVE OVEN. Turn two full turns on each screw. 6 Tighten center screw completely. 7 Tighten the...
Installation Instructions (All Languages)
Page 22
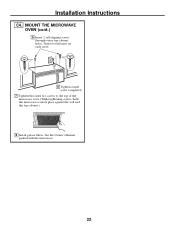
Turn two full turns on each screw. 6 Tighten center screw completely. 7 Tighten the outer two screws to the top of the microwave oven. (While tightening screws, hold the microwave oven in place against the wall and the top cabinet.) 8 Install grease filters. Installation Instructions C4. MOUNT THE MICROWAVE OVEN (cont.) 5 Insert 2 self-aligning screws through outer top cabinet holes. See the Owner's Manual packed with the microwave. 22
Turn two full turns on each screw. 6 Tighten center screw completely. 7 Tighten the outer two screws to the top of the microwave oven. (While tightening screws, hold the microwave oven in place against the wall and the top cabinet.) 8 Install grease filters. Installation Instructions C4. MOUNT THE MICROWAVE OVEN (cont.) 5 Insert 2 self-aligning screws through outer top cabinet holes. See the Owner's Manual packed with the microwave. 22
Installation Instructions (All Languages)
Page 23
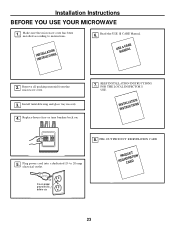
... THE LOCAL INSPECTOR'S USE. Replace house fuse or turn breaker back on. 7. ININSSTTARLULCATTIIOONNS 5. Installation Instructions BEFORE YOU USE YOUR MICROWAVE 1. Install turntable ring and glass tray in cavity . 4. USME A&|+&= NCUAARLE + 2. Read the USE & CARE Manual. Remove all packing material from the microwave oven. 3. Make sure the microwave oven has been installed according to 20-amp electrical outlet. 8.
... THE LOCAL INSPECTOR'S USE. Replace house fuse or turn breaker back on. 7. ININSSTTARLULCATTIIOONNS 5. Installation Instructions BEFORE YOU USE YOUR MICROWAVE 1. Install turntable ring and glass tray in cavity . 4. USME A&|+&= NCUAARLE + 2. Read the USE & CARE Manual. Remove all packing material from the microwave oven. 3. Make sure the microwave oven has been installed according to 20-amp electrical outlet. 8.

