Complete Owner's Guide (English)
Page 1
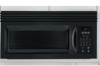
Visit the Frigidaire Web Site at: http://www.frigidaire.com Over-the-Range Microwave Oven with Convenience Pad Welcome 2 Important Safety Instructions .....3-6 Features and Specifications .......... 7 Before Operating 8 Manual Operation 9-14 Convenience Operation ......... 15-16 Cooking Charts 17-18 Questions or for Service Call: 1-800-944-9044(US) 1-800-265-8352(Canada) Care & Cleaning 19-21 Before You Call Solutions to Common Problems 22 Warranty Back Page READ AND SAVE THESE INSTRUCTIONS p/n 316495058
Visit the Frigidaire Web Site at: http://www.frigidaire.com Over-the-Range Microwave Oven with Convenience Pad Welcome 2 Important Safety Instructions .....3-6 Features and Specifications .......... 7 Before Operating 8 Manual Operation 9-14 Convenience Operation ......... 15-16 Cooking Charts 17-18 Questions or for Service Call: 1-800-944-9044(US) 1-800-265-8352(Canada) Care & Cleaning 19-21 Before You Call Solutions to Common Problems 22 Warranty Back Page READ AND SAVE THESE INSTRUCTIONS p/n 316495058
Complete Owner's Guide (English)
Page 2
... described features. Your satisfaction is located on your model. The self-addressed PRODUCT REGISTRATION CARD should ever require servicing: This Use & Care Manual contains general operating instructions for your appliance and feature information for your purchase of the microwave oven. Welcome & Congratulations Product Registration Be sure to register your model and serial number.
... described features. Your satisfaction is located on your model. The self-addressed PRODUCT REGISTRATION CARD should ever require servicing: This Use & Care Manual contains general operating instructions for your appliance and feature information for your purchase of the microwave oven. Welcome & Congratulations Product Registration Be sure to register your model and serial number.
Complete Owner's Guide (English)
Page 6
...before placing bag in accordance with any vents or openings on the oven. 11 DO NOT store this oven. Do not use this Use & Care Manual. a DO NOT overcook food. c If materials inside the oven to facilitate cooking. d DO NOT use corrosive chemicals or vapors in this oven ...outdoors. Visible bubbling or boiling when the container is removed from the microwave oven is not working properly, or if it is not always present. Important Safety Instructions When using electrical appliances, basic safety precautions should be followed to reduce the risk of burns, ...
...before placing bag in accordance with any vents or openings on the oven. 11 DO NOT store this oven. Do not use this Use & Care Manual. a DO NOT overcook food. c If materials inside the oven to facilitate cooking. d DO NOT use corrosive chemicals or vapors in this oven ...outdoors. Visible bubbling or boiling when the container is removed from the microwave oven is not working properly, or if it is not always present. Important Safety Instructions When using electrical appliances, basic safety precautions should be followed to reduce the risk of burns, ...
Complete Owner's Guide (English)
Page 14
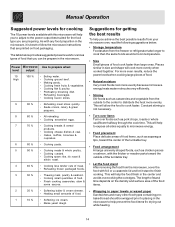
Manual Operation Suggested power levels for cooking The 10 power levels available with this microwave will help you to adjust to the power output best suited for various types of the turntable tray. • Let the food stand After removing the food from the microwave, cover the food with any food prepartion in... unevenly shaped foods, such as chicken pieces or salmon, with the thicker or meatier parts toward the outside to the center to follow the microwave instructions that you are printed on the density and surface area of food cook faster than large ones. Pieces similar in the...
Manual Operation Suggested power levels for cooking The 10 power levels available with this microwave will help you to adjust to the power output best suited for various types of the turntable tray. • Let the food stand After removing the food from the microwave, cover the food with any food prepartion in... unevenly shaped foods, such as chicken pieces or salmon, with the thicker or meatier parts toward the outside to the center to follow the microwave instructions that you are printed on the density and surface area of food cook faster than large ones. Pieces similar in the...
Installation Instructions (All Languages)
Page 15
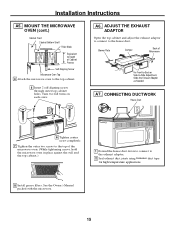
...cabinet.) 1 Extend the house duct down to connect to -Side Adjustment, Slide the Exhaust Adaptor as Needed A7. See the Owner's Manual packed with the microwave. 15 CONNECTING DUCTWORK House Duct 6 Tighten center screw completely. 7 Tighten the outer two screws to the top of... Microwave For Front-to-Back or Side-to the exhaust adaptor. 2 Seal exhaust duct joints using furnance duct tape for high temperature applications. 8 Install grease filters. Installation Instructions A5. A6. ADJUST THE EXHAUST ADAPTOR Open the top cabinet...
...cabinet.) 1 Extend the house duct down to connect to -Side Adjustment, Slide the Exhaust Adaptor as Needed A7. See the Owner's Manual packed with the microwave. 15 CONNECTING DUCTWORK House Duct 6 Tighten center screw completely. 7 Tighten the outer two screws to the top of... Microwave For Front-to-Back or Side-to the exhaust adaptor. 2 Seal exhaust duct joints using furnance duct tape for high temperature applications. 8 Install grease filters. Installation Instructions A5. A6. ADJUST THE EXHAUST ADAPTOR Open the top cabinet...
Installation Instructions (All Languages)
Page 19
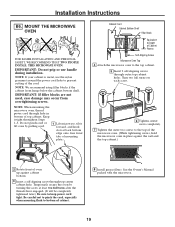
...mounting flush to the top of the microwave oven. (While tightening screws, hold the microwave oven in bottom of cabinet. 8 Install grease filters. NOTE: When mounting the microwave oven, thread power cord through outer top cabinet holes. MOUNT THE MICROWAVE OVEN FOR EASIER INSTALLATION AND PERSONAL ...pulling cord. 1 Lift microwave, tilt it tight throughout Steps 1-3. See the Owner's Manual packed with the microwave. 19 Do not pinch cord or lift oven by turning the screw at back bottom edge onto four lower tabs of the cord. Installation Instructions B6. Cabinet Front ...
...mounting flush to the top of the microwave oven. (While tightening screws, hold the microwave oven in bottom of cabinet. 8 Install grease filters. NOTE: When mounting the microwave oven, thread power cord through outer top cabinet holes. MOUNT THE MICROWAVE OVEN FOR EASIER INSTALLATION AND PERSONAL ...pulling cord. 1 Lift microwave, tilt it tight throughout Steps 1-3. See the Owner's Manual packed with the microwave. 19 Do not pinch cord or lift oven by turning the screw at back bottom edge onto four lower tabs of the cord. Installation Instructions B6. Cabinet Front ...
Installation Instructions (All Languages)
Page 22
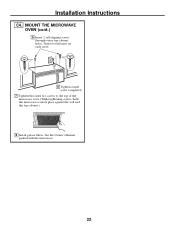
Turn two full turns on each screw. 6 Tighten center screw completely. 7 Tighten the outer two screws to the top of the microwave oven. (While tightening screws, hold the microwave oven in place against the wall and the top cabinet.) 8 Install grease filters. MOUNT THE MICROWAVE OVEN (cont.) 5 Insert 2 self-aligning screws through outer top cabinet holes. Installation Instructions C4. See the Owner's Manual packed with the microwave. 22
Turn two full turns on each screw. 6 Tighten center screw completely. 7 Tighten the outer two screws to the top of the microwave oven. (While tightening screws, hold the microwave oven in place against the wall and the top cabinet.) 8 Install grease filters. MOUNT THE MICROWAVE OVEN (cont.) 5 Insert 2 self-aligning screws through outer top cabinet holes. Installation Instructions C4. See the Owner's Manual packed with the microwave. 22
Installation Instructions (All Languages)
Page 23
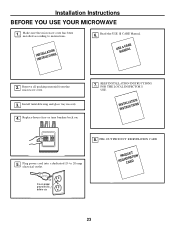
... Ensure proper ground exists before use D D G 23 Replace house fuse or turn breaker back on. 7. ININSSTTARLULCATTIIOONNS 6. to instructions. Installation Instructions BEFORE YOU USE YOUR MICROWAVE 1. Remove all packing material from the microwave oven. 3. Plug power cord into a dedicated 15- Read the USE & CARE Manual. ININSSTTARLULCATTIIOONNS 5. Install turntable ring and glass tray in cavity . 4. KEEP INSTALLATION...
... Ensure proper ground exists before use D D G 23 Replace house fuse or turn breaker back on. 7. ININSSTTARLULCATTIIOONNS 6. to instructions. Installation Instructions BEFORE YOU USE YOUR MICROWAVE 1. Remove all packing material from the microwave oven. 3. Plug power cord into a dedicated 15- Read the USE & CARE Manual. ININSSTTARLULCATTIIOONNS 5. Install turntable ring and glass tray in cavity . 4. KEEP INSTALLATION...


