Complete Owner's Guide (English)
Page 9
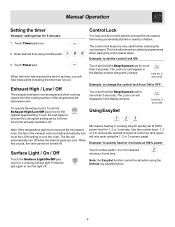
... and hold the Stop/Cancel pad for 3 seconds Example: to change the control lock from ON to turn the exhaust ventilation off when the internal parts are cool. Touch the pad again to choose the Low speed setting and a 3rd time to quickly heat for 2 minutes at 100% power: ...the control panel. Touch number pads 1, 2 or 3 for more than 3 seconds. hold for more than 3 seconds. Using EasySet Microwave heating or cooking may lock the control panel to prevent the microwave from the cooking surface of set the control lock ON: 3. When the timer has reached the end of the range...
... and hold the Stop/Cancel pad for 3 seconds Example: to change the control lock from ON to turn the exhaust ventilation off when the internal parts are cool. Touch the pad again to choose the Low speed setting and a 3rd time to quickly heat for 2 minutes at 100% power: ...the control panel. Touch number pads 1, 2 or 3 for more than 3 seconds. hold for more than 3 seconds. Using EasySet Microwave heating or cooking may lock the control panel to prevent the microwave from the cooking surface of set the control lock ON: 3. When the timer has reached the end of the range...
Complete Owner's Guide (English)
Page 14
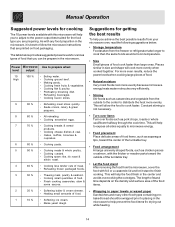
Pieces similar in size and shape will cook more evenly because microwave energy heats water molecules very efficiently. • Stirring Stir foods such as chicken pieces or salmon, with the thicker or meatier parts toward the outside to the center to distribute the heat more evenly. Constant stirring is best ...of food cook faster than large ones. This will allow the food to help you can be wrapped prior to placing in the microwave. As with any food prepartion in the center and avoids overcooking the out edges, The length of stand time depends on food packaging. ...
Pieces similar in size and shape will cook more evenly because microwave energy heats water molecules very efficiently. • Stirring Stir foods such as chicken pieces or salmon, with the thicker or meatier parts toward the outside to the center to distribute the heat more evenly. Constant stirring is best ...of food cook faster than large ones. This will allow the food to help you can be wrapped prior to placing in the microwave. As with any food prepartion in the center and avoids overcooking the out edges, The length of stand time depends on food packaging. ...
Complete Owner's Guide (English)
Page 20
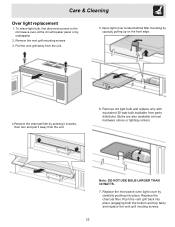
... vent grill back into place. To relace light bulb, first disconnect power to the microwave oven at most hardware stores or lighting centers. Pull the vent grill away from parts distributor. Replace the charcoal filter. Replace the microwave oven light cover by carefully pushing into place (engaging both the bottom and top tabs...
... vent grill back into place. To relace light bulb, first disconnect power to the microwave oven at most hardware stores or lighting centers. Pull the vent grill away from parts distributor. Replace the charcoal filter. Replace the microwave oven light cover by carefully pushing into place (engaging both the bottom and top tabs...
Complete Owner's Guide (English)
Page 21
... greasy foods like chicken or bacon. Food particles and spilled liquids can stick to the oven walls, causing the oven to the operating parts of water standing inside the oven when it in the oven cavity; DO NOT use rough scouring powder or pads on food particles or... surface of food and grease build-up spills immediately. Follow these instructions to keep the inner door panel and oven fron frame free of the microwave with a wet paper towel, especially after cooking. Wipe spatters immediately with soap and a clean damp cloth. Then rinse and wipe completely dry. Use a...
... greasy foods like chicken or bacon. Food particles and spilled liquids can stick to the oven walls, causing the oven to the operating parts of water standing inside the oven when it in the oven cavity; DO NOT use rough scouring powder or pads on food particles or... surface of food and grease build-up spills immediately. Follow these instructions to keep the inner door panel and oven fron frame free of the microwave with a wet paper towel, especially after cooking. Wipe spatters immediately with soap and a clean damp cloth. Then rinse and wipe completely dry. Use a...
Complete Owner's Guide (English)
Page 24
...to change without notice. Damages caused by: services performed by Electrolux or an authorized service company. use of parts other than genuine Electrolux parts or parts obtained from persons other than authorized service companies; CLAIMS BASED ON IMPLIED WARRANTIES, INCLUDING WARRANTIES OF MERCHANTABILITY OR ...which do not involve malfunction or defects in materials or workmanship, or for servicing, such as described or illustrated are not a part of this appliance that prove to use or used other than in a commercial setting. 7. Surcharges including, but not limited to ...
...to change without notice. Damages caused by: services performed by Electrolux or an authorized service company. use of parts other than genuine Electrolux parts or parts obtained from persons other than authorized service companies; CLAIMS BASED ON IMPLIED WARRANTIES, INCLUDING WARRANTIES OF MERCHANTABILITY OR ...which do not involve malfunction or defects in materials or workmanship, or for servicing, such as described or illustrated are not a part of this appliance that prove to use or used other than in a commercial setting. 7. Surcharges including, but not limited to ...
Installation Instructions (All Languages)
Page 2
Shipment/Installation 4 Parts Included 4 Tools You Will Need 5 Mounting Space 5 Step-by-step installation guide Placement of The Mounting Plate 6-8 Removing the Mounting Plate 6 Finding the Wall Studs 6 ... for Outside Back Exhaust 16 Remove Blower Plate 16 Attach Mounting Plate to Wall 17 Preparation of Top Cabinet 17 Adapting Microwave Blower for Outside Back Exhaust 17-18 Mount the Microwave Oven 19 C Recirculating 20 -22 Attach Mounting Plate to Wall 20 Preparation of Top Cabinet 20 Check Blower Plate 21...
Shipment/Installation 4 Parts Included 4 Tools You Will Need 5 Mounting Space 5 Step-by-step installation guide Placement of The Mounting Plate 6-8 Removing the Mounting Plate 6 Finding the Wall Studs 6 ... for Outside Back Exhaust 16 Remove Blower Plate 16 Attach Mounting Plate to Wall 17 Preparation of Top Cabinet 17 Adapting Microwave Blower for Outside Back Exhaust 17-18 Mount the Microwave Oven 19 C Recirculating 20 -22 Attach Mounting Plate to Wall 20 Preparation of Top Cabinet 20 Check Blower Plate 21...
Installation Instructions (All Languages)
Page 4
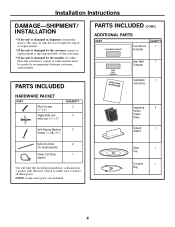
...You will find the installation hardware contained in shipment, return the unit to make sure you have all these parts. PARTS INCLUDED HARDWARE PACKET PART Wood Screws (1⁄4" x 2") Toggle Bolts (and wing nuts) (3⁄16" x 3") QUANTITY 2 4 Self-Aligning ...Machine 3 Screws (1⁄4"-28 x 31⁄4") PARTS INCLUDED (CONT.) ADDITIONAL PARTS PART TOP CABINET TEMPLATE Top Cabinet Template QUANTITY 1 REAR WALL TEMPLATE ININSSTTRAULCLTAITOIONNS Rear Wall 1 Template Installation 1 Instructions Separately 2 Packed ...
...You will find the installation hardware contained in shipment, return the unit to make sure you have all these parts. PARTS INCLUDED HARDWARE PACKET PART Wood Screws (1⁄4" x 2") Toggle Bolts (and wing nuts) (3⁄16" x 3") QUANTITY 2 4 Self-Aligning ...Machine 3 Screws (1⁄4"-28 x 31⁄4") PARTS INCLUDED (CONT.) ADDITIONAL PARTS PART TOP CABINET TEMPLATE Top Cabinet Template QUANTITY 1 REAR WALL TEMPLATE ININSSTTRAULCLTAITOIONNS Rear Wall 1 Template Installation 1 Instructions Separately 2 Packed ...


