Complete Owner's Guide (English)
Page 2
...in completely, signed and returned to providing you consider us for your microwave only as instructed in case your microwave should be practiced when installing, operating and maintaining any appliance. All rights reserved. 2 The serial... plate is our number one priority. Welcome & Congratulations Product Registration Be sure to record your model and serial number. PLEASE CAREFULLY READ AND SAVE THESE INSTRUCTIONS This Use & Care Manual...
...in completely, signed and returned to providing you consider us for your microwave only as instructed in case your microwave should be practiced when installing, operating and maintaining any appliance. All rights reserved. 2 The serial... plate is our number one priority. Welcome & Congratulations Product Registration Be sure to record your model and serial number. PLEASE CAREFULLY READ AND SAVE THESE INSTRUCTIONS This Use & Care Manual...
Complete Owner's Guide (English)
Page 6
... filters. 23 Use care when cleaning the ventilating hood filters. a DO NOT overcook food. b Remove wire twist-ties from the microwave oven is not always present. Corrosive cleaning agents such as lye-based oven cleaners may damage the filters. 24 When flaming foods under...including power cord, must be HEATED in this oven. 6 Use this oven ONLY for its intended use . . 7 As with the installation instructions in this Use & Care Manual. 5 Some products such as whole eggs and sealed containers - Contact nearest authorized service facility for examination, repair, or adjustment. 15 ...
... filters. 23 Use care when cleaning the ventilating hood filters. a DO NOT overcook food. b Remove wire twist-ties from the microwave oven is not always present. Corrosive cleaning agents such as lye-based oven cleaners may damage the filters. 24 When flaming foods under...including power cord, must be HEATED in this oven. 6 Use this oven ONLY for its intended use . . 7 As with the installation instructions in this Use & Care Manual. 5 Some products such as whole eggs and sealed containers - Contact nearest authorized service facility for examination, repair, or adjustment. 15 ...
Installation Instructions (All Languages)
Page 15
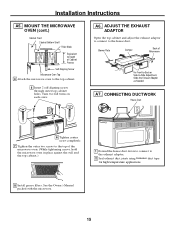
... the exhaust adaptor to connect to the exhaust adaptor. 2 Seal exhaust duct joints using furnance duct tape for high temperature applications. 8 Install grease filters. Turn two full turns on each screw. CONNECTING DUCTWORK House Duct 6 Tighten center screw completely. 7 Tighten the outer two...the house duct down to connect to the house duct. See the Owner's Manual packed with the microwave. 15 A6. Blower Plate Damper Back of Cabinet Recess Self-Aligning Screw Microwave Oven Top 4 Attach the microwave oven to -Side Adjustment, Slide the Exhaust Adaptor as Needed A7. MOUNT ...
... the exhaust adaptor to connect to the exhaust adaptor. 2 Seal exhaust duct joints using furnance duct tape for high temperature applications. 8 Install grease filters. Turn two full turns on each screw. CONNECTING DUCTWORK House Duct 6 Tighten center screw completely. 7 Tighten the outer two...the house duct down to connect to the house duct. See the Owner's Manual packed with the microwave. 15 A6. Blower Plate Damper Back of Cabinet Recess Self-Aligning Screw Microwave Oven Top 4 Attach the microwave oven to -Side Adjustment, Slide the Exhaust Adaptor as Needed A7. MOUNT ...
Installation Instructions (All Languages)
Page 19
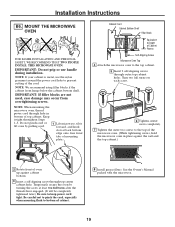
... oven by turning the screw at back bottom edge onto four lower tabs of the cord. See the Owner's Manual packed with the microwave. 19 NOTE: When mounting the microwave oven, thread power cord through top center cabinet hole. Turn two full turns on each screw. 6 Tighten center... when mounting flush to the top cabinet. 5 Insert 2 self-aligning screws through outer top cabinet holes. Installation Instructions B6. Temporarily secure the oven by pulling cord. 1 Lift microwave, tilt it tight throughout Steps 1-3. Keep it forward, and hook slots at least two full turns after the...
... oven by turning the screw at back bottom edge onto four lower tabs of the cord. See the Owner's Manual packed with the microwave. 19 NOTE: When mounting the microwave oven, thread power cord through top center cabinet hole. Turn two full turns on each screw. 6 Tighten center... when mounting flush to the top cabinet. 5 Insert 2 self-aligning screws through outer top cabinet holes. Installation Instructions B6. Temporarily secure the oven by pulling cord. 1 Lift microwave, tilt it tight throughout Steps 1-3. Keep it forward, and hook slots at least two full turns after the...
Installation Instructions (All Languages)
Page 22
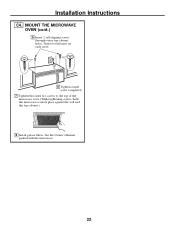
Installation Instructions C4. See the Owner's Manual packed with the microwave. 22 MOUNT THE MICROWAVE OVEN (cont.) 5 Insert 2 self-aligning screws through outer top cabinet holes. Turn two full turns on each screw. 6 Tighten center screw completely. 7 Tighten the outer two screws to the top of the microwave oven. (While tightening screws, hold the microwave oven in place against the wall and the top cabinet.) 8 Install grease filters.
Installation Instructions C4. See the Owner's Manual packed with the microwave. 22 MOUNT THE MICROWAVE OVEN (cont.) 5 Insert 2 self-aligning screws through outer top cabinet holes. Turn two full turns on each screw. 6 Tighten center screw completely. 7 Tighten the outer two screws to the top of the microwave oven. (While tightening screws, hold the microwave oven in place against the wall and the top cabinet.) 8 Install grease filters.
Installation Instructions (All Languages)
Page 23
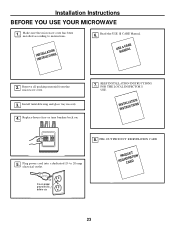
... THE LOCAL INSPECTOR'S USE. ININSSTTARLULCATTIIOONNS 6. Read the USE & CARE Manual. USME A&|+&= NCUAARLE + 2. to instructions. Replace house fuse or turn breaker back on. 7. FILL OUT PRODUCT REGISTRATION CARD RPEGROISDCTUARCRATDTION Ensure proper ground exists before use D D G 23 ININSSTTARLULCATTIIOONNS 5. Installation Instructions BEFORE YOU USE YOUR MICROWAVE 1. Install turntable ring and glass tray in cavity . 4. Remove all packing...
... THE LOCAL INSPECTOR'S USE. ININSSTTARLULCATTIIOONNS 6. Read the USE & CARE Manual. USME A&|+&= NCUAARLE + 2. to instructions. Replace house fuse or turn breaker back on. 7. FILL OUT PRODUCT REGISTRATION CARD RPEGROISDCTUARCRATDTION Ensure proper ground exists before use D D G 23 ININSSTTARLULCATTIIOONNS 5. Installation Instructions BEFORE YOU USE YOUR MICROWAVE 1. Install turntable ring and glass tray in cavity . 4. Remove all packing...

