Complete Owner's Guide (English)
Page 2
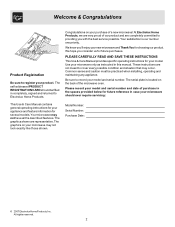
... future purchases. PLEASE CAREFULLY READ AND SAVE THESE INSTRUCTIONS This Use & Care Manual provides specific operating instructions for future reference in case your microwave should be practiced when installing, operating and maintaining any appliance. Common sense and caution must be filled in this manual. Welcome & Congratulations Product Registration Be sure to record...
... future purchases. PLEASE CAREFULLY READ AND SAVE THESE INSTRUCTIONS This Use & Care Manual provides specific operating instructions for future reference in case your microwave should be practiced when installing, operating and maintaining any appliance. Common sense and caution must be filled in this manual. Welcome & Congratulations Product Registration Be sure to record...
Complete Owner's Guide (English)
Page 3
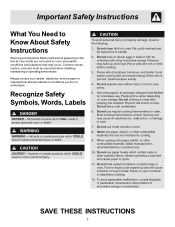
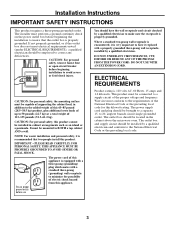
Common sense, caution, and care must be exercised when installing, maintaining or operating a microwave. Always contact your dealer, distributor, service agent or manufacturer about problems or conditions you do not understand. Important Safety Instructions What You Need to Know About Safety Instructions Warning and Important Safety Instructions appearing in the Use & Care Guide are not meant to cover all possible conditions and situations that may occur. Recognize Safety Symbols, Words, Labels SAVE THESE INSTRUCTIONS 3
Common sense, caution, and care must be exercised when installing, maintaining or operating a microwave. Always contact your dealer, distributor, service agent or manufacturer about problems or conditions you do not understand. Important Safety Instructions What You Need to Know About Safety Instructions Warning and Important Safety Instructions appearing in the Use & Care Guide are not meant to cover all possible conditions and situations that may occur. Recognize Safety Symbols, Words, Labels SAVE THESE INSTRUCTIONS 3
Complete Owner's Guide (English)
Page 6
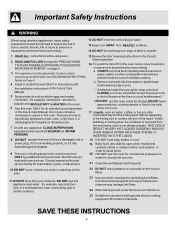
...be HEATED in this oven. 6 Use this oven ONLY for industrial or laboratory use. . 7 As with the installation instructions in accordance with any vents or openings on Page 4 4 Install or locate this oven ONLY in this Use & Care Manual. 5 Some products such as water, coffee, or tea...the oven to excessive microvave energy. Important Safety Instructions When using oven. 2 READ AND FOLLOW the specific "PRECAUTIONS TO AVOID POSSIBLE EXPOSURE TO EXCESSIVE MICROWAVE ENERGY" on page 5. 3 This appliance must be serviced ONLY by CHILDREN or INFIRM PERSONS 8 DO NOT operate this oven if it has ...
...be HEATED in this oven. 6 Use this oven ONLY for industrial or laboratory use. . 7 As with the installation instructions in accordance with any vents or openings on Page 4 4 Install or locate this oven ONLY in this Use & Care Manual. 5 Some products such as water, coffee, or tea...the oven to excessive microvave energy. Important Safety Instructions When using oven. 2 READ AND FOLLOW the specific "PRECAUTIONS TO AVOID POSSIBLE EXPOSURE TO EXCESSIVE MICROWAVE ENERGY" on page 5. 3 This appliance must be serviced ONLY by CHILDREN or INFIRM PERSONS 8 DO NOT operate this oven if it has ...
Complete Owner's Guide (English)
Page 19
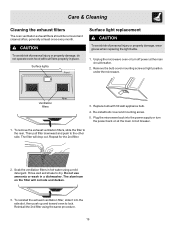
... 3. Care & Cleaning Cleaning the exhaust filters The oven ventilation exhaust filters should be removed and cleaned often; Unplug the microwave oven or turn the power back on the filter will drop out. Rinse well and shake to the rear. Do not ...use ammonia or wash in place. Replace bulb with 30 watt appliance bulb. 4. Plug the microwave back into the side slot, then push up and toward oven to the other side. Then pull filter downward and ... it into the power supply or turn off power at least once every month. Re-install bulb cover and mounting screw. 5.
... 3. Care & Cleaning Cleaning the exhaust filters The oven ventilation exhaust filters should be removed and cleaned often; Unplug the microwave oven or turn the power back on the filter will drop out. Rinse well and shake to the rear. Do not ...use ammonia or wash in place. Replace bulb with 30 watt appliance bulb. 4. Plug the microwave back into the side slot, then push up and toward oven to the other side. Then pull filter downward and ... it into the power supply or turn off power at least once every month. Re-install bulb cover and mounting screw. 5.
Complete Owner's Guide (English)
Page 24
...Electrolux authorizes no person to any parts of parts other than in accordance with original serial numbers that prove to correct the installation of the unit. 4. use or used in accordance with the provided instructions. LIMITATION OF REMEDIES CUSTOMER'S SOLE AND EXCLUSIVE.... Product features or specifications as abuse, misuse, inadequate power supply, accidents, fires, or acts of appliance or home incurred during installation, including but not limited to repair or replace appliance light bulbs, air filters, water filters, other consumables, or knobs, handles,...
...Electrolux authorizes no person to any parts of parts other than in accordance with original serial numbers that prove to correct the installation of the unit. 4. use or used in accordance with the provided instructions. LIMITATION OF REMEDIES CUSTOMER'S SOLE AND EXCLUSIVE.... Product features or specifications as abuse, misuse, inadequate power supply, accidents, fires, or acts of appliance or home incurred during installation, including but not limited to repair or replace appliance light bulbs, air filters, water filters, other consumables, or knobs, handles,...
Installation Instructions (All Languages)
Page 1
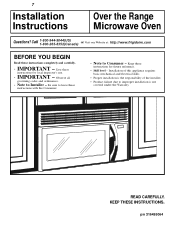
...) or Visit our Website at: http://www.frigidaire.com BEFORE YOU BEGIN Read these instructions for future reference. • Skill level - Keep these instructions with the Consumer. • Note to improper installation is not covered under the Warranty. Be sure... to leave these instructions for local inspector's use. • IMPORTANT - Observe all governing codes and ordinances. • Note to Installer - 7 Installation Instructions Over the Range Microwave Oven Questions? READ CAREFULLY...
...) or Visit our Website at: http://www.frigidaire.com BEFORE YOU BEGIN Read these instructions for future reference. • Skill level - Keep these instructions with the Consumer. • Note to improper installation is not covered under the Warranty. Be sure... to leave these instructions for local inspector's use. • IMPORTANT - Observe all governing codes and ordinances. • Note to Installer - 7 Installation Instructions Over the Range Microwave Oven Questions? READ CAREFULLY...
Installation Instructions (All Languages)
Page 2
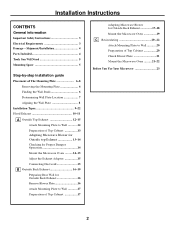
...Wall Studs 6 Determining Wall Plate Location 7 Aligning the Wall Plate 8 Installation Types 9-22 Hood Exhaust 10 -11 A Outside Top Exhaust 12-15 Attach Mounting Plate to Wall 12 Preparation of Top Cabinet 13 Adapting Microwave Blower for Outside top Exhaust 13-14 Checking for Proper Damper Operation 14... Exhaust 16 Remove Blower Plate 16 Attach Mounting Plate to Wall 17 Preparation of Top Cabinet 17 Adapting Microwave Blower for Outside Back Exhaust 17-18 Mount the Microwave Oven 19 C Recirculating 20 -22 Attach Mounting Plate to Wall 20 Preparation of Top Cabinet 20 Check...
...Wall Studs 6 Determining Wall Plate Location 7 Aligning the Wall Plate 8 Installation Types 9-22 Hood Exhaust 10 -11 A Outside Top Exhaust 12-15 Attach Mounting Plate to Wall 12 Preparation of Top Cabinet 13 Adapting Microwave Blower for Outside top Exhaust 13-14 Checking for Proper Damper Operation 14... Exhaust 16 Remove Blower Plate 16 Attach Mounting Plate to Wall 17 Preparation of Top Cabinet 17 Adapting Microwave Blower for Outside Back Exhaust 17-18 Mount the Microwave Oven 19 C Recirculating 20 -22 Attach Mounting Plate to Wall 20 Preparation of Top Cabinet 20 Check...
Installation Instructions (All Languages)
Page 3
... to a supply circuit of electric shock hazard from this appliance. NOTE: For easier installation and personal safety, it replaced with a standard three-prong (grounding) wall receptacle to insure that two people install this kilowatt rating. IMPORTANT - DO NOT USE WITH AN EXTENSION CORD. Wire size ...deficiencies. The outlet box should have it is recommended that the outlet box is properly grounded. You should be installed in the cabinet above the microwave oven. The power supply cord and plug should be brought to make sure the receptacle is properly grounded. If...
... to a supply circuit of electric shock hazard from this appliance. NOTE: For easier installation and personal safety, it replaced with a standard three-prong (grounding) wall receptacle to insure that two people install this kilowatt rating. IMPORTANT - DO NOT USE WITH AN EXTENSION CORD. Wire size ...deficiencies. The outlet box should have it is recommended that the outlet box is properly grounded. You should be installed in the cabinet above the microwave oven. The power supply cord and plug should be brought to make sure the receptacle is properly grounded. If...
Installation Instructions (All Languages)
Page 4
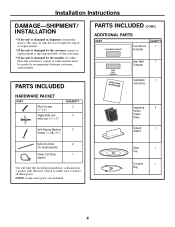
...INCLUDED (CONT.) ADDITIONAL PARTS PART TOP CABINET TEMPLATE Top Cabinet Template QUANTITY 1 REAR WALL TEMPLATE ININSSTTRAULCLTAITOIONNS Rear Wall 1 Template Installation 1 Instructions Separately 2 Packed Grease Filters Exhaust 1 adaptor Nylon Grommet 2 (for metal cabinets) Power Cord Strap 1 (plastic) You will find the... installation hardware contained in which it was bought for repair or replacement. • If the unit is damaged by the customer...
...INCLUDED (CONT.) ADDITIONAL PARTS PART TOP CABINET TEMPLATE Top Cabinet Template QUANTITY 1 REAR WALL TEMPLATE ININSSTTRAULCLTAITOIONNS Rear Wall 1 Template Installation 1 Instructions Separately 2 Packed Grease Filters Exhaust 1 adaptor Nylon Grommet 2 (for metal cabinets) Power Cord Strap 1 (plastic) You will find the... installation hardware contained in which it was bought for repair or replacement. • If the unit is damaged by the customer...
Installation Instructions (All Languages)
Page 5
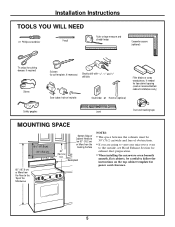
... Filler blocks or scrap wood pieces, if needed for top cabinet spacing (used on the top cabinet template for exhaust duct preparation. • When installing the microwave oven beneath smooth, flat cabinets, be 30″ (76.2 cm) or More from the Cooking Surface 30" (76.2 cm) min.... Installation Instructions TOOLS YOU WILL NEED # 1 Phillips screwdriver Pencil Ruler or tape measure and straight edge Carpenter square (optional) Tin snips (for cutting damper, if ...
... Filler blocks or scrap wood pieces, if needed for top cabinet spacing (used on the top cabinet template for exhaust duct preparation. • When installing the microwave oven beneath smooth, flat cabinets, be 30″ (76.2 cm) or More from the Cooking Surface 30" (76.2 cm) min.... Installation Instructions TOOLS YOU WILL NEED # 1 Phillips screwdriver Pencil Ruler or tape measure and straight edge Carpenter square (optional) Tin snips (for cutting damper, if ...
Installation Instructions (All Languages)
Page 6
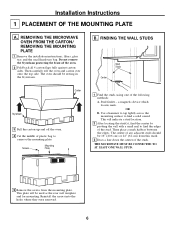
...plate Screws Mounting Plate Carton 1 Find the studs, using one of any adjacent studs should be used as the rear wall template and for mounting. Installation Instructions 1 PLACEMENT OF THE MOUNTING PLATE A. FINDING THE WALL STUDS Wall Studs Center Styrofoam 3 Pull the carton up and off the oven. 4 Cut... the middle of plastic bag to find the edges of the oven. 2 Fold back all 4 carton flaps fully against carton sides. REMOVING THE MICROWAVE OVEN FROM THE CARTON/ REMOVING THE MOUNTING PLATE 1 Remove the installation instructions, filters, glass tray and the small hardware bag.
...plate Screws Mounting Plate Carton 1 Find the studs, using one of any adjacent studs should be used as the rear wall template and for mounting. Installation Instructions 1 PLACEMENT OF THE MOUNTING PLATE A. FINDING THE WALL STUDS Wall Studs Center Styrofoam 3 Pull the carton up and off the oven. 4 Cut... the middle of plastic bag to find the edges of the oven. 2 Fold back all 4 carton flaps fully against carton sides. REMOVING THE MICROWAVE OVEN FROM THE CARTON/ REMOVING THE MOUNTING PLATE 1 Remove the installation instructions, filters, glass tray and the small hardware bag.
Installation Instructions (All Languages)
Page 7
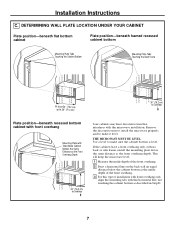
... level to make sure the cabinet bottom is level. Installation Instructions C. If the cabinets have decorative trim that interferes with this type of installation with front overhang only, align the mounting tabs with the microwave installation. This will keep the microwave level. 1 Measure the inside depth of the front ...76.2 cm) to Cooktop Your cabinets may have a front overhang only, with no back or side frame, install the mounting plate down the same distance as described in Step D. 7 Remove the decorative trim to install the microwave properly and to make it level.
... level to make sure the cabinet bottom is level. Installation Instructions C. If the cabinets have decorative trim that interferes with this type of installation with front overhang only, align the mounting tabs with the microwave installation. This will keep the microwave level. 1 Measure the inside depth of the front ...76.2 cm) to Cooktop Your cabinets may have a front overhang only, with no back or side frame, install the mounting plate down the same distance as described in Step D. 7 Remove the decorative trim to install the microwave properly and to make it level.
Installation Instructions (All Languages)
Page 8
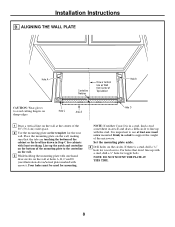
... for toggle bolts. If there is a stud, drill a 3⁄16″ hole for mounting. For holes that the tabs are touching the bottom of the microwave. NOTE: DO NOT MOUNT THE PLATE AT THIS TIME. 8 Hole C Area E Hole D 1 Draw a vertical line on the wall at the center of Top Cabinet Hole... to support the weight of the cabinet or the level line drawn in area E and draw a fifth circle to avoid cutting fingers on the circles. Installation Instructions D. Four holes must be used for wood screws. Set the mounting plate aside. 4 Drill holes on sharp edges.
... for toggle bolts. If there is a stud, drill a 3⁄16″ hole for mounting. For holes that the tabs are touching the bottom of the microwave. NOTE: DO NOT MOUNT THE PLATE AT THIS TIME. 8 Hole C Area E Hole D 1 Draw a vertical line on the wall at the center of Top Cabinet Hole... to support the weight of the cabinet or the level line drawn in area E and draw a fifth circle to avoid cutting fingers on the circles. Installation Instructions D. Four holes must be used for wood screws. Set the mounting plate aside. 4 Drill holes on sharp edges.
Installation Instructions (All Languages)
Page 9
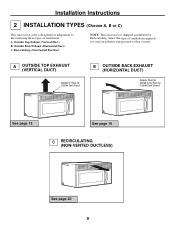
Installation Instructions 2 INSTALLATION TYPES (Choose A, B or C) This microwave oven is shipped assembled for adaptation to that section. Recirculating (Non-Vented Ductless) NOTE: This microwave is designed for Recirculating. Select the type of ventilation: A. Outside Top Exhaust... (Vertical Duct) B. A OUTSIDE TOP EXHAUST (VERTICAL DUCT) Adaptor in Place for Outside Top Exhaust B OUTSIDE BACK EXHAUST (HORIZONTAL DUCT) Adaptor Must Be Moved to the Back for your installation...
Installation Instructions 2 INSTALLATION TYPES (Choose A, B or C) This microwave oven is shipped assembled for adaptation to that section. Recirculating (Non-Vented Ductless) NOTE: This microwave is designed for Recirculating. Select the type of ventilation: A. Outside Top Exhaust... (Vertical Duct) B. A OUTSIDE TOP EXHAUST (VERTICAL DUCT) Adaptor in Place for Outside Top Exhaust B OUTSIDE BACK EXHAUST (HORIZONTAL DUCT) Adaptor Must Be Moved to the Back for your installation...
Installation Instructions (All Languages)
Page 10
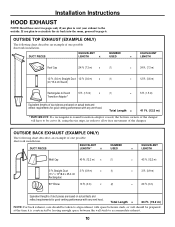
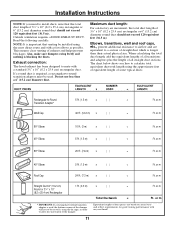
...installation. DUCT PIECES EQUIVALENT NUMBER EQUIVALENT LENGTH x USED = LENGTH Roof Cap 24 Ft. (7.3 m) x (1) = 24 Ft. (7.3 m) 12 Ft. (3.6 m) Straight Duct 12 Ft. (3.6 m) x (1) (6"/15.2 cm Round) = 12 Ft. (3.6 m) Rectangular-to page 6. Straight Duct 3 Ft. (0.9 m) x (1) (31⁄4" x 10"/8.2 x 25.4 cm Rectangular) 90° Elbow 10 Ft. (3 m) x (2) = 3 Ft. (0.9 m) = 20 Ft...EXAMPLE ONLY) The following chart describes an example of one possible ductwork installation. Total Length = 63 Ft. (19.2 m) NOTE: For back exhaust, care should be prepared...
...installation. DUCT PIECES EQUIVALENT NUMBER EQUIVALENT LENGTH x USED = LENGTH Roof Cap 24 Ft. (7.3 m) x (1) = 24 Ft. (7.3 m) 12 Ft. (3.6 m) Straight Duct 12 Ft. (3.6 m) x (1) (6"/15.2 cm Round) = 12 Ft. (3.6 m) Rectangular-to page 6. Straight Duct 3 Ft. (0.9 m) x (1) (31⁄4" x 10"/8.2 x 25.4 cm Rectangular) 90° Elbow 10 Ft. (3 m) x (2) = 3 Ft. (0.9 m) = 20 Ft...EXAMPLE ONLY) The following chart describes an example of one possible ductwork installation. Total Length = 63 Ft. (19.2 m) NOTE: For back exhaust, care should be prepared...
Installation Instructions (All Languages)
Page 11
... the following carefully. or m Straight Duct 6" (15.2 cm) Round or 31⁄4" x 10" (8.2 x 25.4 cm) Rectangular 1 Ft. (0.3 m) x ( ) = Total Ductwork = Ft. or m Ft. The chart below shows you need to install ducts, note that venting be cut to fit, using the most direct route and with a standard 31⁄4" x 10" (8.2 x 25.4 cm) rectangular duct. DUCT...
... the following carefully. or m Straight Duct 6" (15.2 cm) Round or 31⁄4" x 10" (8.2 x 25.4 cm) Rectangular 1 Ft. (0.3 m) x ( ) = Total Ductwork = Ft. or m Ft. The chart below shows you need to install ducts, note that venting be cut to fit, using the most direct route and with a standard 31⁄4" x 10" (8.2 x 25.4 cm) rectangular duct. DUCT...
Installation Instructions (All Languages)
Page 12
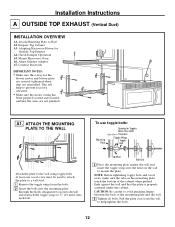
... flush against the wall and insert the toggle wings into drywall and reattach the toggle wings to mount the plate. Installation Instructions A OUTSIDE TOP EXHAUST (Vertical Duct) INSTALLATION OVERVIEW A1. Pull the plate away from the bolts. 2 Insert the bolts into the mounting plate through the holes... for Outside Top Exhaust A4. Wall Bolt End 3 Place the mounting plate against the wall and that the wires are reinstalled. Adapting Microwave Blower for Toggles More Than Wall Thickness Toggle Wings Toggle Bolt Attach the plate to Wall A2. This will help tighten the bolts. ...
... flush against the wall and insert the toggle wings into drywall and reattach the toggle wings to mount the plate. Installation Instructions A OUTSIDE TOP EXHAUST (Vertical Duct) INSTALLATION OVERVIEW A1. Pull the plate away from the bolts. 2 Insert the bolts into the mounting plate through the holes... for Outside Top Exhaust A4. Wall Bolt End 3 Place the mounting plate against the wall and that the wires are reinstalled. Adapting Microwave Blower for Toggles More Than Wall Thickness Toggle Wings Toggle Bolt Attach the plate to Wall A2. This will help tighten the bolts. ...
Installation Instructions (All Languages)
Page 13
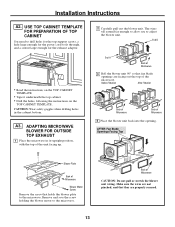
... screw holding the blower motor to fit through, and a cutout large enough for the power cord to the microwave. Installation Instructions A2. Before Rotation After Rotation Back of Microwave Back of Microwave CAUTION: Do not pull or stretch the blower unit wiring. Make sure the wires are not pinched, and ... the unit facing up. 2 Carefully pull out the blower unit. End B End A Back of Microwave 3 Roll the blower unit 90° so that they are facing out the top of Microwave Blower Motor Screw Remove the screw that holds the blower plate to adjust the blower unit. A3. ...
... screw holding the blower motor to fit through, and a cutout large enough for the power cord to the microwave. Installation Instructions A2. Before Rotation After Rotation Back of Microwave Back of Microwave CAUTION: Do not pull or stretch the blower unit wiring. Make sure the wires are not pinched, and ... the unit facing up. 2 Carefully pull out the blower unit. End B End A Back of Microwave 3 Roll the blower unit 90° so that they are facing out the top of Microwave Blower Motor Screw Remove the screw that holds the blower plate to adjust the blower unit. A3. ...
Installation Instructions (All Languages)
Page 14
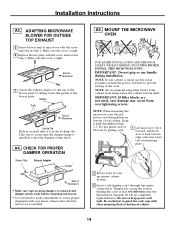
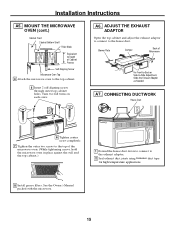
...EXHAUST 5 Secure blower unit to assure that the damper hinge is in Step 1. A4. MOUNT THE MICROWAVE OVEN FOR EASIER INSTALLATION AND PERSONAL SAFETY, WE RECOMMEND THAT TWO PEOPLE INSTALL THIS MICROWAVE OVEN. Adaptor Guide Back of the blower plate. Keep it forward, and hook slots at least two...use the nylon grommet around the power cord hole to assure proper alignment with your cabinet is metal, use handle during installation. NOTE: When mounting the microwave oven, thread power cord through top center cabinet hole. NOTE: We recommend using filler blocks if the cabinet front ...
...EXHAUST 5 Secure blower unit to assure that the damper hinge is in Step 1. A4. MOUNT THE MICROWAVE OVEN FOR EASIER INSTALLATION AND PERSONAL SAFETY, WE RECOMMEND THAT TWO PEOPLE INSTALL THIS MICROWAVE OVEN. Adaptor Guide Back of the blower plate. Keep it forward, and hook slots at least two...use the nylon grommet around the power cord hole to assure proper alignment with your cabinet is metal, use handle during installation. NOTE: When mounting the microwave oven, thread power cord through top center cabinet hole. NOTE: We recommend using filler blocks if the cabinet front ...
Installation Instructions (All Languages)
Page 15
.... 2 Seal exhaust duct joints using furnance duct tape for high temperature applications. 8 Install grease filters. Turn two full turns on each screw. Installation Instructions A5. MOUNT THE MICROWAVE OVEN (cont.) Cabinet Front Cabinet Bottom Shelf Filler Block Equivalent to Depth of Microwave For Front-to-Back or Side-to the top cabinet. 5 Insert 2 self...
.... 2 Seal exhaust duct joints using furnance duct tape for high temperature applications. 8 Install grease filters. Turn two full turns on each screw. Installation Instructions A5. MOUNT THE MICROWAVE OVEN (cont.) Cabinet Front Cabinet Bottom Shelf Filler Block Equivalent to Depth of Microwave For Front-to-Back or Side-to the top cabinet. 5 Insert 2 self...


