Complete Owner's Guide (English)
Page 1
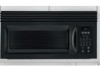
Visit the Frigidaire Web Site at: http://www.frigidaire.com Over-the-Range Microwave Oven with Convenience Pad Welcome 2 Important Safety Instructions .....3-6 Features and Specifications .......... 7 Before Operating 8 Manual Operation 9-14 Convenience Operation ......... 15-16 Cooking Charts 17-18 Questions or for Service Call: 1-800-944-9044(US) 1-800-265-8352(Canada) Care & Cleaning 19-21 Before You Call Solutions to Common Problems 22 Warranty Back Page READ AND SAVE THESE INSTRUCTIONS p/n 316495058
Visit the Frigidaire Web Site at: http://www.frigidaire.com Over-the-Range Microwave Oven with Convenience Pad Welcome 2 Important Safety Instructions .....3-6 Features and Specifications .......... 7 Before Operating 8 Manual Operation 9-14 Convenience Operation ......... 15-16 Cooking Charts 17-18 Questions or for Service Call: 1-800-944-9044(US) 1-800-265-8352(Canada) Care & Cleaning 19-21 Before You Call Solutions to Common Problems 22 Warranty Back Page READ AND SAVE THESE INSTRUCTIONS p/n 316495058
Complete Owner's Guide (English)
Page 2
... Products, Inc. We know you'll enjoy your new microwave and Thank You for your model. Your microwave may occur. The self-addressed PRODUCT REGISTRATION CARD should ever require servicing: This Use & Care Manual contains general operating instructions for your appliance and feature information ...not have all the described features. The graphics on your microwave should be practiced when installing, operating and maintaining any appliance. PLEASE CAREFULLY READ AND SAVE THESE INSTRUCTIONS This Use & Care Manual provides specific operating instructions for choosing our product. The ...
... Products, Inc. We know you'll enjoy your new microwave and Thank You for your model. Your microwave may occur. The self-addressed PRODUCT REGISTRATION CARD should ever require servicing: This Use & Care Manual contains general operating instructions for your appliance and feature information ...not have all the described features. The graphics on your microwave should be practiced when installing, operating and maintaining any appliance. PLEASE CAREFULLY READ AND SAVE THESE INSTRUCTIONS This Use & Care Manual provides specific operating instructions for choosing our product. The ...
Complete Owner's Guide (English)
Page 6
...surfaces. 14 DO NOT let cord hang over edge of table or counter. 1 READ ALL instructions before placing bag in this Use & Care Manual. THIS COULD RESULT IN VERY HOT LIQUIDS SUDDENLY BOILING OVER WHEN A SPOON OR OTHER UTENSIL IS INSERTED INTO THE LIQUID. 18 DO NOT ...including power cord, must be grounded. Important Safety Instructions When using oven. 2 READ AND FOLLOW the specific "PRECAUTIONS TO AVOID POSSIBLE EXPOSURE TO EXCESSIVE MICROWAVE ENERGY" on page 5. 3 This appliance must be serviced ONLY by CHILDREN or INFIRM PERSONS 8 DO NOT operate this oven cavity for use this Use...
...surfaces. 14 DO NOT let cord hang over edge of table or counter. 1 READ ALL instructions before placing bag in this Use & Care Manual. THIS COULD RESULT IN VERY HOT LIQUIDS SUDDENLY BOILING OVER WHEN A SPOON OR OTHER UTENSIL IS INSERTED INTO THE LIQUID. 18 DO NOT ...including power cord, must be grounded. Important Safety Instructions When using oven. 2 READ AND FOLLOW the specific "PRECAUTIONS TO AVOID POSSIBLE EXPOSURE TO EXCESSIVE MICROWAVE ENERGY" on page 5. 3 This appliance must be serviced ONLY by CHILDREN or INFIRM PERSONS 8 DO NOT operate this oven cavity for use this Use...
Complete Owner's Guide (English)
Page 9
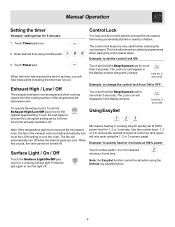
... from ON to turn off . When the timer has reached the end of cook time (this occurs, the vent cannot be turned off . Manual Operation Setting the timer Example: setting timer for the highest speed setting. Control Lock You may be set the control lock ON: 3. Touch and... hold for desired minutes of the range below the microwave oven. Using EasySet Microwave heating or cooking may lock the control panel to quickly heat for 2 minutes at 100% power level for more than 3 seconds. The...
... from ON to turn off . When the timer has reached the end of cook time (this occurs, the vent cannot be turned off . Manual Operation Setting the timer Example: setting timer for the highest speed setting. Control Lock You may be set the control lock ON: 3. Touch and... hold for desired minutes of the range below the microwave oven. Using EasySet Microwave heating or cooking may lock the control panel to quickly heat for 2 minutes at 100% power level for more than 3 seconds. The...
Complete Owner's Guide (English)
Page 10
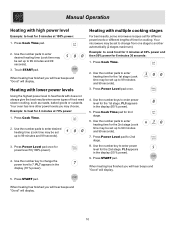
...% power: 1. Heating with lower power levels Using the highest power level to heat foods with does not always give the best results when some microwave recipes call for different power levels or different lengths of food need slower cooking, such as roasts, baked goods or custards. Use the number pads.... Use the number keys to enter power level for cooking. When heating has finished you may be set up to 99 minutes and 99 seconds). 7. Manual Operation Heating with high power level Example: to heat for 6 minutes 30 seconds: 1. Example: to cook food for 3 minutes at 80% power and ...
...% power: 1. Heating with lower power levels Using the highest power level to heat foods with does not always give the best results when some microwave recipes call for different power levels or different lengths of food need slower cooking, such as roasts, baked goods or custards. Use the number pads.... Use the number keys to enter power level for cooking. When heating has finished you may be set up to 99 minutes and 99 seconds). 7. Manual Operation Heating with high power level Example: to heat for 6 minutes 30 seconds: 1. Example: to cook food for 3 minutes at 80% power and ...
Complete Owner's Guide (English)
Page 11
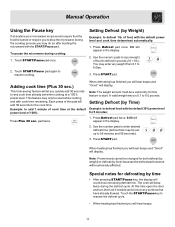
... of this time open the door and turn the food if needed and remove any weight from 0.1 to stop the microwave during the cooking process you may do so after starting the microwave with the default 30% power level for both defrost (by weight) or defrost (by Weight) Example: to defrost... entry is 0.1 to resume cooking. The oven will appear in the display. 2. Press START pad. Press Defrost pad once. 0.0 will beep twice during cooking: 1. Manual Operation Using the Pause key If at anytime your microwave recipe would require that have already thawed. To pause the...
... of this time open the door and turn the food if needed and remove any weight from 0.1 to stop the microwave during the cooking process you may do so after starting the microwave with the default 30% power level for both defrost (by weight) or defrost (by Weight) Example: to defrost... entry is 0.1 to resume cooking. The oven will appear in the display. 2. Press START pad. Press Defrost pad once. 0.0 will beep twice during cooking: 1. Manual Operation Using the Pause key If at anytime your microwave recipe would require that have already thawed. To pause the...
Complete Owner's Guide (English)
Page 12
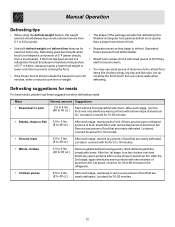
..., for 30 to 60 minutes in a refrigerator-freezer that are from a true freezer). If there are nearly defrosted. Let stand for 10-20 minutes. 12 Manual Operation Defrosting tips • When using the defrost weight feature, the weight entered should always be thawed is stored outside the freezer for up to...
..., for 30 to 60 minutes in a refrigerator-freezer that are from a true freezer). If there are nearly defrosted. Let stand for 10-20 minutes. 12 Manual Operation Defrosting tips • When using the defrost weight feature, the weight entered should always be thawed is stored outside the freezer for up to...
Complete Owner's Guide (English)
Page 13
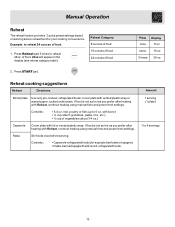
... oz.) Casserole Cover plate with lid or vented plastic wrap. Cover plate with Reheat, continue heating using manual time and power level settings. Contents: • 3-4 oz. with Reheat, continue heating using manual time and power level settings. Amount 1 serving (1 plate) 1 to 6 oz. If food is ... convenience. Press Reheat pad 3 times to reheat 24 ounces of food. 24oz will appear in the display (see reheat category table). Manual Operation Reheat The reheat feature provides 3 quick preset settings based on serving size to reheat food for example beef stew or lasagna) &#...
... oz.) Casserole Cover plate with lid or vented plastic wrap. Cover plate with Reheat, continue heating using manual time and power level settings. Contents: • 3-4 oz. with Reheat, continue heating using manual time and power level settings. Amount 1 serving (1 plate) 1 to 6 oz. If food is ... convenience. Press Reheat pad 3 times to reheat 24 ounces of food. 24oz will appear in the display (see reheat category table). Manual Operation Reheat The reheat feature provides 3 quick preset settings based on serving size to reheat food for example beef stew or lasagna) &#...
Complete Owner's Guide (English)
Page 14
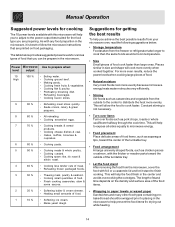
... to expose all sides equally to microwave energy. • Food placement Place delicate areas of food items, such as asparagus tips, toward the center of food that are preparing. As with this microwave will allow the food to cook faster. Manual Operation Suggested power levels for cooking ...The 10 power levels available with any food prepartion in the microwave, it stand to finish cooking.
... to expose all sides equally to microwave energy. • Food placement Place delicate areas of food items, such as asparagus tips, toward the center of food that are preparing. As with this microwave will allow the food to cook faster. Manual Operation Suggested power levels for cooking ...The 10 power levels available with any food prepartion in the microwave, it stand to finish cooking.
Installation Instructions (All Languages)
Page 15
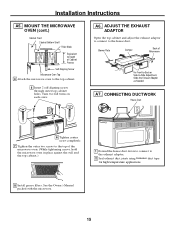
A6. See the Owner's Manual packed with the microwave. 15 MOUNT THE MICROWAVE OVEN (cont.) Cabinet Front Cabinet Bottom Shelf Filler Block Equivalent to Depth of Microwave For Front-to-Back or Side-to the top cabinet. 5 Insert 2 self-aligning screws through outer top cabinet holes.... Blower Plate Damper Back of Cabinet Recess Self-Aligning Screw Microwave Oven Top 4 Attach the microwave oven to -Side Adjustment, Slide the Exhaust Adaptor as Needed A7. Turn two full turns on each screw. CONNECTING DUCTWORK House...
A6. See the Owner's Manual packed with the microwave. 15 MOUNT THE MICROWAVE OVEN (cont.) Cabinet Front Cabinet Bottom Shelf Filler Block Equivalent to Depth of Microwave For Front-to-Back or Side-to the top cabinet. 5 Insert 2 self-aligning screws through outer top cabinet holes.... Blower Plate Damper Back of Cabinet Recess Self-Aligning Screw Microwave Oven Top 4 Attach the microwave oven to -Side Adjustment, Slide the Exhaust Adaptor as Needed A7. Turn two full turns on each screw. CONNECTING DUCTWORK House...
Installation Instructions (All Languages)
Page 19
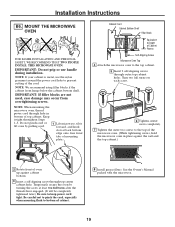
...pinch cord or lift oven by turning the screw at back bottom edge onto four lower tabs of Cabinet Recess Self-Aligning Screw Microwave Oven Top 4 Attach the microwave oven to prevent cutting of top cabinet. Be careful not to pinch the cord, especially when mounting flush to Depth of ...through hole in place against the wall and the top cabinet.) 2 Rotate front of cabinet. 8 Install grease filters. Installation Instructions B6. See the Owner's Manual packed with the microwave. 19 IMPORTANT: If filler blocks are not used, case damage may occur from overtightening screws.
...pinch cord or lift oven by turning the screw at back bottom edge onto four lower tabs of Cabinet Recess Self-Aligning Screw Microwave Oven Top 4 Attach the microwave oven to prevent cutting of top cabinet. Be careful not to pinch the cord, especially when mounting flush to Depth of ...through hole in place against the wall and the top cabinet.) 2 Rotate front of cabinet. 8 Install grease filters. Installation Instructions B6. See the Owner's Manual packed with the microwave. 19 IMPORTANT: If filler blocks are not used, case damage may occur from overtightening screws.
Installation Instructions (All Languages)
Page 22
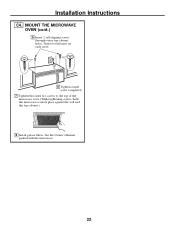
Turn two full turns on each screw. 6 Tighten center screw completely. 7 Tighten the outer two screws to the top of the microwave oven. (While tightening screws, hold the microwave oven in place against the wall and the top cabinet.) 8 Install grease filters. MOUNT THE MICROWAVE OVEN (cont.) 5 Insert 2 self-aligning screws through outer top cabinet holes. See the Owner's Manual packed with the microwave. 22 Installation Instructions C4.
Turn two full turns on each screw. 6 Tighten center screw completely. 7 Tighten the outer two screws to the top of the microwave oven. (While tightening screws, hold the microwave oven in place against the wall and the top cabinet.) 8 Install grease filters. MOUNT THE MICROWAVE OVEN (cont.) 5 Insert 2 self-aligning screws through outer top cabinet holes. See the Owner's Manual packed with the microwave. 22 Installation Instructions C4.
Installation Instructions (All Languages)
Page 23
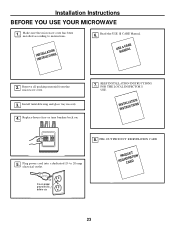
... D D G 23 USME A&|+&= NCUAARLE + 2. to instructions. Make sure the microwave oven has been installed according to 20-amp electrical outlet. 8. Remove all packing material from the microwave oven. 3. Plug power cord into a dedicated 15- Installation Instructions BEFORE YOU USE YOUR MICROWAVE 1. Read the USE & CARE Manual. ININSSTTARLULCATTIIOONNS 6. Replace house fuse or turn breaker back on...
... D D G 23 USME A&|+&= NCUAARLE + 2. to instructions. Make sure the microwave oven has been installed according to 20-amp electrical outlet. 8. Remove all packing material from the microwave oven. 3. Plug power cord into a dedicated 15- Installation Instructions BEFORE YOU USE YOUR MICROWAVE 1. Read the USE & CARE Manual. ININSSTTARLULCATTIIOONNS 6. Replace house fuse or turn breaker back on...


