
Use and Care Guide
Page 2
...shop where you purchased the product. Instead it in the Use and Care Guide, Operating Instructions, Installation Instructions and on Use the washer only as household waste. This book Model Number Serial Number Purchase Date Pedestal A pedestal accessory, Model No. The model and serial ...numbers of your washer are not followed. 2 It also contains information about • Operation • Care • Service Keep it shall be killed or ...
...shop where you purchased the product. Instead it in the Use and Care Guide, Operating Instructions, Installation Instructions and on Use the washer only as household waste. This book Model Number Serial Number Purchase Date Pedestal A pedestal accessory, Model No. The model and serial ...numbers of your washer are not followed. 2 It also contains information about • Operation • Care • Service Keep it shall be killed or ...
Use and Care Guide
Page 3
...warnings could result in accordance with rugs, bedspreads or plastic sheets can produce poisonous gas--resulting in serious injury or death. - The washer will be removed. HYDROGEN GAS IS EXPLOSIVE. do not reach into a properly grounded and polarized 3-prong outlet. Cartons covered with ...before reaching inside. •Failure to comply with these items on the label. - This will stop before using laundry products. Before loading, unloading or adding items, push in the cycle selector knob and allow children to a complete stop if it checked and reinstalled by...
...warnings could result in accordance with rugs, bedspreads or plastic sheets can produce poisonous gas--resulting in serious injury or death. - The washer will be removed. HYDROGEN GAS IS EXPLOSIVE. do not reach into a properly grounded and polarized 3-prong outlet. Cartons covered with ...before reaching inside. •Failure to comply with these items on the label. - This will stop before using laundry products. Before loading, unloading or adding items, push in the cycle selector knob and allow children to a complete stop if it checked and reinstalled by...
Use and Care Guide
Page 4
... the risk of fiberglass left in the drum may stick to fabrics in this washer. 1. Load large items first. Important Safety Instructions (continued) Avoid fire hazard or electrical shock. Sort laundry into loads that can be washed together. Add laundry load to prevent tangling during washing. • Place delicate items such as toilet cleaners...
... the risk of fiberglass left in the drum may stick to fabrics in this washer. 1. Load large items first. Important Safety Instructions (continued) Avoid fire hazard or electrical shock. Sort laundry into loads that can be washed together. Add laundry load to prevent tangling during washing. • Place delicate items such as toilet cleaners...
Use and Care Guide
Page 5
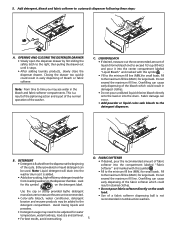
... the fabric softener which could result in damaged clothes. • Do not pour undiluted liquid chlorine bleach directly onto the load or into the washer drum as it is flushed from the dispenser at the beginning of liquid chlorine bleach (not to measure the amount recommended....labeled "Liquid Bleach" and marked with this symbol . • Fill to time you may need to the maximum fill line (MAX.) for front-loading washers to the detergent dispenser. LIQUID BLEACH • If desired, measure out the recommended amount of the cycle. Fill to automatic dispenser following these...
... the fabric softener which could result in damaged clothes. • Do not pour undiluted liquid chlorine bleach directly onto the load or into the washer drum as it is flushed from the dispenser at the beginning of liquid chlorine bleach (not to measure the amount recommended....labeled "Liquid Bleach" and marked with this symbol . • Fill to time you may need to the maximum fill line (MAX.) for front-loading washers to the detergent dispenser. LIQUID BLEACH • If desired, measure out the recommended amount of the cycle. Fill to automatic dispenser following these...

Use and Care Guide
Page 6
...for energy efficiency. Slowly close the dispenser drawer, and press START to continue. • Do not slam the washer door closed or try to hang on top of washer at any utensil used. • Do not combine stain removal products, especially ammonia and chlorine bleach. They can ...• If the dispenser drawer is completed. Do not store or place laundry products on an inside the washer. Stain Removal Safe Stain Removal Procedures To reduce the risk of each load. Washing Procedures Con't 6. Select the cycle, temperature, spin speed, options and features according to type, ...
...for energy efficiency. Slowly close the dispenser drawer, and press START to continue. • Do not slam the washer door closed or try to hang on top of washer at any utensil used. • Do not combine stain removal products, especially ammonia and chlorine bleach. They can ...• If the dispenser drawer is completed. Do not store or place laundry products on an inside the washer. Stain Removal Safe Stain Removal Procedures To reduce the risk of each load. Washing Procedures Con't 6. Select the cycle, temperature, spin speed, options and features according to type, ...
Use and Care Guide
Page 8
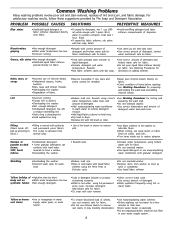
... treat with granular detergent. Add bleach safe for wash load. •Reduce load size. •Rinse in the washer to lubricate fibers. •When ironing, use chlorine bleach to abrasion from washer as soon as cycle is attracting lint. •Load washed too long. See Washing Procedures for fabric. &#... dryer. •Remove lint with lint brush or roller. •See Washing Procedures for sorting and preparing the wash load. •Do not overload washer. •Use correct temperature and amount of detergent, water and wash time. • Use a lint brush or shaver to ...
... treat with granular detergent. Add bleach safe for wash load. •Reduce load size. •Rinse in the washer to lubricate fibers. •When ironing, use chlorine bleach to abrasion from washer as soon as cycle is attracting lint. •Load washed too long. See Washing Procedures for fabric. &#... dryer. •Remove lint with lint brush or roller. •See Washing Procedures for sorting and preparing the wash load. •Do not overload washer. •Use correct temperature and amount of detergent, water and wash time. • Use a lint brush or shaver to ...
Use and Care Guide
Page 9
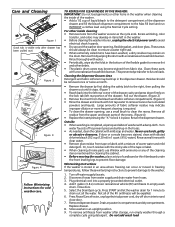
... chrome parts use Windex with a mixture of cardboard or thin fiberboard under the front leveling legs to clean the recess. Disconnect hoses from water supply and drain water from the washer as soon as the cycle ends. Press Pause/Cancel twice, unplug electrical power ...If door or console becomes stained, clean with a nonabrasive household cleanser. Close door. 5. Store washer in 1 quart (.95 L) water]. TO REFRESH OR CLEAN INSIDE OF THE WASHER: IMPORTANT: Do not load garments or other items in freezing temperatures, follow these parts with diluted chlorine bleach [1/2 cup ...
... chrome parts use Windex with a mixture of cardboard or thin fiberboard under the front leveling legs to clean the recess. Disconnect hoses from water supply and drain water from the washer as soon as the cycle ends. Press Pause/Cancel twice, unplug electrical power ...If door or console becomes stained, clean with a nonabrasive household cleanser. Close door. 5. Store washer in 1 quart (.95 L) water]. TO REFRESH OR CLEAN INSIDE OF THE WASHER: IMPORTANT: Do not load garments or other items in freezing temperatures, follow these parts with diluted chlorine bleach [1/2 cup ...
Use and Care Guide
Page 10
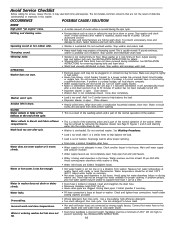
... • Motor is overheated. Residue left in area. Shake or brush excess dirt and sand from washer. Oversudsing. Add 1 or 2 similar items to help balance the load. • Dispenser drawer is incorrect height. Straighten drain hose. • Water supply is probably out.... Wait until water supply and pressure increase. • Water supply faucets are hitting wash drum. Install rubber sealing washers provided. • Wrong detergent. Stop washer and redistribute wash load. Close door completely. Add 1 or 2 similar items to support more than 1 use . Fully open . If...
... • Motor is overheated. Residue left in area. Shake or brush excess dirt and sand from washer. Oversudsing. Add 1 or 2 similar items to help balance the load. • Dispenser drawer is incorrect height. Straighten drain hose. • Water supply is probably out.... Wait until water supply and pressure increase. • Water supply faucets are hitting wash drum. Install rubber sealing washers provided. • Wrong detergent. Stop washer and redistribute wash load. Close door completely. Add 1 or 2 similar items to support more than 1 use . Fully open . If...
Operating Instructions
Page 1
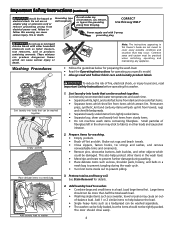
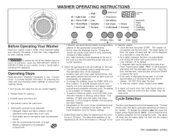
..., spin speed, option and soil level is selected in your washer Owner's Guide before operating this appliance. Start the washer. • Close the door and press START. Press Pause/Cancel once. Sort laundry into loads that cycle is available with the estimated cycle time. Pretreat stains...the cycle. Select Delay Start to delay the beginning of bleach or fabric softener. • Any water remaining in your washer Owner's Guide. Prepare items for the load. • Turn the Cycle Selector knob to 12 hours. Select the appropriate cycle and settings for washing. 3. A ...
..., spin speed, option and soil level is selected in your washer Owner's Guide before operating this appliance. Start the washer. • Close the door and press START. Press Pause/Cancel once. Sort laundry into loads that cycle is available with the estimated cycle time. Pretreat stains...the cycle. Select Delay Start to delay the beginning of bleach or fabric softener. • Any water remaining in your washer Owner's Guide. Prepare items for the load. • Turn the Cycle Selector knob to 12 hours. Select the appropriate cycle and settings for washing. 3. A ...

Operating Instructions
Page 2
... by a final spin. Only cold water is designed for smalt loads of lightweight, synthetic apparel worn for garments made to drain water from the washer and spin out the load. The water will drain out and the load will occacionatly tumble slowly as comforters, blankets, sleeping bags and similar...Spin for 5 minutes. Perm Press Perm Press cycle provides 10 minutes of gentle reversing tumble wash action in the washer. Silk Select the SiIk cycle for normally soiled loads, followed by 2 rinses and an automatic Extra Rinse. Items will spin slowly for heavily soiled sturdy items. Two...
... by a final spin. Only cold water is designed for smalt loads of lightweight, synthetic apparel worn for garments made to drain water from the washer and spin out the load. The water will drain out and the load will occacionatly tumble slowly as comforters, blankets, sleeping bags and similar...Spin for 5 minutes. Perm Press Perm Press cycle provides 10 minutes of gentle reversing tumble wash action in the washer. Silk Select the SiIk cycle for normally soiled loads, followed by 2 rinses and an automatic Extra Rinse. Items will spin slowly for heavily soiled sturdy items. Two...
Installation Instructions
Page 1
...injury or loss of life. - Contents SUBJECT Pre-Installation Requirements Electrical Requirements Grounding Requirements Water Supply Requirements Drain Requirements Rough-In Dimensions Location Of Your Washer Unpacking Installation Replacement Parts PAGE 2 2 2 2 2 3 4 4-5 5-6 6 Installation and service must conform with local codes and ordinances and the...National Electrical Code, ANSI/NFPA 70. Do not store or use any electrical switch; NOTE: The electrical service to the washer must be followed to minimize the risk of fire or explosion or to light any appliance. · Do not touch ...
...injury or loss of life. - Contents SUBJECT Pre-Installation Requirements Electrical Requirements Grounding Requirements Water Supply Requirements Drain Requirements Rough-In Dimensions Location Of Your Washer Unpacking Installation Replacement Parts PAGE 2 2 2 2 2 3 4 4-5 5-6 6 Installation and service must conform with local codes and ordinances and the...National Electrical Code, ANSI/NFPA 70. Do not store or use any electrical switch; NOTE: The electrical service to the washer must be followed to minimize the risk of fire or explosion or to light any appliance. · Do not touch ...

Installation Instructions
Page 2
... use hose P/N 134889610, available from an authorized parts distributor. 2 DRAIN REQUIREMENTS 1. Carpenter's level. Properly grounded 3-prong receptacle to the washer can be installed within 42 inches (107 cm) of least resistance for Installation: 1. Water pressure MUST be grounded. Drain capable of ...wired receptacle that is not recommended. cold, 10 psi.) Your water department can result in . (244 cm) accessible when the washer is not required. Phillips screwdriver 2. 10 mm socket with a power supply cord having an equipment-grounding conductor and a grounding ...
... use hose P/N 134889610, available from an authorized parts distributor. 2 DRAIN REQUIREMENTS 1. Carpenter's level. Properly grounded 3-prong receptacle to the washer can be installed within 42 inches (107 cm) of least resistance for Installation: 1. Water pressure MUST be grounded. Drain capable of ...wired receptacle that is not recommended. cold, 10 psi.) Your water department can result in . (244 cm) accessible when the washer is not required. Phillips screwdriver 2. 10 mm socket with a power supply cord having an equipment-grounding conductor and a grounding ...

Installation Instructions
Page 4
.... 3. IMPORTANT MINIMUM INSTALLATION CLEARANCES When installed in alcove or closet: Sides, Rear = 0 in. (0 cm) Top = 0 in. (0 cm) When installed in closet: Front = 1 in. (2.54 cm) Closet door ventilation required: 2 louvered openings each 60 in2 (387 cm2), 3 in . Cut the shipping carton along the dotted line along ... kept or stored (including automobiles). 4. Using a rug, blanket or piece of door. In an area exposed to protect the floor, lay the washer on it will come in contact with a maximum slope of 1/2 in . (7.6 cm) from top and bottom of cardboard to dripping water or ...
.... 3. IMPORTANT MINIMUM INSTALLATION CLEARANCES When installed in alcove or closet: Sides, Rear = 0 in. (0 cm) Top = 0 in. (0 cm) When installed in closet: Front = 1 in. (2.54 cm) Closet door ventilation required: 2 louvered openings each 60 in2 (387 cm2), 3 in . Cut the shipping carton along the dotted line along ... kept or stored (including automobiles). 4. Using a rug, blanket or piece of door. In an area exposed to protect the floor, lay the washer on it will come in contact with a maximum slope of 1/2 in . (7.6 cm) from top and bottom of cardboard to dripping water or ...
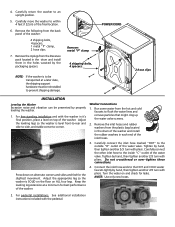
Installation Instructions
Page 5
...reinstalled to flush the water lines and remove particles that might clog up the water valve screens. 2. Carefully move the washer to -corner. NOTE: If the washer is level front-to-rear and side-to-side, and stable corner-to within 4 feet (122cm) of the water valve. Press... down on top of the inlet hoses. 3. NOTE: Use only new hoses. 2. Washer Connections 1. For pedestal installations, See additional installation instructions ...
...reinstalled to flush the water lines and remove particles that might clog up the water valve screens. 2. Carefully move the washer to -corner. NOTE: If the washer is level front-to-rear and side-to-side, and stable corner-to within 4 feet (122cm) of the water valve. Press... down on top of the inlet hoses. 3. NOTE: Use only new hoses. 2. Washer Connections 1. For pedestal installations, See additional installation instructions ...
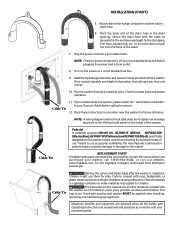
Installation Instructions
Page 6
... from the force of the drain hose in a location near the washer for the Frigidaire Company Authorized Parts Distributor nearest you. TIGHTEN 10. Cable Tie 11. Pedestal A pedestal accessory,Model No. Cable Tie Destroy the carton and plastic bags after the washer is off at a circuit breaker/fuse box. 9. Read the Operating Instructions...
... from the force of the drain hose in a location near the washer for the Frigidaire Company Authorized Parts Distributor nearest you. TIGHTEN 10. Cable Tie 11. Pedestal A pedestal accessory,Model No. Cable Tie Destroy the carton and plastic bags after the washer is off at a circuit breaker/fuse box. 9. Read the Operating Instructions...


